Reclassify Asset
For reclassifying an Asset and its Asset Components, there are two (2) methods available. Each of these processes are outlined in this document:
Single Asset Reclassification
To reclassify a single Asset and its Asset Components, perform the following steps:
-
Navigate to the main ‘Assets’ page and make a selection from the map screen.
-
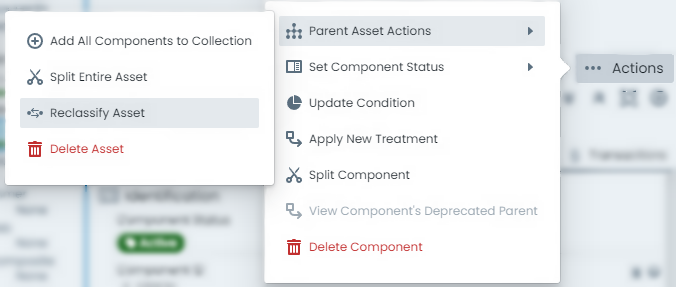
At the top of the info panel, click the ‘Actions’ menu.

-
From the ‘Actions’ menu options, hover or select ‘Parent Asset Actions’ and then choose ‘Reclassify Asset’. Note, if the Info Panel is already focused on the Parent Asset record, the ‘Reclassify Asset’ will be in the initial Actions menu.
-
A fly-out panel will appear with the required tools for performing an asset reclassification. Set the the ‘Reclassification Mode’ to ‘Asset Reclassification’.
-
From the ‘Target Asset Classification Mapping’ control, choose the Asset Classification that you are reclassifying the asset to.
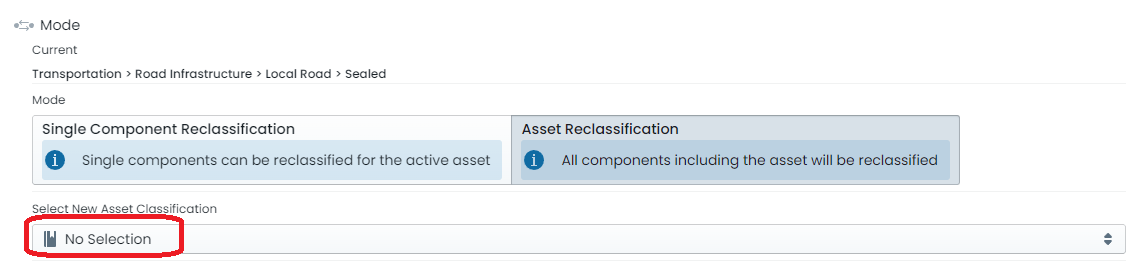
Choose the asset class from the left hand side of the drop-down list first, and then refine to the asset classification. The search box at the top of the drop-down list can also be used to limit the options.
-
Once the asset classification has been chosen, the ‘Component Mapping’ section will become active. Each of the active asset’s components must be matched to a corresponding target asset classification component group.

For each row in the mapping list, select the ‘New Component Type’ on the right-hand side.
WarningALL current Components must have a target Component Type in the target Asset Classification.
-
With the component mapping complete, use the calendar control to set the desired ‘Effective Date’ for the operation to occur.
-
You can now proceed to ‘Preview the Reclassification’. This will submit your settings to test if the reclassification will be valid. In the case that any issues are found, these will be returned to you and rendered just above the preview button.
This process is essentially checking that the two classifications are compatible, and that any data loss can be avoided.
-
Once the preview has succeeded without errors, and when you are ready with the proposed reclassification, click ‘Reclassify (immediate)’.
Bulk Asset Reclassification
To reclassify a number of Assets and their Asset Components, perform the following steps:
-
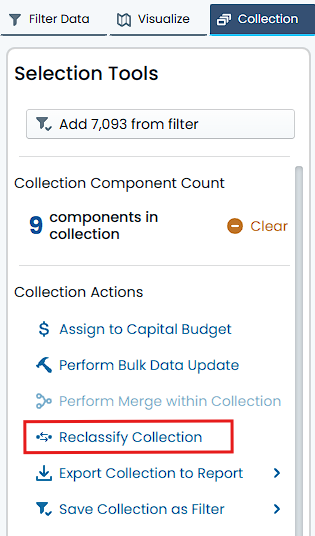
Navigate to the main ‘Assets’ page and build a collection from the map screen.
-
From the Collections panel, in the ‘Collection Actions’ section, choose ‘Reclassify Collection’.
-
A fly-out panel will appear with the required tools for performing an asset reclassification. Before you start however, the system will review your collection to ensure it contains just one distinct Asset Classification. If more than one is found, don’t panic, the system will guide you through refining your collection so that the scope of the collection is reduced to a single classification.

-
With a single classification confirmed, set the ‘Reclassification Mode’ to ‘Asset Reclassification’.
-
From the ‘Target Asset Classification Mapping’ control, choose the Asset Classification that you are reclassifying the asset to.
Choose the asset class from the left hand side of the drop-down list first, and then refine to the asset classification. The search box at the top of the drop-down list can also be used to limit the options.
-
Once the asset classification has been chosen, the ‘Component Mapping’ section will become active. Each of the Component Types within the source Asset Classification must be matched to a corresponding target Component Type within the target Asset Classification.
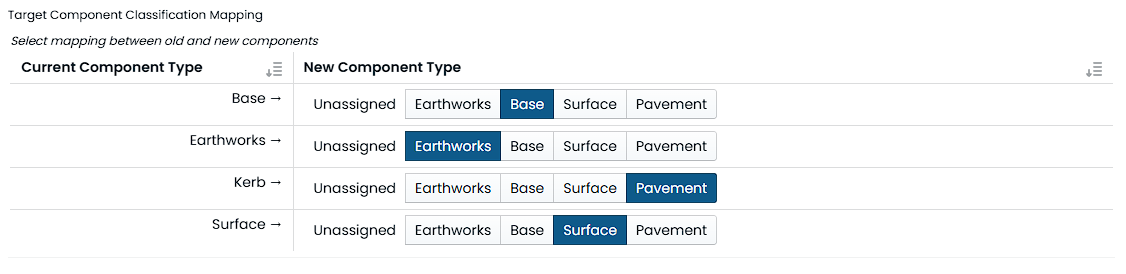
For each row in the mapping list, select the ‘New Component Type’ on the right-hand side.
WarningALL current Component Types must have a target Component Type in the target Asset Classification.
Note: This is slightly different to the single asset reclassification mode, where the mapping is performed at the individual component level. In bulk reclassification, the mapping is performed at the component type level. This means that all components of a given type will be reclassified to the same target component type.
-
With the component mapping complete, use the calendar control to set the desired ‘Effective Date’ for the operation to occur.
-
You can now proceed to ‘Preview the Reclassification’. This will submit your settings to test if the reclassification will be valid. In the case that any issues are found, these will be returned to you and rendered just above the preview button.
This process is essentially checking that the two classifications are compatible, and that any data loss can be avoided.
-
Once the preview has succeeded without errors, and when you are ready with the proposed reclassification, click ‘Reclassify (immediate)’.