Building Collection Sets
This document provides an overview on how to use the collection set concept in the Metrix Asset Management system, including:
Defining a Collection Set
-
To get started, navigate to the main ‘Assets’ map in the Metrix Asset Management system.
-
On the left hand side of the page, make sure the ‘Collection’ tab is activated.

-
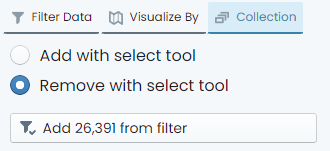
To start building your collection set, click the ‘Add with select tool’ option at the top of the panel. This will place you in ‘Selection’ mode where any clicked assets in the map view will add those asset components to your collection set.
InfoThe selection tool will add ALL components from a clicked asset. It does, however, respect any applied custom filters that may be excluding some component types. That is, if you filter out road base and road earthworks (leaving just surface), and click on a road segment, only the surface will be added to your collection. Without a filter, all three (3) component groups will be added.
-
Once you have added some asset components to your collection, the ‘Remove with select tool’ option will activate as an optional mode. Using this mode will mean that every asset clicked on will REMOVE its components from your collection set (if they were a part of it).
-
Also, you have the option of simply adding ALL components from your current custom filter definition to your collection set. That is, if you have a filter that results in 15 components, then those 15 components would be added to your collection set.
-
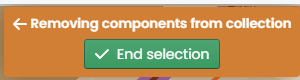
Once you have finished defining your collection set, click the ‘End selection’ option which will be hovering at the top of the map window.
Collection Set Actions
-
Once you have a defined collection set, you can then perform actions on it including bulk data updates and generating reports.
-
To generate a report from the current collection set, simply click ‘Generate Report’ from the ‘Collection Panel’ and choose the report you would like to create. The results of the report will be filtered down to your current collection set.
InfoOther available collection actions are subject to their own instructions.
Saving Collection Set as Filter
-
Once you have finished building the collection, simply click on the ‘Save as filter’ option in the ‘Collection Panel’.
-
A fly-out menu will appear prompting you for a name for the new filter. Input a name for the filter (this is how you will find it later).
-
To opt to allow other system users to see the filter you have defined, toggle the ‘Shared’ control. By default, filters are private and NOT shared.
-
When you are done, click ‘Save’. The filter is now saved under that name. If you shared the filter, other users will see it in the ‘Filter Drop-Down’ at the top of the panel.
InfoFilters created from Collections will be listed under the ‘Collection’ tab of the ‘Filter Drop-Down’ list.