Welcome to the User Guide for the Metrix Asset Management System.
This guide is designed to help you navigate and effectively use the
system to effectively manage your organisation’s assets. Provided
throughout, are step-by-step instructions on how to configure, manage,
and report your organisation's assets. The document is broken down into
several sections tailored to specific functions of the system,
including:
End-user processes,
System configuration, and
Administration functions
By the end of this guide, you will have a solid understanding of how to
use the Metrix Asset Management System to achieve your
organisation’s goals.
Let’s get started!
Getting Help and Support
Metrix Assets support team is always available to assist with any
issues, concerns, or questions clients may have. Our team can be
contacted via the following channels at any time:
Throughout this guide, you will find several tutorial videos for specific
topics. These videos are curated by the team at Metrix at the request
of users. If you would like a particular topic covered in video form, please
don’t hesitate to contact us via the above means.
The current video tutorials available are below:
Replacing a Spatial Feature
Spitting Asset/Component Features
Reclassification of Assets & Components
Subsections of Introduction
End User Processes
This section covers some of the more basic functions of the Metrix
Asset Management System including:
Getting around the system generally
Interacting with your Assets
Generating Reports
Interacting with Dashboards
Working with Capital Budgets
Using Defects
The general assumption throughout this section is that you have access
to a valid Metrix environment and have been issued with an active
user account for that environment. If one or both assumptions are
incorrect, please contact your system administrator before continuing –
notwithstanding this, feel free to read on.
Subsections of End User Processes
Getting Around
This section covers some of the core usability functions of the Metrix
Asset Management System including:
Initialising a new user account & logging in to the system
Resetting your password
Basic system navigation
The general assumption throughout this section is that you have access
to a valid Metrix environment and have been issued with an active
user account for that environment. If one or both assumptions are
incorrect, please contact your system administrator before continuing –
notwithstanding this, feel free to read on.
Subsections of Getting Around
About
This section contains basic information about navigating around your Metrix Asset Management system.
Subsections of About
System Navigation
Depending on your account privileges – which will be set by your system
administrator – you will see different functions available to you when
you first login. There are, however, a couple of core system pages that
will be available to you regardless of your account privileges. This
section details some of the basic facets of these pages.
To navigate to each page of the Metrix system, use the section
header located at the top of the application. Regardless of where
you are within the system, this section header will always be
available. The section header will generally look like the
following:
Review the Dashboard Page - The dashboard provides a quick and easy
overview of some core statistics about your assets within the
system. This can be useful for extracting charts and graphs for
generating your Asset Management Plans and Policies. It is also
handy for gaining a high-level snapshot of your asset performance.
Review the Assets Page - The assets page is the main engine room of
the system. This is where users can view their asset portfolio
through an intuitive map interface, fetch information, as well as
perform edits on that information.
Review the Capital Page (permissions dependant) - The capital page is where you can
manage your capital works projects. This includes the ability to
create, edit, and track the progress of projects, as well as view
associated costs and timelines. Additionally, you can manage settings
such as the current financial year and the like.
Review the Operations Page (permissions dependant) - The operations page is where you can
manage your operational activities. This includes the ability to
create, edit, and track the progress of operational tasks. These can
include maintenance activities, inspections, and other operational
tasks related to your assets.
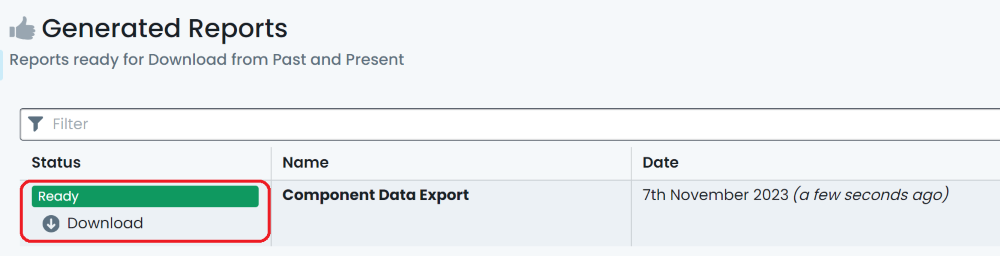
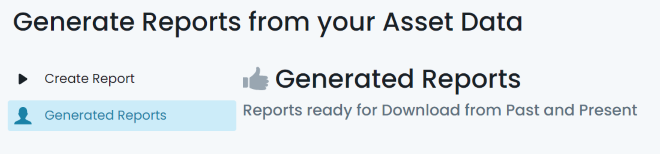
Review the Reports Page - The report generation page is full of
predefined report templates to help you extract the information you
need about your assets. Additionally, you can access previously
generated reports from within this page.
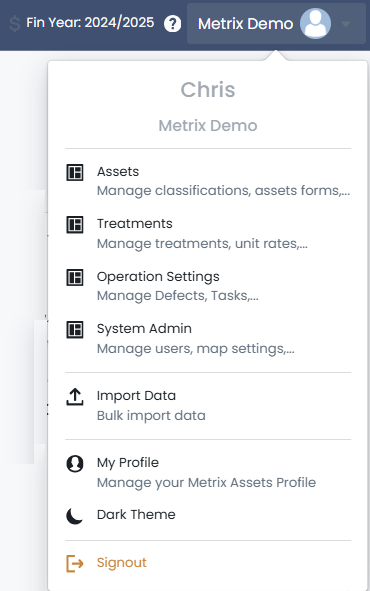
Review the System Menu - In the top right-hand corner of the
application, you will see a menu drop-down labelled with your
organisation’s Site ID. This contains all site configuration
options (if your account has the rights to see such settings). It is
also where you can access and manage your Profile information and
sign out of the application.
How To Guides
This section contains a handful of useful How-To documents on core usability functions of the Metrix
Asset Management System including:
Before you can use your Metrix Asset Management System, you must
have a valid Metrix account with which you can login with. To gain
access to such an account, your organisation’s system administrator
needs to generate an invitation for you to register. If you have not
received an invitation, please consult your organisation’s system
administrator.
Once invited, you will receive an email with your username details as
well as a temporary password that you need to change immediately. Follow
the ‘Sign In’ button from this email to perform the password change.
Info
The email will come from support@metrixassets.com. If you do not receive it within 2 hours, check your junk/spam folders in case it has been captured there.
Your new password must meet the following requirements:
Minimum length of 8 characters
No spaces
At least one uppercase letter
At least one lowercase letter
At least one number
At least one special characters (excluding + and -)
Once you set and confirm your new password, you can safely delete the
invitation email. Please note that the invitation email will expire
after 7 days. At which time, a new invitation will need to be generated.
Logging in to Metrix
To log in to your Metrix Asset Management System environment, you
will need to know your organisation’s Site ID and have a valid username
and password for that environment. Your organisation’s Site ID is used
within the web URL of your system.
Example
If an organisation’s Site ID was “Smithtown”, then the web URL for accessing
that system would be www.smithtown.metrixassets.net
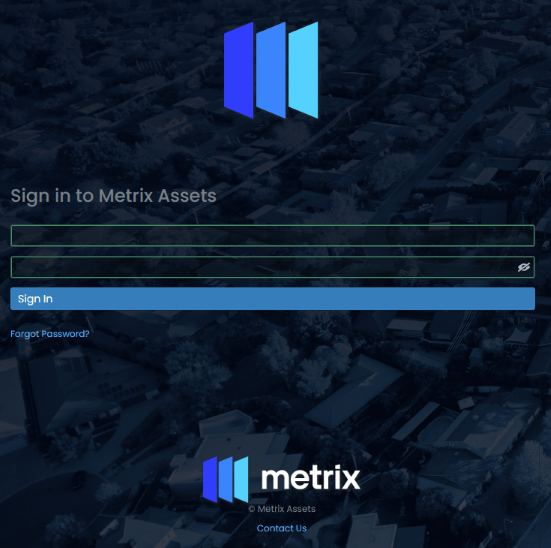
Once you enter your organisation’s web URL, you will be presented with a
login page. This page is requesting your username – which is your email
address – and the password that you have defined when initialising your
Metrix account (see Initialising a Metrix account
for details on this).
Resetting your Password
If at any time, you forget your password for the Metrix Asset
Management System, you can request a password reset from the main login
page. To do this, complete the following steps.
Click on “Forgot Password” below the “Sign In” button and you will
be redirected to the password reset page.
Enter your username – which is your email address – and click
“Reset Password”.
At this point, you will be redirected to a password reset
verification stage. A verification code will be emailed to your
email address.
Once you have received your email, enter the verification code along
with a new password. The new password must also meet the password
requirements stipulated above (see
Initialising a Metrix account
for details on this).
Info
The email will come from support@metrixassets.com. If you do not receive it
within 2 hours, check your junk/spam folders in case it has been captured there.
Basic Functions
This section provides an overview as well as useful tutorials on some of the more basic functions of
the Metrix Asset Management System including:
Using the Map View
Information Panels
Basemaps and Focus Modes
Custom Filters
Map Themes (Visualisations)
The Actions Menu
Collections
Spatial Features
Residual Life Calculations
Financial Movements
The general assumption throughout this section is that you have access
to a valid Metrix environment and have been issued with an active
user account for that environment. If one or both assumptions are
incorrect, please contact your system administrator before continuing –
notwithstanding this, feel free to read on.
Subsections of Basic Functions
About
This section covers some of the more basic functions of the Metrix
Asset Management System including:
This page covers some of the basic navigation options available within the core ‘Assets’ page
in the Metrix Asset Management system including:
Pan / Tilt / Zoom the map window
Info Tool
Search
Map Window Pan / Tilt / Zoom
The built-in map window inside the main ‘Assets’ page supports various computer mouse gestures
to interact with the map location and view. These are detailed below:
Info
These notes assume a standard right-hand mouse configuration with scroll wheel.
Pan:
Panning a map means to shift the map image relative to the display window without changing the viewing scale.
To pan the map window, hold down the ’left’ (main) mouse button and drag your cursor. The map
will follow until you release the mouse button.
Zoom-In:
‘Zooming in’ refers to the action of adjusting the view of the map to make a specific area appear larger and closer.
To zoom in, scroll the mouse wheel up.
Zoom-Out:
‘Zooming out’ refers to the action of adjusting the view to make the image or area ot he map appear smaller and farther away.
To zoom out, scroll the mouse wheel down.
Rotate:
‘Map rotation’ is a way of viewing the map window from a different orientation.
To rotate the map view, hold down the ‘right’ mouse button and drag your cursor
to the left of the map window. The map will continue to rotate in a clockwise direction
until you release the mouse button.
Note: to rotate counter-clockwise, drag the cursor to the right.
Tilt:
‘Map tilt’ refers to the angle at which the map is being viewed from. By default, the tilt is ‘flat’ and being viewed from directly above.
When ’tilted’, the map view is angled so that the user feels they are looking ‘along’ the map.
To tilt the map view, hold down the ‘right’ mouse button and drag your cursor
up to the top of the map window. The map will continue to tilt until you release the mouse
button.
Note: to reverse the tilt, drag the cursor down.
Info Tool
In order to interrogate an asset via the main ‘Assets’ page map window, pan & zoom the map window
to the asset location and single click (left-click) on the asset’s spatial feature.
Info
Remember, click and drag will pan the map. Single click to use the Info Tool.
The info panel will appear/populate on the right hand side of the map window when one or more
valid features have been interrogated by a click.
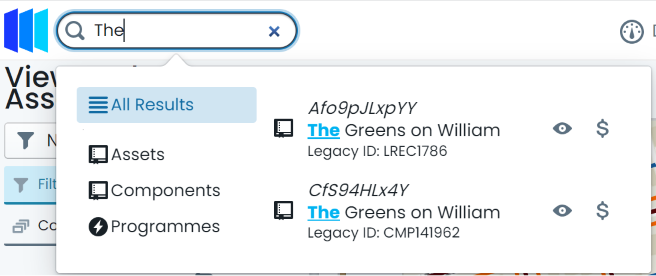
Search
In addition to basic pan and click operations, the Metrix Asset Management system contains a
free text search tool that can navigate and select chosen results for you. To start a search, simply
click inside the search pill at the top of the page, and begin typing your criteria. The following
asset/component fields are included in the search index:
Asset Description
Asset ID
Component Description
Component ID
The search tool will begin looking for results immediately and render them in a box below the search pill.
By default, ‘All Results’ will be shown. Users can however, refine their results to the following
result levels:
Assets
Components
Programmes
Info Panels
This section details the info panels available within the core ‘Assets’ page in the Metrix Asset
Management system including:
The component info panel displays information as it pertains to the selected/active component.
The component info panel has the tab title of ‘Info’. The following sections are included in the
component info panel.
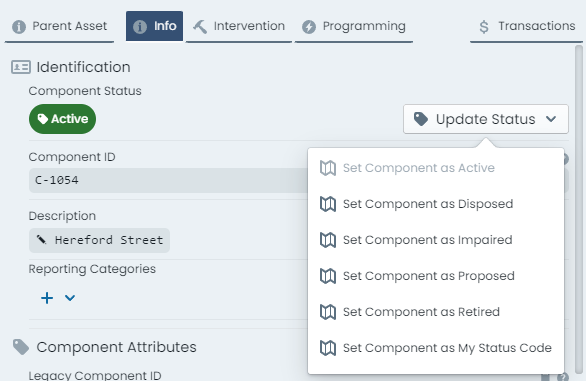
Identification:
Contains identifying information for the component including:
Status: a tag indicating the current status code of the component.
Component ID: the unique component ID for the component automatically set by the system.
Barcode Value: any barcode value assigned to the component for in-field identification.
Description: the brief description value set by end users for the component.
Report Categories: an array of tags indicating any report categories/options assigned
to the component.
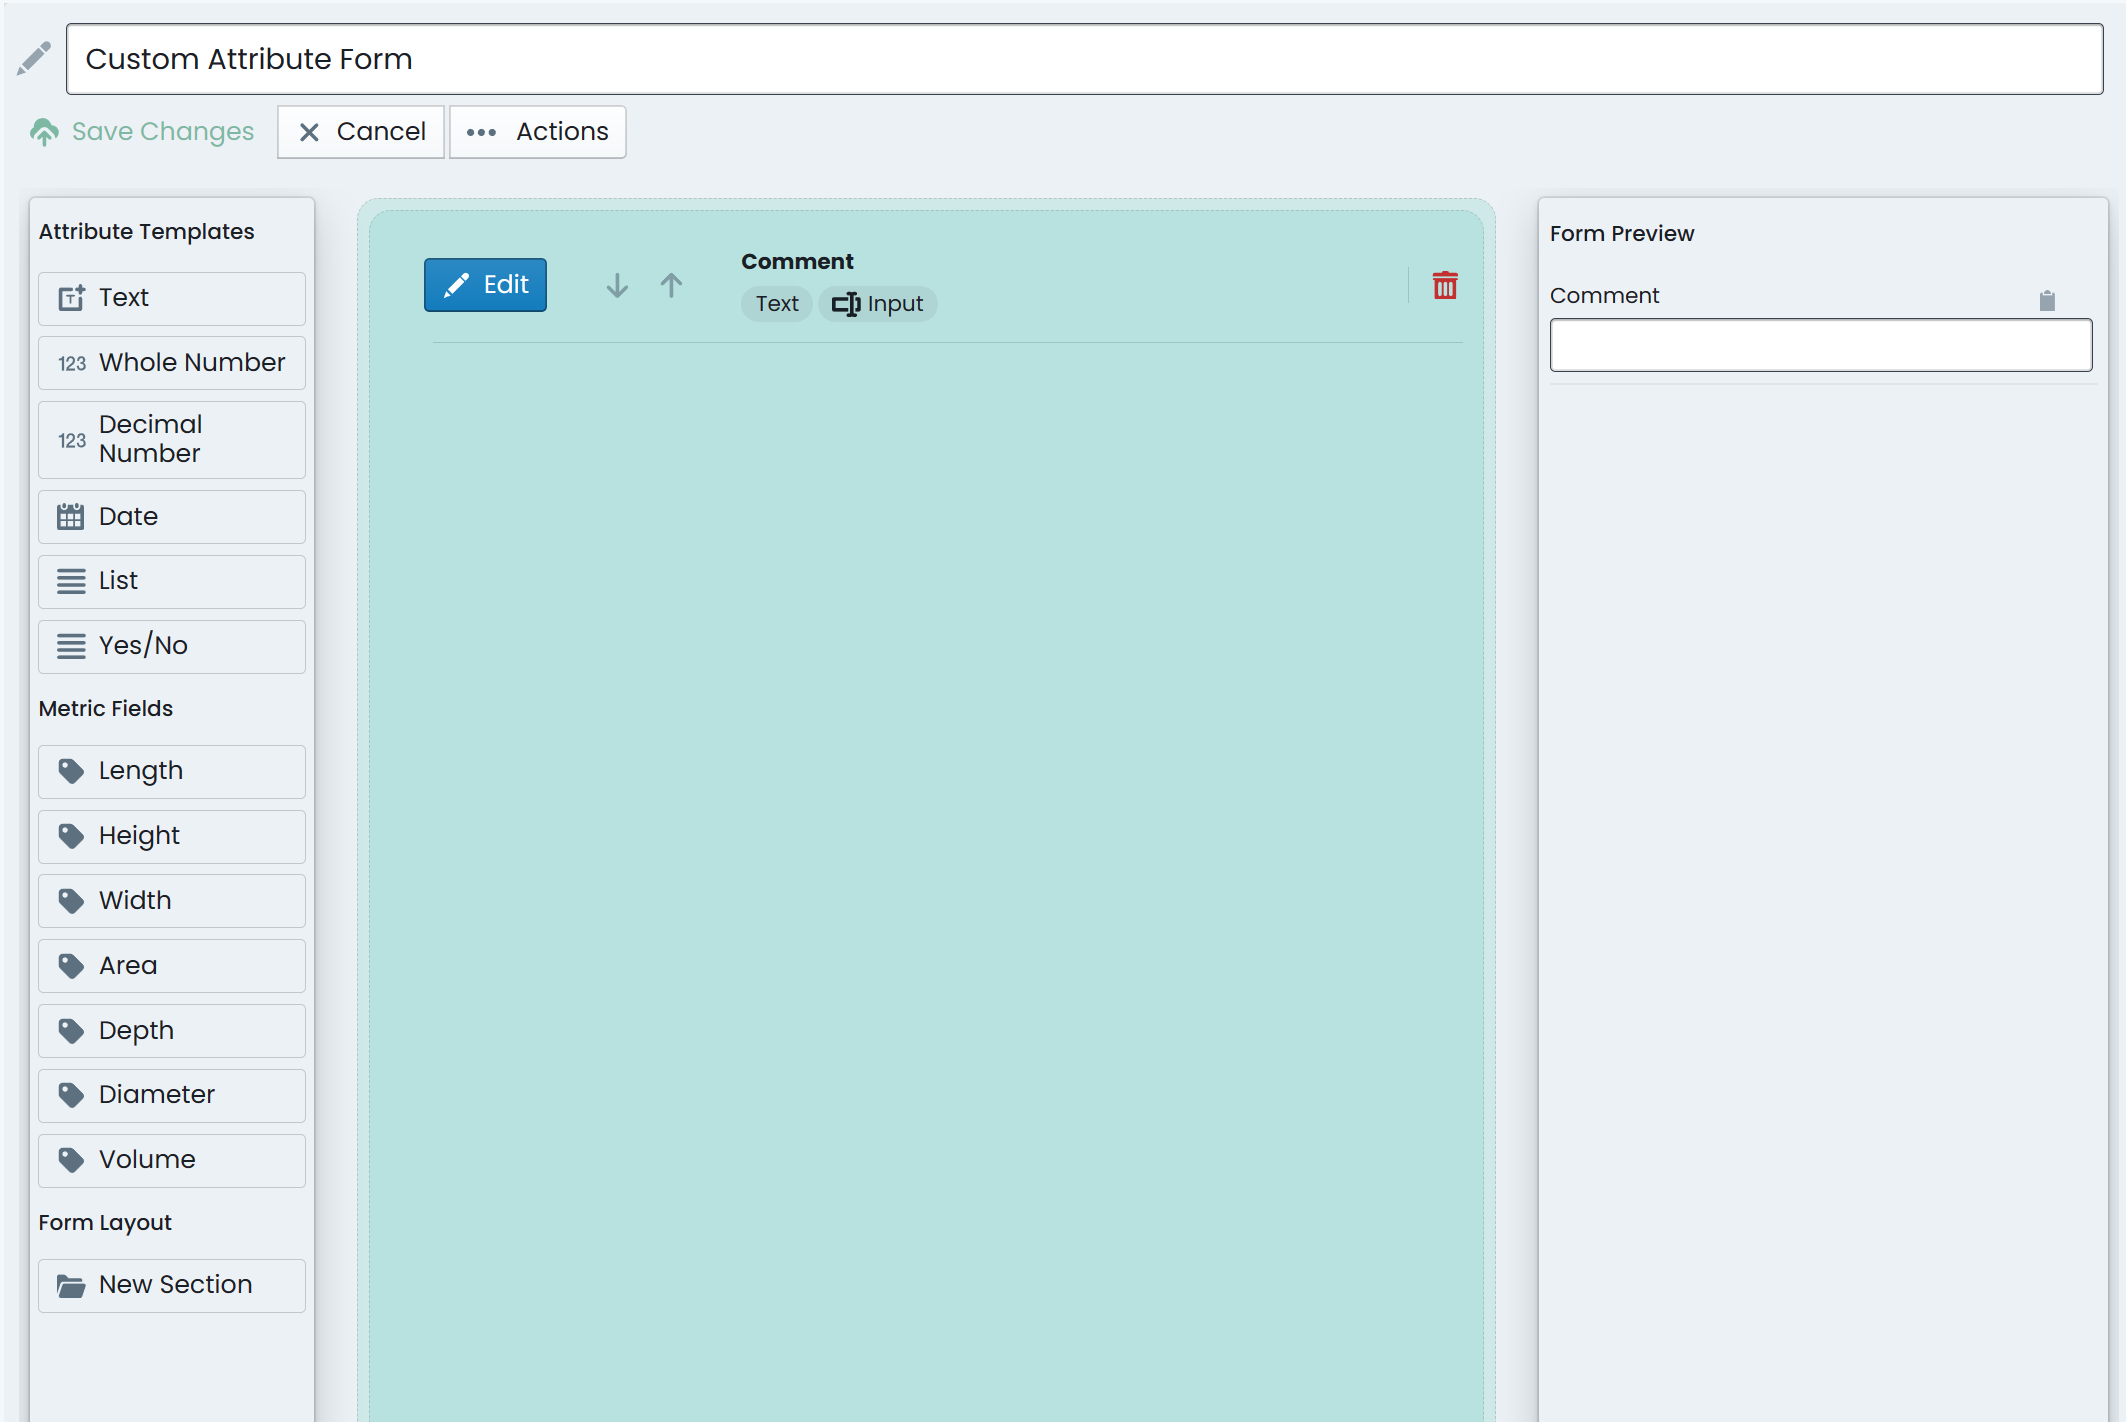
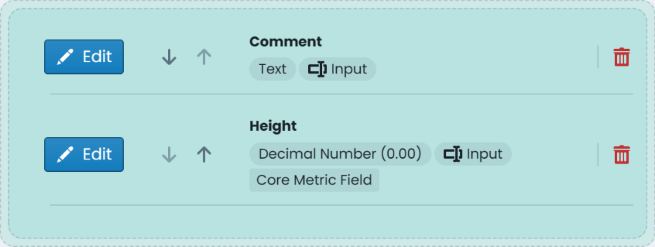
Component Attributes:
Renders the custom form definition assigned to the component’s
component group (if any). Each form field will be displayed in accordance with the
form definition’s layout specification.
Spatial:
Provides basic information about the component’s underlying spatial feature as
well as access to tools to update or replace the geometry definition. Additionally,
the unique Shape ID value for the spatial record is displayed at the bottom of this section.
Attachments:
Displays a panel where users can interact with existing component
attachments and upload new attachments. Any existing attachments can be clicked on to view,
download, or manage. Users can also simply drag and drop files into this section to create
new attachments against the component.
Task Types:
Renders a list of task records attributed
to the component. Users can also create new task entry from this section.
Intervention Info Panel
The intervention info panel displays information as it pertains to the lifecycle metrics of the selected/active
component. The intervention info panel has the tab title of ‘Intervention’. The following sections are included
in the intervention info panel.
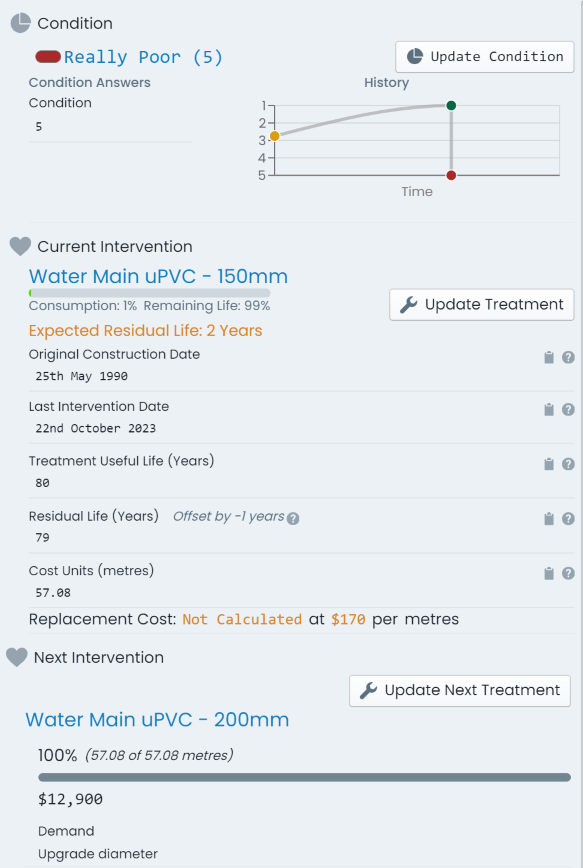
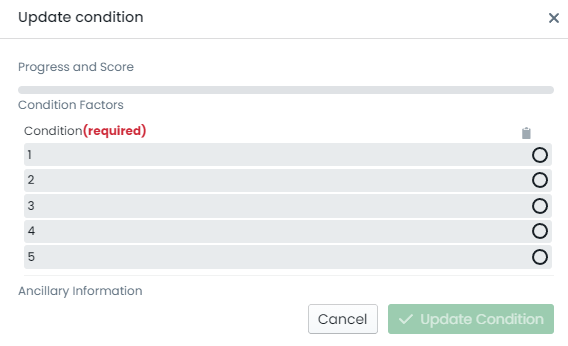
Condition:
contains information about the latest condition assessment for the component. Additionally,
a button (‘Update Condition’) is provided for updating the condition with a new assessment. Lastly, a graph displaying the
change in condition over time is presented for context.
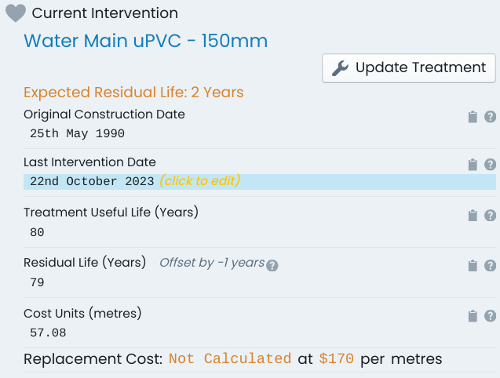
Current Intervention:
contains information about the current state of the component including:
Current Intervention Treatment: the current treatment definition assigned to the component.
Original Construction Date: the date the component was originally commissioned.
Last Intervention Date: the date the component last underwent capital intervention.
Treatment Useful Life (Years): The number of years that the component is expected to be in service before
its next capital intervention.
Residual Life (Years): The remaining service life of the component until its next capital
intervention is due. This includes any ‘Residual Life Offsets’ that may apply.
Cost Units (UOM): The current cost unit value ascribed to the component. Note: The ‘UOM’ (unit of measure)
is defined by the assigned ‘Intervention Treatment’ definition - i.e. ‘metres’. In the case where a cost
unit formula is in force, this will be a read only field.
Additionally, this section contains a button (‘Update Treatment’) linking to a panel that allows users to update the current
intervention treatment.
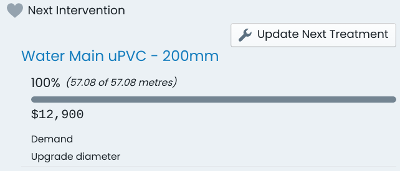
Next Intervention:
contains information about any slated next intervention treatment definition. The recorded
intent and scope of the next intervention is detailed alongside a button (‘Update Next Treatment’) linking to a panel that allows users to update the next intervention treatment.
Transactions Info Panel
The transactions info panel displays information as it pertains to the financial transaction ledger of the selected/active
component. The transaction info panel has the tab title of ‘Transactions’. The following sections are included
in the transactions info panel.
Finance Summary:
contains a snapshot of the current ‘Gross Value’, ‘Depreciable Value’, ‘Accumulated Depreciation
Value’, and the ‘Carrying Value’. These figures represent the financial position of the selected/active component
including all of its active financial transaction ledger postings.
Info
When an intervention treatment has been assigned to the component, and valid rates exist, the ’ value summary pills also
display a calculated value field based on the relevant rates and residual life.
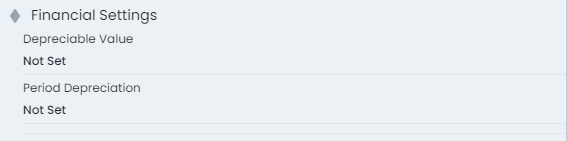
Financial Settings:
provides an interface for users to view and manage the selected/active components depreciation
settings - which are optional and, presently, for information purposes only. Users can view/set the depreciable value
of the component as either a fixed value, or a percentage share of the components gross value. Likewise, users can set the
annual depreciation rate for the component as either a fixed value, or a percentage share of the components value.
Transaction History:
this sections provides a table view of every active financial ledger transaction posted
against the selected/active component. Each row details the transaction type, finance category, posting date, and
posting value of the entry. Additionally, each row has an option to delete the transaction posting (if permitted).
Info
The option to delete a transaction posting is only permissible in the following circumstances:
The transaction is the most recent posting (top row of the table), and
The transaction did not occur during a locked financial period.
Lastly, above the transaction history table, reside options to create new financial ledger transaction entries (‘New Transaction’)
as well as performing a financial reclassification (‘Reclassify’) of the component.
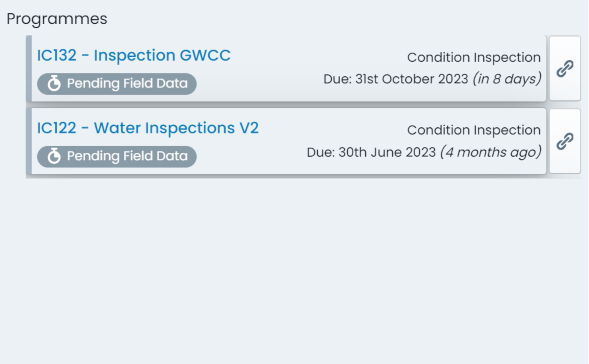
Programming Info Panel
The programming panel displays details on any mobile programmes that the selected/active component
is an item within. For each related programme, users are provided with an overview of the programme name,
due date, and current completion status.
Clicking on a programme item will bring up a panel providing additional information about the component
item within the programme.
Beta Feature
Elements of the Programme system are still flagged as beta products. As such, some of the items and information
accessible through this panel are subject to change.
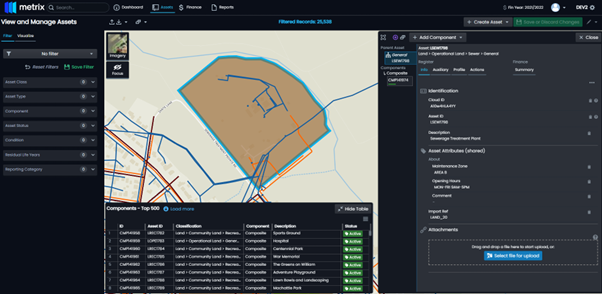
Parent Asset Info Panel
The parent asset info tab provides information pertaining to the parent asset of the selected/active
component. The parent asset info panel has the tab title of ‘Parent Asset’. The sections detailed below
are included in the parent asset info panel.
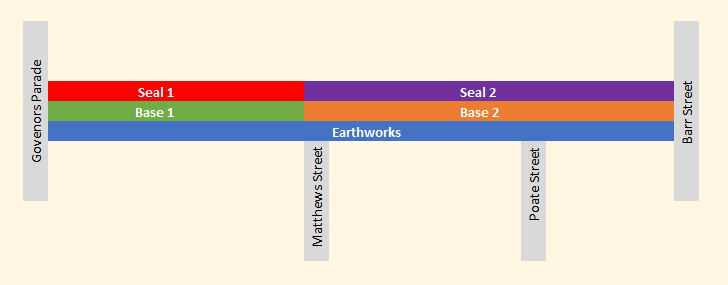
Example
Consider a road asset with three (3) components - earthworks, base, and surface. Each of the components
would have their own unique component info panel, intervention info panel, transactions info panel, and
programming info panel. That is, each time you change the active component, the information contained within
these panels will update to reflect the new entity.
The parent asset info panel is constant regardless of the active component. The information displayed on this
panel will only change when a different asset is activated. Likewise, any details edited on the parent
asset info panel will persist for any of the ‘sibling’ components across the asset. That is, the information
is shared.
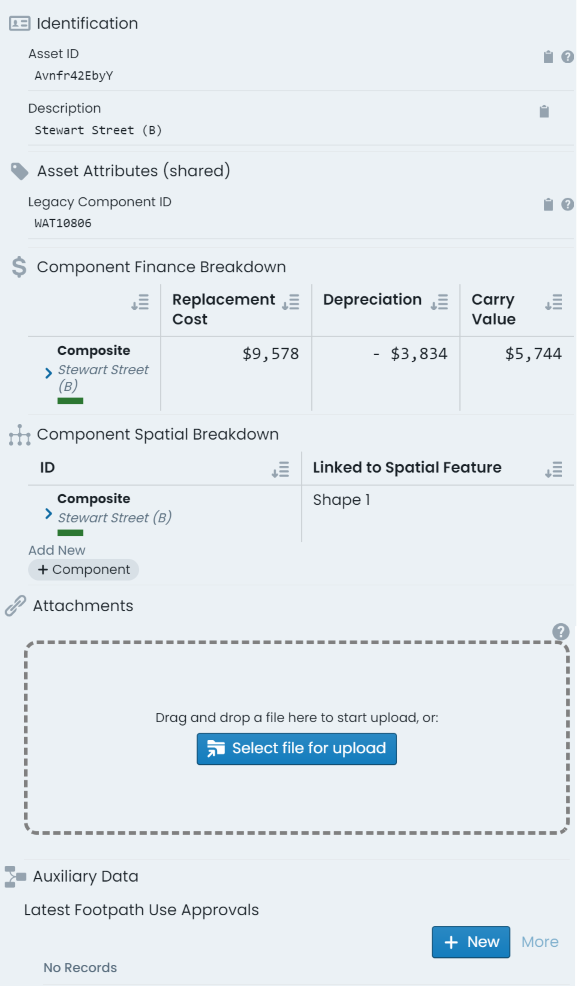
Identification:
contains identifying information for the asset including:
Asset ID: the unique asset ID for the asset automatically set by the system.
Barcode Value: any barcode value assigned to the asset for in-field identification.
Description: the brief description value set by end users for the asset.
Asset Attributes (shared):
renders the custom form definition assigned to the asset’s
classification (if any). Each form field will be displayed in accordance with the
form definition’s layout specification.
The ‘shared’ reference in the section’s header is simply communicating that the
information within this panel is shared across all child components of the asset.
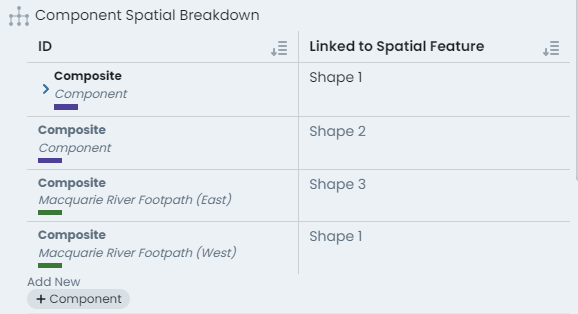
Component Spatial Breakdown:
as each component within an asset can be defined by either
a common/shared geometry, or a distinct geometry to that component, the component spatial
breakdown provides a context for the spatial features used across the asset..
Attachments:
displays a panel where users can interact with existing asset
attachments and upload new attachments. Users can interact with existing asset
attachments and upload new attachments. Any existing attachments can be clicked on to view,
download, or manage. Users can also simply drag and drop files into this section to create
new attachments against the asset.
Task Types:
renders a list of task records attributed
to the asset. Users can also create new task record entries from this section.
Info Panel Tools
This section discusses the following info panel tools that exist and/or can be
used regardless of the specific info panel you are viewing at the time. These tools are situated
above the core info panel sections and are always visible (whilst the info panel is open).
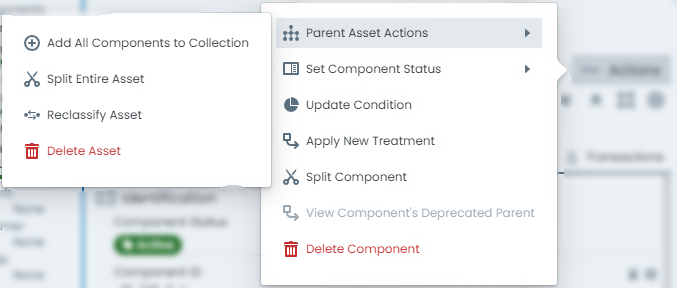
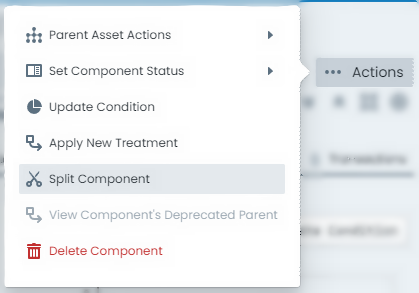
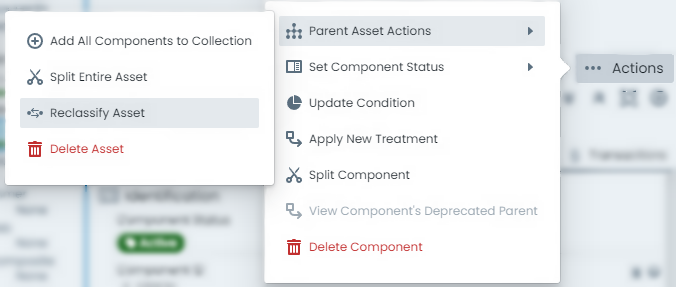
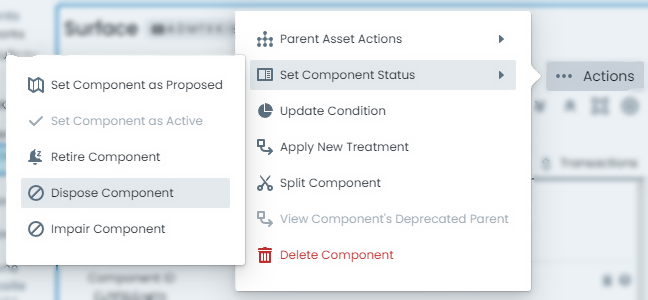
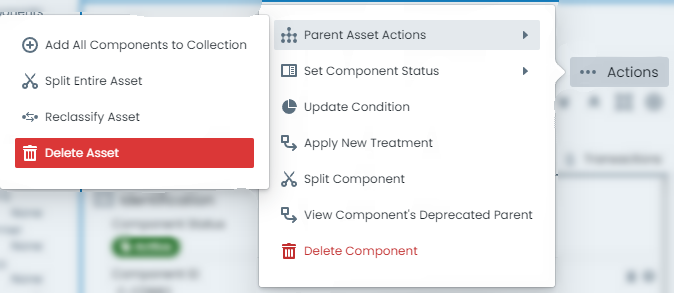
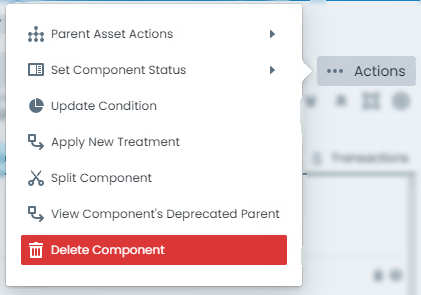
Actions Menu:
The ‘Actions’ menu contains a list of asset and component related actions that can be completed using
the system. Depending on the selected asset and/or the active component, various options in the actions menu
will be enabled and disabled.
Zoom to component:
The ‘Zoom to Component’ button is located in the top-right hand corner
of the info panel, outside of any other content panels (i.e. component info panel, transaction
info panel, etc.). When clicked, the map window will pan and zoom to reveal the extents of the
active component.
Panel expansion and collapse:
The expand and collapse options provide users with the ability
to collapse all of the info panel sections into flatter, header only, sections. This can be useful on smaller
resolution monitors, when looking for a certain section header. Conversely, the expand button will
display every info panel’s content.
Shortcut pills:
The shortcut pills give quick and easy access to core data like condition,
carrying value, and ID values. Furthermore, clicking on the pill will take users through to the
appropriate info panel for further information.
Add to collection option:
The ‘Add to Collection’ tool allows users to include the selected/active
component in the current (or new, if none is current) collection set. Note: When the component is already
included in the collection set, this button will change to ‘Remove from Collection’.
Edits Options:
When the selected/active component has been modified, this pill acts as a menu that
renders information about the data that has been modified (when clicked). Further to this, users can
revert any pending changes against the selected/active component by clicking ‘Rollback’ in this menu.
Classification Shortcut:
At the very top of the info panel, next to the classification label, exists
a settings button that will take users through to the classification configuration page for the
selected/active components classification.
Close Info Panel:
To close the info panel completely, simply click the ‘X’ icon in the top-right hand
corner of the info panel.
Other Useful Info Panel Tools
Component group switch:
On the left-hand side of the info panel is the active component switcher. This
side panel displays all of the assets components, with the current active component highlighted. Users can simply
click on a different component in this list to switch the info panel to displaying information about that
component. Furthermore, this panel also lists component groups that exist on the asset classification definition,
but do not have any assigned components.
Copy Field Values:
Throughout all of the info panels, on the right-hand side of any data field, users will
find the ‘Copy Field Value’ button. This will put the value contained in the adjacent field into the users clipboard.
Basemaps & Focus Mode
The Metrix Asset Management system provides built-in access to publicly accessible
aerial photography imagery as well as basemaps as backdrops to your asset portfolio.
These layers provide users with helpful context on the area they are viewing in the map window.
To further assist with seeing asset content in association with these layers, Metrix also
contains some tools to modify which backdrop you are seeing, as well as the colour intensity
of the backdrop in comparison to your asset portfolio.
Focus Mode
For nearly all users, there exists a colour combination that is hard to decipher between and thus
difficult to read when displayed in a map window. To cater for this, the Metrix Asset Management
map tools provide users with the ability to put the map backdrop into ‘Focus Mode’. This will
binarise (to make black-and-white) the backdrop so that the colours of your asset portfolio are
easier to distinguish.
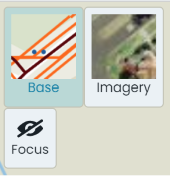
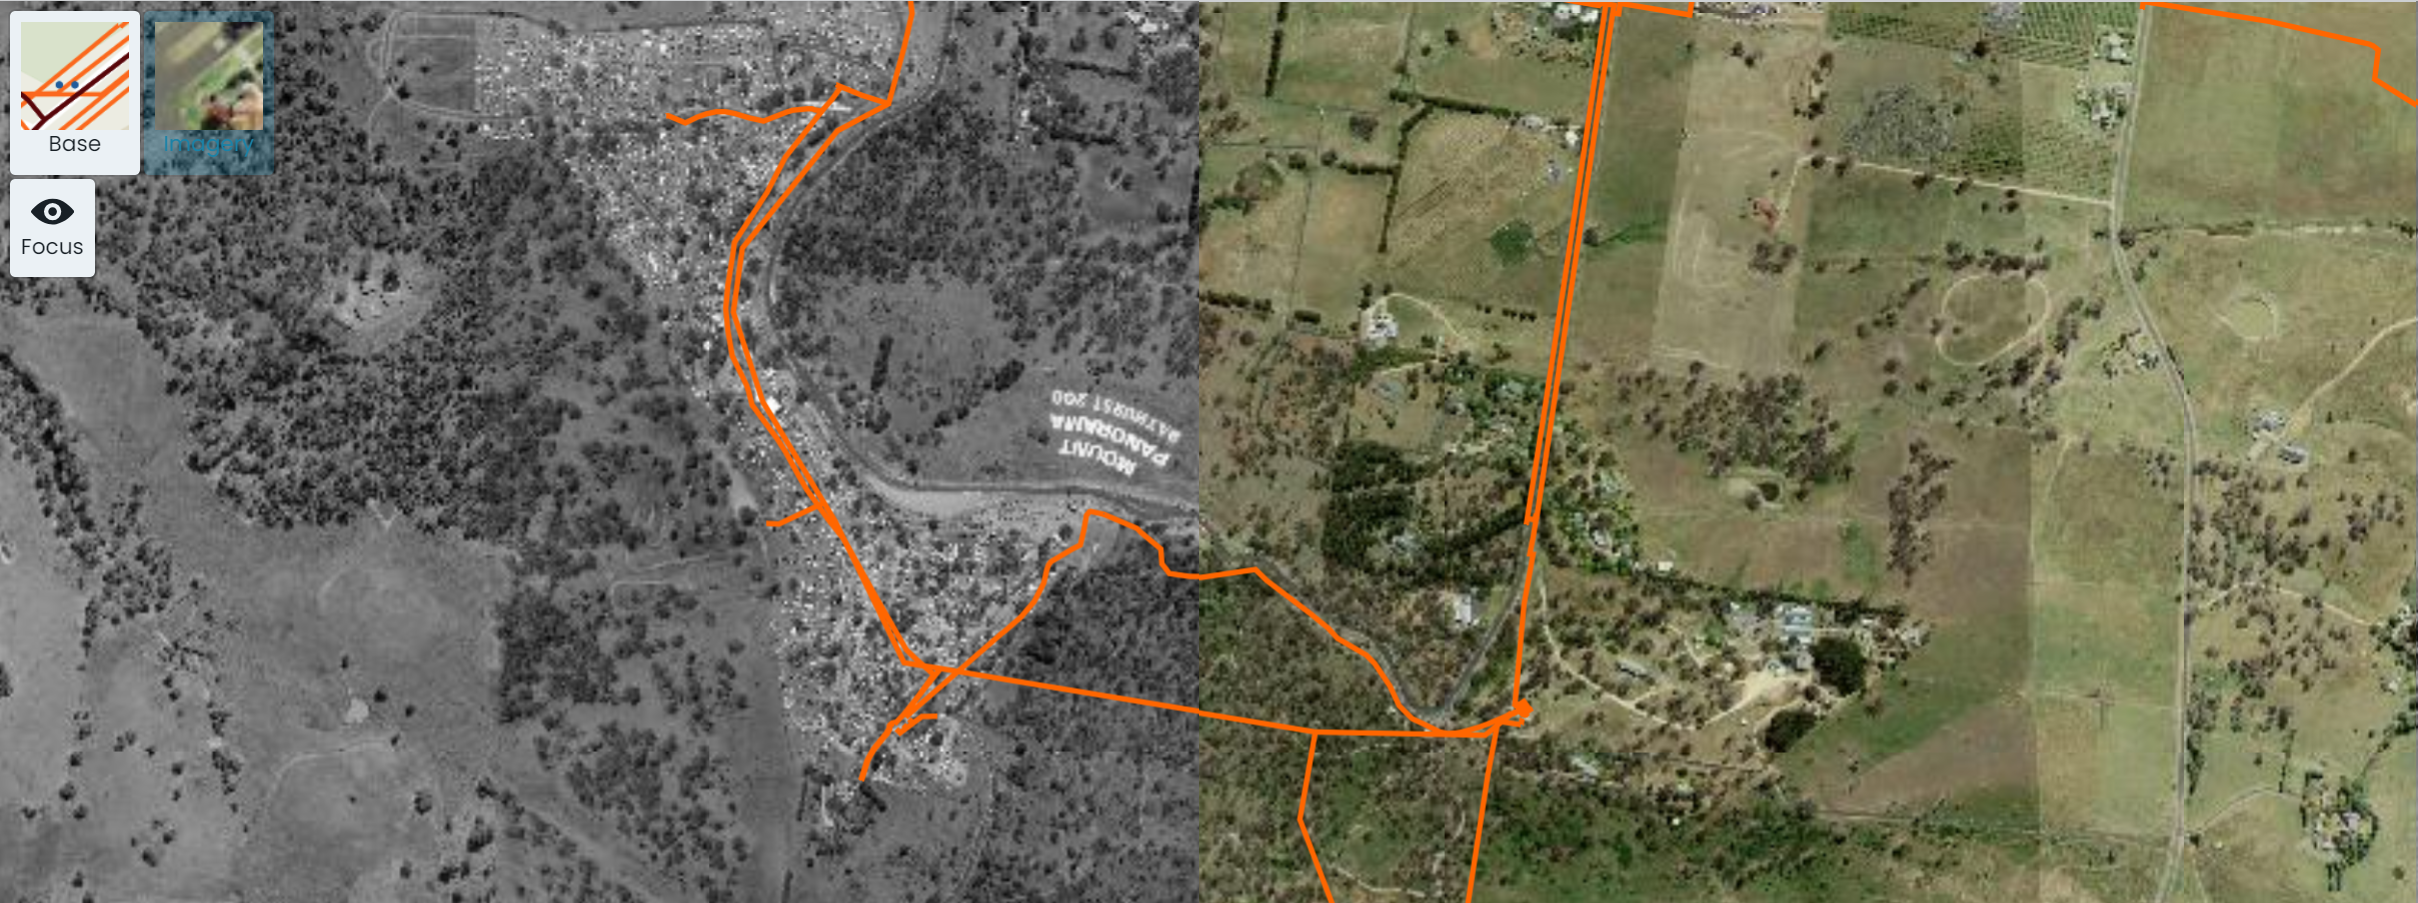
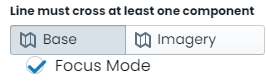
View Aerial Imagery as Backdrop
To view the aerial imagery as a backdrop to your asset portfolio, simply click on the ‘Imagery’
button in the top-left hand corner of the map window. This will swap out the underlying view to
the aerial photograph imagery configured for your environment. The screenshot below shows a map window
with aerial imagery as the backdrop, split between focus mode and standard.
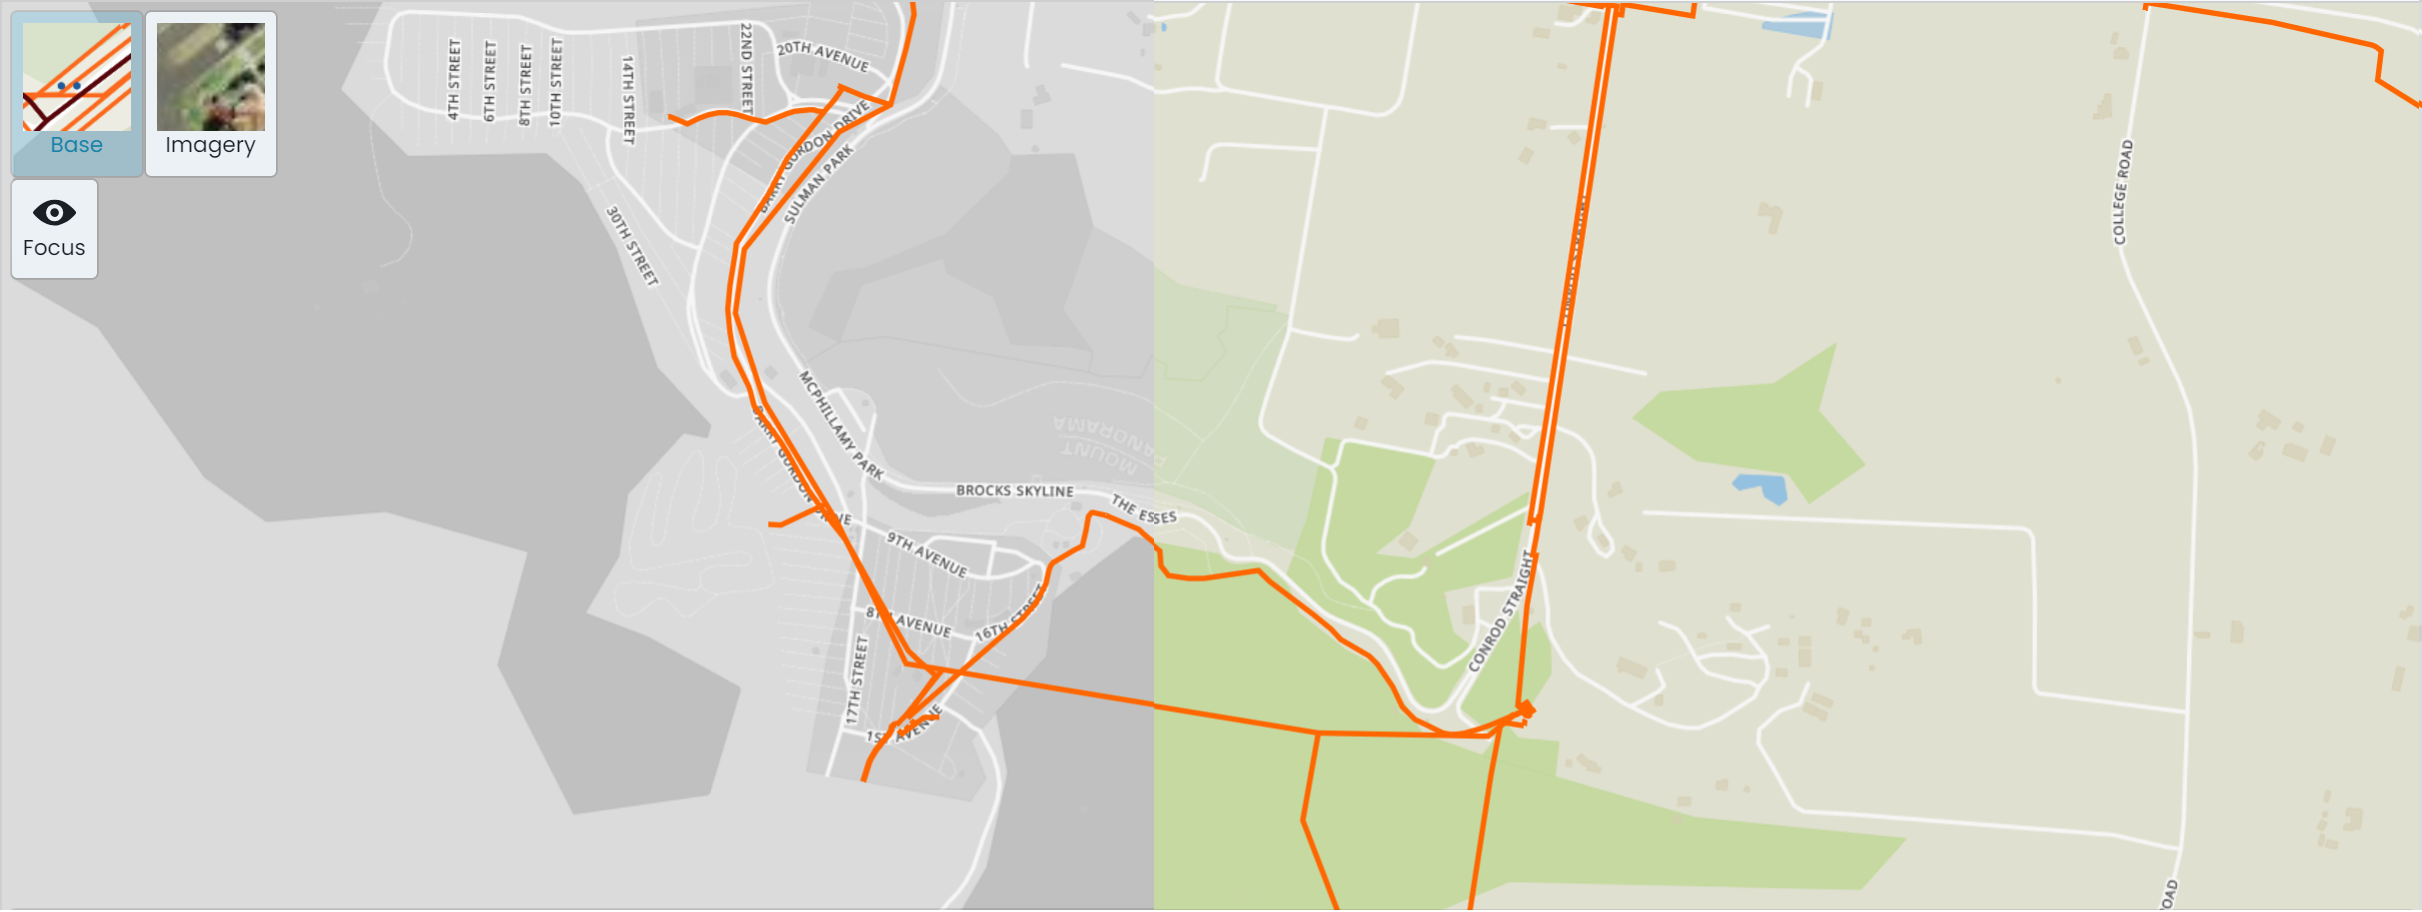
View Basemap as Backdrop
To view the basemap as a backdrop to your asset portfolio, simply click on the ‘Base’
button in the top-left hand corner of the map window. This will swap out the underlying view to
the basemap configured for your environment. The screenshot below shows a map window
with basemap as the backdrop, split between focus mode and standard.
Subsections of Basemaps & Focus Mode
Custom Filters
The Metrix Asset Management system is equipped with a built-in data filtering tool that works
across a variety of pages and functions within the system. This allows users to create and manage
subsets of their entire asset portfolio for viewing, reporting, as well as sharing with other users
of the system. Additionally, the data filtering tools can aid in highlighting asset management
targets within your asset portfolio - filters can be combined to create multiple restrictions on
included components.
Example
Filters can be used to find ‘problem’ assets, or those that may require review for capital intervention.
For example, you could build the following filter to find expiring road surfaces:
Classification = Transport > Roads > Local Roads > Sealed
Component = Road Surface
Condition = Really Poor
Residual Life = Less than 5 years
Applying the above filter will restrict the displayed components to only those meeting this criteria.
Saving & Sharing Filters
Once a filter has been configured, users can choose to save that filter for later reuse. Saved filters can also
be shared so that all users of the system can leverage that filter set.
Info
Saved filters will regenerate matching results every time they are selected. That is, the parameters are
saved for reuse, not the list of result components. This means users can save a filter, and check back in on
the components that fall in and out of its result set over time!
Filters across the System
In addition to the core ‘Assets’ page map window, the filter tool works across the Metrix Asset Management
system in areas such as:
Dashboards,
Report Exports, and
Capital Budgeting
This means that users can define a filter once, and then, view dashboard widgets as they pertain to that reduced
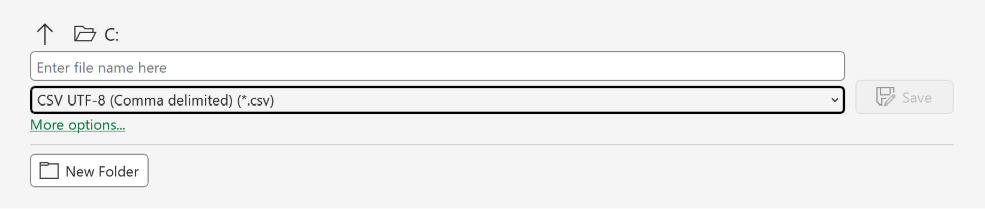
data set only. Further more, users can create a filter and then export the results of that filter to a CSV report
by choosing the filter in the reports page.
Filter Options
The following options are filterable in the Metrix Asset Management System:
Asset Classification
Component Group
Status Code
Reporting Category
Condition
Useful Life
Residual Life
Next Intervention Year
Metric Values (area, length, diameter, height, length, volume, and width)
Component ID list
Map Themes (Visualisation)
The Metrix Asset Management system is equipped with a built-in map theming tool that works
automatically with your data and attributes. This allows users to visualise breakdowns of
their entire asset portfolio, assisting in better and faster decision making. Additionally,
these visualisation tools can aid in highlighting asset management targets within your asset portfolio.
Info
Remember, the Metrix Asset Management system controls spatial features at a component level. When
viewing some map themes, there may be overlapping shapes caused by stacked geometries of multiple
asset components. This can cause obscuration and/or blending of the rendered colours.
In these cases, it is advisable to filter
your data to a specific component group.
Available Map Themes/Visualisations
There are a number of built-in map theme visualisations that are ready to work immediately for you. These
cover a range of areas from lifecycle theming, to report category visualisations. The following details some
of the available themes. This is not an exhaustive list, but provided for context on the types of themes provided.
General Map Themes
These map themes switch around the asset classification and status.
Asset Class
This is the default visualisation theme for the system. Each component is coloured according to
its Asset Class (the first level of the asset classification structure).
Component Group
This theme colours according to the Component Group level of the classification structure. This offers far more
granularity than the Asset Class theme.
Users should be aware of potential stacked geometry issues when using this theme.
Status
The status theme colours each component geometry according to its current status code.
Intervention Map Themes
These map themes aim to highlight the lifecycle metrics associated with your asset portfolio.
Condition
The condition theme displays components on a colour gradient from green (1 - excellent) to red (5 - really poor).
Residual Life
This theme converts a component’s residual life to a percentage of its overall useful life. The result is then
displayed on a colour gradient from green (100% remaining life) to red (0% remaining life).
Construction Year
This displays components in a accordance with their recorded original construction date. This is a useful data audit tool
as it will highlight anomaly records (in comparison to the surrounding asset components).
Report Categories
The system takes each of your configured report category configurations and automatically creates a map theme to render
each component in accordance with their assigned option within that category (including missing or no assignments).
The map theme switcher will render an option for each configured report category.
Metric Attributes
The custom attribute form specifications contain several restricted attribute names that relate to component metrics such as
width, length, height, etc. If any of these fields are implemented within your component custom attribute definitions, the
map theme generator can style your geometries based on these numeric results.
Custom Attributes
Any custom attribute definition that is controlled by an option list will be available within the map theme switcher for render.
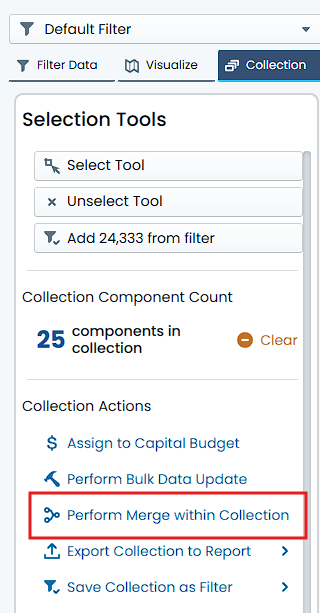
Collection Sets
The concept behind collections within the Metrix Asset Management system is to allow users to
choose various components from a map or list, and build an actionable group from them. A collection, in
other words, is a selection set that users can use in system actions.
Once a collection set has been constructed, users can use that collection to:
Perform bulk data updates
Schedule inspections
Generate reports
Create custom filters using the entities in the filter
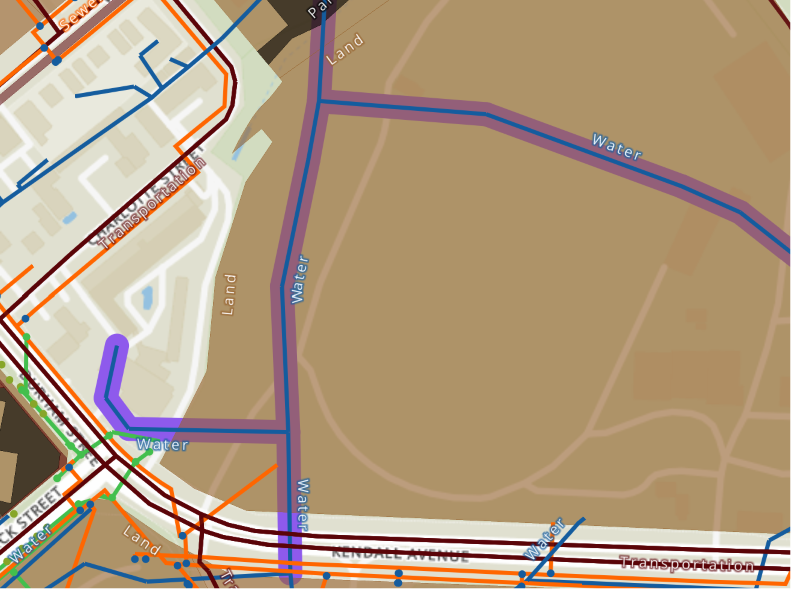
When a component is included in a collection set, the spatial feature will be rendered with a halo, highlighting
it to the user.
As mentioned in the above list, collections can be converted into permanent custom filters. User can also
start a collection from the components resulting from an existing custom filter. There is a two-way
interoperability at play here.
Spatial Features
An elemental facet of the Metrix Asset Management system is spatial representation of asset components. At a basal level,
this is enforced by the mandatory requirement that every component maintained in the system MUST reference a valid spatial
feature. The system has been built around the existence of spatial features, and several tools exist to make this both
beneficial, and easy for end users, including:
Feature sharing across asset components.
Built-in geometry editing tools,
Integration with 3rd party GIS editing platforms such as QGIS,
Attribute updates tied to relative spatial properties, and
Performing asset operations using spatial techniques (line split),
Shared Component Geometries
Each spatial feature in the system is its own record. That is, the geometry is not ‘just’ another attribute of the asset
component. Instead, by maintaining spatial features as distinct entities, we are able to ’link’ a single geometry to
more than one component. This means, you can have the same line feature representing the earthworks, base, and surface
of your road asset. Editing the line once, will update the representation for all.
It should be noted, however, that this sharing feature is not mandatory. Within an asset, each component could have their own
distinct spatial representation. YOu could even maintain a hybrid approach, with two components sharing a geometry, whilst a third
maintains a distinct feature.
The only caveat is that geometries cannot be shared across components with different asset parents. The relationship must stay
within a single asset.
Managing Spatial Features
The system come with built-in spatial editing tools for basic geometry creation and updates. These tools are simple to use
and support all simple geometry types; points, lines, and polygons. In the case that your geometric construction requirements
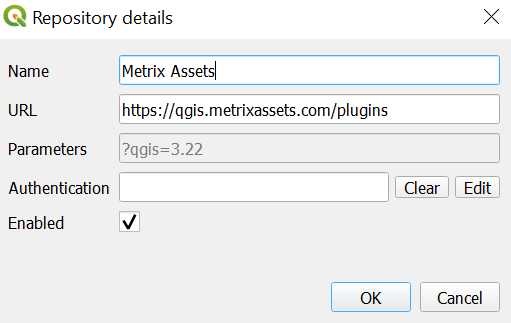
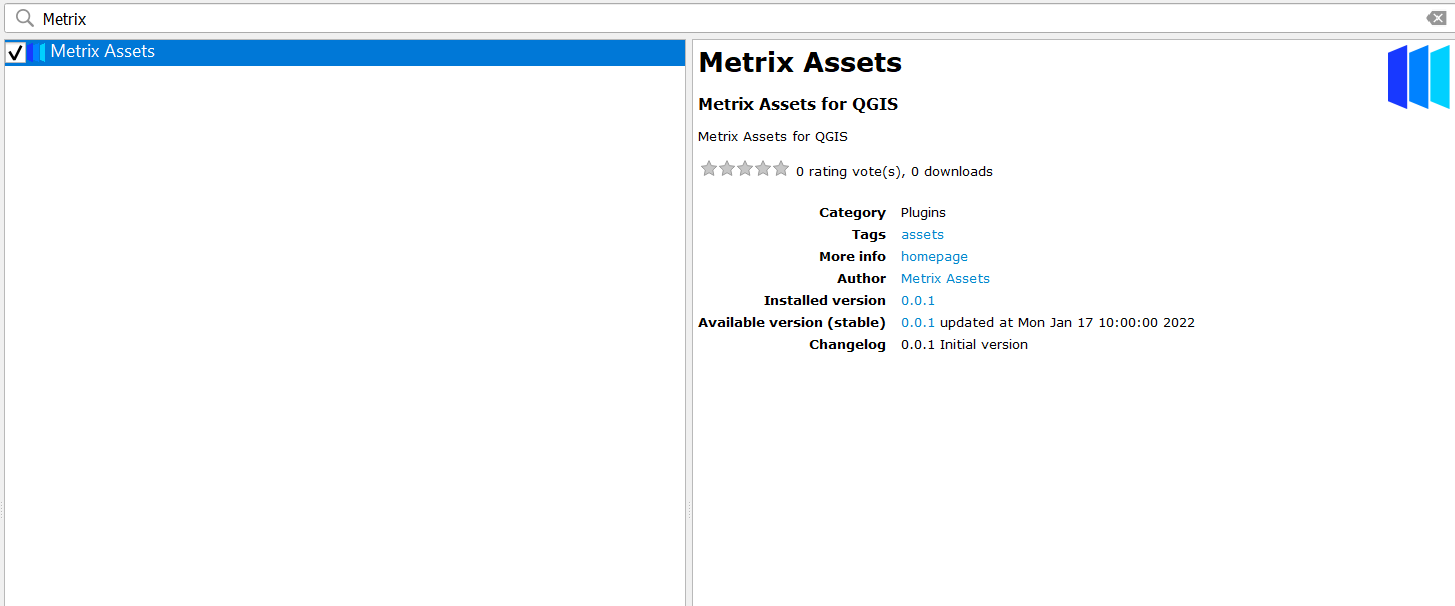
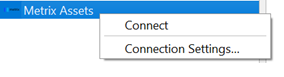
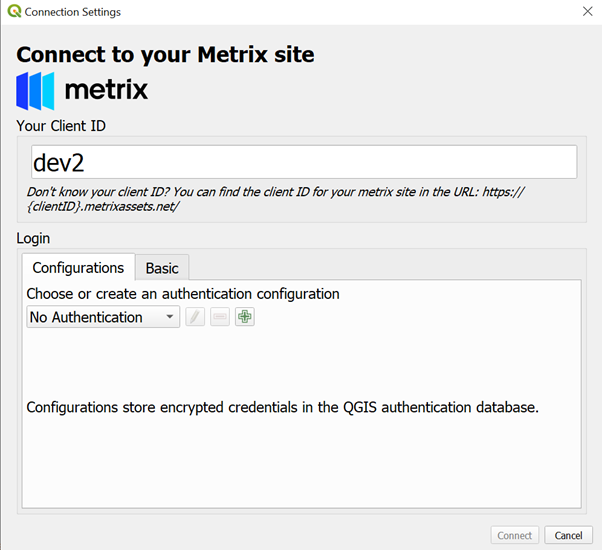
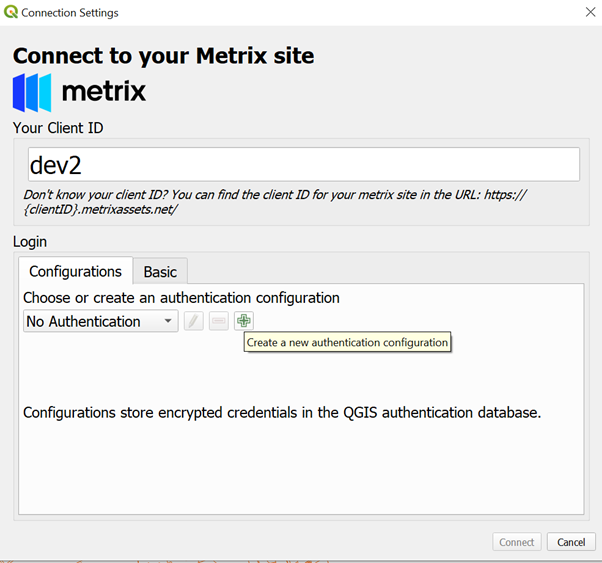
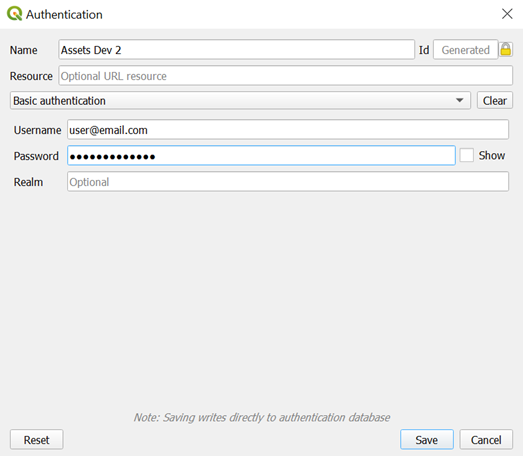
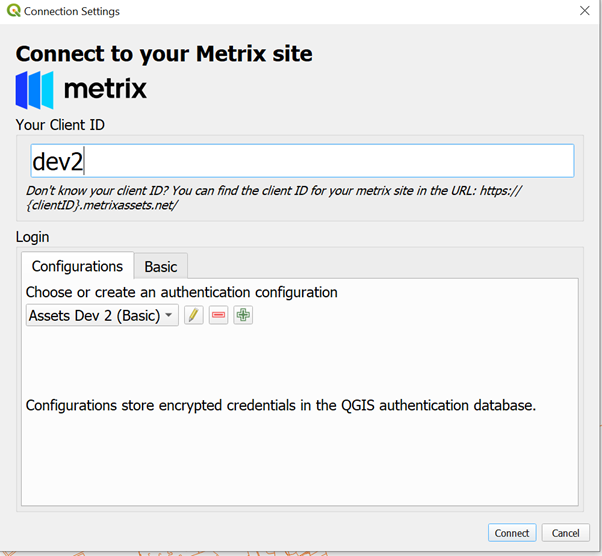
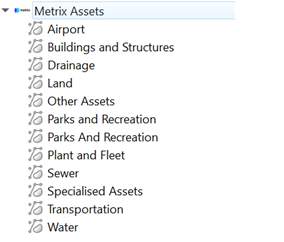
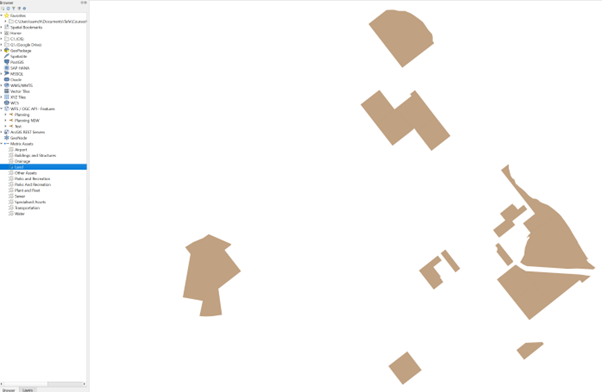
are more advanced that those offered in system, the Metrix Asset Management system has published a free to access
QGIS plugin that can connect to your cloud environment (using your Metrix account details), view your geometry data, as well as
make edits and save changes back to the system.
Tip
A workflow that many users implement is to initialise an asset its components in system first, and then switch to using the
QGIS plugin to refine and align the new features accordingly.
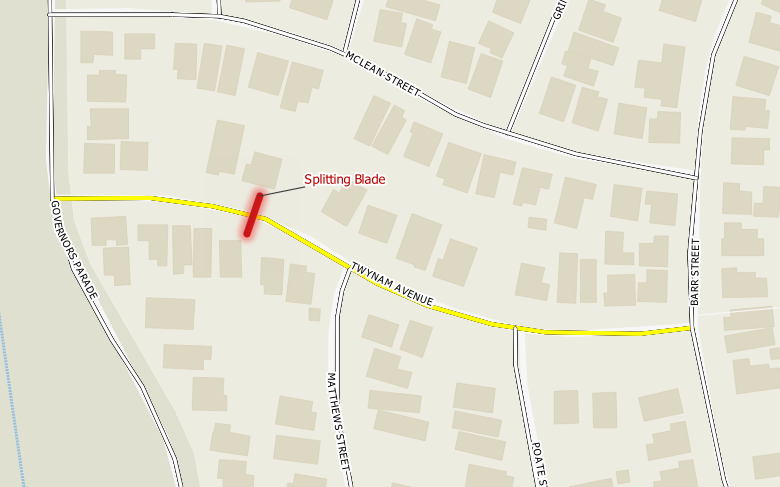
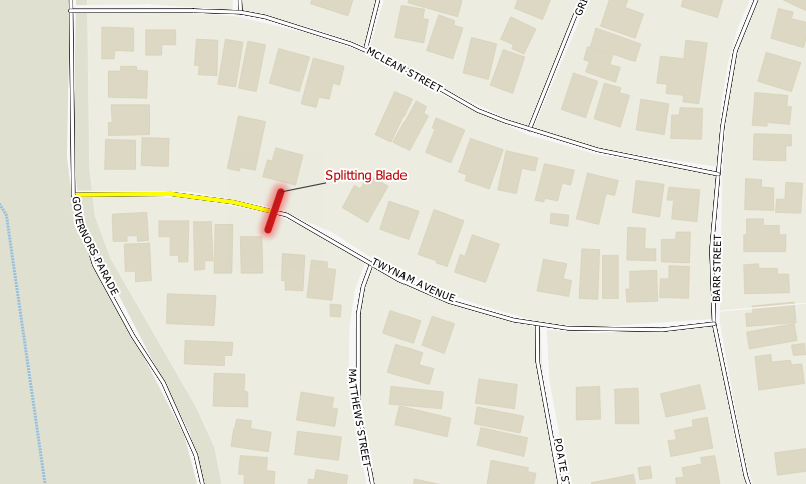
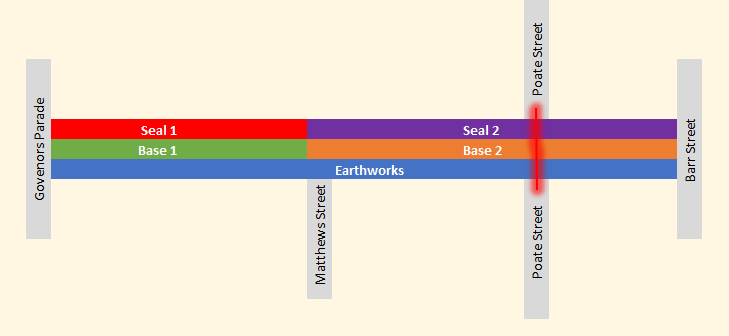
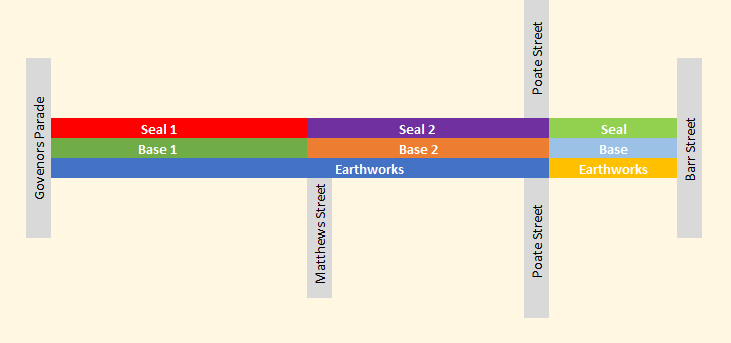
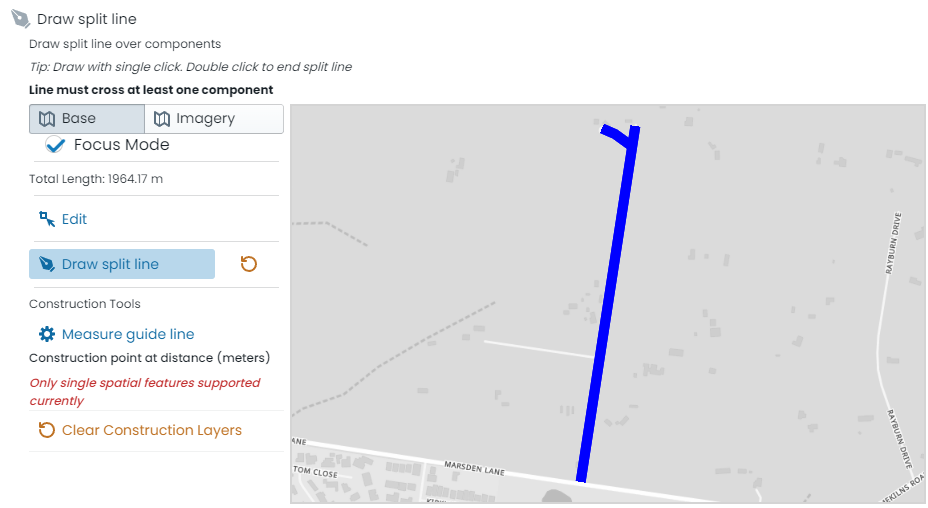
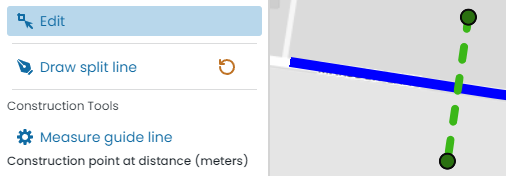
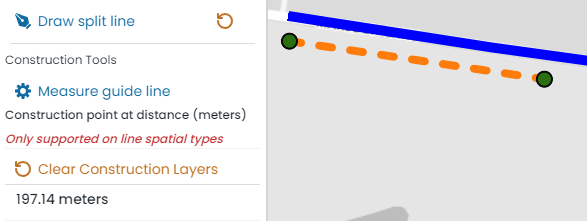
Asset Operations with Spatial Tools (the line splitting tool)
With such a strong relationship to underlying spatial features, the Metrix Asset Management system is able to leverage
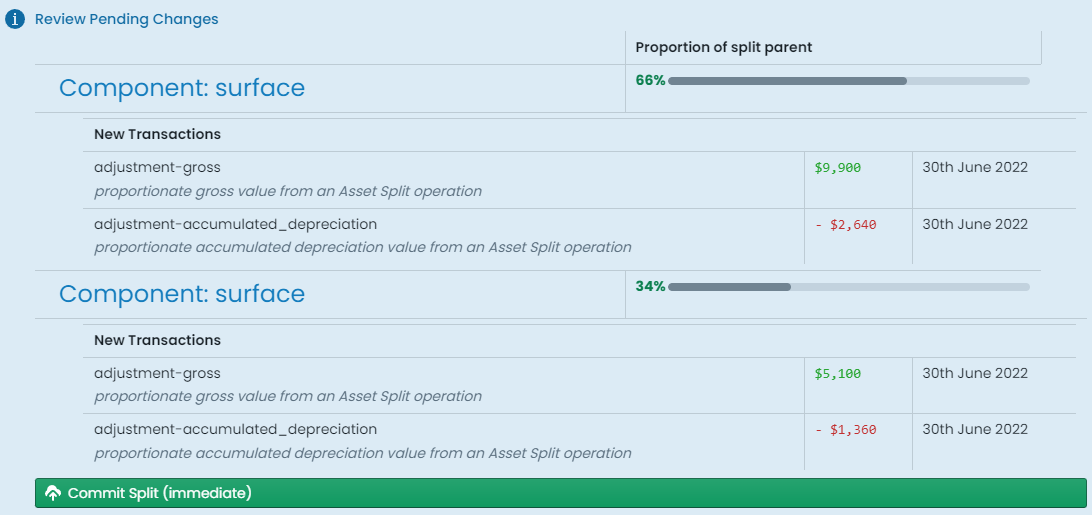
geometric principles in offering advanced asset management operations, in an easy to use and understand package. Such an operation
is the ability for users to SPLIT assets or components at a given point with the system handling all the financial apportionment
of capital value for them. This is great for recording partial renewals, re-segmenting your network assets to cater for
additional installations.
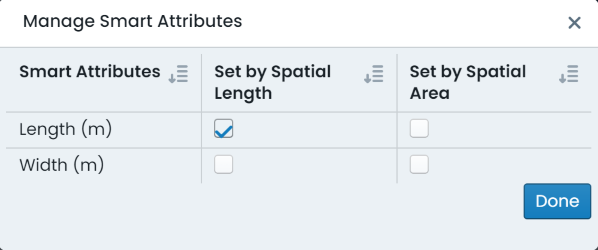
Smart Attributes
Another added benefit of mandating spatial features is the ability to leverage spatial properties as attribute information. See
smart attributes for more information.
Residual Life Calculations
In simple terms, the Residual Life is the number of years that a Component has left/remaining before a capital intervention is required. The Residual Life is calculated as the difference between its useful life and the Component’s age plus any residual life offsets (see below) recorded against the Component.
As a Component goes through it’s life, it is expected that it will degrade/age over the years. How any particular Component experiences this ageing process however, will be in accordance with some very local factors relevant to that Component only. This means that any one Component could under-shoot or exceed it’s expected useful life - it also exemplifies how a Component’s useful life is just an averaged expectation, rather than a hard-and-fast rule.
To cater for such variations to lifecycle patterns, the system allows for the Residual Life to be ‘set’ by the user at any point throughout the Component’s life cycle. That is, the user does not modify the useful life of each Component, but rather, can set the residual life to the value they see fit.
This translates to a residual life offset being inferred upon the Component. This residual life offset takes effect upon the calculated residual life by being added to the calculated residual life.
It is for the reasons stated above, that the formula for Residual Life in the Metrix Asset Management system is:
$$ [UsefulLife] - [Age] + [ResidualLifeOffset] $$
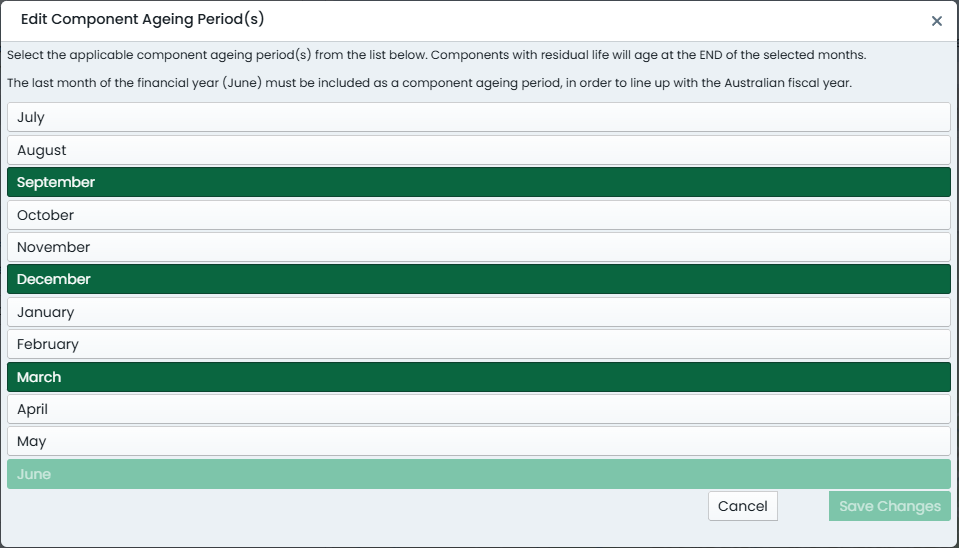
Info
It is important to remember however, a Component will NOT start ageing until it reaches it’s Initial Capital Anniversary date. By default, this is 30 June and is listed in the ‘Intervention Statistics’ section of the Component info panel.
Further to this, it is important to note that adjustments to a Component’s Residual Life only begin taking effect once the Initial Capital Anniversary date has passed. This is simply because, as mentioned above, the Component does not commence ‘ageing’ until it passes this date.
Inputs to Residual Life
The following provides additional details on the inputs to the residual life formula discussed above.
Residual Life Offset
A component’s residual life offset is an offset applied to the calculated ‘residual life’, to either increase or decrease the resulting value. The residual life offset is calculated by the Metrix Asset Management system as the difference between the calculated ‘residual life’ and the subjectively assessed remaining life. That is:
Consider the road surface component of a road Asset that has a useful life of 15 years. Now consider that the age of the Component is 10 years. This means that the residual life (using the formula above) is:
Note: at this point in time, the component has NO residual life offset, thus we add zero.
Now assume that at this time, when the component is 10 years old, it is assessed and deemed to actually have 6 years of life left. The system calculates the residual life offset (using the formula above) to be:
There is NO requirement of a user to consider the concept of residual life offset when altering the residual life of a component. In fact, a user can be safely ignorant of the concepts of residual life offset. All the user needs to supply (going by the above example) is that the residual life of the component should be 6, not 5. The system will take that value and calculate the +1 years offset in the backend.
If the user were to state that the residual life was actually 8, then the system would calculate an offset of +3 years.
As the residual life offset is applied to the residual life value after the initial basic residual life calculation takes place, the reported residual life will continue to decrease as time passes. The user does not need to do anything for this, the system will handle it all.
Capital Anniversary Dates
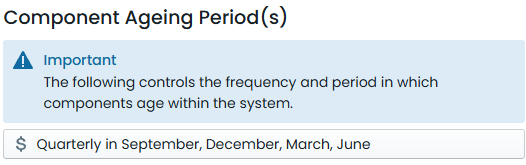
A Capital Anniversary date is a pre-ordained time of the fiscal year when a capital asset undergoes an ageing event. By default, Metrix environments are configured for annual (once per year) capitalisation. - however, this can be adjusted to suit the needs of the organisation to frequencies such as quarterly, monthly, or the like.
When a Component is first built, or renewed, it will receive a construction date and/or a last intervention date. The Capital Anniversary event relevant to this date is:
the Initial Capital Anniversary. This is the date in which the Component will BEGIN ageing.
Throughout the Component’s life, two other Capital Anniversary events are continuously relevant to the Component - the Most Recent Capital Anniversary and the Next Capital Anniversary:
the Most Recent Capital Anniversary is the most recent date in which the Component underwent an ageing event, and
the Next Capital Anniversary is the next date in which the Component is scheduled to undergo a capitalisation event.
All of the above Capital Anniversary dates are listed in the ‘Intervention Summary’ section of the Component info panel.
Age
A component’s age is calculated as the difference between the first ‘capital anniversary’ that occurred after the component’s intervention date, and the most recent ‘capital anniversary’ to have passed.
Example
Consider a Component whose last intervention date was 1 September 2018. Also, assume that the current date is 1 March 2022. The component first starts ageing on 30 June 2019 (the first ‘capital anniversary’ following its intervention date), and the last ageing anniversary for the component is 30 June 2021 (the most recent ‘capital anniversary’ to have passed). The Component is therefore 2 years old.
Reports generated from the system support returning the age of a component at a date other than the current date. A report generated at a date of 2 years in the past, will return the age of the component at that date - not today.
Last Intervention Date
The last intervention date refers to the date in which a component last underwent capital intervention works relating to it’s treatment. This includes:
the original_construction_date of the component,
the date of major renewal works on the component, or
the date of substantial upgrade works on the component.
Example
Consider the road surface for a brand new road Asset. After it is first built and commissioned, the Last Intervention Date will be equal to the ‘original_construction_date’. Years later, the road surface will require a reseal treatment. After this reseal (a major renewal intervention), the last intervention date will be the date that this reseal occurred.
The original_construction_date will NOT change following an intervention (i.e. a reseal for a road surface). Only the last intervention date will change over the course of a component’s lifetime.
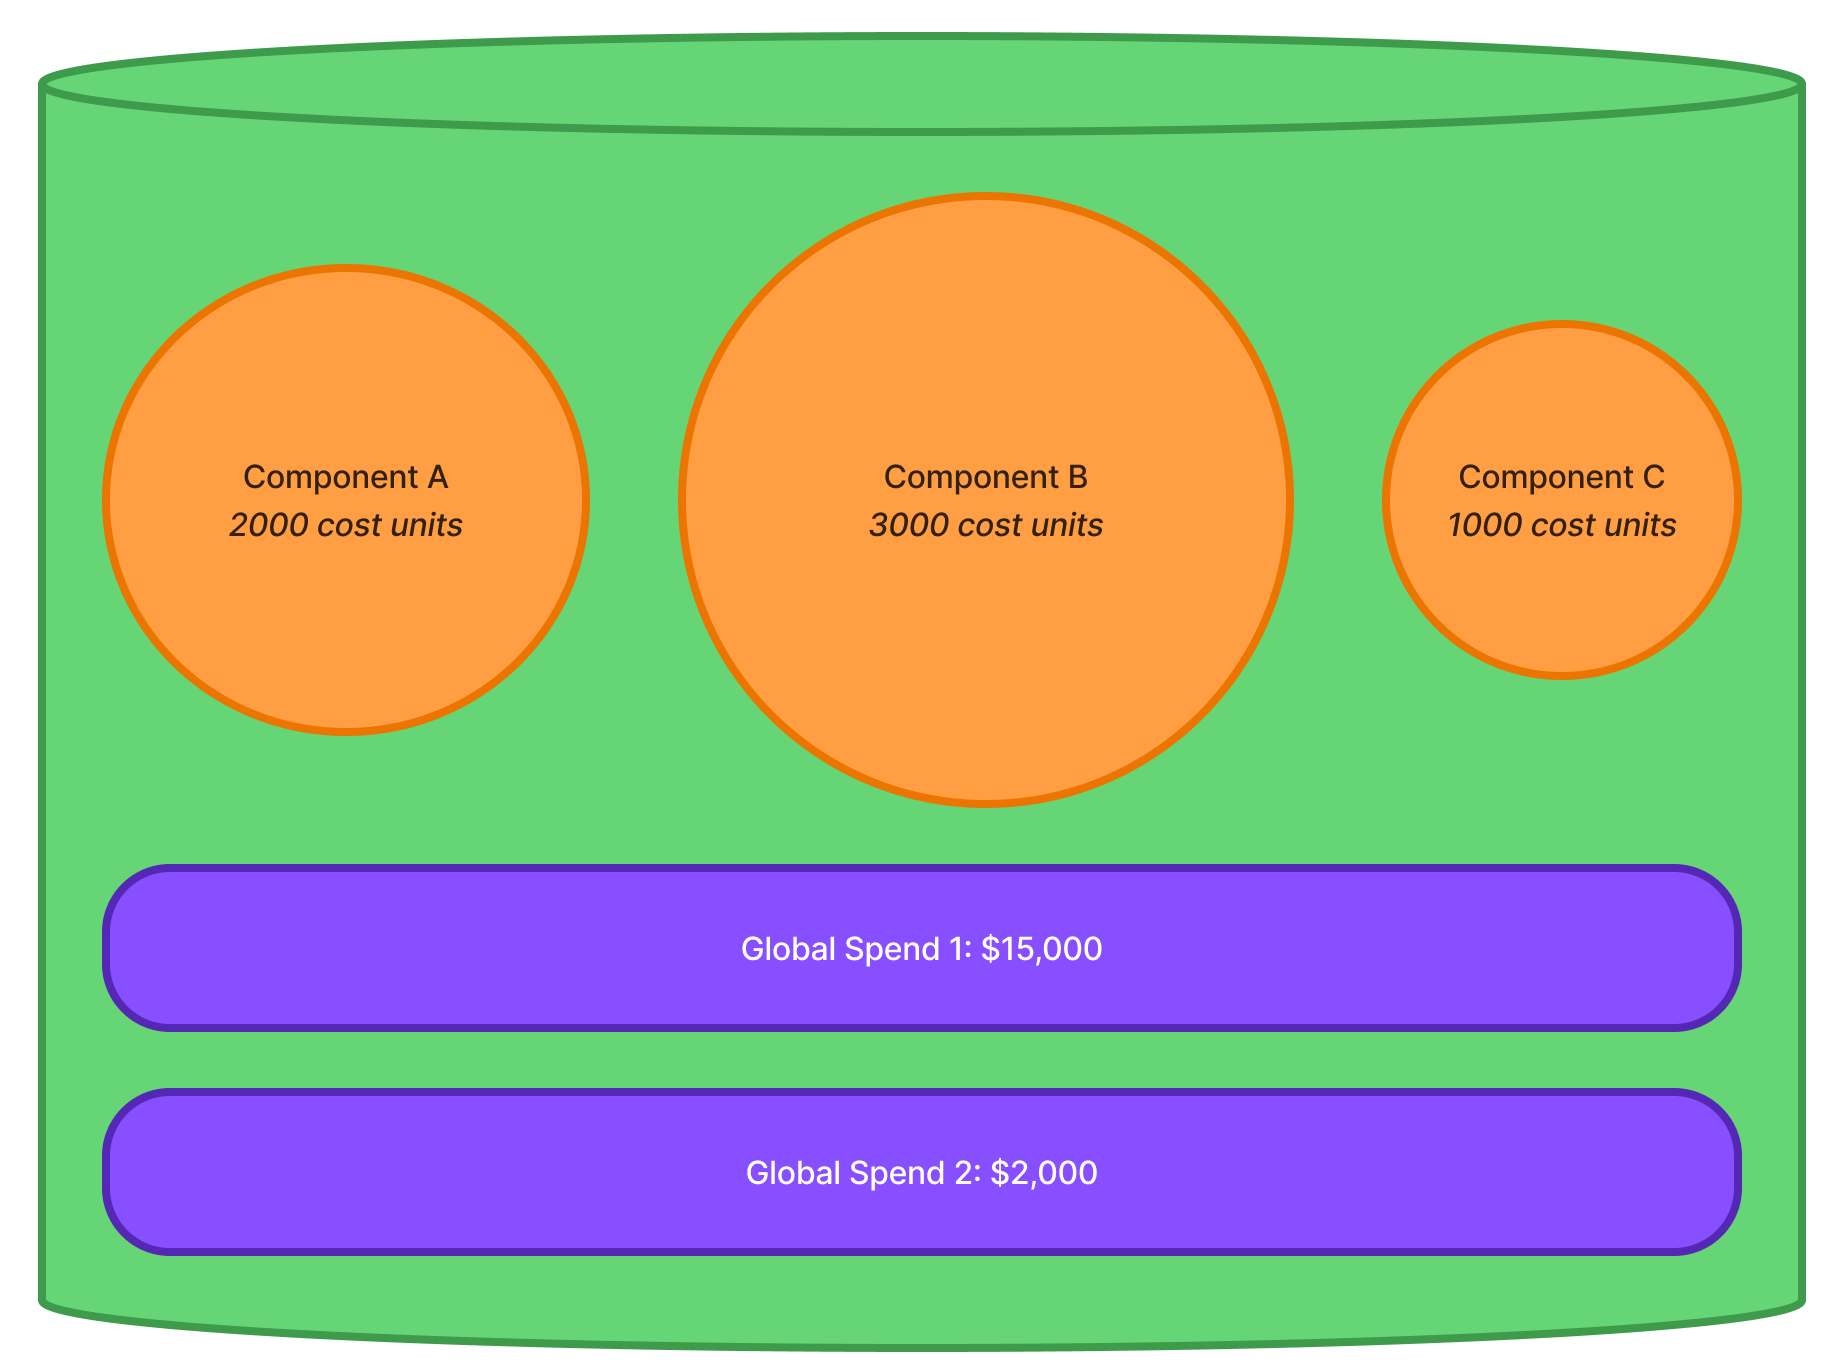
Component Quantity/Size
The quantity/size of a component in the Metrix Asset Management system
is stored within the ‘Cost Units’ value, in the ‘Intervention’ info panel. Given that
component shapes and measurement techniques differ from type to type, and the method
of ascribing a cost to that shape/technique is variable, the cost units value of a
component is not restricted to a specific component metric such as length, area,
volume, etc. Rather, the cost units number field is free to represent whatever quantity
that is required to satisfy the assigned intervention treatment.
Info
The cost method merely controls the calculation configuration for replacement cost.
To perform the calculation, the treatment must have an assigned Unit Rate relative
to the cost method. Also, the Component must have a valid ‘Cost Units’ multiplier -
in the correct Unit of Measure defined by the treatment - for that Unit Rate.
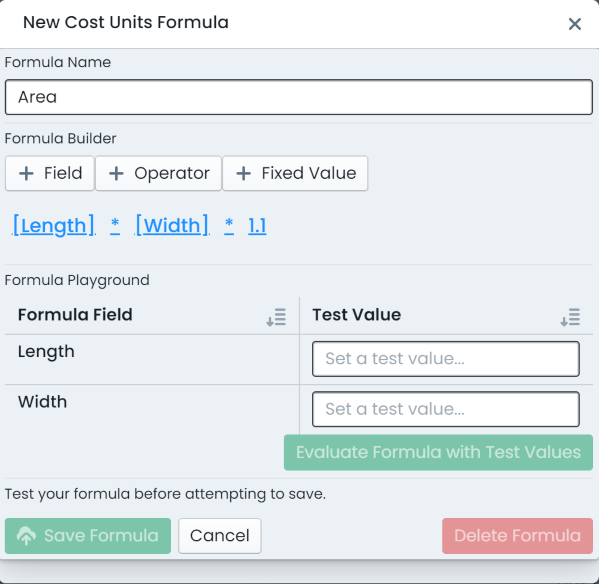
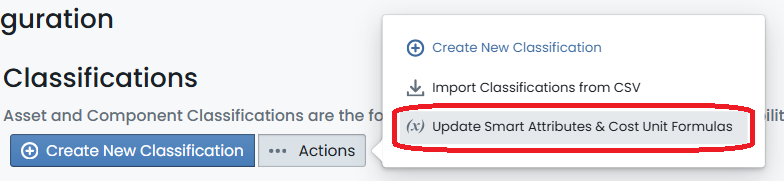
Metrix also supports the implementation of cost unit formulas to automatically
calculate these values based off the value of certain metric fields. This is covered
in another section pertaining to
Smart Attributes and
Cost Unit Formulas.
Example
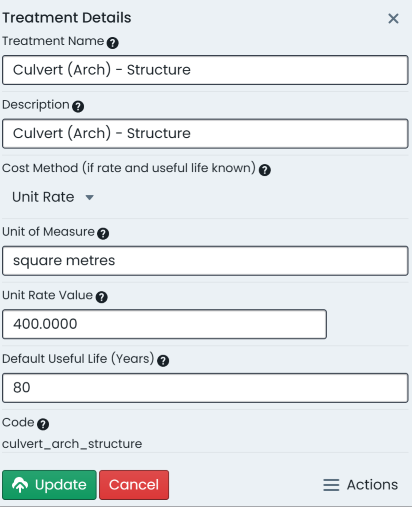
Consider the road surface component of a road Asset. The treatment associated with the component is called ‘14/7mm Initial Seal’ and has the following properties:
Units of Measure: Square Metres
Cost Method: Unit Rate
Unit Rate: $3.25
Default Useful Life: 15 years
From this, we can determine that the component’s cost units are measured in ‘Square Metres’ and, given the ‘Cost Method’ is ‘Unit Rate’, the replacement cost will be calculated by multiplying the ‘Unit Rate’ by the ‘Cost Units’.
Given that the road surface is 1200 sq.m, the cost units for the Component is 1200.
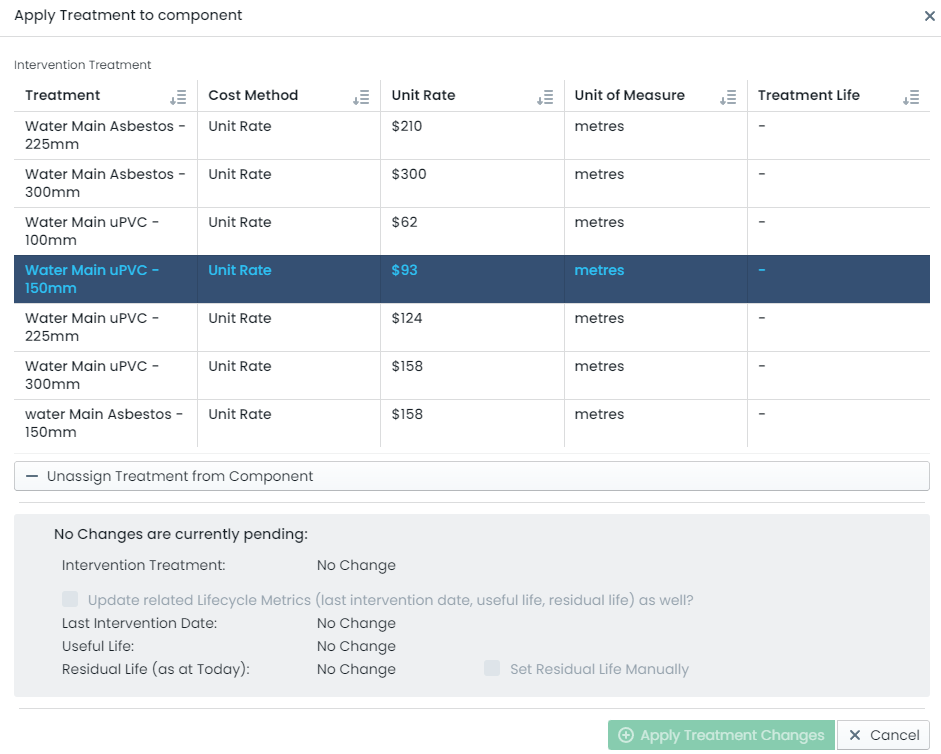
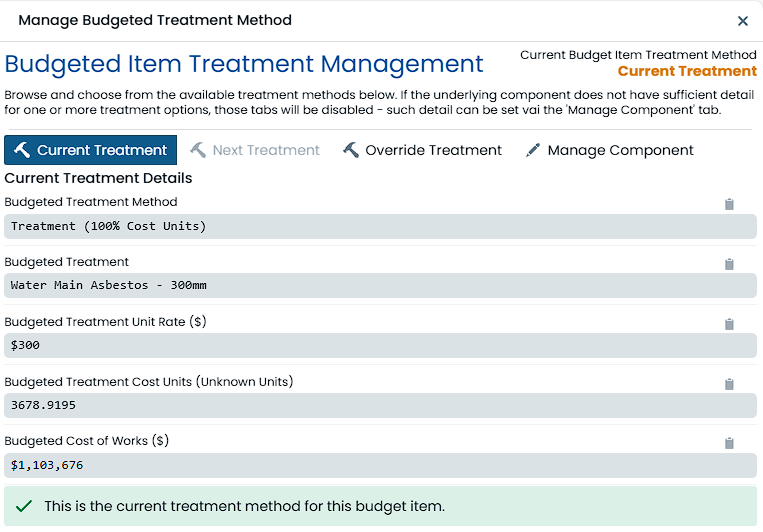
Component Treatments & Next Treatment
Intervention Treatments in the Metrix Asset Management System
provide the ability for users to store and manage unit rates and default
useful lives for a variety of component interventions. When
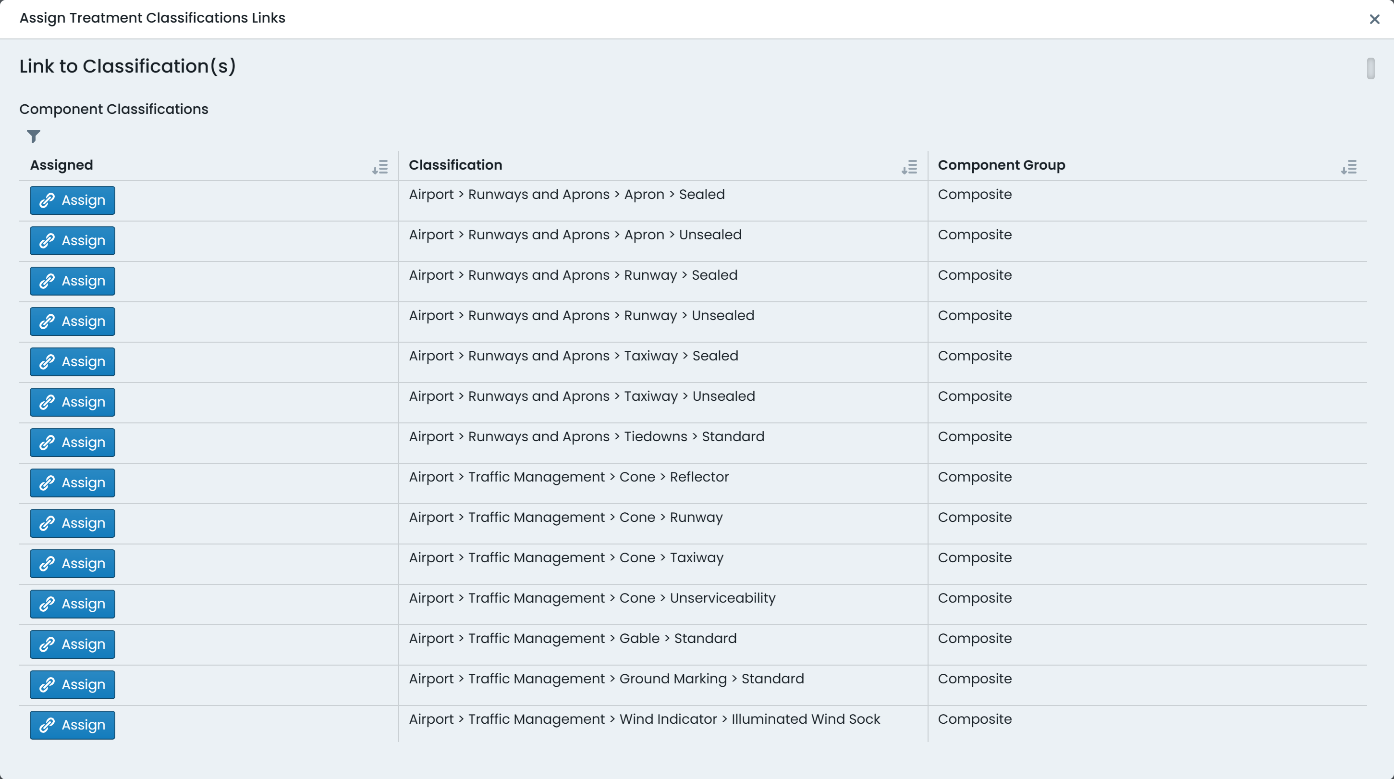
assigned
to a component group, treatment definitions are able to be used to define the
current and/or next intervention method for given components.
Component Treatment
The current component treatment informs a component ‘Unit Rate’ (for current cost calculations),
the ‘Default Useful Life’, as well as an indicator to the material and/or methodology used in
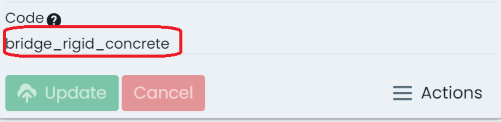
it’s original construction. The later of these depends on the naming conventions used in
defining
intervention treatments.
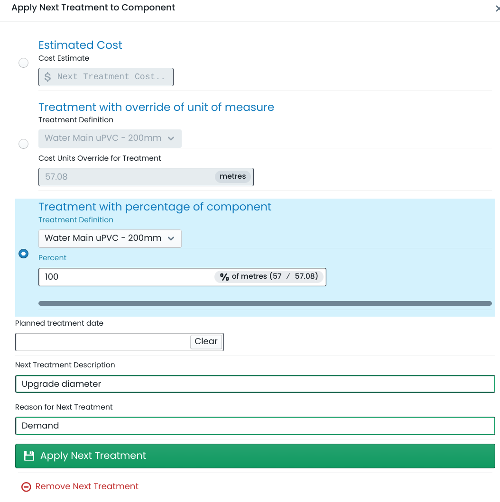
Next Treatment
A component’s next treatment definition allows for users to record their ‘best guess’ how a component’s
upcoming intervention treatment will be conducted. Such definitions can be based on:
Estimated Cost: for works that may be based around an externally quoted price.
Treatment with Override Unit of Measure: for works that will be conducted in accordance with a chosen
treatment definition - but for a specific quantity of
cost units.
Treatment with Percentage of Component: for works that will be conducted in accordance with a chosen
treatment definition - but for a percentage share of the component’s current cost units.
Financial Movements
The financial transactions ledger within the Metrix Asset Management system tracks the financial
consumption and restoration of asset components over their lifetime. This data is then collated in a
number of system reports that satisfy the financial reporting obligations of user organisations. The
following outlines a number of terms used throughout the system, and how they tie into the financial
frameworks in force.
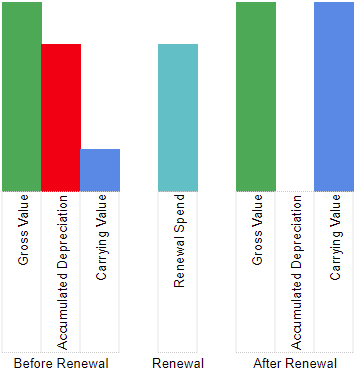
Gross Value
The replacement cost of a component at the time of valuation (or revaluation). Gross value can increase
or decrease over the life of a component through intervention actions such as additions or upgrades to
the asset component. Another way that gross value increases or decreases is through indexation – this is
essentially increasing the value of a component by a percentage amount, typically in line with CPI.
Accumulated Depreciation Value
The accumulated depreciation of a component is the sum of all depreciation transactions logged against
it over its life time.
The formula for accumulated depreciation is:
$$ \sum [Depreciation Charges] $$
In the Metrix Asset Management system, the accumulated depreciation is posted as a NEGATIVE NUMBER
to reflect the fact that it is a ‘consuming’ factor.
Example
Consider a road surface Component for a road Asset. The initial gross value for the component is $123,000.
Each year, the component incurs a depreciation charge of -$8,200. After 5 financial year periods (assuming
no other depreciation events occur) the accumulated deprecation would be:
The carrying value of a component is the net worth of the component to the entity in adjusted terms. Carrying
value is a calculated value that deducts the accumulated depreciation from the gross value. Given that the
depreciation figure is already stored within the Metrix Asset Management system as a negative figure however,
the formula for carrying value is:
$$ [Gross Value] + \sum [Depreciation Charges] $$
Example
Consider again, the road surface component from the previous example. The accumulated deprecation is calculated
to be -$41,000
The carrying value** for the component after this 5 years period is therefore:
$$ $123,000 + (-$41,000) = $82,000 $$
Renewals and Depreciation
In the Metrix Asset Management system, a renewal expenditure is typically posted as a POSITIVE movement against the components
accumulated depreciation. This is to recognise the fact that the action has ‘undone’ the financial consumptions
of the past. In turn, the components carrying value (assuming renewal costs equal gross value and a fully
depreciated component) is restored to its original gross value as expected.
How To Guides
This section provides user guides on some of the basic elements of the Metrix Asset Management
system including:
This guide provides an overview on how to make asset component selections from a map view
withing the Metrix Asset Management system, including:
Selecting from the Map
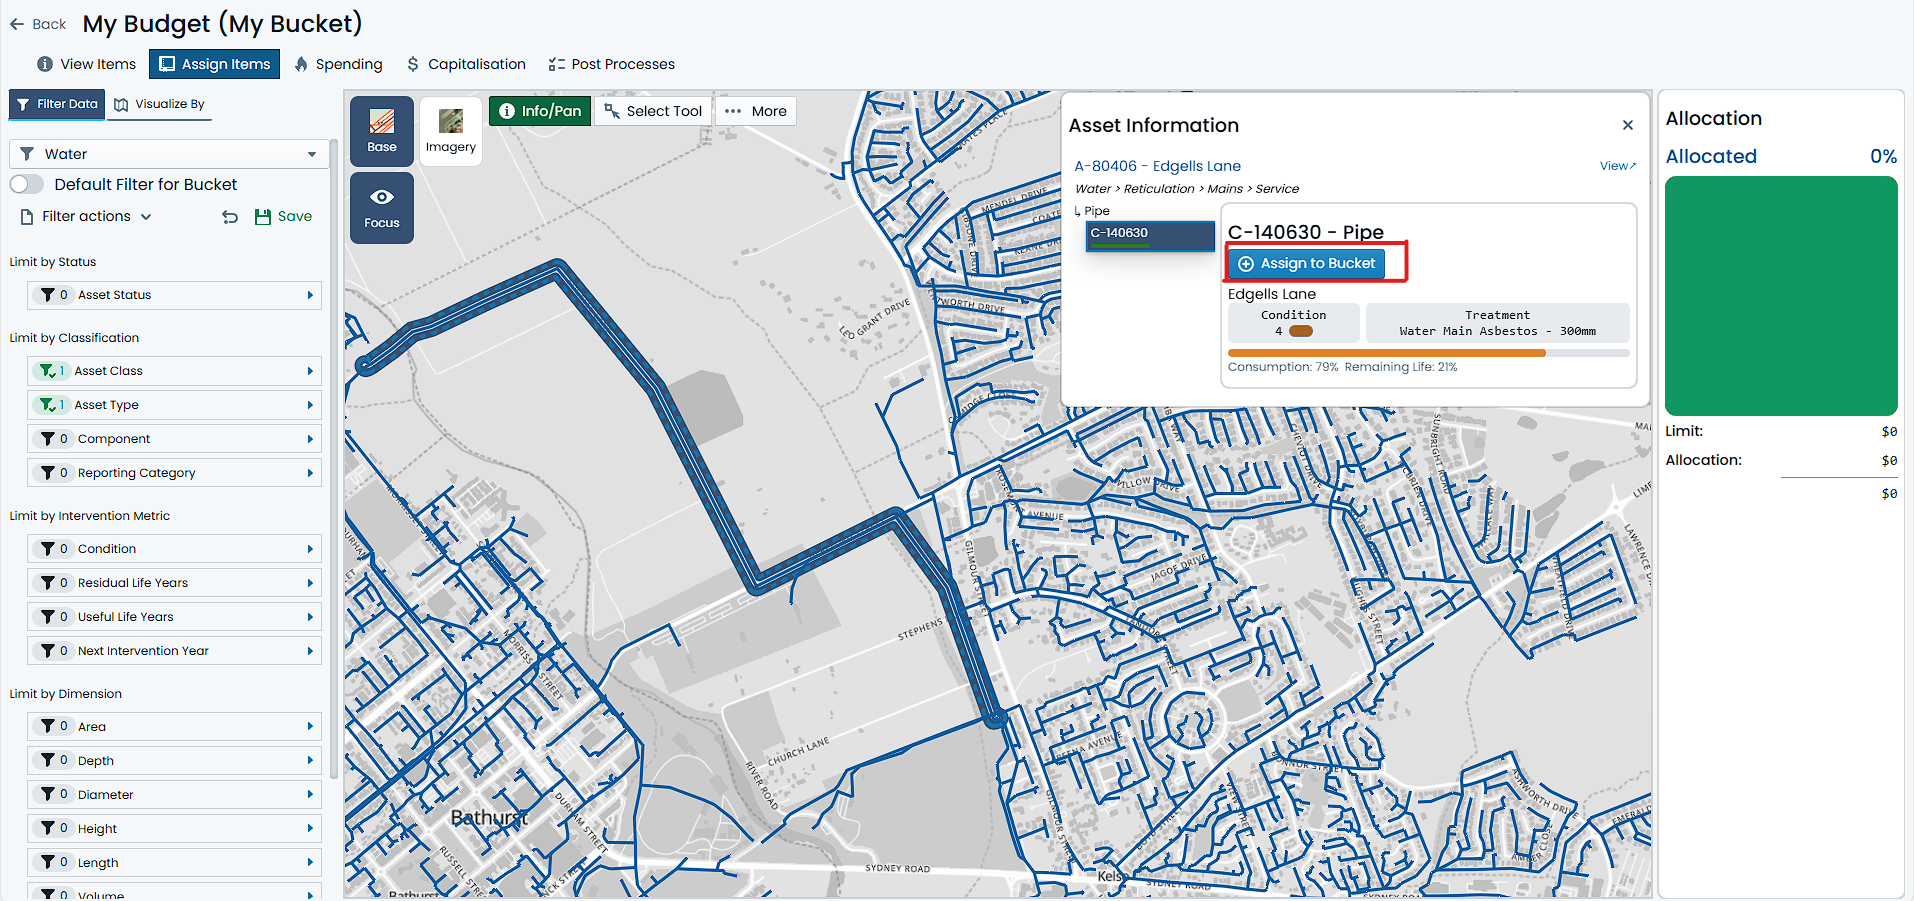
When you wish to get information about an asset and/or component in your current map view,
simply click on the spatial feature.
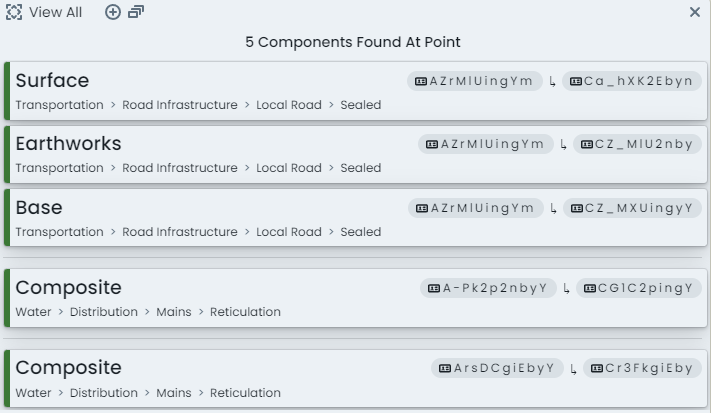
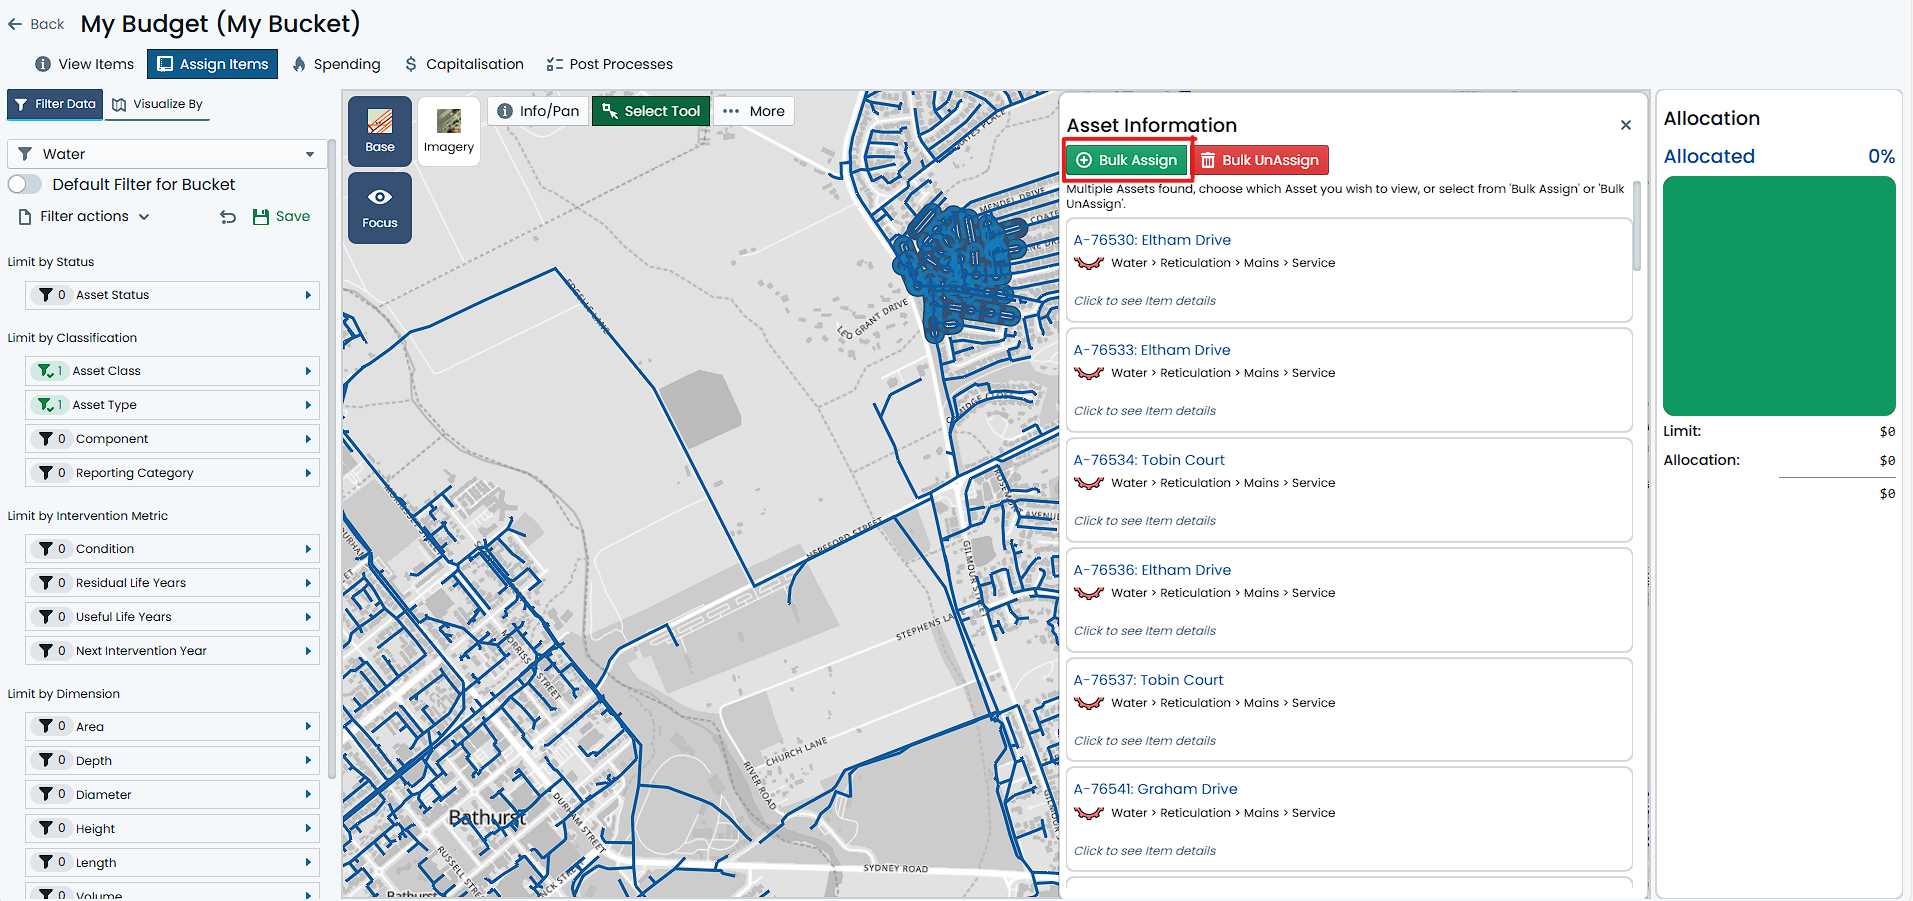
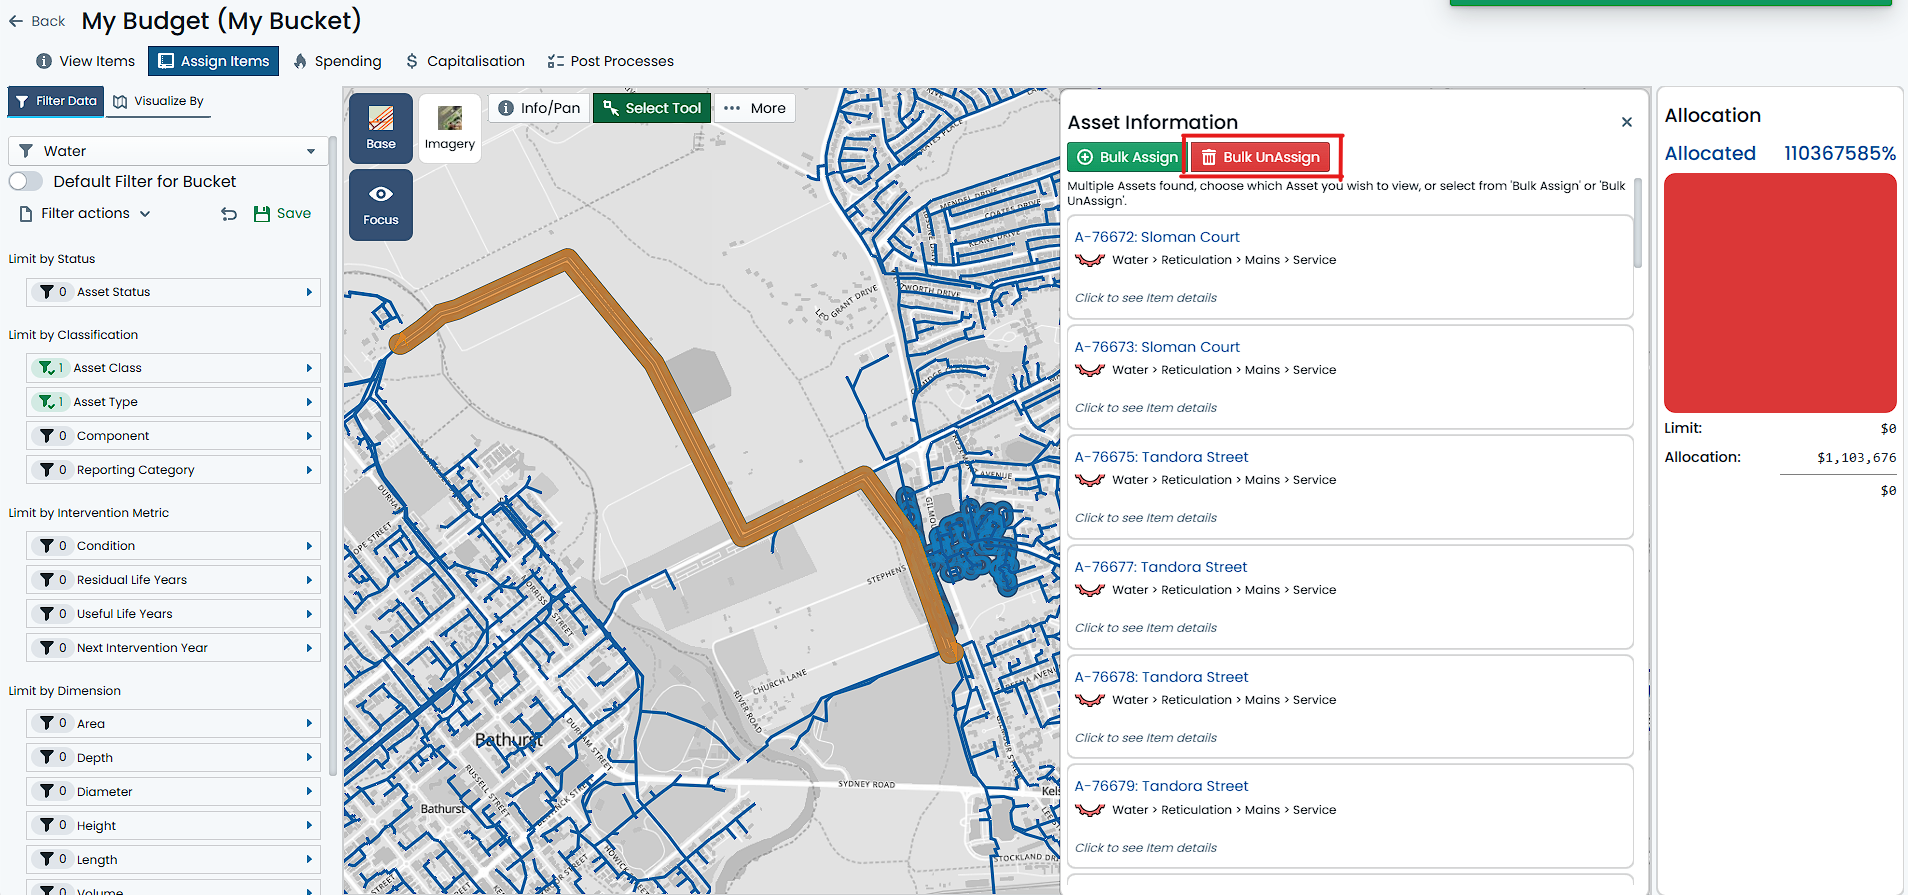
On the right-hand side of the window, an info panel will appear. If the area you clicked on
contains more than one (1) valid asset component, you will be presented with the option to
refine your selection down to the target component you want information about.
As seen above, each asset (falling in the range of your click location) will be grouped and
the sub-components displayed for your choice. Click on the asset/component you wish to
view.
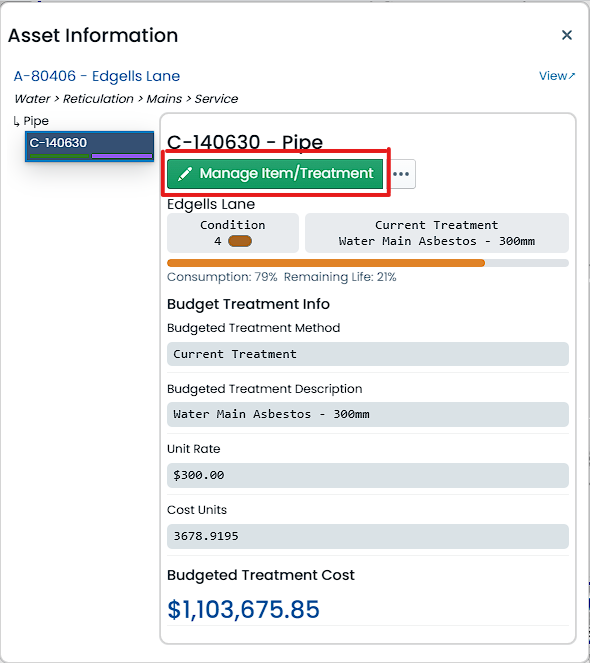
The component info panel will then render for your chosen component.
Info
If the location of your mouse click only intersected one (1) component, you will be taken straight
to this panel.
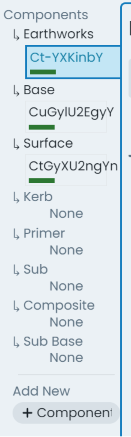
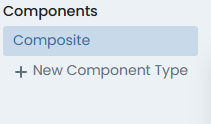
Changing Component Groups within an Asset
When viewing information about a selected component, you can switch to another component on the
same asset using the ‘Components’ switcher on the left-hand side of the info panel.
Each available component group (on the asset classification configuration) will be rendered in this
side panel. If the asset has one or more component entries against a particular component group,
a component ID and status tag will be shown. Otherwise, it will state, ‘None’.
To view the information about one of the listed components in this list, simply click on that entry in
this panel.
Changing Info Panel Display
To view different information about the selected component, users can simply switch between the
tabs across the top of the info panel.
Info
The ‘Parent Asset’ tab contains asset level information and is therefore identical no matter what
component within the asset you are viewing.
Using Custom Filters
This document provides an overview on how to filter your asset portfolio using the built-in
custom filter tools, including:
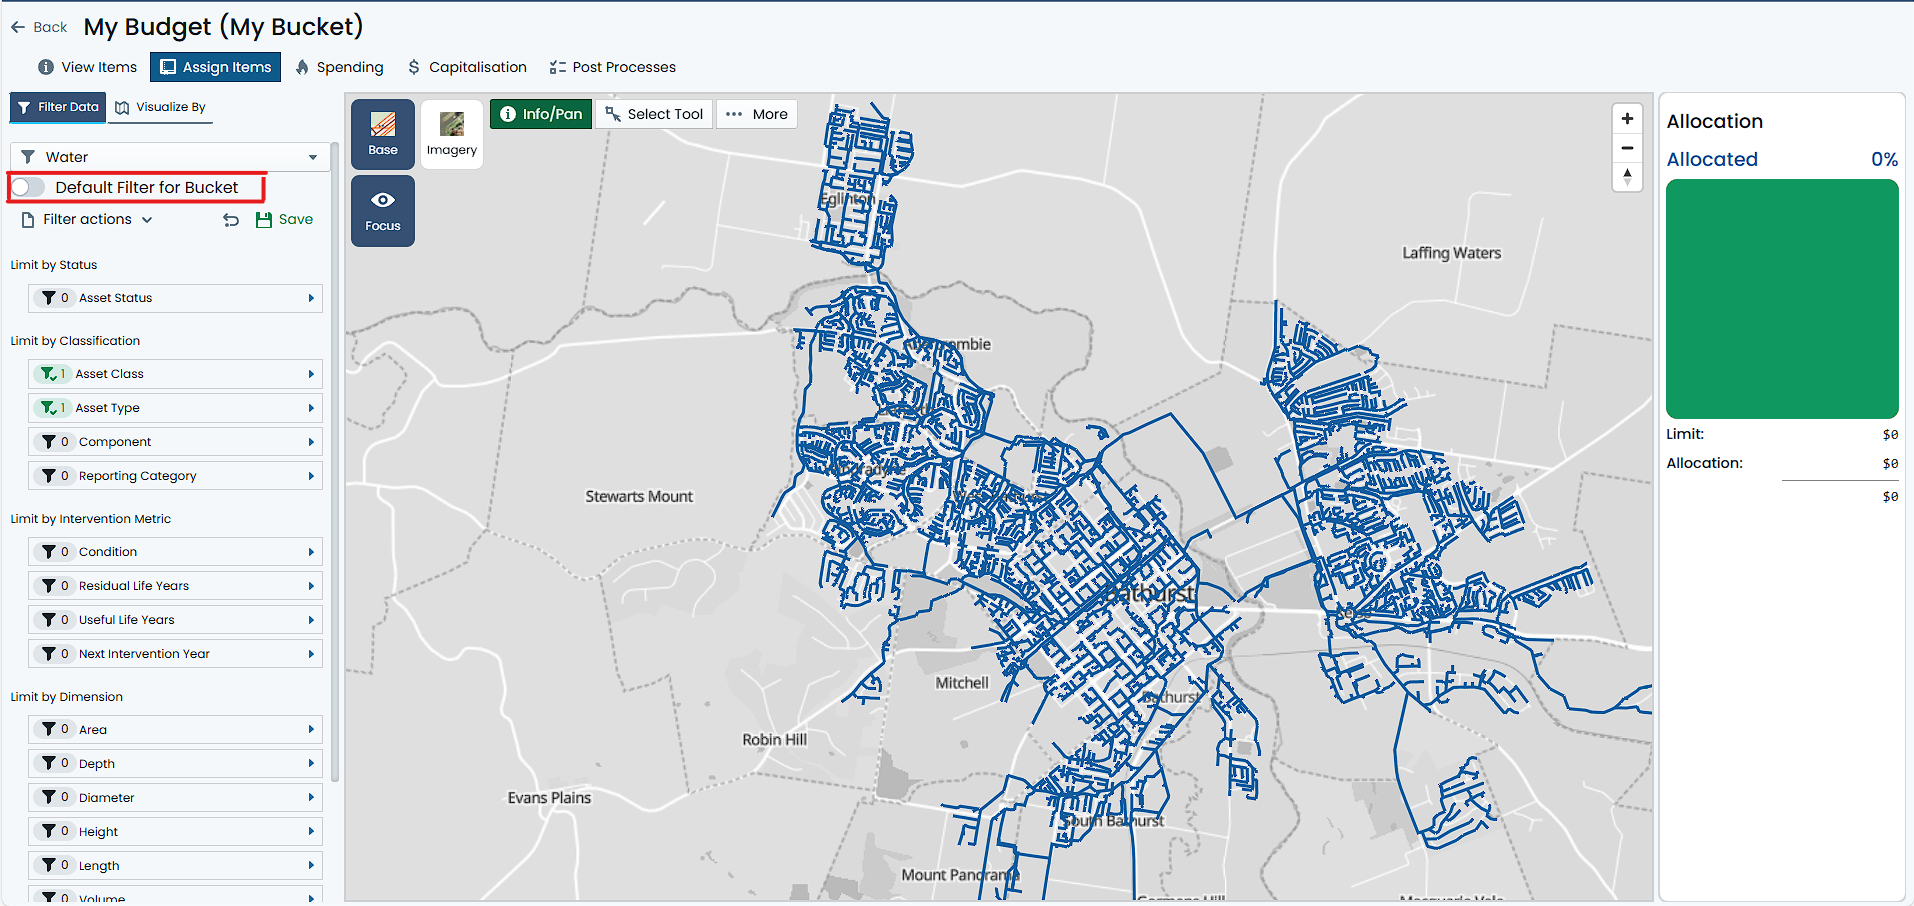
Filtering Data
To get started using custom filters, navigate to the main ‘Assets’ map in the Metrix Asset Management
system.
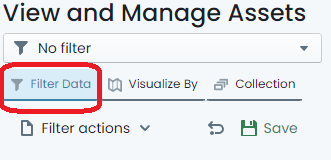
On the left hand side of the page, make sure the ‘Filter Data’ tab is activated.
Here, you will see a number of categories that can be used to filter the visible asset components in the
map view.
Note: If there is a current filter applied, clear it by following
these
steps.
Choose any category to begin your filter by clicking on the ‘filter pod’ for that category. For example: Click
on ‘Condition’.
A menu fly-out will appear where you can then further define how you wish to apply the filter using the chosen
category. These will typically be represented by checkboxes for restrictions to apply to your portfolio. For example:
For condition, you may tick ‘Excellent’. This would restrict the visible asset portfolio to components with
a Condition value of ‘Excellent’.
Filter conditions can be chained together. Click on another ‘filter pod’ and set some additional restrictions. For
example: Click on ‘Residual Life Years’. The fly-out requests that you input two (2) values:
a. The operator (<, >, =), and
b. The value relative to the operator.
Inputting > 6 would restrict the visible components to those with more than 6 years of residual life remaining.
To remove a specific filter definition, simply uncheck the restriction within that category. For value based filter
settings, there is a ‘Reset’ option within the menu fly-out.
Clear the Filter
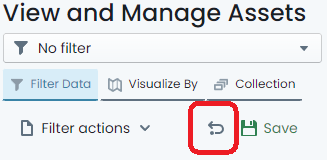
To clear an active filter, simply click the ‘return’ icon at the top of the filter panel. This will remove all
of your configured filter settings.
Note: This does not affect the settings of ‘Saved’ filters, but will clear the filter from being active.
Saving/Sharing a Filter Definition
The system supports the saving and sharing of filters. To do so, define your filter following the steps above.
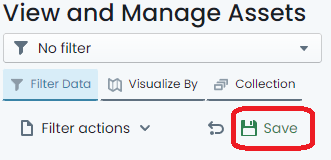
Once you have finished configuring the filter properties, simply click on the ‘Save’ option at the top of
the filter panel.
A fly-out menu will appear prompting you for a name for the new filter. Input a name for the filter (this is how
you will find it later).
To opt to allow other system users to see the filter you have defined, toggle the ‘Shared’ control. By default,
filters are private and NOT shared.
When you are done, click ‘Save’. The filter is now saved under that name. If you shared the filter, other users will
see it in the ‘Filter Drop-Down’ at the top of the panel.
Using Save Filters
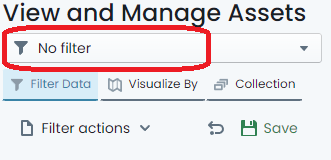
To use a predefined filter that you have saved, or another user has saved and shared, simply expand the drop-down menu
at the top of the filter panel.
Here you will find a list of filters that can be applied. If you already have a saved filter applied, it will be highlighted
in this menu.
To stop using the filter, either clear
it, or select ‘No Filter’ from the ‘Filter Drop-Down’.
Info
The ‘Filter Drop-Down’ menu also contains a section for filters that were defined using a collection set. These can be accessed
from the ‘Collection’ tab of the menu. More information on saving collection sets as filters can be found
here.
Deleting a Saved Filter Definition
At any time, the user who created a custom filter, can delete that custom filter definition. This includes shared filters.
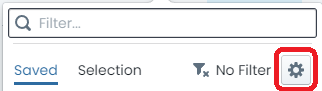
To delete a saved filter, click on the ‘Settings’ cog in the ‘Filter Drop-Down’ menu.
A dialog detailing each saved filter available to the user will then be displayed. Next to each of the filters in the table,
is a button to ‘Delete’ the filter from the system. Click this button to delete the filter.
Info
If the ‘Delete’ button is not visible, or deactivated, it means that you do not own the filter.
Filter Actions
The ‘Filter’ panel also contains short-cuts to a few reports that can be generated using the current filter definition
as a filter.
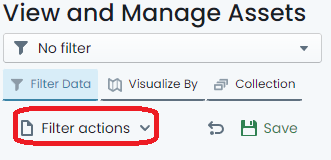
To use these action short-cuts, simply click on the ‘Filter actions’ menu at the top of the filter panel.
From the menu, choose which report you would like to generate.
Info
The filter does NOT have to be saved in order to generate a report in this fashion.
Using Map Themes (Visualisations)
This document provides an overview on how to use the built-in custom map themes in the Metrix Asset
Management system.
Note
The Metrix Asset Management system controls spatial features at a component level. When
viewing some map themes, there may be overlapping shapes caused by stacked geometries of multiple asset components.
This can cause obscuration and/or blending of the rendered colours.
In these cases, it is advisable to filter your data to a specific component group.
To get started, navigate to the main ‘Assets’ map in the Metrix Asset Management system.
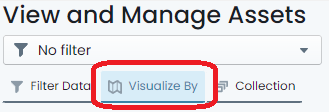
On the left hand side of the page, make sure the ‘Visualise By’ tab is activated.
.
Initially, you will see a map legend for the currently applied map theme. By default, this is
set to colour switch on ‘Asset Class’. To change the map theme to a different pre-configured
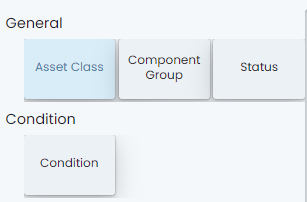
visualisation, simply click ‘Switch Map Theme’ at the top of the panel.
This will now display all of the available built-in map themes in a range of contextual categories.
.
To apply a specific visualisation, simply click on the tile in this view.
The theme will apply, and you will be returned to the ‘Legend View’ as it pertains to your
chosen theme.
Repeat this process to go to another theme.
Info
Remember, the default map theme is called ‘Asset Class’. Choosing this theme will essentially
reset your visualisations to system standard.
Component Change History
This document provides an overview on how to use the Component Change History Viewing tool in the Metrix
Asset Management system.
To get started, navigate to the main ‘Assets’ map in the Metrix Asset Management system and
select an asset record to
bring up it’s Info Panel.
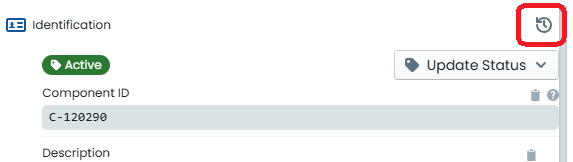
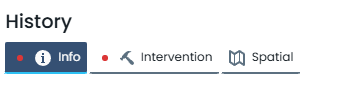
Ensure you have either the ‘Info’ or ‘Intervention’ panel tab open, and look for the ‘History’ icon
along the right-hand side edge of the panel. A ‘History’ icon is available at the top of each ‘section’
of Info Panel content.
.
A slide-out drawer will appear, initially with the Component’s current information listed. Only sections
where history is tracked, are shown.
At the bottom of the slide-out drawer, you will see some navigation buttons. These allow you to move
backwards and forwards through the change history of the active component. Additionally, around these navigation
buttons, you will see the date and time of the change, as well as the name of user who made the change.
.
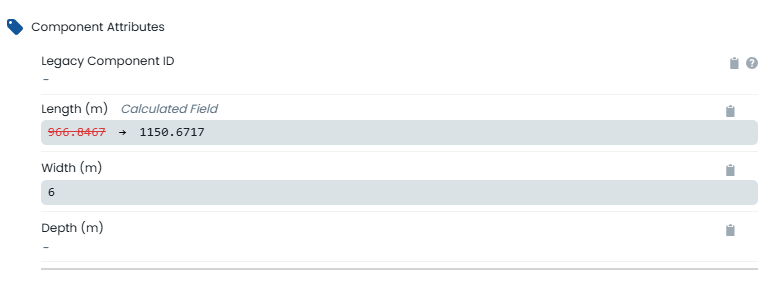
Any differences that exist between the record version you are CURRENTLY VIEWING and the LIVE VERSION of the
component record will be highlighted in red. In the example below, the current (live) value of the component’s
length is 966.8467, whereas the historic value of this field value is 1150.6717.
.
Additional indicators exist on each tab to guide users towards areas where changes exist on the current component
version. These indicators are shown as a red dot next to the tab label. In the example below, the ‘Info’ and
the ‘Intervention’ tabs contain changes, whereas the ‘Spatial’ tab does not.
.
Building Collection Sets
This document provides an overview on how to use the collection set concept in the Metrix Asset
Management system, including:
Defining a Collection Set
To get started, navigate to the main ‘Assets’ map in the Metrix Asset Management system.
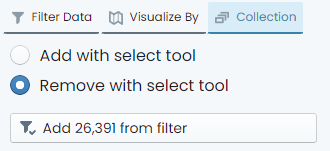
On the left hand side of the page, make sure the ‘Collection’ tab is activated.
To start building your collection set, click the ‘Add with select tool’ option at the top of the
panel. This will place you in ‘Selection’ mode where any clicked assets in the map view will
add those asset components to your collection set.
Info
The selection tool will add ALL components from a clicked asset. It does, however, respect any applied
custom filters that may be excluding some component types. That is, if you filter out road base and
road earthworks (leaving just surface), and click on a road segment, only the surface will be
added to your collection. Without a filter, all three (3) component groups will be added.
Once you have added some asset components to your collection, the ‘Remove with select tool’ option
will activate as an optional mode. Using this mode will mean that every asset clicked on will
REMOVE its components from your collection set (if they were a part of it).
Also, you have the option of simply adding ALL components from your current custom filter definition
to your collection set. That is, if you have a filter that results in 15 components, then those
15 components would be added to your collection set.
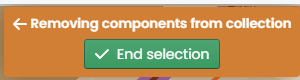
Once you have finished defining your collection set, click the ‘End selection’ option which will be
hovering at the top of the map window.
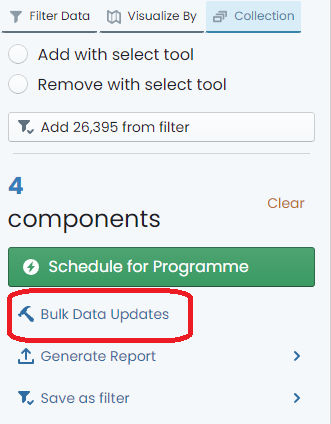
Collection Set Actions
Once you have a defined collection set, you can then perform actions on it including
bulk data updates and generating reports.
To generate a report from the current collection set, simply click ‘Generate Report’ from the
‘Collection Panel’ and choose the report you would like to create. The results of the report
will be filtered down to your current collection set.
Info
Other available collection actions are subject to their own instructions.
Saving Collection Set as Filter
Once you have finished building the collection, simply click on the ‘Save as filter’ option in
the ‘Collection Panel’.
A fly-out menu will appear prompting you for a name for the new filter. Input a name for the filter (this is how
you will find it later).
To opt to allow other system users to see the filter you have defined, toggle the ‘Shared’ control. By default,
filters are private and NOT shared.
When you are done, click ‘Save’. The filter is now saved under that name. If you shared the filter, other users will
see it in the ‘Filter Drop-Down’ at the top of the panel.
Info
Filters created from Collections will be listed under the ‘Collection’ tab of the ‘Filter Drop-Down’ list.
Editing Data
This section provides guidance on how to maintain your asset and component data in the Metrix
Asset Management system. Including:
Basic Data Edits
Save or Discard Changes
Create/Edit Task Type Definition
Reshape/Replace Component Geometry
Assign/Unassign Report Categories (Tags)
Update Condition
Update Treatment
Update Next Treatment
Bulk Updates of Collection Sets
Financial Settings per Component
Post Transactions
Delete Transaction(s)
Subsections of Editing Data
About
This section provides an overview of the two-step saving process implemented in the Metrix
Asset Management system.
Subsections of About
Staged Changes
Making edits to your asset information in the Metrix Asset Management system is a two-phased
process. First, you make the alterations. Then, you save those changes (or discard them). Prior to this
second step, the changes are considered to be STAGED, and awaiting final SAVE.
Users can make many edits in a single sessions before opting to save or discard the staged changes.
After your first alteration, you will notice that the ‘Save or Discard Edits’ button in the top-right
hand corner of the page is now activated. Additionally, there is an orange marker line surrounding the
info panel for the asset/component that the changes occurred on.
Prior to saving changes, users are provided the chance to review their work via a summary of the changes
panel.
How To Guides
This section provides guidance on how to maintain your asset and component data in the Metrix
Asset Management system. Including:
With appropriate user rights, editing your asset information in the Metrix Asset Management system
has been tailored to be super simple, and safe. To get started with editing your asset information,
follow these steps:
Navigate to the main ‘Assets’ page and make a
selection
from the map screen.
Your asset and component data is displayed inside the info panel on the right-hand side of the
page. This is where you will also edit the data.
To edit a field, simply click the information content - if the field is editable, and you have the
appropriate privileges, the content will transform into an editable control. Depending on the field,
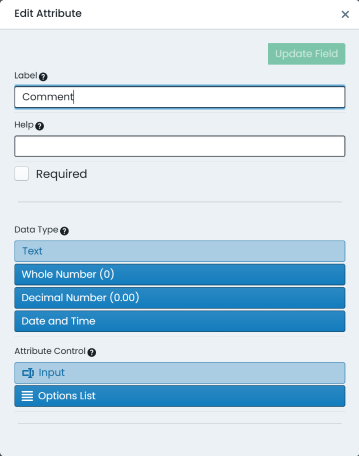
users will be presented with one of the following controls:
Instructions on how to use each of the above controls are discussed below.
Text Input Box
For alpha-numeric free text fields, the control that renders when you set it to edit mode will be
a standard input box.
To edit content in an input box, simply locate your cursor and begin typing.
Once you have finished making your edits, click anywhere outside of the box to release the control.
The edits you made are now STAGED and ready to save.
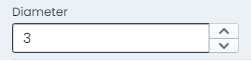
Number Input Box
For numeric data fields, the control that renders when you set it to edit mode will be a standard number input/picker box.
To edit content in an input box, simply locate your cursor and begin typing.
Another option you have is to click the increase/decrease toggles on the right-hand side of the input box.
Once you have finished making your edits, click anywhere outside of the box to release the control.
The edits you made are now STAGED and ready to save.
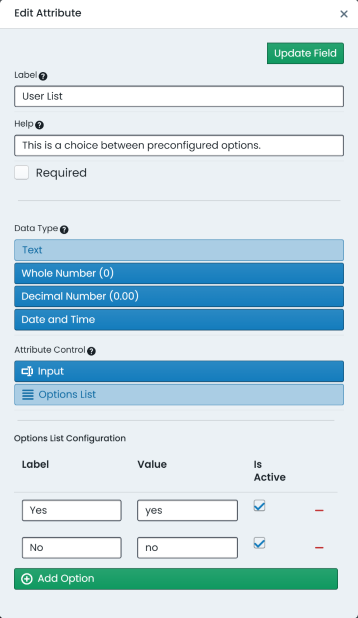
Option Row
For list based data fields that have fewer than 5 options, the control that renders when you set it to edit mode will be an option row.
To alter or set the active choice in the option row, simply click that option.
The edits you made are now STAGED and ready to save.
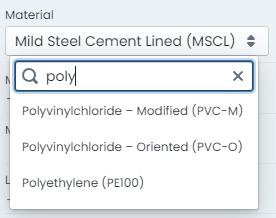
Drop Down List
For list based data fields that have more than 5 options, the control that renders when you set it to edit mode will be an drop-down list.
To alter or set the active choice in the option row, simply choose that option from the list.
The drop down list control also supports filtering of the visible list items. To do this, simply type your filtering letters into the
search box at the top of the list.
The edits you made are now STAGED and ready to save.
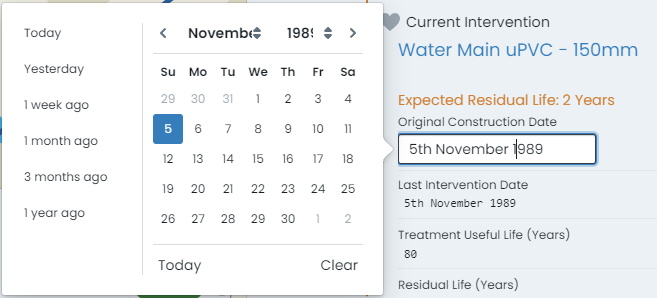
Calendar Picker
For date based data fields, the control that renders when you set it to edit mode will be a dynamic calendar control.
To edit content in a calendar control, simply choose the date value from the displayed calendar widget.
The calendar is month based. Users can change the visible month and year using the drop down options at the top of the control.
Some calendar controls are also pre-configured with ‘quick-dates’ allowing you to set the value to date such as ‘1 week ago’.
The edits you made are now STAGED and ready to save.
Save or Discard Changes
Making edits to your asset information in the Metrix Asset Management system is a two-phased
process. First, you make the alterations. Then, you save those changes (or discard them). The following
outlines how you can do this.
This document provides guidance on saving changes, as well as some other options around saving or discarding
your changes, including.
For each of the following sections, we assume you have one or more pending changes to your asset information.
If not, make some edits
to your asset and/or component information.
Info
It should be noted that users can make many edits in a single sessions before opting to save or discard
those changes.
Give it a try.
After your first alteration, you will notice that the ‘Save or Discard Edits’ button in the top-right
hand corner of the page is now activated. Additionally, there is an orange marker line surrounding the
info panel for the asset/component that the changes occurred on.
Saving Changes
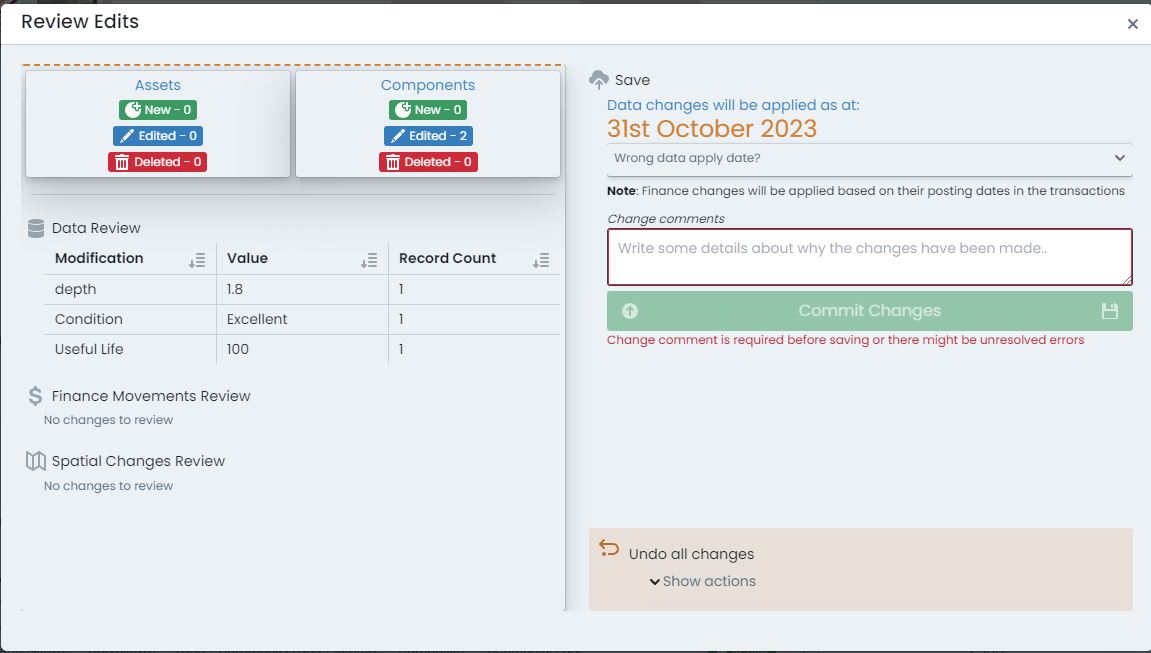
Start by reviewing your change(s), click on the ‘Save or Discard Edits’ button. A dialog will appear with a
summary of the changes you have made to your asset and/or component data.
Alterations are broken down by type, and summarised into affected record counts.
To commit the changes, provide a short comment about the alteration, and then click ‘Commit Changes’.
The data will then be permanently saved to your Metrix Asset Management system.
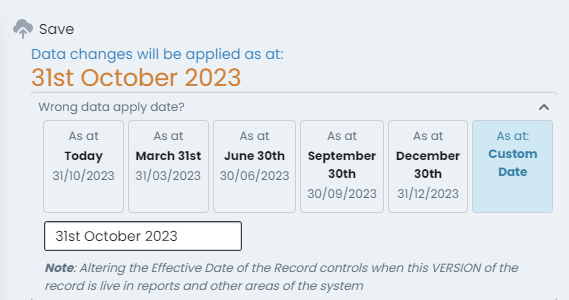
Saving Changes at a Specific Date
The Metrix Asset Management system maintains a full audit history of changes users make in the
system. This audit history is available through the ‘Report’ generators - allowing a user to backdate
certain reports, to get asset/component information as it was at a specific point in time.
To extend upon this capacity, the system also supports backdating the ‘Effective Date’ of an alteration
so that it can be visible in specific reporting ranges.
Example
A common use case for this feature is logging updated CONDITION values for components that were renewed during
a specific financial period - but only being recorded after said period has passed.
For example, updating condition values during your ‘End of Year’ process in August, to affect information in June.
Start by reviewing your change(s) - click on the ‘Save or Discard Edits’ button. A dialog will appear with a
summary of the changes you have made to your asset and/or component data.
Alterations are broken down by type, and summarised into affected record counts.
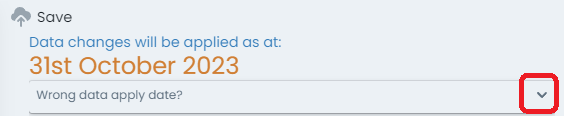
To set a specific ‘Effective Date’ for the alterations summarised, expand the panel below the current date (which
is rendered at the top of this dialog).
The expanded panel provides options to override the ‘Effective Date’ with shortcut values, or a custom date entry.
Make your selection for ‘when’ the change(s) should be applied.
The data will then be permanently saved to your Metrix Asset Management system, effective from the date you
specify.
Discarding ALL Changes
Start by reviewing your change(s), click on the ‘Save or Discard Edits’ button. A dialog will appear with a
summary of the changes you have made to your asset and/or component data.
Alterations are broken down by type, and summarised into affected record counts.
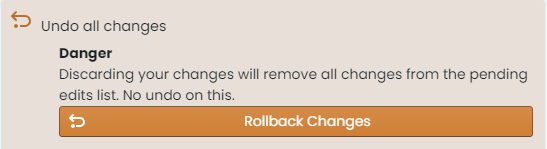
On the bottom left-hand side of the dialog portal, a collapse panel is rendered offering you the
option to ‘Undo all Changes’. Click on this panel.
The panel will expand, revealing an option to ‘Rollback Changes’. To continue with undoing any
alterations you have made since your last save, click this button.
Any alterations you have made will be reverted, and your session restored.
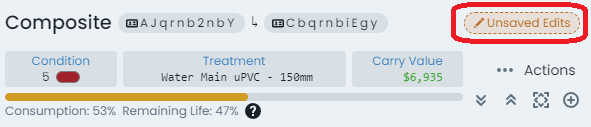
Discarding Specific Component Alterations
At any time during an editing session, users can review what information has changed on a specific
asset or component from right within the info panel. In the top right-hand corner of the info
panel is an ‘Edits Indicator’ that appears when the active asset/component has pending edits against
it.
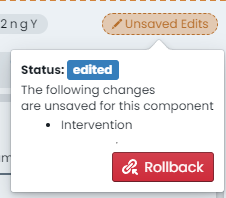
Click on this indicator to see a brief summary of the changes.
To rollback all changes recorded against the active component, click on the ‘Rollback’ button inside
this preview.
Note
This option only relates to COMPONENT data edits. It cannot be used to revert alterations made on the parent
asset info panel.
Task Types
This guide provides an overview on how to create or edit task records in the
Metrix Asset Management system. The areas covered include:
Info
It should be noted that, in order to use a specific task type, it must be assigned
to the classification.
Viewing Task Records
Any task records that have been captured, will be displayed in the parent asset info panel (for records
logged at an asset level), or the component info panel (for records logged against a specific component). To see the records,
scroll to the bottom of the respective info panel, to the section titled ‘Task Data’.
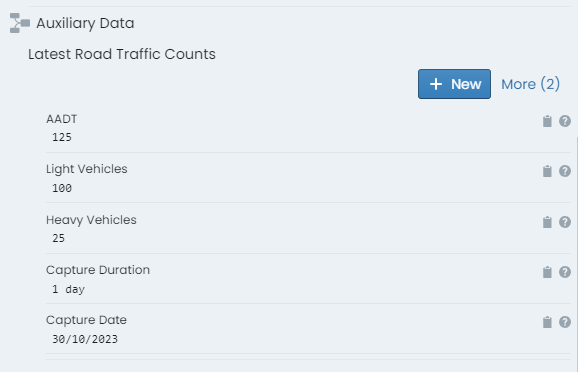
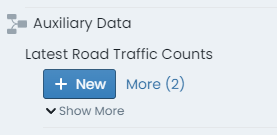
The most recent entry will be displayed in a form layout. In the top right-hand corner of the form is an indicator (titled ‘More’)
regarding how many records of that task type exist against the asset or component. Click this label to see more records.
The form view will expand at this point to a form view per task record, stacked and ordered by record date. Scroll this view to
see the details of each entry.
Enter a New Task Record
To capture a new task data record, navigate to the relevant info panel. That is, to capture a record against the
asset, go to the parent asset info panel. To capture a record against a specific asset component, go to that component info panel.
Scroll to the bottom of the info panel to where the task records are rendered.
Info
If no task types are assigned to the appropriate classification level, this section will simply state ‘No task types configured’.
If more than one task type is assigned, they will each be listed in this section.
For the relevant task type definition, click on the ‘New’ button.
A fly-out panel will appear with the task form rendered in edit mode. Complete this form.
When you are finished, simply click ‘OK’ at the bottom of the form. To cancel, click the ‘X’ in the top right-hand
corner of the form.
The new task record entry is now STAGED and ready to save.
Edit a Task Record
To edit an existing task data record, simply navigate to the record in the appropriate info panel. That is, for a record
logged against an asset, go to the parent asset info panel. For a record logged against specific asset component, go to that component info
panel.
Scroll to the bottom of the info panel to where the task records are rendered.
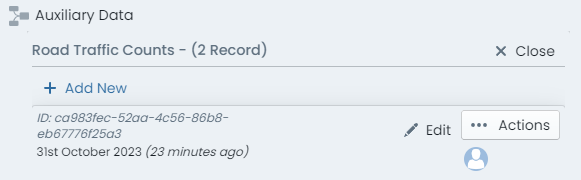
For the task type you are altering, click the ‘More’ option to expand the entries.
Each record entry rendered for the task definition will have an ‘Edit’ button at the top of it. Click this button.
A fly-out panel will appear with the task form rendered in edit mode. Update this form.
When you are finished, simply click ‘OK’ at the bottom of the form. To cancel, click the ‘X’ in the top right-hand
corner of the form.
The modified task record entry is now STAGED and ready to save.
Delete a Task Record
To delete an existing task data record, simply navigate to the record in the appropriate info panel. That is, for a record
logged against an asset, go to the parent asset info panel. For a record logged against specific asset component, go to that component info
panel.
Scroll to the bottom of the info panel to where the task data records are rendered.
For the task type you are altering, click the ‘More’ option to expand the entries.
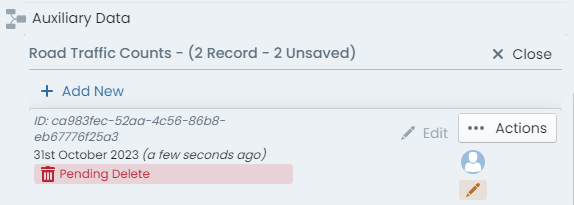
Each record entry rendered for the task type definition will have an ‘Actions’ button at the top of it. Click this button.
In the menu that flies out from this button, there will be a ‘Delete’ option. Click this option.
The task record entry is now STAGED for deletion. Simply save
your changes for this to take effect.
Reshape/Replace Component Geometry
This section provides an overview on how to manage your spatial features within the Metrix Asset Management
system. The context covered includes:
Important
Spatial features can be shared by more than one component. Remember to check if the feature you are modifying is
shared
and if this has any effect on you doing so.
Reshaping an existing Component Spatial Feature
To alter the spatial feature of a component, select the asset and navigate to the appropriate component info panel.
Within the component info panel, is a section titled ‘Spatial’. To modify the current geometry without changing the
geometry type (point, line, polygon), click ‘Reshape/Move’.
The info panel will hide itself and you will be immersed into the geometry editing view.
Make the desired edits to your geometry, according to its type of
point or
line/polygon.
When finished, click ‘End Editing’ on the panel at the top of the map window.
The updated geometry is now STAGED and ready to save.
Replacing an existing Component Spatial Feature
To replace the spatial feature of a component, select the asset and navigate to the appropriate component info panel.
Within the component info panel, is a section titled ‘Spatial’. To replace the current geometry by changing the
geometry type (point, line, polygon), click the ‘Replace With’ menu.
From the menu list, choose the desired geometry type for the new spatial feature - point, line, or polygon.
The info panel will hide itself and you will be immersed into the geometry editing view.
When finished, click ‘End Editing’ on the panel at the top of the map window.
The replaced geometry is now STAGED and ready to save.
For more information, see the helpful tutorial video below.
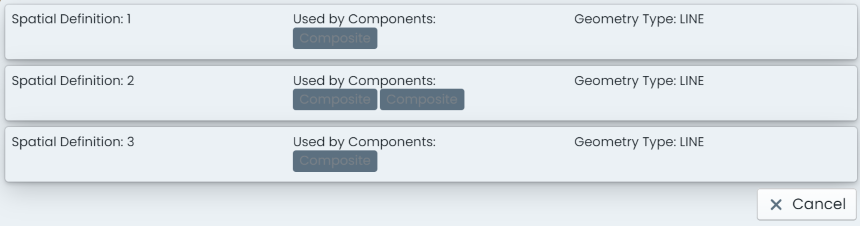
Confirming Shared Spatial Features
To confirm whether or not an active component spatial feature is shared with other components on the asset record, navigate
to the parent asset info panel.
Within the parent asset info panel is a section titled ‘Component Spatial Breakdown’. This displays a table view specifying each
asset component alongside the geometry number* that the component is using.
In the above screenshot, the asset has four (4) components, and three (3) unique spatial features. The first and last component (in the table view)
are using ‘Shape 1’* and the middle two components reference their own shape. We therefore know that ‘Shape 1’ is shared across those two
components.
* this number is dynamically generated and simply serves to inform whether a shape feature is used on more than one component.
Modifying Point Features
Point features support relocation.
Moving Points
To move a point, simply:
Click once on its current location (it will change color to bright green).
Click-and-drag the feature from where it currently is, to where you wish it to be located.
Release to finish relocating.
When finished, click ‘End Editing’.
Modifying Lines & Polygons
Line/Polygon features support both relocation and reshaping.
Moving Lines/Polygons
To move a line or polygon, simply:
Click once on any of the line/perimeter segments.
Click-and-drag (from that segment). The entire shape will begin to follow your cursor across the map.
Release to finish relocating.
Reshaping Lines/Polygons
To reshape a line or polygon, simply:
Click once on any of the line/perimeter vertex nodes (it will change color to bright green).
Click-and-drag (from that vertex node) from where it currently is, to where you wish it to be located.
Release to finish relocating the node.
Repeat the above for other vertex nodes that need moving.
To ADD a new vertex node, click once on one of the segment center marker (white dot).
A new vertex node will be created, click-and-drag it to the desired location.
Release to finish relocating.
Creating Point Features
To create a new point feature:
Simply click on the map window where you want the point to be located.
To alter this location after initial placement, follow the instructions to relocate a
point
Creating Line & Polygons
To create a new line or polygon feature:
Click on the map window where you want the first vertex node to be located.
Then, continue to click map locations for each subsequent vertex node location.
Double-click to finish drawing new vertex nodes.
To alter the location of a vertex node after initial placement, follow the instructions to relocate a
line/polygon
Assign/Unassign Report Categories (Tags)
This document provides an overview on how to assign and unassign specific report category tags from asset
components in the Metrix Asset Management system. Please note that in order to use a report category,
it must be first defined
in the system configuration.
Assign Report Categories
To assign a report category (tag) against a component:
Navigate to the component info panel for the asset component.
Within the first ‘Identification’ section of the panel is a sub-section called ‘Report Categories’.
To add a new report category tag, click on the ‘+’ drop down list. The remaining available (not currently
assigned to the active component) report categories will render inside this menu.
Info
If the ‘+’ button is disabled, it means there are no available report categories, or, all report categories have
already been assigned to the active component.
For each report category, the menu will render a sub-menu so that you can choose the tag to apply. Choose
the desired combination you wish to apply.
The category assignment is now STAGED and ready to
save.
Unassign Report Categories
To unassign a report category (tag) from a component:
Navigate to the component info panel for the asset component.
Within the first ‘Identification’ section of the panel is a sub-section called ‘Report Categories’.
Current assignments will display in this section. On the right-hand side of each rendered category tag,
there is a ‘-’ (remove) icon. To unassign the category tag, simply click this icon.
The category un-assignment is now STAGED and ready to
save.
Update Condition
This document provides an overview on how to set or update the condition score of an asset
component in the Metrix Asset Management system. Please note that in order to use CUSTOM condition assessments,
one must be first defined
and assigned to the
relevant component group in the system configuration. Otherwise, the default condition assessment form will be used.
To set/update the condition for a component:
Navigate to the desired asset component and select the intervention info panel.
At the top of the intervention info panel, the current condition is summarised. If this part of the info panel
is not currently expanded, click on ‘Show More’ to expand it.
Click on ‘Update Condition’
A fly-out panel will then appear with the condition form rendered in edit mode. Fill out this form.
When finished, click ‘Update Condition’ at the bottom of the form.
The new condition entry is now STAGED and ready to
save.
Update Treatment
This document provides an overview on how to set, update, or remove an intervention treatment of an asset
component in the Metrix Asset Management system. Please note that in order to use an intervention
treatment definition, it must be first
defined
and assigned
to the relevant component group in the system configuration.
To set/update the intervention treatment for a component:
Navigate to the desired asset component and select the intervention info panel.
Within the intervention info panel, the current treatment details are summarised.
If this part of the info panel is not currently expanded, click on ‘Show More’ to expand it.
Click on ‘Update Treatment’
A fly-out panel will then appear with a list of
assigned
intervention treatments as well as other intervention related settings.
For your first step, choose the appropriate treatment from the list of treatments by clicking on it. Alternatively,
to completely clear the component’s treatment definition, select ‘Unassign Treatment from Component’ at the bottom of
the table.
At the bottom of the panel, a brief summary of the change is rendered. Additionally, there is a checkbox
asking if you wish to change any associated details along with the treatment. To update the:
Last Intervention Date,
Useful Life, and
Residual Life,
toggle the checkbox. Doing so will set the intervention date to today, the useful life to the treatment
definition’s default useful life, and the residual life to be equal with useful life.
For the above associated lifecycle metrics, users are able to overwrite the default values generated by
the system. Simply input any adjustments to the Last Intervention Date, Useful Life, and/or Residual Life
as deemed fit.
Info
Be aware that the useful life cannot be exceeded by the residual life. Also, when setting a value for the
residual life, please be aware that the default effective date for the residual life offset is today.
See Residual Life Calculations
When finished, click ‘Apply Condition’ at the bottom of the form.
The new treatment and any associated changes are now STAGED and ready to
save.
Info
The option to update the intervention date and useful/residual life values is provided as a way of
prompting users to consider possible side effects of a treatment change. Please also consider if the
condition should be updated, or any financial ledger entries made.
Update Next Treatment
This document provides an overview on how to set or update the next treatment specifications of an asset
component in the Metrix Asset Management system. Please note that in order to use particular treatment
definitions, they must first be
defined
and assigned
to the relevant component group in the system configuration.
To set/update the next treatment specification for a component:
Navigate to the desired asset component and select the intervention info panel.
Within the intervention info panel, the current definition for the next treatment is summarised.
If this part of the info panel is not currently expanded, click on ‘Show More’ to expand it.
Click on ‘Update Next Treatment’
A fly-out panel will then appear with the options for setting the next treatment specification.
The first part of the panel requires users to choose the manner in which the component next treatment
is being specified. This is either:
Estimated Cost: If choosing this method, enter the estimated cost of the next treatment into the
input box below the radio button.
Treatment with Override Unit of Measure: if choosing this method, pick a treatment from the drop-down
list, and also set an override value for the component cost units.
Treatment with Percentage of Component: if choosing this method, pick a treatment from the drop-down
list, and also set an override percentage share for the component cost units.
Set one of these options.
Next, set the estimated date for the next intervention treatment. This is an optional field.
Lastly, enter a description and reason for the next intervention treatment.
When finished, click ‘Apply Next Treatment’ at the bottom of the form.
The new treatment specification is now STAGED and ready to
save.
Bulk Updates
This document provides an overview on how to perform bulk updates across many asset components in the Metrix
Asset Management system. To use this feature, the components must be a part of an active
collection
set.
Info
Currently, bulk updates are restricted to the following areas:
Navigate to the main ‘Assets’ map in the Metrix Asset Management system.
Build a collection
containing the asset components you want to update.
When the collection is ready, click ‘Bulk Data Updates’ in the collection actions area. This will launch the
‘Bulk Data Update’ panel where assets and components within your collection are batched into their respective
classification configuration.
Data Updates
To perform data updates, ensure you are using the ‘Data’ tab of the bulk panel and then locate the specific
asset classification or component group on the left-hand side navigation tree.
On the right-hand side of the panel, a form will render showing you the possible data updates that you can
make.
Info
At the top of this form, the number of assets or components (from your collection set) that are associated with
the selected asset classification or component group will be rendered.
Remember, any changes you make on this panel will be played out across all of those records.
Report Category Updates
To perform report category updates, switch to the ‘Assign/Unassign Report Categories’ tab of the bulk panel.
Each report category defined in the system will be listed.
Click to expand the desired report category.
Each category has two options to choose from:
Bulk assign your collection set to a single report category option.
Bulk unassign your collection from one or more report category options.
Choose options from the left or right-hand side controls based on your desired outcome.
Bulk updating information is more prone to errors as the program cannot perform much of the validation
until the save step
of the process.
Component Finance Settings
This document provides an overview on how to set or update the financial settings for an asset
component in the Metrix Asset Management system. These settings relate to how the component is
going to be depreciated over it’s lifetime, including any residual value, and the rate at which
it is consumed.
Info
These settings are completely optional and serve to allow users to override the default status of
zero residual value and a remaining life vs carrying value based depreciation schedule.
Currently, maintaining these values will not impact ‘Estimated Depreciation’ report values or
consumption dashboards. They are designed for users to reference for information purposes.
To set/update the finance settings for a component:
Navigate to the desired asset component and select the transactions info panel.
Within the transactions info panel is a section title ‘Financial Settings’. It is here
that users can record such information.
Depreciable Value
To set or update the ‘Depreciable Value’, click on the current field value (it may be
set to ‘Not Set’).
First, choose whether the ‘Depreciable Value’ is to be a fixed dollar value, or a percentage figure
based on the component’s gross value. To completely remove the ‘Depreciable Value’ setting for the
active component, choose ‘Not Set’ and skip the next step.
Set the numeric value that corresponds with the option you set in the previous step. For percentage
figures, the value must be between 0 & 100.
Period Depreciation Value
To set or update the ‘Period Depreciation’ value, click on the current field value (it may be
set to ‘Not Set’).
First, choose whether the ‘Period Depreciation’ value is to be a fixed dollar value, or a percentage
figure based on the component’s gross value. To completely remove the ‘Period Depreciation’ value
setting for the active component, choose ‘Not Set’ and skip the next step.
Set the numeric value that corresponds with the option you set in the previous step. For percentage
figures, the value must be between 0 & 100.
The updated finance settings are now STAGED and ready to
save.
Posting Component Transactions
This document provides an overview on how to create a new posting to the financial transactions ledger
for an asset component in the Metrix Asset Management system. These transactions form the basis of
a component’s capital valuation and an organisation’s end of period financial statements.
Info
It should be noted that this is considered the ‘macro’ method of maintaining component capital value
in the system. Typically, movements of asset value are driven via complimentary methods such as:
CSV Data Import, and
Capital Budget Finalisation
To post a new financial transactions ledger entry for an asset component:
Navigate to the desired asset component and select the transactions info panel.
Within the transactions info panel is a section title ‘Transaction History’. It is here
that users can see past recorded movements, as well as post new ones.
To post a new financial transactions ledger entry, click ‘New Transaction’ at the top of the
history summary table.
Info
If the summary table and/or the ‘New Transaction’ button is not displayed for your active
component, it typically means that the asset component does not currently contain the
prerequisite information for carrying capital value.
This typically means that the underlying component is not Active.
Users may also be presented with warnings about missing construction/intervention dates
or useful life values - these are warnings that do not prevent transaction creation, but
should be considered.
A fly-out panel with a transaction generation form will appear.
Set the posting ‘Date’ for the new transaction. This is the date that the transactions value
will be recognised by the system. The date cannot extend beyond the end of the current
financial period (typically the end of the financial year).
Select the ‘Effect’ that the posting will have on the asset component. That is, will the
posting affect the component’s gross value, or its accumulated depreciation value.
From the transaction ‘Type’ drop-down list, choose the desired transaction type for the
new posting.
Info
Each transaction type in the list is tagged with the required polarity of the transaction ‘Value’
according to the chosen transaction type ‘Effect’. This will be either:
Positive: value must be greater than zero
Negative: value must be less than zero
Any: no restriction
Enter a transaction ‘Value’ with consideration for the polarity restriction for your chosen
transaction type.
Info
For the ‘Depreciation’ transaction type, an ‘Estimated Annual Depreciation Amount’ figure will be
displayed above the ‘Value’ input box for information purposes.
If the component does not currently carry any capital value, the ‘Finance Category’ will need
to be defined next. Choose a valid finance category from the drop-down list. If your
component already carries value, this drop-down will be disabled.
Lastly, enter a comment for the transaction.
When finished, click the button below the comment input box that contains a summary of
the transaction.
The transaction has been generated and is now STAGED and ready to
save.
Info
Users can also ‘Quick Populate’ the transaction entry page by choosing a recently generated
transaction from the ‘Recent’ drop-down list at the top of the panel. This will populate
each field according to the chosen recent transaction.
Deleting Component Transactions
This document provides an overview on how to delete existing postings to the financial transactions ledger
for an asset component in the Metrix Asset Management system.
Info
Deleting a transaction CANNOT BE UNDONE and should only be performed as a last resort. An alternative
option (to deleting a transaction) would be to post a transaction of the same transaction type, with an
obverse value to the transaction you are over-riding, where allowed by the transaction type.
To delete an existing financial transactions ledger entry for an asset component:
Navigate to the desired asset component and select the transactions info panel.
Within the transactions info panel is a section title ‘Transaction History’. It is here
that users can see past recorded movements, and delete them.
In the transaction history table, each entry contains a ‘Delete’ option (rendered as a trash-can) on
the far right-hand side of the row. To delete a transaction entry, click this button.
Info
When processing the deletion of one or more transactions, the system considers the following:
Following removal of the transactions, the component must not be left with a negative carrying value.
Transactions from previous financial periods cannot be removed.
These restrictions do not apply to transactions that have not yet been saved/committed to the system.
Repeat the above step for each transaction that you may need to remove.
The transaction(s) have been STAGED for removal and are ready to
save.
Editing Barcode Values
This document provides an overview on how to set or remove a barcode value of an asset or asset
component in the Metrix Asset Management system. Please note that in order to modify barcode
values, the user must have the appropriate permissions set.
To set the barcode value for an asset or component:
Navigate to the desired asset or component and select the basic info panel.
Within the info panel ‘Identification’ section, details pertaining to any current barcode value assignment
is shown. If no value has been assigned, this will be empty.
Hovering over the barcode value will render a preview of the barcode
To assign a barcode value (where one has not previously been assigned), click ‘Add Barcode Link’.
Note: If the asset or component has a previously assigned barcode value, this will need to be removed/unlinked
first.
A panel will slide out asking for the value of the barcode to link to the active asset or component.
Enter the value within this text entry.
The panel will validate the supplied barcode value. If the value is NOT valid, the ‘Save (Immediatley)’ button
will be disabled - follow the prompts to ‘repair’ the entered value.
To save the new barcode value, click ‘Save (Immediately)’. Note; this change (as inferred) does NOT go via
the staged changes process. Rather, the link will occur immediatley.
To remove the barcode value for an asset or component:
Navigate to the desired asset or component and select the basic info panel.
Within the info panel ‘Identification’ section, details pertaining to any current barcode value assignment
is shown.
To remove the currently assigned barcode link for an asset or component, simply click the ‘Trash’ icon
next to the barcode value.
A dialog will appear asking for confirmation. Confirm the deltion.
Creating Assets & Components
This section provides guidance on creating new assets or asset component records within the
Metrix Asset Management system, including:
Creating new Assets and Asset Components
Appending Asset Components to Existing Assets
Subsections of Creating Assets & Components
About
This section provides guidance on creating new assets or asset component records within the
Metrix Asset Management system, including:
Creating Assets
Appending Components to Assets
Subsections of About
The Bare Minimum
The Metrix Asset Management system supports a wide scope of asset related data. When it comes to
creating new records within your system, more information is always encouraged. As a minimum however,
the following record types are required:
Each asset must contain at least one (1) asset component record.
Additionally, the following resources or fields are MANDATORY:
A valid asset classification and component group definition,
A short Asset description and Component description,
A valid Component status
A valid Spatial Feature Definition
How To
This section provides guidance on creating new assets or asset component records within the
Metrix Asset Management system, including:
Creating a new asset record in the Metrix Asset Management system is a simple process that involves
choosing an asset classification, defining a spatial feature, and then populating the asset and
component data fields.
To create a new asset record:
Navigate to the main ‘Assets’ page.
Above the map window, is a button titled ‘Create Asset’. Click this button.
A fly-out ‘Create New Asset’ panel will show at the bottom of the map window. Firstly, it will render
a list of available asset classes configured in your system.
Info
The asset class is the ‘first level’ of the asset classification
structure.
Choose an asset class for your new asset.
The panel will then render the the list of asset classifications relative to your chosen asset class.
Choose an asset classification for your new asset.
On the right-hand side of the panel, you will then be presented with options for creating the asset
components. Firstly, confirm which component group(s) you wish to include as components for your new
asset.
Info
For each component group that remains checked, the system will generate one (1) component.
Next, choose the initial status from the status drop-down list. The default status is ‘Proposed’. Each
of the components, defined in step 5, will be assigned this status.
Then set the effective date for the new asset components via the calendar input control. Each of the
components created, defined in step 5, will be generated as at this date.
The last step involved in creating a new asset is to define the spatial feature that will be assigned
to ALL of the asset components, defined in step 5. Click on either
New Point,
New Line, or
New Polygon
and digitise the spatial feature as per these instructions for
points ↗ or
these instructions for
lines/polygons ↗.
Info
To finish digitising lines and polygons, simply double-click the map.
When you have finished digitising the spatial feature, click ‘Finish & Create’ at the bottom of the panel. Assets
will be created immediately upon clicking ‘Finish & Create’. They do NOT go via the staged changes process.
The asset, once created, will then be selected and ready for you to update the attributes, intervention details, and
condition as necessary.
Appending Components to Assets
Creating a new component record against an existing asset in the Metrix Asset Management system
is a simple process that involves selecting the parent asset, choosing the target component group,
confirming or defining a spatial feature, and then populating your new component data fields.
To create a new component record against an existing asset:
Navigate to the main ‘Assets’ page and make a
selection
from the map screen.
On the left-hand side of the info panel (right side of the page) the ‘Components’ switcher lists each
component group (from the asset classification configuration) available to the asset. At the bottom of
this listing, there is a button labelled ‘Add New’ and titled ‘Component’. Click this button.
A fly-out ‘Create New Component’ panel will show at the bottom of the map window rendering your
component creation options. Firstly, confirm which component group(s) you wish to generate and append
to the parent asset.
Info
For each component group that remains checked, the system will generate one (1) component.
Next, choose the initial status from the status drop-down list. The default status is ‘Proposed’. Each
of the components, defined in step 3, will be assigned this status.
Then set the effective date for the new components via the calendar input control. Each of the
components created, defined in step 3, will be generated as at this date.
The last step involved in appending components for an asset is to define the spatial feature that will be assigned
to the new components, defined in step 5. Click on either
New Point,
New Line,
New Polygon, or
Create with / Choose from Current Asset Geometry
New Spatial Feature
If defining a new spatial feature, digitise the geometry as per these instructions for
points ↗ or
these instructions for
lines/polygons ↗.
Info
To finish digitising lines and polygons, simply double-click the map.
When you have finished generating or confirmting the spatial feature, click ‘Finish & Create’ at the bottom of the panel.
To finish, click ‘Finish & Create’.
Using Existing Spatial Features
If you choose to inhertit the spatial feature from an existing component on the parent asset, one of two workflows
will occur:
If the components of the parent asset rely on a single spatial feature, the fourth button option will be labelled
‘Create with Current Asset Geometry’. Clicking this option will complete the process and your new components will
be appended to the parent asset and share the one spatial feature.
If the components of the parent asset rely on multiple spatial features, the fourth button option will be labelled
‘Choose from Current Asset Geometries’. Clicking this option will present another panel requiring you to choose
which spatial feature to inherit.
As you hover on each option row (representing a distinct spatial feature), the corresponding feature will be highlighted
in the map window.
Click a spatial feature row to choose your geometry. Then click ‘Create Component’.
Components will be created immediately - they do NOT go via the staged changes process.
The components, once created, will then be selected and ready for you to update the attributes, intervention details, and
condition as necessary.
Special Record Actions
This section provides guidance on how to perform specific Asset Management actions in the Metrix
Asset Management system, for existing records. Including:
Splitting Assets and/or Components
Reclassifying Assets and/or Components
Setting Component Status
Deleting Assets and/or Components
Performing a Financial Re-Categorisation
Subsections of Special Record Actions
About
This section provides guidance on how to perform specific Asset Management actions in the Metrix
Asset Management system, for existing records. Please note that asset and component actions do NOT
go via the staged
changes process. Sections include:
The ability to split an Asset is vitally important in keeping the Organisation’s financial reporting, engineering concepts, and asset management data policies in sync. The core concept involves splitting a linear geometry (representing one or more Components associated with an Asset) at any given coordinate, at an effective date.
The returned feature set represents the two (or more in certain cases) new Assets, each containing a distinct copy of the original Components, with each new Component being proportionately associated with one of the two (or more) resultant geometries. The original Asset and Components are deprecated (see section on deprecation).
The following concepts are covered in this article:
Note: This article is specifically addressing Asset Split operations where the goal is to generate two (or more) distinct new Assets with their own Components (mirroring the original). Users may also be interested in reading about
splitting asset components
whereby the parent Asset is maintained, but a sub-selection of Components are split and duplicated within said parent Asset.
How a Split Works
The basic mechanics of the Asset Split operation is that a user submits a request to the system for a split to occur. The system will respond (assuming no errors occur) with the required Asset, Component, and Resource inserts and updates that need to occur. Accepting this response will process the Split operation. This process is summarised below:
User submits request for a split operation
System assesses the request and responds with a detailed summary of the inserts and updates required to achieve the split
User accepts the response, and the split occurs.
Requesting a Split
To request a split, the following information is required:
The Split Level (split_level) which must be set to ‘asset’ for an Asset Split.
The Asset Record ID (asset_uid) of the Asset being split
The Splitting Blade definition (intersection_wkt) defined in Well Known Text.
An optional Posting Date (posting_date) for when transactions associated with the split operation should occur. This field will default to the current date/time if empty.
An optional Effective Date (effective_date) for when the split should occur. This field will default to the current date/time if empty.
Optional Split Flags (flags) that can control facets of what will be copied across to the new Assets and Components. See ‘Advanced Splitting: Resource Exclusions’ for more information.
System Assesses the Request and Response
Upon receiving a split request, the system will review the prohibitions detailed in the section, ‘When a Split can Occur’. It will then commence building a response that (if accepted by the user) instructs the system on how to:
Deprecate the Old (split) Asset and Components
Create the new Asset and Components
Append the appropriate valuations and resources to the new Assets and Components.
User Accepts the Response and the Split Occurs
After reviewing the response - where the user can investigate in detail what will and wont be created - the user can accept the response and the relative Split Operation will occur.
How the Split Works at a Geometry Level
In order to perform the split, the user must provide a splitting blade - a linear geometry that cuts across the Component geometry/geometries at the desired split coordinate. See screenshot below:
In the above screenshot, the Asset (Twynam Avenue) is highlighted in yellow and the user provided splitting blade is located about 25% along it’s overall length. For the purpose of this example, we will assume that Twynam Avenue has three (3) Components - earthworks, base, and seal - all sharing the same linear geometry running from Governors Parade to Barr Street.
Prior to the split, the Twynam Avenue Asset Components could be represented by the following (basic) attribute data set:
Description
Component Class
Cost Units
Units of Measure
Treatment
Twynam Avenue Earthworks
Earthworks
357
metres
nil
Twynam Avenue Base
Base
357
metres
300mm Compacted Gravel Base
Twynam Avenue Seal
Surface
2142
square metres
10mm Initial Seal
With the ID of the Asset and the definition of the splitting blade supplied, the system first derives the NEW Component Geometries that would result from the split operation. See screenshot below:
In the above screenshot, the split has occurred and the first of the resultant two geometries is highlighted in yellow. The remaining portion of Twynam Avenue is associated with the second of the resultant two geometries.
Following the split, Twynam Avenue is now two (2) distinct Assets whose Components could be represented by the following attribute data set:
Asset 1 (highlighted in yellow)
Description
Component Class
Cost Units
Units of Measure
Treatment
Twynam Avenue Earthworks
Earthworks
89.25
metres
nil
Twynam Avenue Base
Base
89.25
metres
300mm Compacted Gravel Base
Twynam Avenue Seal
Surface
535.5
square metres
10mm Initial Seal
NOTE: the proportion of length between ‘Asset 1’ and the original Asset is assumed to be 25% - the System has returned the new Cost Unit values based on this geometric truth.
Asset 2 (not highlighted)
Description
Component Class
Cost Units
Units of Measure
Treatment
Twynam Avenue Earthworks
Earthworks
267.75
metres
nil
Twynam Avenue Base
Base
267.75
metres
300mm Compacted Gravel Base
Twynam Avenue Seal
Surface
1606.5
square metres
10mm Initial Seal
NOTE: the returned data for ‘Asset 2’ represents 75% of the original Cost Unit values. All Components have been duplicated to the second Asset and can be managed in isolation of Asset 1 from now on.
When a Split can Occur
The following restrictions are enforced by the system when a user attempts to perform an Asset Split operation:
The splitting blade MUST pass through the subject Geometry/Geometries at some point.
The construction/Intervention dates of the Components cannot be after the effective date.
The status effect of the Components must be active.
The Component must have no Transaction postings that occur after the posting date.
The posting date must not conflict with a Locked Financial Year.
Only linear Geometries can be split.
Resources Assigned to the New Assets
Following an Asset Split, the following resources are copied across to the new Assets. They are discussed in detail below.
Original Attribution
Transaction Summary
Condition History
Report Categories
Task Records
Original Attribution
Each new Asset or Component record that is created will inherit it’s attribution from the original Asset or relevant Component. Attributes are copied to the new Assets and Components unchanged - The ONLY EXCEPTION to this is the cost units value, which is modified by the Component’s relative proportionality.
Transaction Summary
Each new Component record that is created will inherit a proportionate baseline value from the original relevant Component and the original Component’s Value is written-off. This means there is ZERO change in overall value in the system. Consider the following 50/50 split of a single Component into two (2) new Components.
The original transaction schedule would look something like this, with the carrying value displayed at the bottom.
Comp ID
Year
Transaction Type
Value
comp_1
2015
Recognition (Gross)
$1500
comp_1
2016
Annual Depreciation
-$150
comp_1
2017
Annual Depreciation
-$150
comp_1
2018
Annual Depreciation
-$150
comp_1
2019
Annual Depreciation
-$150
$900
As a part of the Asset Split operation, the following transaction schedule would be generated and applied. Note: transaction schedule simplified to years for the example.
Comp ID
Year
Transaction Type
Value
Comment
comp_1
2020
Adjustment (Depreciation)
$600
Writing off the accumulated depreciation
comp_1
2020
Adjustment (Gross)
-$1500
Writing off the gross value
comp_2
2020
Recognition (Gross)
$750
Bringing on 50% of gross value to the first new Component.
comp_2
2020
Recognition (Gross)
-$300
Bringing on 50% of accumulated depreciation to the first new Component.
comp_3
2020
Recognition (Gross)
$750
Bringing on 50% of gross value to the second new Component.
comp_3
2020
Recognition (Gross)
-$300
Bringing on 50% of accumulated depreciation to the second new Component.
By the end of the process, the valuation summary for ALL Components would be:
Comp ID
Gross Value
Depreciation Value
Carrying Value
comp_1
$0
$0
$0
comp_2
$750
-$300
$450
comp_3
$750
-$300
$450
$1500
-$600
$900
Condition History
For each newly created Component, the relevant Condition History is copied to across in a split operation. The term ‘relevant’ refers to whether or not the Condition record concerned the spatial bounds associated with the new Component (see section: Advanced Splitting: Multiple Geometry Features), as well as whether or not the Condition record existed at the ‘Effective Date’ for the split operation.
The following table details this concept of ‘relevant’ Condition history for an Effective Date of 12/10/2000. Note, each row represents a Condition record that lasts from the Assessment Date until the Assessment Date of the subsequent row. That is, the above Component was considered to be in Condition 1 from January 1993 to February 1997.
Assessment Date
Condition
Carried Over?
22/01/1993
1
No
27/02/1997
2
No
15/04/1999
3
Yes (see note below)
28/01/2002
4
Yes
26/01/2008
5
Yes
Note: this condition record is carried over, however the Assessment Date is set to the Effective Date (October 2000) and a comment is added to reflect the original Assessment Date.
Report Categories
For each newly created Component, the LATEST (as at the Effective Date) relevant Report Categories are copied across in a split operation. That is, if a Component held a Special Schedule 7 Category of ‘Roads’ at the Effective Date, each new Component would inherit this Report Category.
Task Records
For each newly created Component, the relevant Task Records are copied across in a split operation. This occurs at both the Asset and Component Register level. Please note, the same rules of ‘relevancy’ that apply to the Condition History, apply to Task Records.
What happens to the Original Asset and Components
Following an Asset Split operation, the original Asset and ALL of it’s Components are marked with a status code of ‘Deprecated’. This is a special system status code (that users cannot access) which marks the record as ‘superseded by another record or records’. Deprecated records remain in the system, but they are excluded from the default map view, tables, filters, dashboards, and reports.
Information associated with a Deprecated Asset record can be fetched via the NEW Asset record(s). Each new record maintains a ‘Deprecated Parent’ linkage back to the original Asset.
Note: In the case of an Asset Split operation, only the Asset records receive a Deprecated Parent link back to the original Asset. The Component’s do not receive such a linkage in this case as the operation was at the Asset level.
Advanced Splitting: Multiple Geometry Features
In certain situations, an Asset’s Components may not all be represented by the same Geometry record. See the cross-section view below:
In the above example, the Asset (Twynam Avenue) is associated with five (5) Components. An earthworks Components, represented by a single Geometry running from Governors Place to Barr Street. Two (2) base Components running from Governors Place to Matthews Street and then from Matthews Street to Barr Street. And Two (2) seal Components running from Governors Place to Matthews Street and then from Matthews Street to Barr Street (identical to the base).
Given the above scenario, if Poate Street was to be extended such that it now crosses Twynam Avenue, the Asset Management and Engineering principles may require Twynam Avenue to be now represented as two (2) Assets, split by it’s intersection with Poate Street. In this case, the splitting blade would look like the following:
In the above, the Twynam Avenue Asset is to be split by its new full intersection with Poate Street. For the purpose of the example, we will assume the split blade is 75% along the original Asset’s length.
The resultant Assets and Components of such a split are shown below. The original Seal 1 and Base 1 features are not altered by proportionality, they are simply copied and associated with the new, shorter, Twynam Avenue Asset. The Seal 2, Base 2, and Earthworks Components however, are split between the two new Twynam Avenue Assets.
In the above, the Twynam Avenue Asset is to be split by its new full intersection with Poate Street. For the purpose of the example, we will assume the split blade is 75% along the original Asset’s length.
The association and proportion share of the new Assets and Components can be represented in the following table. As can be seen, Base 1 and Seal 1 features are copied and wholly associated with the first Asset (Governors Pde to Matthews Street). However, the Earthworks, Base 2, and Seal 2 are copied and distributed across the splitting blade.
Original Asset
New Asset
Original Component
New Component Share (%)
Twynam Ave
Twynam Ave (Governors Pde to Matthews St)
Earthworks
75%
Twynam Ave
Twynam Ave (Governors Pde to Matthews St)
Base 1
100%
Twynam Ave
Twynam Ave (Governors Pde to Matthews St)
Base 2
60%
Twynam Ave
Twynam Ave (Governors Pde to Matthews St)
Seal 1
100%
Twynam Ave
Twynam Ave (Governors Pde to Matthews St)
Seal 2
60%
Twynam Ave
Twynam Ave (Governors Pde to Matthews St)
Earthworks
75%
Twynam Ave
Twynam Ave (Matthews St to Barr St)
Earthworks
25%
Twynam Ave
Twynam Ave (Matthews St to Barr St)
Base 2
40%
Twynam Ave
Twynam Ave (Matthews St to Barr St)
Seal 2
40%
Splitting Asset Components
The ability to split a Component is vitally important in keeping the Organisation’s financial reporting, engineering
concepts, and asset management data policies in sync. The core concept involves splitting a linear geometry (
representing one or more Components) at any given coordinate, at an effective date.
The returned feature set represents the two or more new Components, each containing a distinct copy of the original
Components, with each new Component being proportionately associated with one of the two (or more) resultant geometries.
The original Components are deprecated (see section on deprecation) and the new Components are inherited by the original
Asset.
The following concepts are covered in this article:
Note: This article is specifically addressing Component Split operations where the goal is to maintain the single
Asset parent. Users may also be interested in reading about
asset splitting
whereby the parent Asset is
also deprecated and the result is two (or more in certain cases) new Assets with all new associated Components.
How a Split Works
The basic mechanics of the Component Split operation is that a user submits a request to the system for a split to
occur. The system will respond (assuming no errors occur) with the required Component/Resource inserts and updates that
need to occur. Accepting this response will process the Split operation. This process is summarised below:
User submits request for a split operation
System assesses the request and responds with a detailed summary of the inserts and updates required to achieve the
split
User accepts the response, and the split occurs.
Requesting a Split
To request a split, the following information is required:
The Split Level (split_level) which must be set to ‘component’ for a Component Split.
The Asset Record ID (asset_uid) of the Asset that ‘owns’ the Component(s) being split.
The Component Record IDs (component_uids) of the Component(s) that are being split.
The Splitting Blade definition (intersection_wkt) defined in Well Known Text.
An optional Effective Date (effective_date) for when the split should occur. This field will default to the current
date/time if empty.
Optional Split Flags (flags) that can control facets of what will be copied across to the new Components. See '
Advanced Splitting: Resource Exclusions’ for more information.
System Assesses the Request and Response
Upon receiving a split request, the system will review the prohibitions detailed in the section, ‘When a Split can
Occur’. It will then commence building a response that (if accepted by the user) instructs the system on how to:
Deprecate the Old (split) Components
Create the new Components against the original Asset
Append the appropriate valuations and resources to the new Components.
User Accepts the Response and the Split Occurs
After reviewing the response - where the user can investigate in detail what will and wont be created - the user can
accept the response and the relative Split Operation will occur.
How the Split Works at a Geometry Level
In order to perform the split, the user must provide a splitting blade - a linear geometry that cuts across the
Component geometry/geometries at the desired split coordinate. See screenshot below:
*In the above screenshot, the Asset (Twynam Avenue) is highlighted in yellow and the user provided splitting blade is
located about 25% along it’s overall length. For the purpose of this example, we will assume that Twynam Avenue has
three (3) Components - earthworks, base, and seal - all sharing the same linear geometry running from Governors Parade
to Barr Street.*
Prior to the split, the Twynam Avenue Components could be represented by the following (basic) attribute data set:
Description
Component Class
Cost Units
Units of Measure
Treatment
Twynam Avenue Earthworks
Earthworks
357
metres
nil
Twynam Avenue Base
Base
357
metres
300mm Compacted Gravel Base
Twynam Avenue Seal
Surface
2142
square metres
10mm Initial Seal
Assuming the user only wants to split the Base and Surface Components (leaving the Earthworks untouched), they would
supply the Asset Record ID, and the two (2) Component ID’s relating to the Surface and Base. The system then derives the
NEW Component Geometries that would result from the split operation. See screenshot below:
*In the above screenshot, the split has occurred and the first of the resultant two geometries is highlighted in
yellow - a portion of the base and seal will be associated with this geometry. The remaining portion of base and seal
Components are associated with the second of the resultant two geometries. The earthworks are still associated with the
original geometry record.*
Following the split, Twynam Avenue is still one distinct Asset, however, instead of having three (3) Components, it now
has five (5). The new Component Structure (ignoring deprecated Components) would look like this:
Description
Component Class
Cost Units
Units of Measure
Treatment
Twynam Avenue Earthworks
Earthworks
357
metres
nil
Twynam Avenue Base 1
Base
89.25
metres
300mm Compacted Gravel Base
Twynam Avenue Seal 1
Surface
535.5
square metres
10mm Initial Seal
Twynam Avenue Base 2
Base
267.75
metres
300mm Compacted Gravel Base
Twynam Avenue Seal 2
Surface
1606.5
square metres
10mm Initial Seal
NOTE: the proportion of length between the smaller geometry and the original Asset is assumed to be 25% - the System
has returned the new Cost Unit values based on this geometric truth.
When a Split can Occur
The following restrictions are enforced by the system when a user attempts to perform an Asset Split operation:
The splitting blade MUST pass through the subject Geometry/Geometries at some point.
The construction/Intervention dates of the Components cannot be after the effective date.
The status effect of the Components must be active.
The Component must have no Transaction postings that occur after the effective date.
The effective date must not conflict with a Locked Financial Year.
Only linear Geometries can be split.
Resources Assigned to the New Components
Following a Component Split, the following resources are copied across to the new Components. They are discussed in
detail below.
Original Attribution
Transaction Summary
Condition History
Report Categories
Task Records
Original Attribution
Each new Component record that is created will inherit it’s attribution from the original relevant Component. Attributes
are copied to the new Components unchanged - The ONLY EXCEPTION to this is the cost units value,
which is modified by the Component’s relative proportionality.
Transaction Summary
Each new Component record that is created will inherit a proportionate baseline value from the original relevant
Component and the original Component’s Value is written-off. This means there is ZERO change in overall value in the
system. Consider the following 50/50 split of a single Component into two (2) new Components.
The original transaction schedule would look something like this, with the carrying value
displayed at the bottom.
Comp ID
Year
Transaction Type
Value
comp_1
2015
Recognition (Gross)
$1500
comp_1
2016
Annual Depreciation
-$150
comp_1
2017
Annual Depreciation
-$150
comp_1
2018
Annual Depreciation
-$150
comp_1
2019
Annual Depreciation
-$150
$900
As a part of the Component Split operation, the following transaction schedule would be generated and applied. Note:
transaction schedule simplified to years for the example.
Comp ID
Year
Transaction Type
Value
Comment
comp_1
2020
Adjustment (Depreciation)
$600
Writing off the accumulated depreciation
comp_1
2020
Adjustment (Gross)
-$1500
Writing off the gross value
comp_2
2020
Recognition (Gross)
$750
Bringing on 50% of gross value to the first new Component.
comp_2
2020
Recognition (Gross)
-$300
Bringing on 50% of accumulated depreciation to the first new Component.
comp_3
2020
Recognition (Gross)
$750
Bringing on 50% of gross value to the second new Component.
comp_3
2020
Recognition (Gross)
-$300
Bringing on 50% of accumulated depreciation to the second new Component.
By the end of the process, the valuation summary for ALL Components would be:
Comp ID
Gross Value
Depreciation Value
Carrying Value
comp_1
$0
$0
$0
comp_2
$750
-$300
$450
comp_3
$750
-$300
$450
$1500
-$600
$900
Condition History
For each newly created Component, the relevant Condition History is copied to across in a split operation. The term '
relevant’ refers to whether or not the Condition record concerned the spatial bounds associated with the new Component (
see section: Advanced Splitting: Multiple Geometry Features), as well as whether or not the Condition record existed at
the ‘Effective Date’ for the split operation.
The following table details this concept of ‘relevant’ Condition history for an Effective Date of 12/10/2000. Note,
each row represents a Condition record that lasts from the Assessment Date until the Assessment Date of the subsequent
row. That is, the above Component was considered to be in Condition 1 from January 1993 to February 1997.
Assessment Date
Condition
Carried Over?
22/01/1993
1
No
27/02/1997
2
No
15/04/1999
3
Yes (see note below)
28/01/2002
4
Yes
26/01/2008
5
Yes
Note: this condition record is carried over, however the Assessment Date is set to the Effective Date (October 2000)
and a comment is added to reflect the original Assessment Date.
Report Categories
For each newly created Component, the LATEST (as at the Effective Date) relevant Report Categories are copied across in
a split operation. That is, if a Component held a Special Schedule 7 Category of ‘Roads’ at the Effective Date, each new
Component would inherit this Report Category.
Task Records
For each newly created Component, the relevant Auxiliary Data Records are copied across in a split operation. Please
note, the same rules of ‘relevancy’ that apply to the Condition History, apply to Task Records.
What happens to the Original Components
Following a Component Split operation, the original Components are marked with a status code of ‘Deprecated’. This is a
special system status code (that users cannot access) which marks the record as ‘superseded by another record or
records’. Deprecated records remain in the system, but they are excluded from the default map view, tables, filters,
dashboards, and reports.
Information associated with a Deprecated Component record can be fetched via the NEW Component record(s). Each new
record maintains a ‘Deprecated Parent’ linkage back to the original Component.
Advanced Splitting: Resource Exclusions
When requesting a Component Split operation, a user can supply some optional flags that will alter what resources the
newly created Components will receive. The flags currently available in the system are:
Apportion Cost Units (apportion_cost_units - true/false): If not supplied, this defaults to TRUE. This flag
indicates that the user wishes for the Cost Unit values of each new Component to be proportionately set based on its '
share’ of the original Component. If set to FALSE, each new Component will receive a Cost Units value equal to that of
it’s parent Component.
Copy Condition History (copy_condition_history - string): If not supplied, this defaults to all. This flag
indicates what sort of Condition History the user would like to translate to the new Components. The following options
are available:
all (default): All relevant Condition history will be copied.
latest: Only the most recent Condition record (relative to Effective Date) will be copied.
none: No Condition records will be copied.
Copy Report Categories (copy_report_categories - true/false): If not supplied, this defaults to TRUE. This flag
indicates that the user wishes for the relevant Report Categories to be copied to the new Components.
Copy Task Records (copy_auxiliary_data - string): If not supplied, this defaults to all. This flag
indicates what sort of Task Record History the user would like to translate to the new Components.
The following options are available:
all (default): All relevant Records will be copied.
latest: Only the most recent Record (relative to Effective Date) will be copied.
none: No Records will be copied.
Advanced Splitting: Multiple Geometry Features
In certain situations, an Asset’s Components may not all be represented by the same Geometry record. See the
cross-section view below:
*In the above example, the Asset (Twynam Avenue) is associated with five (5) Components. An earthworks Components,
represented by a single Geometry running from Governors Place to Barr Street. Two (2) base Components running from
Governors Place to Matthews Street and then from Matthews Street to Barr Street. And Two (2) seal Components running
from Governors Place to Matthews Street and then from Matthews Street to Barr Street (identical to the base).*
Given the above scenario, if Poate Street was to be extended such that it now crosses Twynam Avenue, the Asset
Management and Engineering principles may require the Component’s of Twynam Street to reflect this new extent. In this
case, the splitting blade would look like the following:
*In the above, the Twynam Avenue Components are to be split by its new full intersection with Poate Street. For the
purpose of the example, we will assume the split blade is 75% along the original Asset’s length.*
The resultant Components of such a split are shown below. The original Seal 1 and Base 1 features are not altered by
proportionality, they are therefore UNMODIFIED by the split operation. The Seal 2, Base 2, and Earthworks Components
however, are split by the intersection blade.
*In the above, the Twynam Avenue Components are to be split by its new full intersection with Poate Street. For the
purpose of the example, we will assume the split blade is 75% along the original Asset’s length.*
The association and proportion share of the new Components can be represented in the following table. As can be seen,
Base 1 and Seal 1 features are left UNMODIFIED. However, the Earthworks, Base 2, and Seal 2 are copied and
distributed across the splitting blade.
Asset
Original Component
New Component Share (%)
Comment
Twynam Ave
Base 1
100%
Unmodified
Twynam Ave
Seal 1
100%
Unmodified
Twynam Ave
Earthworks
75%
Long section of Split
Twynam Ave
Earthworks
25%
Short section of Split
Twynam Ave
Base 2
60%
Long section of Split
Twynam Ave
Base 2
40%
Short section of Split
Twynam Ave
Seal 2
60%
Long section of Split
Twynam Ave
Seal 2
40%
Short section of Split
Merging Assets
The ability to merge an Asset is vitally important in keeping the Organisation’s financial reporting, engineering concepts, and asset management data policies in sync. The core concept involves merging/combining two or more spatial features (representing one or more Assets), at an effective date.
The returned feature represents a new combined Asset, containing a distinct copy of the original Asset and Component’s data, with each being associated with parent Assets/Components. The original Assets and Components are deprecated (see section on deprecation).
The following concepts are covered in this article:
Note: This article is specifically addressing Asset Merge operations where the goal is to generate one new Asset with its own Component(s) from two or more Assets. At the date of publication of this guide, the ability to merge Components within an Asset is not supported by this tool.
How a Merge Works
The basic mechanics of the Asset Merge operation is that a user submits a request to the system for a merge to occur. The system will respond (assuming no errors occur) with the required Asset, Component, and Resource inserts and updates that need to occur. Accepting this response will process the Merge operation. This process is summarised below:
User submits request for a merge operation
System assesses the request and responds with a detailed summary of the inserts and updates required to achieve the merge
User resolves any merge conflicts identified by the system (such as conflicting attribute values)
User accepts the response, and the merge occurs.
For Components within each Asset, they will be merged in accordance with their Component Group classification. For example, when merging two road Assets, all child Surface Components will be merged together, all child base Components will be merged together, and all child earthwork Components will be merged together.
Requesting a Merge
To request a merge, the following information is required:
The Asset Record IDs (asset_uid) of the Assets being merged
A Posting Date (posting_date) for when any transactions associated with the merge operation should occur. This field will default to the current date/time if empty.
System Assesses the Request and Response
Upon receiving a merge request, the system will review the prohibitions detailed in the section, ‘When a Merge can Occur’. It will then commence building a response that (if accepted by the user) instructs the system on how to:
Deprecate the Old (merged) Assets and Components
Create the new Asset and Components
Append the appropriate valuations and resources to the new Asset and Components.
During this process, the system analyses the Asset and Component attribution from all records being merged. Any conflicting values will be flagged to the user for resolution.
User Resolves any Merge Conflicts Identified by the System
The system will return a summary of merge request. This summary will include details regarding any conflicts that need to be resolved before continuing. Along with each conflict, the system will return some suggested values that might resolve the conflict. Where appropriate (for numeric values) the suggested values may include sums, averages, min and/or max values of the input Components for the Component Group in question.
Examples of conflicts, system suggestions, and possible ways to resolve them, include:
Mismatch Cost Units: This is expected as each Component being merged will likely have a different value for Cost Units, reflecting their individual size/quantity. The system will return the sum of all Cost Units for that Component Group, as well as the average, the min, and the max value across the Component Group. Users may wish to elect the SUM value, reflecting the fact that the new Components size will be an aggregate of each input Components size.
Mismatch Custom Text Attribute: This can occur from time to time and will typically not be accompanied by any ‘smart’ sugestions (sum, average, etc.). Users will be asked to choose one of the values from the input Components for the Component Group.
In all of the above examples, and during any merge operation, users do NOT have to settle for any of the suggested values (smart or otherwise). In all cases, a manual override is available for conflicting attributes.
User Accepts the Response and the Merge Occurs
After reviewing the response and resolving all merge conflicts - where the user can investigate in detail what will and wont be created - the user can accept the response and the relative Merge Operation will occur.
How the Merge Works at a Component by Component Level
In order to perform the merge, the user must provide two or more valid Asset Records.
Prior to the merge, the Twynam Avenue Asset Components could be represented by the following (basic) attribute data set:
Asset 1
Description
Component Class
Cost Units
Units of Measure
Treatment
Twynam Avenue Earthworks
Earthworks
89.25
metres
nil
Twynam Avenue Base
Base
89.25
metres
300mm Compacted Gravel Base
Twynam Avenue Seal
Surface
535.5
square metres
10mm Seal
Asset 2
Description
Component Class
Cost Units
Units of Measure
Treatment
Twynam Avenue Earthworks
Earthworks
267.75
metres
nil
Twynam Avenue Base
Base
267.75
metres
300mm Compacted Gravel Base
Twynam Avenue Seal
Surface
1606.5
square metres
14mm Seal
NOTE: each Surface Component have differing values for ‘Treatment’. This will be a merge conflict that user must resolve in order to complete the merge. Additionally, each of the Cost Unit value conflicts (per Component Group) will need to be resolved.
The system, upon reviewing the merge request, will return a merge preview response highlighting any merge conflicts. For the above example (and for the information supplied), the following merge conflicts are likely:
Component Class
Merge Conflict
Values Encountered
Possible Sollutions
Earthworks
Cost Units
89.25, 267.75
Sum(357), Avg(178.5), Min(89.25), Max(267.75), Other (User Defined)
Base
Cost Units
89.25, 267.75
Sum(357), Avg(178.5), Min(89.25), Max(267.75), Other (User Defined)
Surface
Cost Units
535.5, 1606.5
Sum(2142), Avg(1071), Min(535.5), Max(1606.5), Other (User Defined)
Surface
Treatment
10mm Seal, 14mm Seal
10mm Seal, 14mm Seal, Other (User Defined)
For the above merge conflict, the resolution may be the following:
Component Class
Merge Conflict
Solution
Earthworks
Cost Units
357 (sum)
Base
Cost Units
357 (sum)
Surface
Cost Units
2142 (sum)
Surface
Treatment
10mm Seal
Following the merge, Twynam Avenue is now one (1) distinct Asset whose Components could be represented by the following attribute data set:
Description
Component Class
Cost Units
Units of Measure
Treatment
Twynam Avenue Earthworks
Earthworks
357
metres
nil
Twynam Avenue Base
Base
357
metres
300mm Compacted Gravel Base
Twynam Avenue Seal
Surface
2142
square metres
10mm Seal
When a Merge can Occur
The following restrictions are enforced by the system when a user attempts to perform an Asset Merge operation:
At least two (2) Assets must be submitted for merge.
All Assets within the merge operation must share the same Asset Classification.
The construction/Intervention dates of the Components cannot be after the posting date.
The status effect of the Components must be active.
The Component must have no Transaction postings that occur after the posting date.
The posting date must not conflict with a Locked Financial Year.
For each Component Group, the Finance Category for associated Capital Value must be the same.
The Asset Components must not have any outstanding WIP transactions (from a Capital Budget process).
The Assets or Components must not have any outstanding Programming Tasks.
Resources Assigned to the New Asset
Following an Asset Merge, the following resources are migrated to the new Asset. They are discussed in detail below.
Original Attribution (with consideration for any merge conflict instruction)
Transaction Summary
Condition (with consideration for any merge conflict instruction)
Report Categories (with consideration for any merge conflict instruction)
Original Attribution
The Asset/Component record that is created will inherit it’s attribution from the original Assets or relevant Components. Attributes are copied to the new Assets and Components unchanged (excepting any merge conflict instrucitons).
Transaction Summary
Each new Component record that is created will inherit a combined baseline value from the original relevant Components and the original Componens Value is written-off. This means there is ZERO change in overall value in the system. Consider the following merge of two (2) Components into one (1) new Component.
The original transaction schedule would look something like this, with the carrying value displayed at the bottom. For Component 1,
Comp ID
Year
Transaction Type
Value
comp_1
2015
Recognition (Gross)
$1500
comp_1
2016
Annual Depreciation
-$150
comp_1
2017
Annual Depreciation
-$150
comp_1
2018
Annual Depreciation
-$150
comp_1
2019
Annual Depreciation
-$150
$900
For Component 2,
Comp ID
Year
Transaction Type
Value
comp_2
2015
Recognition (Gross)
$2000
comp_2
2016
Annual Depreciation
-$200
comp_2
2017
Annual Depreciation
-$200
comp_2
2018
Annual Depreciation
-$200
comp_2
2019
Annual Depreciation
-$200
$1200
As a part of the Asset Merge operation, the following transaction schedule would be generated and applied. Note: transaction schedule simplified to years for the example.
Comp ID
Year
Transaction Type
Value
Comment
comp_1
2020
Adjustment (Depreciation)
$600
Writing off the accumulated depreciation
comp_1
2020
Adjustment (Gross)
-$1500
Writing off the gross value
comp_2
2020
Adjustment (Depreciation)
$800
Writing off the accumulated depreciation
comp_2
2020
Adjustment (Gross)
-$2000
Writing off the gross value
comp_3
2020
Recognition (Gross)
$3500
Bringing on the sum of gross value to the merged new Component.
comp_3
2020
Recognition (Gross)
-$1400
Bringing on the sum of accumulated depreciation to the merged new Component.
By the end of the process, the valuation summary for ALL Components would be:
Comp ID
Gross Value
Depreciation Value
Carrying Value
comp_1
$0
$0
$0
comp_2
$0
$0
$0
comp_3
$3500
-$1400
$2100
$3500
-$1400
$2100
Condition
For the newly created Component, the relevant Condition is copied across in a merge operation. On conflict, the user will be asked to choose which Condition value should be applied.
Report Categories
For the newly created Components, the LATEST (as at the Effective Date) relevant Report Categories are copied across in a merge operation. That is, if a Component held a Special Schedule 7 Category of ‘Roads’ at the Effective Date, each new Component would inherit this Report Category. This is, of course, subject to any merge conflict instructions.
What happens to the Original Assets and Components
Following an Asset Merge operation, the original Assets and ALL of their Components are marked with a status code of ‘Deprecated’. This is a special system status code (that users cannot access) which marks the record as ‘superseded by another record or records’. Deprecated records remain in the system, but they are excluded from the default map view, tables, filters, dashboards, and reports.
Information associated with a Deprecated Asset record can be fetched via the NEW Asset record(s). Each new record maintains a ‘Deprecated Parent’ linkage back to the original Asset.
Reclassifying Assets/Components
An Assets Classification configuration controls a great deal of behaviour within the Metrix
Asset Management system. From custom form definitions & cost unit formulas, to depreciable flags
& suggested intervention treatments, the Classification configuration is fundemental in
controlling and streamlining your Asset workflows.
Info
Reclassification occurs in-situ within the Asset and Component record.
That is to say, the process does NOT require the deprecation of the original Asset(s)
or Component(s), and creation of new/replacement records.
Types of Reclassification
Given the signifigance of the Classifications role, it can be neccesary (from time to time) to
Reclassify either:
Assets to an entirely different Asset Classification, or,
Components (within an Asset) to a different Component Type on the Asset Classification.
This is where the Reclassification tool within Metrix can be of assistance. The
Reclassification tool guides users through the process of performing one of the above
types of Reclassification on one or more Assets - that is, both single and bulk workflows
are supported.
Component Type Mapping
Once you choose a target Asset Classification (for full Asset Reclassification), or specify that
your are simply Reclassifying Components within their Asset, the system will guide you through
a process of mapping Component Types. This process can be performed in a number of different
ways, depending on the type of Reclassification being performed.
Full Asset Reclassification
For each Component Type in your source Asset Classification, you will be asked to assign/map
those records to a Component Type from the target Asset Classification.
For example: Consider a source Classification that contains ‘Earthworks’, ‘Base’, & ‘Seal’,
and a target Classification that contains ‘Formation’, ‘Base’, & ‘Surface’. You may choose
a Component Type mapping configuration such as the following:
Earthworks > Formation
Base > Base
Seal > Surface
Reclassifying Components within an Asset
For each Component type within the current Asset Classification, you will be asked to
assign/map/skip those records to a different Component Type within the Classification.
For example: Consider an Asset that contains ‘Earthworks’, ‘Base’, & ‘Seal’,
and its Classification configuration contains ‘Earthworks’, ‘Base’, ‘Seal’ & ‘Surface’. You may choose
a Component Type mapping configuration such as the following:
Earthworks > Skip
Base > Skip
Seal > Surface
This would reclassify the selected ‘Seal’ Component Types to a ‘Surface’ Component Type. Nothing
would happen to the ‘Earthworks’ or ‘Base’ Components.
Finance Re-Categorisation
A component’s finance category is defined by the first entry into the financial transactions ledger
posted against that component. Following that, all transactions against that component will utilise
that same finance category. To change a component’s finance category, the adjustment must be
recorded through the financial transactions ledger as a movement off the original category, and then
on to the new category.
Below is a summary of the involved movements posted during a financial re-categorisation from ‘Roads’ to
‘Footpaths’.
Category
Transaction Type
Value
Roads
Reclassification (Accumulated Depreciation)
$150
Roads
Reclassification (Gross)
-$200
Footpaths
Reclassification (Gross)
$200
Footpaths
Reclassification (Accumulated Depreciation)
-$150
$0
Note: In the above example, the gross value is $200, and the accumulated depreciation is -$150
In the above schedule, the process involves:
Writing off the accumulated depreciation value from the old category
Writing off the gross value from the old category
Writing on the gross value for the new category
Writing on the accumulated depreciation value for the new category
Importantly, the net change in carrying value for the component is zero.
Deprecated Records
Following an action that results in assets or components being regenerated into a new entity, the original records will be marked as ‘deprecated’. This is a special system status code (that users cannot access) which marks the record as ‘superseded by another record or records’. Deprecated records remain in the system, but they are excluded from the default map view, tables, filters, dashboards, and reports.
Information associated with a Deprecated records can be fetched via the NEW (replacing) record(s). Each new record maintains a ‘Deprecated Parent’ linkage back to the original record. This can
be accessed via the
Actions menu at the top of the info panel.
How To Guides
This section provides guidance on how to perform specific Asset Management actions in the Metrix
Asset Management system, for existing records. Including:
The ability to split an Asset is vitally important in keeping the Organisation’s financial reporting,
engineering concepts, and asset management data policies in sync. This section provides an overview
on two different methods supported by the Metrix Asset Management system to perform spatial,
linear bisections of your assets or asset components.
For a basic overview of how splitting works, please see the video below:
Subsections of Splitting Assets or Components
Split Assets
To perform a spatial split of an asset and its components, follow these steps:
Navigate to the main ‘Assets’ page and make a
selection
from the map screen.
Info
For splitting assets, a particular component selection within the asset is not relevant.
At the top of the info panel, click the ‘Actions’ menu.
From the ‘Actions’ menu options, hover or select ‘Parent Asset Actions’ and then choose
‘Split Entire Asset’.
A fly-out panel wil appear with tools ready for you to perform the split operation. Refer to
the section on
Splitting Tools
for an overview of this panel.
Draw a split line across your asset in the panel’s map window. Double-click to finish drawing.
Info
Make sure the splitting plane you digitise, crosses the original asset at least once.
Note also, you can split a single feature MULTIPLE times by drawing in a ‘zig-zag’ fashion.
This is a great way to create more than two (2) sub-features.
Below the map window, use the calendar control to enter the desired posting date which will
be used when apportioning any capital value across the split results.
Once the posting date is selected, the system will prepare a preview of the split that would
be required to suit.
Two or more - depending on the pattern of your digitised split line - asset records, with
relevant child components, will be rendered for your review. Each asset and component displays
the percentage share that they will demand from the original asset. Further to this, this share
is used to calculate the proportion of capital value that each asset component will receive.
When you are happy with the previewed results, click ‘Commit Split (immediate)’
This operation does NOT proceed via staged changes, and occurs immediately. You have successfully
split your asset and its sub-components.
Split Components
To perform a spatial split of a single asset component, follow these steps:
Navigate to the main ‘Assets’ page and make a
selection
from the map screen.
Info
Make sure you have the correct component selected - the one you wish to split
At the top of the info panel, click the ‘Actions’ menu.
From the ‘Actions’ menu options, choose ‘Split Component’.
A fly-out panel wil appear with tools ready for you to perform the split operation. Refer to
the section on
Splitting Tools
for an overview of this panel.
Draw a split line across your component in the panel’s map window. Double-click to finish drawing.
Info
Make sure the splitting plane you digitise, crosses the original component at least once.
Note also, you can split a single feature MULTIPLE times by drawing in a ‘zig-zag’ fashion. This is
a great way to create more than two (2) sub-features.
Below the map window, use the calendar control to enter the desired posting date which will
be used when apportioning any capital value across the split results.
Once the posting date is selected, the system will prepare a preview of the split that would
be required to suit.
Two or more - depending on the pattern of your digitised split line - component records will be
rendered for your review. Each component displays the percentage share that they will demand from
the original component. Further to this, this share is used to calculate the proportion of capital
value that each component will receive.
When you are happy with the previewed results, click ‘Commit Split (immediate)’
This operation does NOT proceed via staged changes, and occurs immediately. You have successfully
split your component.
Explode Multi-Part Features
Multi-geometry spatial features are supported within the Metrix Asset Management system. Sometimes
however, it can become necessary to de-aggregate such features into their constituent building blocks.
This document provides an overview on how to perform such de-aggregation (explode) of geometries
in the system.
Info
Geometry explosion is a COMPONENT level tool. Even if the spatial feature is shared across many
asset components, this operation will only create single-part geometry features for your active
component.
Any components also sharing the multi-geometry will continue to reference the multi-geometry.
Navigate to the main ‘Assets’ page and make a
selection
from the map screen.
Info
Make sure you have the correct component selected - the one you wish to explode
At the top of the info panel, click the ‘Actions’ menu.
From the ‘Actions’ menu options, choose ‘Split Component’.
A fly-out panel wil appear with tools ready for you to perform the operation. At the top
of the panel, choose ‘Explode’.
Use the calendar control to enter the desired posting date which will be used when
apportioning any capital value across the exploded results.
Once the posting date is selected, the system will prepare a preview of the explosion that would
be required to suit.
Two or more - depending on the original multi-geometry - component records will be
rendered for your review. Each component displays the percentage share that they will demand from
the original feature. Further to this, this share is used to calculate the proportion of capital
value that each component will receive.
When you are happy with the previewed results, click ‘Commit Split (immediate)’
This operation does NOT proceed via staged changes, and occurs immediately. You have successfully
exploded your component.
Split Tools
This document provides a brief overview of the splitting
asset and/or
components tools,
and how to use them to generate a valid splitting plane.
The following tools are discussed:
Drawing your Splitting Plane
To draw the splitting plane:
Click on ‘Draw split line’.
In the map window, click to start the splitting plane.
Move the cursor and click again to add vertex nodes to your splitting plane.
To finish, double-click.
To clear the splitting plane and redraw, simply click the redo button next to the ‘Draw split line’ button.
Info
Once drawn, the splitting plane can be edited. Simply click ‘Edit’ and then manage the splitting plane
following these directions.
Measure Guide Line
The splitting panel provides users with the option to generate ‘construction lines’ before committing their split
plan. These ‘construction lines’ will reveal their length for added context for the user. To use the measure tool:
Click on ‘Measure guide line’.
In the map window, click to start the construction line.
Move the cursor and click again to add vertex nodes to your construction line.
To finish, double-click.
The length of your construction line will be calculated and displayed below.
The construction line(s) can be cleared by clicking ‘Clear Construction Layers’.
Map Context
The built-in map window in the split panel contains controls to toggle aerial imagery, basemaps, as well as the
Metrix mapping focus mode. Set these views accordingly to provide yourself with the required context to draw
the split plane.
For information about each setting, read below.
Focus Mode
For nearly all users, there exists a colour combination that is hard to decipher between and thus
difficult to read when displayed in a map window. To cater for this, the Metrix Asset Management
map tools provide users with the ability to put the map backdrop into ‘Focus Mode’. This will
binarise (to make black-and-white) the backdrop so that the colours of your asset portfolio are
easier to distinguish.
View Aerial Imagery as Backdrop
To view the aerial imagery as a backdrop to your asset portfolio, simply click on the ‘Imagery’
button in the top-left hand corner of the map window. This will swap out the underlying view to
the aerial photograph imagery configured for your environment. The screenshot below shows a map window
with aerial imagery as the backdrop, split between focus mode and standard.
View Basemap as Backdrop
To view the basemap as a backdrop to your asset portfolio, simply click on the ‘Base’
button in the top-left hand corner of the map window. This will swap out the underlying view to
the basemap configured for your environment. The screenshot below shows a map window
with basemap as the backdrop, split between focus mode and standard.
Merging Assets
From time to time, your network of assets may become too bifurcated. For these scenarios, the Metrix
Asset Management system has support for users merging assets.
Merge Assets
To merge two or more asset records:
Navigate to the main ‘Assets’ page and make a
collection
from the map screen. This will represent the assets you wish to merge together as one.
From the Collections side-bar options, choose ‘Perform Merge within Collection’.
Confirm the Asset Classification of the Assets that you wish to merge. This step is
provided to prevent accidental merge of adjacent assets/components.
Confirm the selected records (within the Assset Classification) that will be merged.
This is essentially a preview of what you have selected, once again to prevent accidental
merge of adjacent assets/components. Click ‘Continue’.
Supply a Posting Date, if required. If the underlying Asset(s) have any capital value, you
will be prompted for a Posting Date value. Enter a Posting Date if required. Then click
‘Generate Merge Preview’.
The system will analyse the request and return a preview of the merge operation, along
with any merge conflicts discovered.
Navigate through the tabs of ‘Asset Data’, and ‘Component Group Data’. At the top of each
tabbed section, a highlight will detail any merge conflicts within the tab that MUST
be resolved. Review the data in each tab, resolve any merge conflicts, and generally
review the data that will be created on the new merged record(s).
Once on the ‘Finalise and Review’ tab, you can click ‘Complete Merge’. This will commit the
merge operation.
Reclassification
From time to time, an organisation’s asset infrastructure will undergo different purposes - or data
management practices may adjust. In these cases, it can become necessary to Reclassify Assets and/or
Components to different Asset Classifications (or Component Types). This section provides an overview
on two different methods supported by the Metrix Asset Management system to perform Reclassification
of Assets (including the Asset Components) or Components.
To reclassify a single Asset and its Asset Components, perform the following steps:
Navigate to the main ‘Assets’ page and make a
selection
from the map screen.
At the top of the info panel, click the ‘Actions’ menu.
From the ‘Actions’ menu options, hover or select ‘Parent Asset Actions’ and then choose
‘Reclassify Asset’. Note, if the Info Panel is already focused on the Parent Asset
record, the ‘Reclassify Asset’ will be in the initial Actions menu.
A fly-out panel will appear with the required tools for performing an asset reclassification.
Set the the ‘Reclassification Mode’ to ‘Asset Reclassification’.
From the ‘Target Asset Classification Mapping’ control, choose the Asset Classification
that you are reclassifying the asset to.
Choose the asset class from the left hand side of the drop-down list first, and then refine
to the asset classification. The search box at the top of the drop-down list can also
be used to limit the options.
Once the asset classification has been chosen, the ‘Component Mapping’ section will become
active. Each of the active asset’s components must be matched to a corresponding target asset
classification component group.
For each row in the mapping list, select the ‘New Component Type’ on the right-hand side.
Warning
ALL current Components must have a target Component Type in the target Asset Classification.
With the component mapping complete, use the calendar control to set the desired ‘Effective Date’
for the operation to occur.
You can now proceed to ‘Preview the Reclassification’. This will submit your settings to
test if the reclassification will be valid. In the case that any issues are found, these
will be returned to you and rendered just above the preview button.
This process is essentially checking that the two classifications are compatible, and that
any data loss can be avoided.
Once the preview has succeeded without errors, and when you are ready with the proposed
reclassification, click ‘Reclassify (immediate)’.
Bulk Asset Reclassification
To reclassify a number of Assets and their Asset Components, perform the following steps:
Navigate to the main ‘Assets’ page and build a
collection
from the map screen.
From the Collections panel, in the ‘Collection Actions’ section, choose ‘Reclassify Collection’.
A fly-out panel will appear with the required tools for performing an asset reclassification.
Before you start however, the system will review your collection to ensure it contains just
one distinct Asset Classification. If more than one is found, don’t panic, the system will
guide you through refining your collection so that the scope of the collection is reduced to
a single classification.
With a single classification confirmed, set the ‘Reclassification Mode’ to ‘Asset Reclassification’.
From the ‘Target Asset Classification Mapping’ control, choose the Asset Classification
that you are reclassifying the asset to.
Choose the asset class from the left hand side of the drop-down list first, and then refine
to the asset classification. The search box at the top of the drop-down list can also
be used to limit the options.
Once the asset classification has been chosen, the ‘Component Mapping’ section will become
active. Each of the Component Types within the source Asset Classification must be matched
to a corresponding target Component Type within the target Asset Classification.
For each row in the mapping list, select the ‘New Component Type’ on the right-hand side.
Warning
ALL current Component Types must have a target Component Type in the target Asset Classification.
Note: This is slightly different to the single asset reclassification mode, where the mapping is
performed at the individual component level. In bulk reclassification, the mapping is performed
at the component type level. This means that all components of a given type will be reclassified
to the same target component type.
With the component mapping complete, use the calendar control to set the desired ‘Effective Date’
for the operation to occur.
You can now proceed to ‘Preview the Reclassification’. This will submit your settings to
test if the reclassification will be valid. In the case that any issues are found, these
will be returned to you and rendered just above the preview button.
This process is essentially checking that the two classifications are compatible, and that
any data loss can be avoided.
Once the preview has succeeded without errors, and when you are ready with the proposed
reclassification, click ‘Reclassify (immediate)’.
Reclassify Components within Asset Classification
For reclassifying Components between Component Types within their Asset Classification, there
are two (2) methods available. Each of these processes are outlined in this document:
To reclassify a component within its parent asset, perform the following steps:
Navigate to the main ‘Assets’ page and make a
selection
from the map screen.
At the top of the info panel, click the ‘Actions’ menu.
From the ‘Actions’ menu options, hover or select ‘Parent Asset Actions’ and then choose
‘Reclassify Asset’. Note, if the Info Panel is already focused on the Parent Asset
record, the ‘Reclassify Asset’ will be in the initial Actions menu.
A fly-out panel will appear with the required tools for performing an asset reclassification.
Set the the ‘Reclassification Mode’ to ‘Component Reclassification’.
Info
There is no need to choose a target asset classification, as the components are being
reclassified within their current asset classification.
The target Asset Classification control will be disabled when you choose ‘Component Reclassification’
mode.
Once the mode has been set, the ‘Component Mapping’ section will become active.
Each of the active Asset’s Components can be matched to a corresponding Component Type
within the Parent Asset’s Asset Classification.
For components in the mapping list that you wish to reclassify to a different Component Type,
select the ‘New Component Type’ on the right-hand side. Otherwise, leave it set to ‘Skip’.
With the component mapping complete, use the calendar control to set the desired ‘Effective Date’
for the operation to occur. This defaults to the current date.
You can now proceed to ‘Preview the Reclassification’. This will submit your settings to
test if the reclassification will be valid. In the case that any issues are found, these
will be returned to you and rendered just above the preview button.
This process is essentially checking that the Component Types are compatible, and that
any data loss can be avoided.
When you are ready with the proposed reclassification, click ‘Reclassify (immediate)’.
Bulk Reclassification of Components within Asset Classification
To reclassify components within their parent assets in bulk (across many Assets), perform
the following steps:
Navigate to the main ‘Assets’ page and make a
collection
from the map screen.
From the Collections panel, in the ‘Collection Actions’ section, choose ‘Reclassify Collection’.
A fly-out panel will appear with the required tools for performing an asset reclassification.
Before you start however, the system will review your collection to ensure it contains just
one distinct Asset Classification. If more than one is found, don’t panic, the system will
guide you through refining your collection so that the scope of the collection is reduced to
a single classification.
With a single classification confirmed, set the the ‘Reclassification Mode’ to ‘Component Reclassification’.
Info
There is no need to choose a target asset classification, as the components are being
reclassified within their current asset classification.
The target Asset Classification control will be disabled when you choose ‘Component Reclassification’
mode.
Once the mode has been set, the ‘Component Mapping’ section will become active.
Each of the Component Types within the Asset Classification can be matched a
different Component Type within the Asset Classification, or left unchanged.
Info
Note: This is slightly different to the single component reclassification mode, where the mapping is
performed at the individual component level. In bulk reclassification, the mapping is performed
at the component type level. This means that all components of a given type will be reclassified
to the same target component type.
With the component mapping complete, use the calendar control to set the desired ‘Effective Date’
for the operation to occur. This defaults to the current date.
You can now proceed to ‘Preview the Reclassification’. This will submit your settings to
test if the reclassification will be valid. In the case that any issues are found, these
will be returned to you and rendered just above the preview button.
This process is essentially checking that the Component Types are compatible, and that
any data loss can be avoided.
When you are ready with the proposed reclassification, click ‘Reclassify (immediate)’.
Financial Re-Categorisation
To perform a financial re-categorisation, firstly, ensure that you understand the
purpose and implications
of such a process. Then, simply follow these steps.
Navigate to the main ‘Assets’ page and make a
selection
from the map screen.
Ensure the correct asset component is your active selection.
Within the transactions info panel is a section title ‘Transaction History’. It is here
that users can see past recorded movements, as well as perform financial re-categorisations.
At the top of the ‘Transaction History’ section, click on the ‘Reclassify’ button.
Info
If the summary table and/or the ‘Reclassify’ button is not displayed for your active
component, it typically means that the asset component does not have any transactions
posted against it. This therefore indicates that re-categorisation is NOT necessary.
A fly-out panel will display, requiring the target finance category and posting date
for the change to occur.
Enter the posting date for the financial re-categorisation to occur using the calendar
input.
Select the target finance category from the drop-down list.
Provide an optional comment.
Click ‘Reclassify’ when ready.
This operation does NOT proceed via staged changes, and occurs immediately. You have successfully
re-categorised your component.
Set Component Status
This section provides an overview on how to alter a component’s status code in the Metrix
Asset Management system:
Navigate to the main ‘Assets’ page and make a
selection
from the map screen.
Info
Make sure you have the correct component selected - the one you wish to update the status for
The component’s status is referenced toward the top of the ‘Info’ tab in the component information panel.
To the right of this label, exists an option to ‘Update Status’ for the active component. Click this drop
down list and choose the desired status from the options presented.
Alternatively, setting the status in an option in the Info Panel ‘Actions’ menu.
From the ‘Actions’ menu, choose ‘Set Component Status’ and then, from the sub-menu,
choose the target component status that you wish to set.
A fly-out panel will appear seeking confirmation for the status change. If the target status
effect is ‘inactive’, the system will also generate the required financial transactions
ledger postings required to successfully set the status.
These transactions are designed to ensure that ‘inactive’ components (i.e. disposed) do not
carry any value or have any gross value. If you proceed, the transactions will be posted to
your ledger.
Once satisfied with the proposed change, click the confirmation button at the bottom of the panel.
This operation does NOT proceed via staged changes, and occurs immediately. You have successfully
updated the status on your component.
Deleting Assets & Components
From time to time, you may create a new asset or asset component and that eventuates to being a mistake.
For these scenarios, the Metrix Asset Management system has support for users deleting assets or
asset components.
Warning
Delete operations cannot be undone.
Assets and/or components that have financial transactions ledger entries within a locked
financial period, cannot be deleted.
Assets must contain at least one (1) active component, so the last remaining component of
an asset cannot be deleted.
Delete Assets
To delete an asset record and its asset components:
Navigate to the main ‘Assets’ page and make a
selection
from the map screen.
At the top of the info panel, click the ‘Actions’ menu.
From the ‘Actions’ menu options, hover or select ‘Parent Asset Actions’ and then choose
‘Delete Asset’.
The asset deletion has been STAGED and is ready to
save.
Delete Component
To delete an asset component from a parent asset:
Navigate to the main ‘Assets’ page and make a
selection
from the map screen.
Info
Make sure you have the correct component selected - the one you wish to delete.
At the top of the info panel, click the ‘Actions’ menu.
From the ‘Actions’ menu options, choose ‘Delete Component’.
The component deletion has been STAGED and is ready to
save.
System Configuration
This section covers areas of the Metrix Asset Management System that
would be managed by a system administrator and/or an asset class
champion. The settings discussed will control how your assets and
components behave within the system. The following topics are covered:
Asset and component classifications
Custom form definitions
Task Type Specifications
Component intervention treatments
Condition functions
Reporting categories
Status Codes
Finance categories & transaction types
Configuring asset classifications
The general assumption throughout this section is that you have access
to a valid Metrix environment and have been issued with an active
user account for that environment WITH ADMINISTRATIVE PRIVILEGES.
If one or both assumptions are incorrect, please contact your system
administrator before continuing – notwithstanding this, feel free to
read on.
Subsections of System Configuration
Classifications
Introduction to Classifications
The classification system within the Metrix Asset Management System
is the framework through which asset & component behaviour is
controlled. The classification configuration can control the
availability of system resources for a given asset/component such as
custom data attributes, available task records, available
intervention treatments, condition capture requirements, and more.
Subsections of Classifications
About
This section contains basic information about classifications in the Metrix Asset Management system.
Subsections of About
Classification Structure
Below is a representation of the asset classification structure within
the Metrix Asset Management System. Each asset classification structure
is broken into four levels being asset class, asset type, asset sub-type,
and asset group. Each of these levels are hierarchical in that:
Asset classes contain one or more asset types,
Asset types contain one or more asset sub-types, and
Asset sub-types contain one or more asset group.
Each asset in your Metrix Asset Management System will be assigned
to an asset classification at the asset group level. Then, within the asset
group definition is one or more component group definitions. Each component
assigned to the asset will be ascribed to one of these component groups.
Example
The following is an example of an Asset Class, Asset Type, Asset SubType, Asset Group, and Component Group represented as a string:
A Component in the above Component Group would be associated with a Sealed Local Road in the Entities Road Infrastructure Transportation Asset stock.
Note
Remember, if you are looking to import data against an asset classification, you will need to use the classification’s identifier. This is typically
a ‘code friendly’ version of the above text string, with spaces replaced by underscores and all characters in lower case.
Furthermore, for imports, there is a separation between the asset classification and the component group. That is, the asset classification identifier
would be used for the column asset_classification_id and the component group identifier would be used for the column component. This would look like the following:
Using the correct ID is important when accessing Metrix via APIs or using CSV file
imports. The following details the ID values that can be used for classification
references.
Asset Classification ID
The asset classification ID references a classification structure down to the asset group
level. Once a classification has been created, the ID value (which will remain constant
regardless of classification alterations) can be found at the top of the classification
configuration screen, below the ‘Classification Label’.
Component Group ID
The component group ID references a specific component group within a greater asset classification
reference.Once a classification has been created, the ID value (which will remain constant
regardless of classification alterations) can be found at the top of the classification
configuration screen, below the ‘Classification Label’.
How To Guides
This section contains how to guides with respect to classifications in the Metrix Asset Management system.
Subsections of How To Guides
Navigating Classifications
To view your asset classifications:
Navigate to the system menu in the upper right-hand corner of the
application and select the “Assets” option.
On the left-hand side of the application, you will notice a list of
menu items. The Asset & Component Classification section is
contained within the first option labelled, “Classifications”. If it
is not already active, click on “Classifications”.
This “Classifications” management screen is broken down by asset
class and then each class is segmented by the class’s types, the
type’s sub-types, and lastly, the sub-type’s groups (asset group
then contain one or more component types).
To navigate the classification structure, simply choose an asset
class, and then the type/sub-type/group combination your desire. The
corresponding configuration and available component types will then
be shown.
Creating Classifications
To create a new asset classification definition, you will need to have
prepared the following pieces of information:
The asset class name, or the name of an existing asset class that
will contain the new classification asset type.
The asset type name, or the name of an existing asset type that will
contain the new classification asset sub-type.
The asset sub-type name, or the name of an existing asset sub-type
that will contain the new classification asset group.
The asset group name.
To get started, click on “Create New Classification” on the
“Classification” management page. A dialog box will appear to prompt you
through the following steps.
Firstly, you need to select or define the asset class name for your
new asset classification. Click on the “Select (or define new)
class” drop down control and either select from the existing list of
asset class names or create a new asset class by typing it into the
input box and clicking “Add”.
Once the asset class is selected or inputted, the system will prompt
for the asset type name that belongs to the above asset class.
Repeat the process defined in step 1 for asset type, asset sub-type,
and asset group.
With the asset group defined, the system will then prompt for the
component type definition(s).
The default “Composite” component type can be either left in place,
r renamed.
To add additional component types, simple click “New Component Type”
and provide a name for the definition.
Once satisfied with the new classification structure, click “Create
Classification”. Your new classification will now be available for
use.
Info
Every classification structure must have at least one (1) defined component type. By default, each classification is pre-seeded with a standard component type called “Composite”.
Users may remove the “Composite” component type definition only when they define at least one (1) alternative component type.
Adding Component Groups to Classifications
If you have a pre-existing classification definition (class / type /
sub-type / group) but you wish to further refine available component
types by adding additional options, you can choose to create component
types against existing asset classifications. To do so, select the
desired asset classification from the “Classifications” management page,
and complete the following steps:
In the “Classification Configuration” panel (on the right-hand side
of the page), click on “New Component Type”.
For component type creation, there are two initial options under the
‘Add Mode’ section. You can create a component type from blank, or
you can create a component type and base it’s initial configuration
against a difference component type’s definition.
From Blank
To create from blank, simply type the new component type name in the
input box and click “Create”.
From Existing
To create from an existing component type, select the desired
component type definition to copy, and then type the new component
type name into the input box. Click “Create” when ready.
Type the name of the new Component type.
Once finished, click ‘Create’ and your new component type will be
ready for configuration.
Deleting Component Groups from a Classification
When a component group is no longer required within the scope of an asset
classification, the Metrix Asset Management system provides functionality
for administrators to permanently remove it from the system.
Warning
Deleting component groups cannot be undone. The following restrictions also apply
when it comes to deleting component groups:
Component group cannot be in use: If the component group is in use by any components,
regardless of status, then the component group cannot be deleted.
Asset classification must have at least ONE (1) component group: If the
component group is the last/only group within the parent asset classification,
then the component group cannot be deleted.
To delete a component group from an asset classification, follow these steps:
To begin, navigate to the component group within the asset classification using
the ‘Classifications’ page. (Assets Menu > Classifications > Selected Classification
> Selected Component Group).
Click on ‘Edit Configuration’ to enter allow editing the classification definition.
This will convert the view to an editing mode with some additional options. Make
sure you have the desired component group selected (for delete) before continuing.
Click on ‘Delete Component Classification’ in the upper right-hand corner of
the component configuration breakdown. If the button is not enabled, this means that
the component cannot be deleted (see warning notes, above).
In the subsequent dialog, confirm your decision by clicking ‘Delete’.
The component group will now be permanently deleted from the system.
Deleting Asset Classifications
When an asset classification is no longer required, the Metrix Asset Management system
provides functionality for administrators to permanently remove it from the system.
Warning
Deleting asset classifications cannot be undone. The following restrictions also apply
when it comes to deleting asset classifications:
Asset classification cannot be in use: If the asset classification is in use by any
assets, regardless of status, then the classification cannot be deleted.
To delete an asset classification, follow these steps:
To begin, navigate to the asset classification using
the ‘Classifications’ page. (Assets Menu > Classifications > Selected Classification).
Click on ‘Edit Configuration’ to enter allow editing the classification definition.
This will convert the view to an editing mode with some additional options. Note:
the selected component group will not have any impact on this process.
Click on ‘Delete Asset Classification’ in the upper right-hand corner of
the parent asset classification configuration breakdown. If the button is not enabled,
this means that the asset classification cannot be deleted (see warning notes, above).
In the subsequent dialog, confirm your decision by clicking ‘Delete’.
The asset classification will now be permanently deleted from the system.
Form Management
The form manager in the Metrix Asset Management System offers a
fully customisable solution for managing all types of asset attribute
data. The original concept behind the form manager was to give users the
freedom of recording the information that matters to their organisation
without needing to fit within predefined system limits.
The following sections provide instruction on you can create your own
custom form using the Metrix form manager to achieve the above
features.
Subsections of Form Management
About
This section contains basic information about form specifications in the Metrix Asset Management system.
Subsections of About
Form Definitions
The form manager allows users to create forms to capture data in a
controlled yet customisable manner. It does this by providing:
Unlimited data field count.
User defined data types including:
Text fields
Number fields
Date fields
List fields that give end-users a range of options to choose from
for the answer.
The ability to mark fields as required.
Form sections to improve readability.
It should be noted that there are several functions within the system that support
custom form definitions. These include, but are not limited to:
Custom attribute forms for assets and components,
Task Type forms, and
Mobile Data Capture custom forms.
As such, the steps involved in initiating a new form definition can
differ from case to case. However, once the form has been established,
the construction and manipulation of the form’s attributes and layout is
identical between cases.
How To Guides
This section contains how to guides with respect to form specifications in the Metrix Asset Management system.
Subsections of How To Guides
Creating Forms
This section covers the necessary steps involved in creating a new form
definition within the Metrix Asset Management System.
Info
With regards to Custom Attribute Forms, simply creating a form does NOT make
it available for use. You still need to assign the form to the Classification(s)
that should use the form.
To create a new form definition within Metrix, complete the
following steps:
From the Form Manager page within the Metrix configuration section,
click on ‘Create New Form’.
On the right-hand side, a new default form definition will appear.
This layout is the same for all types of form designers within the
Metrix Asset Management System. That is, form element management
on the left, form structure in the middle, and a form preview on the
right.
Firstly, in the text input at the top of the form designer, give you
form a title – this value is defaulted to ‘New Form’. Simply
overwrite that value with the title of your form.
Adding fields to a form definition
Next, try adding a new field to the form definition. To do this,
simply choose from the new attribute templates on the left-hand side
of the form designer. Each of these templates offer a distinct set
of default attribute field constraints, including:
a. Text: A free text input field with no restrictions
b. Whole Number: A numeric input field that restricts entries to
whole numbers only.
c. Decimal Number: A numeric input field that allows entry of
numbers to decimal precision.
d. Date: A calendar-based input field that allows users to pick
date values.
e. List: An empty option row configuration. Once configured, users
will need to choose from the list of options presented.
f. Yes/No: A preconfigured option row field. This is pre-populated
with two options – ‘Yes’ and ‘No’.
Once you add the field, you will be presented with the attribute
field configuration dialog.
In this dialog, you can alter the attribute label – this is
defaulted to ‘New Field’ and should be replaced before you can
commit the field.
Another option to set is the ‘Help’ option for the field. Attribute
help, if set, will be shown to the user when they hover or click on
the question-mark icon next to the field in the form layout. This
can be a short sentence giving context to the attribute.
The ‘Required’ checkbox will allow you to set this attribute as NOT
optional. This will mean users cannot save an entry until they fill
out this specific (and any other required) attribute(s).
Lastly, for attribute configuration, you can alter the ‘Data Type’
and ‘Attribute Control’. These two settings essentially enable you
to essentially overwrite the initial attribute template you chose in
step 4. For example, assuming that you selected a ‘Text’ attribute
template, you could change this to a ‘Whole Number’ for the ‘Data
Type’ and/or ‘Options List’ for the ‘Attribute Control’.
Additional settings for ‘Options List’ Attributes
When the ‘Attribute Control’ is set to ‘Options List’ there are
additional configuration steps that need to be completed before
committing the attribute definition. That is, to set the option
array that the user will be presented with. In the screenshot below,
the attribute example has been configured with two (2) options –
‘Yes’ and ‘No’.
The list contains four (4) columns. From left to right, they are:
a. Label: This is the text that is displayed to the user.
b. Value: This is the value that is stored as the actual attribute
value.
c. Is Active: This checkbox allows you to disable certain options from
an Options List array.
d. Delete (untitled): On the far right-hand side of each Options List
configuration is a ‘minus’ symbol. This represents the ability to
remove an Options List option from the configured list.
To add an option to the Options List configuration, simply click
‘Add Option’ at the base of the existing list. Fill out the ‘Label’
and ‘Value’ for the new option.
Adding Core Metric fields to a form definition
In addition to ‘Attribute Templates’, the left-hand panel also
contains various predefined ‘Core Metric Field’ definitions that can
be added to the form. These fields are special in the following
ways:
a. Metric fields can be used as a Data Filter.
b. Metric fields can be used to define a Map Theme.
A ‘Core Metric Field’ definition is hard coded as a ‘Decimal Number’
field that is NOT marked as required. The following fields are
preconfigured in the system:
a. Length,
b. Height,
c. Width,
d. Area,
e. Depth,
f. Diameter,
g. Volume.
It should be noted that any single Core Metric Field can only be
used once per form definition. That is, you cannot add ‘Height’ more
than once to any one form – it can, however, be used on as many
separate forms as you wish.
Managing Form Layout
With the desired attributes established on your form definition, you
may wish to tweak the layout in one or more ways. The Metrix
form designer allows users to do such quickly and easily.
To relocate an attribute within the form definition, you can click
on the arrow up/down buttons on the centre form structure layout
when in edit mode.
To remove a field from a form definition, you can click on the
trash-can icon on the right-hand side on the field within the form
definition.
Managing Form Groups
Lastly, one or more attribute fields can be grouped within a form
section. To create a new field group, simply click ‘New Section’ on
the left-hand side of the form designer (beneath the Core Metric
Fields picker).
To move fields into the section, simply move the field up or down
until its position is within the section outline. It should be noted
that each group will default to the bottom of the existing form
definition layout.
To rename a form group, click on the ‘Edit’ icon (pencil) next to
the current group title. Replace the current title and save that
change.
Form groups (and all of the attributes within that group) can be
moved up and down the form in the same manner as individual
attribute fields. To do so, use the up/down arrows beneath the group
title.
To remove a form group from the form definition, click on the menu
option (next to the up/down buttons). There are two options:
a. Remove Section: This will remove the form group from the
definition, but any attributes that were a part of that group
will be retained, and simply left as un-grouped attributes.
b. Remove Section and Fields: This will remove the form group as
well as any of the attributes that were part of that group.
Editing Existing Forms
From time to time, it becomes necessary to edit the structure or
contents of an existing attribute form. To do this, use the following
steps as a guide:
Navigate to the form manager page (Assets Menu > Form Manager >
Selected Form).
With the form you wish to edit selected, simple click on the ‘Edit
Form’ button at the top of the form preview.
From here, the steps to alter the form contents are identical to
creating a new form.
When you have finished the alterations, click on ‘Save Changes’.
Alternatively, click ‘Cancel’ to revert to the original form.
Info
Removing a field from a form definition will NOT have any impact
on any existing data stored against that field throughout your environment.
It will just suppress that information from being displayed and
stop future entry of values against it.
Assigning Forms to Classifications
Once a form definition has been constructed, you can assign it to a
specific classification (or a set of classifications) in order to use
that form in production.
Info
This process relates to Custom Attribute form definitions only.
For other form types, see the relevant section of this user guide
for implementing the form in production.
To begin assigning a form to a classification or set of
classifications, navigate to that form within the Form Manager page
(Assets Menu > Form Manager > Selected Form).
Underneath the form title, there is an ‘Actions’ button – this type
of button is implemented system wide as an indicator of additional
options to manage a resource.
From the ‘Actions’ menu, choose ‘Manage Classification Links’.
A dialog box will appear with lists of available links that could be
made. On the left-hand side, are Asset Classifications. On the
right-hand side, are Component Classifications. These break down as
follows:
Assigning a form to an Asset Classification will make the form
behave as a custom form for an entire asset. That is, all
Components of that Asset will share the attributes on that form.
Assigning a form to a Component Classification will only make
the form available when users are editing that specific
Component Type. Each Component within an Asset can have
different form definitions (i.e. base vs seal forms).
To assign a form to a classification, simply click ‘Assign’ next to
that classification title.
To unassign a form from a classification, simply click ‘Unassign’
next to that classification title.
The system will manage the availability of the above buttons based
on the form state in the system.
Using the filter options
When there are a great number of Classification configurations to
wade through, it can become difficult to find the one you are after.
This is where the filter option comes in handy. To filter the
classification list, simply click on the ‘Filter’ icon at the top of
the classification list – the icon looks a little like a funnel.
To filter by a specific letter or set of letters, simply type them
into the text input that will appear above the classification list.
To filter by classifications that already have the form assigned,
mark the checkbox titled ‘Show Assigned Only’.
Deleting Forms
When a form is no longer required, the Metrix Asset Management system provides functionality
for administrators to permanently remove it from the system.
Warning
Deleting form definitions cannot be undone. The following restrictions also apply
when it comes to deleting forms:
Form definition cannot be in use: If the form definition is currently assigned
to any asset or component classification, then it cannot be deleted.
To delete a form definition, follow these steps:
To begin deleting a form definition, navigate to that form within the Form Manager page
(Assets Menu > Form Manager > Selected Form).
Underneath the form title, there is an ‘Actions’ button – this type
of button is implemented system wide as an indicator of additional
options to manage a resource.
From the ‘Actions’ menu, choose ‘Delete Form’. If the button is not enabled, this means that
the form cannot be deleted (see warning notes, above).
In the subsequent dialog, confirm your decision by clicking ‘Yes delete this form’.
The form will now be permanently deleted from the system.
Task Types
Task Types, in the Metrix Asset Management System, provides a means
for users to record multiple pieces of information against a single
component over time.
The following sections contain instruction on you can create your own task types
accompanied by a robust form design using the Metrix form manager.
Subsections of Task Types
About
This section contains basic information about task type specifications in the Metrix Asset Management system.
Subsections of About
Task Types
A Task Type specification is backed by the built-in form manager
(see Form Management )
delivering the same freedom to record the information that matters to your
organisation, without needing to fit within any predefined system limits.
Each task definition is essentially an attribute form that can
be posted against a component many times – to track the changes over time.
In information management speak, the task definitions offer one-to-many relationship capabilities.
Further to the above, a task definitions can also be linked to one or more attached documents and/or images. These
attachments can be used to provide additional context to the task definition. When mobile application users
interface with the task definition, they can view the attachments and download them to their device for offline.
Sample use cases for task definition attachments include:
A photo of a damaged component
A PDF of a service manual
A photo of a completed task
How To Guides
This section contains how-to-guides with respect to task type specifications in the Metrix Asset Management system.
Subsections of How To Guides
Creating Task Types
This section covers the necessary steps involved in creating a new
task type definition within the Metrix Asset
Management System. As the task types are backed by the form management
system (see Form Management ),
after a certain point the instructions will defer to the directions on
creating/managing a form definition.
Info
As with the custom attribute forms, simply creating a task type
definition does NOT make it available for use. You still need to assign the
task type to the Classification(s) that should use it.
To create a new task type definition within Metrix,
complete the following steps:
Navigate to the ‘Task Types’ management page (Assets
Menu > Task Types).
Click on ‘Create New Task Type’ at the top of the page
This will create and display a default task type definition with a
single form field, ‘Comment’.
Replace the Task Type Name (‘New Form’) with a task name that
relates to the new task, and then begin editing the task type
form layout. For this, follow the steps outlined in Creating
a new Form.
Editing Existing Task Types
From time to time, it becomes necessary to edit the structure or
contents of an existing task type specification. To do this, use the
following steps as a guide:
Navigate to the task types manager page (Assets Menu >
Task Types > Selected Task Type).
With the task type you wish to edit selected, simple click on the
‘Edit’ button at the top of the preview.
From here, the steps to alter the form contents are identical to
creating a new form.
When you have finished the alterations, click on ‘Save Changes’.
Alternatively, click ‘Cancel’ to revert to the original form.
Info
Removing a field from a task type definition will NOT have any impact on
any existing data stored against that field throughout your environment.
It will just suppress that information from being displayed and stop
future entry of values against it.
Task Type Attachments
Task Type attachments are used to provide additional context to a task definition. When mobile application users
interface with the task definition, they can view the attachments and download them to their device for offline use.
To add an attachment to a task definition, follow these steps:
Navigate to the ‘Task Types’ management page (Assets Menu > Task Types).
With the task type you wish to attach to selected, simple click on the
‘Add Attachments’ button at the top of the preview.
This will open a dialog box where you can upload the attachment.
Supported file types include images, PDFs, and other common document formats.
Please note, that there is also the option to link to an existing attachment.
This is useful when the attachment is already stored in the system, and you
wish to link/share it with another task definition.
Once the attachment is uploaded, it will be displayed in the task type preview.
You can add multiple attachments to a single task definition.
Assigning Task Types to Classifications
Once a task type has been constructed, you can assign it to a
specific classification (or a set of classifications) to use
in production.
To begin assigning a task type to a classification or
set of classifications, navigate to that task type within the
Task Type page (Assets Menu > Task Types > Selected Task Type).
Underneath the task type title, there is an ‘Actions’ button – this
type of button is implemented system-wide as an indicator of
additional options to manage a resource.
From the ‘Actions’ menu, choose ‘Manage Classification Links’.
A dialog box will appear with lists of available links that could be
made. On the left-hand side, are Asset Classifications. On the
right-hand side, are Component Classifications. These break down as
follows:
Assigning a task type to an Asset Classification will make the
task type available on the ‘Parent Asset’ tab of all child
Components. That is, all Components of that Asset will share the
task type.
Assigning a task type to a Component Classification will only
make the task type available when users are editing that specific
Component Type. Each Component within an Asset can have
different task type links definitions (i.e. base vs seal forms).
To assign a task types to a classification, simply click ‘Assign’ next
to that classification title.
To unassign a task type from a classification, simply click
‘Unassign’ next to that classification title.
The system will manage the availability of the above buttons based
on the form state in the system.
Using the filter options
When there are a great number of Classification configurations to
wade through, it can become difficult to find the one you are after.
This is where the filter option comes in handy. To filter the
classification list, simply click on the ‘Filter’ icon at the top of
the classification list – the icon looks a little like a funnel.
To filter by a specific letter or set of letters, simply type them
into the text input that will appear above the classification list.
To filter by classifications that already have the task types assigned,
mark the checkbox titled ‘Show Assigned Only’.
Deleting Task Types
When a task type is no longer required, the Metrix Asset Management
system provides functionality for administrators to permanently remove it from the system.
Warning
Deleting task type specifications cannot be undone. The following restrictions also apply
when it comes to deleting task types:
Task Type definition cannot be in use: If the task type is currently assigned
to any asset or component classification, then it cannot be deleted.
Task Type definition cannot have tasks recorded against it: If there are any tasks
recorded against the task type, then it cannot be deleted.
To delete a task type definition, follow these steps:
To begin deleting a task type definition, navigate to that task type within the
Task Type management page
(Assets Menu > Task Types > Selected Task Type).
Underneath the task type title, there is an ‘Actions’ button – this type
of button is implemented system-wide as an indicator of additional
options to manage a resource.
From the ‘Actions’ menu, choose ‘Delete’. If the button is not enabled, this means that
the task type cannot be deleted (see warning notes, above).
In the subsequent dialog, confirm your decision by clicking ‘Yes, delete’.
The task type definition will now be permanently deleted from the system.
Intervention Treatments
Intervention Treatments in the Metrix Asset Management System
provide the ability for users to store and manage unit rates and default
useful lives for a variety of component interventions. Furthermore, any
rationale used in determining the unit rate information for a given
intervention treatment can be stored as an attachment against that
treatment for later reference.
The unit rate information and default useful life capacity of
intervention treatments are pivotal to many of the predicted cost and
consumption metrics within the system. Additionally, when used in
conjunction with the system’s Next Treatment logic, the intervention
treatments provide for more reliable costing of impending capital works
programs.
The following sections provide instruction on you can create your own
intervention treatments within the Metrix Asset Management System.
Subsections of Intervention Treatments
About
This section contains basic information about intervention treatment definitions in the Metrix Asset Management system.
Subsections of About
Treatment IDs
Using the correct ID is important when accessing Metrix via APIs or using CSV file
imports. The following details the ID values that can be used for treatment code
references.
Treatment Definition ID
The treatment ID is the only way to make a valid reference to an intervention treatment from external
locations such as API calls or CSV Data Imports. Once a treatment definition has been created, the ID
value (which will remain constant regardless of alterations) can be found in the treatment preview
under the section labelled, ‘Code’.
Treatment Cost Methods
Each intervention treatment unit rate will be based off one of the
following three (3) ‘Cost Rate Methods’:
Unit Rate: when the calculation of a components value is dependent
on the size (or amount) of the component. The Unit Rate is
multiplied by the component ‘Cost Unit’ value to yield the
calculated cost. For Unit Rate, the formula for replacement cost is:
Fixed Value: when the components value is a known fixed figure. No
calculation occurs for Fixed Value costs. For Fixed Value, the
formula for replacement cost is:
$$\lbrack Unit\ Rate\rbrack$$
Network Asset: when the individual cost of the component is
negligible; at a network level however, the cost of a large
collection of said components is substantial, and that is what is
stored. To calculate individual component cost of a Network Asset,
the proportionate share of ‘Cost Units’ of the component is
multiplied by the Network Asset value. For Network Assets, the
formula for replacement cost is:
Consider the road surface component of a road Asset. The ‘Cost Units’ of
the component relates to the area (square metres) of the surface - say
1200 m^2^. The unit rate of the treatment is $3.25. The replacement
cost of the Component is therefore:
$$\$1200 \times 3.25 = \$3900$$
Fixed Value
Consider a shade structure. The fixed value of the treatment is $6500.
The replacement cost is therefore:
$$\$6500$$
Network Asset
Consider a network of street bins. The network rate of the treatment is
$15,000 (which is the total cost of all the bins in the network). The
network consists of 100 bins; 80 of these are standard street bins, 20
are premium street bins. To cater for the difference in the individual
costs, the ‘Cost Units’ for the standard street bins is 1, and 2 for the
premium street bins.
The individual cost for a standard street bin is therefore:
This section contains how to guides with respect to intervention treatment definitions in the Metrix Asset Management system.
Subsections of How To Guides
Creating Intervention Treatments
This section covers the necessary steps involved in creating a new
intervention treatment within the Metrix Asset Management System.
This extends to the initial creation of the treatment with basic field
values. In subsequent sections, details such as attachments, bulk
creation, and history will also be detailed.
Info
As with most resources within Metrix, simply creating an intervention treatment
does NOT make it available for use. You still need to assign the intervention
treatment to the Classification(s) that should use it.
To create a new intervention treatment within Metrix, complete the
following steps:
Navigate to the ‘Treatments’ management page (Assets Menu >
Treatments).
Click on ‘Create New Treatment’ at the top of the page.
This will create and display a default treatment definition on the
right-hand side of the page.
From here, you will first need to set the ‘Treatment Name’ and
provide a short ‘Description’ for the new intervention treatment.
Simply type these values into the corresponding form fields.
Next, you will need to choose the ‘Cost Method’ of the intervention
treatment. See
(see Background
for more information on choosing an appropriate method.
With the ‘Cost Method’ chosen, the interface will react by asking
for follow up information related to this method. Firstly, you will
need to set the ‘Unit of Measure’ for the intervention treatment.
This is a free text field and is typically populated with values
such as ‘metres’, ‘square metres’, and the like.
Next, set the ‘Unit Rate’ value – this is the dollar value unit
rate for the treatment.
Lastly, set the optional ‘Default Useful Life’ field. This value, if
set, will provide a suggested useful life to users applying this
treatment to components.
Once all fields are completed as desired, click ‘Create’. The
treatment has now been created.
Creating Intervention Treatments in Bulk
Given the breadth of scope surrounding intervention treatments, it can
become overwhelming to consider keying each definition into the system
manually. For this reason, the Metrix Asset Management System
supports importing bulk treatment definitions through simply pasting
compatible Excel/CSV data rows. The following instructions guide you
through using this bulk import process.
Navigate to the Treatments management page (Assets Menu >
Treatments).
Next to the ‘Create New Treatment’ button, click on the ‘Actions’
menu.
From the drop-down options, select ‘Import Treatments from CSV’.
A dialog will appear with an input for pasting Excel/CSV data, and
some basic instructions on use. Before proceeding, consider the
following notes on data formatting.
a. The pasted data should NOT contain the header row.
b. The pasted data should contain the following fields (in this
specific order):
Treatment
Description
Cost Method ID (see below for details)
Unit Rate
Unit of Measure
Default Useful Life
c. With regards to the Cost Method ID, the accepted values are:
For Unit Rate, use
$ unit\_rate $
For Network Rates, use
$ network\_assets $
For Fixed Rate, use
$ fixed\_value $.
Paste your formatted data into the text box.
A preview of your pasted data will appear in a table view below the
text box. Any errors will be highlighted in this preview.
To confirm the creation of the previewed treatments, click ‘Save’
below the preview table. Alternatively, click ‘Clear’ to cancel.
The imported treatments will now be created.
Editing existing Intervention Treatments
As conditions over time adjust, it becomes necessary to maintain your
treatment definitions to reflect the new normal. Typically, this means
updating unit rates, and/or default useful lives. To edit an existing
intervention treatment, follow these steps:
Navigate to the desired Intervention Treatment (Assets Menu >
Treatments > Selected Treatment).
With the desired treatment selected, an editable preview of the
definition will appear on the right-hand side of the page.
Enter the required alterations to the selected treatment.
Once complete, simply click ‘Update’ to commit the changes.
Attaching Information to Intervention Treatments
Given the amount of detail that goes into calculating treatment unit
rates and default life values, there is often a large amount of
supporting documentation around the intervention treatments inside the
Metrix Asset Management System. To assist with managing this
information, the system makes it easy to upload these documents against
the treatment definition directly. To do so, follow these steps:
Navigate to the desired Intervention Treatment (Assets Menu >
Treatments > Selected Treatment).
With the treatment selected, a preview of the treatment definition
will appear on the right-hand side of the page.
At the bottom of this preview, is an ‘Actions’ menu that provides
additional management options for the selected treatment. Click on
the ‘Actions’ menu.
From the drop-down menu, choose ‘Manage/View Attachments’.
The standard Metrix attachments interface will then display in a
new dialog box. Any existing attachments will be displayed, as well
as an option to upload additional documents.
To create a new attachment against the selected treatment, you can
do one of the following:
a. Drag and drop the file into the ‘drop space’ denoted by a
dashed line. The attachment will immediately upload and be
linked to the treatment.
b. Choose the file from your file system using the file picker.
To do this, click ‘Select File for Upload’ and then choose the
desired file from the file picker. The attachment will
immediately upload and be linked to the treatment.
c. Choose from an existing attachment that is already linked to
another Intervention Treatment. To do this, click ‘Link to an
Existing Upload’ and choose the attachment from the subsequent
list. This will mean that you do not have multiple copies of the
same attachment but can still access it from many treatments.
Once finished, simply close the dialog box.
Viewing Intervention Treatment History
At any time in the Metrix Asset Management System, you can see the
status of a treatment at any time in its history. To do so, follow these
steps:
Navigate to the desired Intervention Treatment (Assets Menu >
Treatments > Selected Treatment).
With the desired treatment selected, an editable preview of the
definition will appear on the right-hand side of the page.
At the bottom of this preview, is an ‘Actions’ menu that provides
additional management options for the selected treatment. Click on
the ‘Actions’ menu.
From the drop-down menu, choose ‘Show Treatment History’.
A dialog box will appear, showing the earliest record of the current
intervention treatment.
At the bottom of this preview are two arrows for navigating through
historic versions of the treatment.
Just above these arrows, is an ‘Updated on’ field detailing when the
change occurred.
Assigning Intervention Treatments to Classifications
Once a treatment definition has been constructed, you can assign it to a
specific classification (or a set of classifications) in order to use
that treatment in production as either a component current treatment, or
next treatment.
To begin assigning treatment to a classification or set of
classifications, navigate to that treatment within the Intervention
Treatment page (Assets Menu > Treatments> Selected Treatment).
With the desired treatment selected, an editable preview of the
definition will appear on the right-hand side of the page.
At the bottom of this preview, is an ‘Actions’ menu that provides
additional management options for the selected treatment. Click on
the ‘Actions’ menu.
From the ‘Actions’ menu, choose ‘Manage Classification Links’.
A dialog box will appear with lists of available links that could be
made. It should be noted that only Component Classification links
are valid for Intervention Treatments.
To assign a treatment to a classification, simply click ‘Assign’
next to that classification title.
To unassign a treatment from a classification, simply click
‘Unassign’ next to that classification title.
The system will manage the availability of the above buttons based
on the form state in the system.
Using the filter options
When there are a great number of Classification configurations to
wade through, it can become difficult to find the one you are after.
This is where the filter option comes in handy. To filter the
classification list, simply click on the ‘Filter’ icon at the top of
the classification list – the icon looks a little like a funnel.
To filter by a specific letter or set of letters, simply type them
into the text input that will appear above the classification list.
To filter by classifications that already have the treatment assigned,
mark the checkbox titled ‘Show Assigned Only’.
Deleting Intervention Treatments
When a treatment is no longer required, the Metrix Asset Management system provides functionality
for administrators to permanently remove it from the system.
Warning
Deleting treatment definitions cannot be undone. The following restrictions also apply
when it comes to deleting treatments:
Intervention treatment cannot be in use: If the treatment definition is currently assigned
to any component within the system, regardless of status, then it cannot be deleted.
To delete a treatment definition, follow these steps:
To begin deleting an intervention treatment, navigate to that treatment (Assets Menu > Treatments
> Selected Treatment).
On the bottom right-hand side of the treatment preview, there is an ‘Actions’ button – this type
of button is implemented system wide as an indicator of additional options to manage a resource.
From the ‘Actions’ menu, choose ‘Delete Treatment’. If the button is not enabled, this means that
the treatment cannot be deleted (see warning notes, above).
In the subsequent dialog, confirm your decision by clicking ‘Delete’.
The treatment will now be permanently deleted from the system.
Condition Functions
Condition Functions in the Metrix Asset Management System provide
the ability for users to tailor their condition assessment methodologies
for both individual component types as well as globally. A Condition
Function is a scored and weighted questionnaire designed to lead
inspectors through their review of asset quality, function, and
performance. In addition to the weighted matrices, a condition function
offers the capacity for ancillary information gathering at the time of
the inspection with ’non-weighted’ questions.
Further to the above, a condition function can also be linked to one or more attached documents and/or images.
These attachments can be used to provide additional context to the condition function. When mobile application
users interface with the condition function, they can view the attachments and download them to their device for
offline. Sample use cases for condition function attachments include:
A photo of a component in Excellent condition
A PDF manual guiding users through the condition ranges
The following sections provide instruction on you can create your own
condition functions within the Metrix Asset Management System.
Subsections of Condition Functions
About
This section contains basic information about condition function definitions in the Metrix Asset Management system.
The fundamental principle of condition functions within the Metrix
Asset Management System is a guided questionnaire that accumulates
weighted scores throughout its completion – with the ultimate score
yielding a condition result.
Further to the above, a condition function can also be linked to one or more attached documents and/or images.
These attachments can be used to provide additional context to the condition function. When mobile application
users interface with the condition function, they can view the attachments and download them to their device for
offline. Sample use cases for condition function attachments include:
A photo of a component in Excellent condition
A PDF manual guiding users through the condition ranges
Subsections of About
Condition Function Scoring
The fundamental principle of condition functions within the Metrix
Asset Management System is a guided questionnaire that accumulates
weighted scores throughout its completion – with the ultimate score
yielding a condition result. There is no limit on the number of
questions that can be set within a condition function. The only
requirement is that the total weight of scored results sums to 100. See
below for an example condition function.
Question 1 - Weight 40% - Are there any potholes occurring throughout the segment?
Options
Option Score
No potholes
0 points
Few individual potholes seen
40 points
Potholes occurring in clusters
80 points
Potholes grouped throughout segment
100 points
Question 2 - Weight 30% - Are the any shoves occurring throughout the segment?
Options
Option Score
No shoves
0 points
One shove formed outside of travel lane
50 points
Multiple shoves and/or Shoves within travel lane
100 points
Question 3 - Weight 30% - Is there evidence of Cracking or Flushing?
Options
Option Score
None
0 points
Minor cracking evident
20 points
Moderate cracking evident
60 points
Significant cracking or flushing evident
100 points
Using the above example condition function as a template, the following
results would be generated by the system as condition results.
Question
Answer
Points
Weighted Result
1
Few individual potholes seen
40
$ 40 \times 40\% = 16 $
2
One shove formed outside of travel lane
50
$ 50 \times 30\% = 15 $
3
Moderate cracking
60
$ 60 \times 30\% = 18 $
49 out of 100
Info
The weighted condition score is always out of 100 – with 100 being a poor
condition and 0 being excellent. Metrix will map these scores to a
default condition scale of 1-5 and these scales can be set by system administrators.
A score of 49/100 would map to a condition of 2.
The Metrix Asset Management System comes pre-configured with a
default condition function for use by any newly created classifications.
This function has one (1) question with five (5) answer options detailed
below:
Question: Condition (Weight 100%)
Options
Option Score
1
0 points
2
20 points
3
60 points
4
80 points
5
100 points
As seen above, the default condition function simply defers the
condition result to the end user’s subjective assessment.
How To Guides
This section contains how to guides with respect to condition function definitions in the Metrix Asset Management system.
Subsections of How To Guides
Creating Condition Functions
This section covers the necessary steps involved in creating a new
condition function within the Metrix Asset Management System.
This extends to the initial creation of the function with scored &
weighted questions, as well as additional information fields.
In subsequent sections, details such as editing functions and
assigning functions to component classifications is discussed.
Info
As with most resources within Metrix, simply creating a condition function
does NOT make it available for use. You still need to assign the condition
function to the Classification(s) that should use it.
By DEFAULT, all component classifications are initialised to utilise the built-
in condition function which essentially requires users to choose a value
between 1 and 5 to reflect the component condition.
To create a new condition function within Metrix, complete the
following steps:
Navigate to the ‘Condition functions’ management page (Assets Menu >
Condition functions).
Click on ‘Create New Condition Function’ at the top of the page.
This will initialise and display a default condition function definition
on the right-hand side of the page.
From here, you will first need to set the ‘Function Name’ and
provide a short ‘Description’ for the new condition function.
Simply type these values into the corresponding form fields.
Next, you will define the condition score factors for the new condition
function. This will form the set of questions asked of the user in
order to derive a final condition score.
Defining Condition Score Factors
To initialise your first condition score factor, simply click on the
‘Add Condition Score Factor’ button.
Each condition score factor you define will require the following:
a. Enter a Factor Label - this is the question that will be asked of
the end user.
b. Confirm a Factor Weight for the score.
c. For each answer Option, provide an Option Label and Score.
To perform the above steps, simply type these values into the corresponding
form fields. In the screenshot below, the Factor Label has been set to ‘Question Label’,
the Factor Weight has been set to 60%, the Option Label has been set to
‘First Option’ and the Option Score was set to 56.
To add more options to the condition score factor, simply click ‘Add Option’ and fill out
the new Option Label and Option Score.
To add additional condition score factors, simply click on ‘Add Condition
Score Factor’.
Info
You can learn more about the structure and purpose of Condition Functions
within these docs. See
Initialising a Metrix account
for further details.
Defining Extra Information Fields
The Extra Information Fields allow you to create additional inputs for users
to populate when completing condition assessments using the new condition
function. An extra information field does not contribute to the
overall condition score - rather, provides any required context you may
wish to collect.
To add new extra information fields to your condition function, simply click
‘Add Extra Information Field’.
Each extra information field you define will require the following:
a. Enter a field label - this is the question that will be asked of
the end user.
b. If applicable, mark the extra field as required by ticking the
checkbox, ‘Required’.
c. Choose the response type as either ‘Text Value’ or ‘Option List’.
See below for details on the two options:
From Text
This will present the user with a free text input field to respond
to the extra information question.
Option List
This will require you to configure a list of valid answers to the
extra information question.
When using ‘Option List’, the extra information question must be
marked as required.
‘Option List’ options can be added and removed once ‘Option List’
has been chosen from the drop down.
Note
Don’t forget that the total condition factor score weights must add
up to 100%. Throughout the function definition, any errors will be
highlighted for you to keep track of.
Once complete, simply click ‘Save Function’ to commit the
new function.
Editing Existing Condition Functions
As your organisation’s Asset Maturity evolves over time, it may
become necessary to alter your condition functions to reflect additional
or revised data scopes. Typically, this involves adjusting some
condition factor scores/weights, more or less condition factors,
and/or adjusting extra field definitions. To edit an existing
condition function, follow these steps:
Navigate to the desired Condition Function (Assets Menu >
Condition Functions > Selected Function).
With the desired condition function selected, a preview of the
definition will appear on the right-hand side of the page. This
view will default to read-only. To begin editing the condition
function, click the ‘Edit Function’ button.
Enter the required alterations to the selected condition function.
Once complete, simply click ‘Save Function’ to commit the changes.
Condition Function Attachments
Condition Function attachments are used to provide additional context to a function definition. When mobile application users
interface with the condition function, they can view the attachments and download them to their device for offline use.
To add an attachment to a condition function, follow these steps:
Navigate to the ‘Condition Function’ management page (Assets Menu > Condition Functions).
With the condition function you wish to attach to selected, simple click on the
‘Add Attachments’ button at the top of the preview.
This will open a dialog box where you can upload the attachment.
Supported file types include images, PDFs, and other common document formats.
Please note, that there is also the option to link to an existing attachment.
This is useful when the attachment is already stored in the system, and you
wish to link/share it with another condition function.
Once the attachment is uploaded, it will be displayed in the condition function preview.
You can add multiple attachments to a single condition function.
Assigning Condition Functions to Classifications
Once a condition function has been constructed, you can assign it to a
specific classification (or a set of classifications) in order to use
that function in production when completing condition assessment
inspections.
To begin assigning condition functions to a classification or set of
classifications, navigate to that function within the Condition
Function page (Assets Menu > Condition Functions> Selected Function).
With the desired function selected, a preview of the
definition will appear on the right-hand side of the page.
At the top-right of this preview, is an ‘Actions’ menu that provides
additional management options for the selected function. Click on
the ‘Actions’ menu.
From the ‘Actions’ menu, choose ‘Manage Classification Links’.
A dialog box will appear with lists of available links that could be
made. It should be noted that only Component Classification links
are valid for Condition Functions.
To assign a function to a classification, simply click ‘Assign’
next to that classification title.
To unassign a function from a classification, simply click
‘Unassign’ next to that classification title.
The system will manage the availability of the above buttons based
on the form state in the system.
Using the filter options
When there are a great number of Classification configurations to
wade through, it can become difficult to find the one you are after.
This is where the filter option comes in handy. To filter the
classification list, simply click on the ‘Filter’ icon at the top of
the classification list – the icon looks a little like a funnel.
To filter by a specific letter or set of letters, simply type them
into the text input that will appear above the classification list.
To filter by classifications that already have the function assigned,
mark the checkbox titled ‘Show Assigned Only’.
Deleting Condition Functions
When a condition function is no longer required, the Metrix Asset Management
system provides functionality for administrators to permanently remove it from the system.
Warning
Deleting condition functions cannot be undone. The following restrictions also apply
when it comes to deleting condition functions:
Condition function cannot be in use: If the condition function is currently assigned
to any component within the system, regardless of status, then it cannot be deleted. That is,
if a condition assessment has been conducted using the condition function definition, then it
cannot be removed.
To delete a condition function, follow these steps:
To begin deleting a condition function, navigate to that function (Assets Menu > Condition functions
> Selected Condition function).
Underneath the condition function title, there is an ‘Actions’ button – this type
of button is implemented system wide as an indicator of additional
options to manage a resource.
From the ‘Actions’ menu, choose ‘Delete’. If the button is not enabled, this means that
the function cannot be deleted (see warning notes, above).
In the subsequent dialog, confirm your decision by clicking ‘Delete’.
The condition function will now be permanently deleted from the system.
Report Categories (Tags)
Report Categories, sometimes referred to as Tags, in the Metrix Asset
Management System provide the ability for users to apply custom levels
of organisation to their asset portfolio. The following sections provide instruction
on you can create your own report categories within the Metrix Asset Management System.
Subsections of Report Categories (Tags)
About
This section contains basic information about report category definitions in the Metrix Asset Management system.
Subsections of About
Report Categories
Report Categories, sometimes referred to as Tags, in the Metrix Asset
Management System provide the ability for users to apply custom levels
of organisation to their asset portfolio. This has proven to be very useful for
grouping otherwise unrelated assets and components together for specific
reporting purposes.
A report categories is simply a custom category, set by your administrators,
with pre-defined category options, also configured by your administrators.
Example
A classic example of a report category is a ‘Responsible Officer’ report category
for ‘Airport’ assets. At an airport, there are many different asset classifications
ranging from water/sewer infrastructure, transportation assets, as well as the
airport specific items. All of these pieces of infrastructure could have
different asset/component classifications that span different asset classes. A
report category of ‘Responsible Officer - Airport Manager’ would allow you to
group them together for specific reporting purposes.
Report Category ID
Using the correct ID is important when accessing Metrix via APIs or using CSV file
imports. The following details the ID values that can be used for report category
references.
Report Category & Option ID
The report category ID is the only way to make a valid reference to a report category & option combination from external
locations such as API calls or CSV Data Imports. Once a report category has been created, the ID
value (which will remain constant regardless of alterations) can be found in the report category preview table
in the ‘Code’ column.
How To Guides
This section contains how to guides with respect to report category definitions in the Metrix Asset Management system.
Subsections of How To Guides
Creating Report Categories
This section covers the necessary steps involved in creating a new
report category within the Metrix Asset Management System.
This extends to the initial creation of the category, as well as
populating the category options for it.
To create a new report category within Metrix, complete the following
steps:
Navigate to the ‘Report Categories’ management page (Assets Menu >
Report Categories).
Click on ‘Create New Report Category’ at the top of the page.
This will initialise and display a blank report category definition
in a new dialog window.
Set the new ‘Category Name’ by entering it into the text input.
Set the label for the first ‘Category Option’ for the report
category by typing it into the corresponding option input.
To add additional ‘Category Options’ simply click on the plus (’+’)
symbol next to one of the existing options.
To remove a ‘Category Option’ simply click the remove (’-’) symbol
next to the corresponding option.
Info
Each report category definition must have at least one (1) report
category option assigned to it. This is why the first option in
each set of report category definitions does not have a remove
option.
When you have finished defining the report category, click ‘Create’.
Edit Existing Report Categories
As your organisation evolves over time, it may become necessary
to alter your report category definitions to reflect additional
or revised category options. Typically, this involves adding and/or
removing category options. To edit an existing report category definition
set, follow these steps:
Navigate to the desired Report Category (Assets Menu > Report
Categories > Selected Category).
With the desired report category selected, a preview of the
definition will appear on the right-hand side of the page. This
is a read-only overview of the selected report category.
To remove a report category option, simply click on the trash
can icon to the right of the option entry. If this icon is muted,
it means that the option is currently assigned to an asset component
and cannot be removed.
To add a new option to the category definition, click on ‘Create
New Option for Current Category’ at the top of the category
definition. A new dialog will appear, enter the label of the new
option and click ‘Create’.
Note
Renaming category titles or category option labels is currently NOT
supported.
Deleting Report Categories
When a report category is no longer required, the Metrix Asset Management system provides functionality
for administrators to permanently remove it from the system.
Warning
Deleting report categories cannot be undone. The following restrictions also apply
when it comes to deleting forms:
Report category cannot be in use: If the report category is currently assigned
to any component, regardless of status, then it cannot be deleted.
To delete a report category (including all of it’s options), follow these steps:
To begin deleting a report category, navigate to that report category
(Assets Menu > Report Categories > Selected Category).
Underneath the category title, there is an ‘Actions’ button – this type
of button is implemented system wide as an indicator of additional
options to manage a resource.
From the ‘Actions’ menu, choose ‘Delete Report Category’. If the button is not enabled, this means that
the category cannot be deleted (see warning notes, above).
In the subsequent dialog, confirm your decision by clicking ‘Delete’.
The report category will now be permanently deleted from the system.
Status Codes
Status Codes, in the Metrix Asset Management System provide the ability for
users to apply customised life-stage tags to their asset portfolio. Such associations
can assist with triaging assets through various phases of life including proposed assets,
active assets and inactive assets.
Subsections of Status Codes
About
This section contains basic information about status code definitions in the Metrix Asset Management system.
Subsections of About
Status Code Effect
Within the system, the above phases are referred to as ‘Status Effects’. These are
predefined codes that impact the behaviour of status codes of each type. A status
code’s effect cannot be modified after initial creation. Following is a description of
each built-in status effect:
Proposed:
Assets that have not yet been commissioned, but are included in the
asset portfolio for information and data tracking. Assets at with status codes of this
type cannot have financial ledger transactions logged against them.
Active:
Assets that form part of the normal asset portfolio.
Inactive:
Assets that are no longer part of the asset portfolio. These assets
typically represent those that have been fully disposed and/or removed from service.
Assets at with status codes of this type cannot have financial ledger transactions
logged against them.
Status Code IDs
Using the correct ID is important when accessing Metrix via APIs or using CSV file
imports. The following details the ID values that can be used for status code
references.
Status Code ID
The status code ID is the only way to make a valid reference to a status code from external
locations such as API calls or CSV Data Imports. Once a status code has been created, the ID
value (which will remain constant regardless of alterations) can be found in the ‘Code’ column
of the status configurations table.
How To Guides
This section contains how to guides with respect to status code definitions in the Metrix Asset Management system.
Subsections of How To Guides
Creating Status Codes
This section covers the necessary steps involved in creating a new
status code within the Metrix Asset Management System.
This extends to the initial creation of the code with status
effect. In subsequent sections, editing and deleting status codes
is discussed.
To create a new status code within Metrix, complete the
following steps:
Navigate to the ‘Status Codes’ management page (Assets Menu >
Status Codes).
Click on ‘Create New Status Code’ at the top of the page.
This will initialise a new status code and display a dialog
box waiting for additional details.
From here, you will need to set the ‘Status Name’, the ‘Status
Effect’ (see Status Codes),
and a brief ‘Description’ for the new status code.
When you have finished defining the status code, click ‘Create’
Note
Editing a status code is restricted to updating the description only.
Other properties including the status label and the status effect cannot
be modified after initial creation.
Editing Status Codes
In the Metrix Asset Management system, editing a status code is restricted
to updating the description only. Other properties including the status label
and the status effect cannot be modified after initial creation.
To edit the description of a status code, complete the following steps:
Navigate to the ‘Status Codes’ management page (Assets Menu > Status Codes).
This page renders every status code currently configured in the system. To edit a
particular status code description, click on the pencil ‘Edit’ icon on the
right-hand side of the description field in the corresponding row.
Once finished, click on the tick icon at the right-end of the input box.
Deleting Status Codes
When a status code is no longer required, the Metrix Asset Management
system provides functionality for administrators to permanently remove it from the system.
Warning
Deleting status codes cannot be undone. The following restrictions also apply
when it comes to deleting status codes:
Status codes cannot be in use: If the status code is currently assigned
to any component within the system, then it cannot be deleted.
To delete a status code, follow these steps:
To begin deleting a status code, navigate to the ‘Status Codes’ management page
(Assets Menu > Status Codes).
This page renders every status code currently configured in the system. To delete
a particular status code, click the trash-can ‘Delete’ icon at the far right-hand
side of the row. If the button is not enabled, this means that
the status code cannot be deleted (see warning notes, above).
In the subsequent dialog, confirm your decision by clicking ‘Delete’.
The status code will now be permanently deleted from the system.
Finance Ledger Codes
Finance Ledger Codes in the Metrix Asset Management System provide the ability for
users to construct custom reporting states for the financial transaction ledger. In this,
there are two key code types that can be set to structure an organisations end of period
financial reporting - Finance Categories, and Transaction Types.
Subsections of Finance Ledger Codes
About
This section contains basic information about financial settings in the Metrix Asset Management system.
Subsections of About
Finance Categories
The finance category is the principle categorisation field for
the Financial Movement Report - the key input tool for an organisations ‘Infrastructure,
Property, Plant, and Equipment’ statement. Typically, organisations will configure one
finance category within Metrix for each desired reporting row within this end of
period statement.
In practice, an asset components finance category is assigned via the first
financial transaction ledger entry made against it. Each subsequent transaction, posted
against that component, will inherit that finance category. To change a components
finance category, a ‘Reclassification’ process must occur which will write-off the
gross and accumulated depreciation value from the component under the ‘old’ category,
and then write both back on against the ’new’ category (no value is created or lost,
but the finance category will be changed).
Finance Category ID
The finance category ID is the only way to make a valid reference to a finance category from external
locations such as API calls or CSV Data Imports. Once a finance category has been created, the ID
value (which will remain constant regardless of alterations) can be found in the ‘Code’ column of the
finance category preview table.
Transaction Types
The transaction type is designed to inform the financial transaction
ledger on the type of financial movement that the entry represents. Built-in transaction
types include ‘Recognition’, ‘Renewal’, ‘Addition’, etc.
Example
During a reporting period, an asset component may have six (6) renewal transactions, two (2)
depreciation transactions, and one (1) upgrade transaction posted against it. The end of period
report (the Temporal Finance Report) will sum the six (6) renewal postings, the two (2)
depreciation postings, and the one (1) upgrade postings as the summary of movements for that
component during the reporting period.
Transaction Type Effects
Each transaction type is assigned to a transaction type effect of ‘Gross’ and/or ‘Accumulated
Depreciation’. When the Temporal Finance Report is generated, the movement results are
summed into these transaction type allotments.
Restrictions can be applied to transaction type posting values such as ‘Positive Values’ only,
or, ‘Negative Values’ only. This can assist with controlling end user input around expected
movement behaviour in terms of capital value. For example, the built-in depreciation
transaction type has a restriction of ‘Negative Values’ only because depreciation is always
and only ever a decrement to an asset components carrying value.
Transaction Type ID
The transaction type ID is the only way to make a valid reference to a transaction type from external
locations such as API calls or CSV Data Imports. Once a transaction type has been created, the ID
value (which will remain constant regardless of alterations) can be found in the ‘Code’ column of the
transaction type preview table.
Information about System Transaction Types
The important thing to note about transaction types is that they are performing two roles.
Firstly, they are “grouping” the transaction for EOY reporting. That is, the renewal, depreciation,
addition, parts of the transaction type are simply grouping the spend into a category. Additionally,
they are “allocating” the transaction to have an effect on either the gross value or the amount
of accumulated depreciation carried by the component. That is, the gross versus accumulated
depreciation parts.
Sites can also add their own transaction types to cover financial cases not considered by the system’s
built-in types.
The following are some generic definitions for the system pre-configured transaction types (grouped into
like categories):
Financial Management Transaction Types
Depreciation: Economically recognising the year-on-year (or quarter, etc.) degradation of infrastructure.
This transaciton type has accumulated depreciation effect targets only.
Indexation: Economically recognising the impact of CPI on the valuation register. When a component
is indexed, the “percentage” effect is applied equally to gross and accumulated depreciation.
Revaluation: These transaction types balance a component’s capital value to the desired level for revaluation.
They are adjustments to the gross and/or accumulated_depreciation so that the new value matches that of the valuer’s. WIP: These are for recognising works in progress. WIP transactions can be posted to carry gross project value
over financial periods when project timeframes span more than one financial period. At the “end” of the project,
any WIP transactions would be “reversed”, and the value would be reposted with its actual transaction type
(i.e. addition, installation, etc.).
Infrastructure Modification Transaction Types
Additions: For upgrading existing infrastructure (road widening, building additions, etc). Typically, these
transactions only target gross value.
Installation: For new infrastructure. Again, these transactions typically only target gross value.
Recognition: Used for onboarding value into the system - that is, Metrix recognising existing value on components.
This could also be used for recognising value for “found” assets and the like.
Renewal: Used for tracking spends that are focused on the replacement of existing service capacity of
infrastructure (reseals, pipe replacements, etc.) Note, the use of the term “service capacity” is aimed
at extending to cases where a component may be in a new location, but its purpose is to usurp that of an
existing component (i.e. pipe replacement on the other side of the road).
Disposal/Impairment Transaction Types
Disposal: Accelerated depreciation of infrastructure to allow removal from the ledger. Typically, the system
will only target accumulated depreciation with disposal transactions.
Impairment: Same as disposal but recognises the loss of value is due to a specific event (e.g. storm damage).
Like disposal, the system will typically only target accumulated depreciation with impairment transactions.
Write-Off: This transaction type is easily/often confused with disposal/impairments. The actual intention
of the write-off transaction type is to fully remove any trace of value AFTER a disposal (or after the component
reaches $0 written down value). See the worked example below for context of its intention:
Component with gross value of $1000, accumulated depreciation of -$900, would be carrying a written down value
of $100.
To dispose (or impair) the component, one would post a disposal-accumulated_depreciation transaction of -$100.
Its new value state is now: gross value is $1000, accumulated depreciation is -$1000, written down value of $0.
The actual gross value (and accumulated depreciation) is still sitting on the capital valuation register at
this point. True, they do cancel each other out in terms of written down value, but they are still inflating
gross/accumulated_depreciation figures.
To fully remove the value, the Write-Off transactions are used. The gross value is written off with -$1000,
and the accumulated depreciation is written off with +$1000.
System Operation Transaction Types
Adjustment: System transaction type for splitting/merging. These transactions balance-off value from a
parent to children records (or vice-versa for merge).
Migration Adjustment: Legacy system transaction type used in onboarding clients that have historical
movements that do not fit into the above.
It is NOT recomended that end-users of the Metrix Asset Management system utilise these system operation
transaction types directly. Rather, leave them for tool-call usages (such as split and merge).
How To Guides
This section contains how to guides with respect to financial settings in the Metrix Asset Management system.
Subsections of How To Guides
Creating Finance Categories
This section covers the necessary steps involved in creating a new finance category within
the Metrix Asset Management System. This extends to the initial creation of the category
along with a description. In subsequent sections, editing and deleting finance categories
is discussed.
To create a new finance category within Metrix, complete the following steps:
Navigate to the ‘Finance Categories’ management page (Assets Menu > Finance Categories).
Click on ‘Create New Finance Category’ at the top of the page.
This will initialise a new finance category and display a dialog
box waiting for additional details.
From here, you will need to set the ‘Finance Category Name’,
and an optional ‘Description’ for the new category.
When you have finished defining the finance category, click ‘Create’
Note
Editing a finance category is restricted to updating the description only.
Other properties including the category name cannot be modified after
initial creation.
Editing Finance Categories
In the Metrix Asset Management system, editing a finance category is restricted
to updating the description only. Other properties including the category name
cannot be modified after initial creation.
To edit the description of a finance category, complete the following steps:
Navigate to the ‘Finance Categories’ management page (Assets Menu > Finance Categories).
This page renders every finance category currently configured in the system. To edit a
particular finance category description, click on the pencil ‘Edit’ icon on the
right-hand side of the description field in the corresponding row.
Once finished, click on the tick icon at the right-end of the input box.
Deleting Finance Categories
When a finance category is no longer required, the Metrix Asset Management
system provides functionality for administrators to permanently remove it from the system.
Warning
Deleting finance categories cannot be undone. The following restrictions also apply
when it comes to deleting finance categories:
Finance categories cannot be in use: If the finance category is currently assigned
to any component via a posted transaction within the system, then it cannot be deleted.
To delete a finance category, follow these steps:
To begin deleting a finance category, navigate to the ‘Finance Categories’ management page
(Assets Menu > Finance Categories).
This page renders every finance category currently configured in the system. To delete
a particular finance category, click the trash-can ‘Delete’ icon at the far right-hand
side of the row. If the button is not enabled, this means that
the finance category cannot be deleted (see warning notes, above).
In the subsequent dialog, confirm your decision by clicking ‘Delete’.
The finance category will now be permanently deleted from the system.
Creating Transaction Types
This section covers the necessary steps involved in creating a new transaction type within
the Metrix Asset Management System. This extends to the initial creation of the type
along with the type effect, and any value restrictions that may apply. In subsequent sections,
editing and deleting transaction types is discussed.
To create a new transaction type within Metrix, complete the following steps:
Navigate to the ‘Transaction Types’ management page (Assets Menu > Transaction Types).
Click on ‘Create New Transaction Types’ at the top of the page.
This will initialise a new transaction type and display a dialog
box waiting for additional details.
From here, you will need to set the ‘Transaction Type Name’, the ‘Transaction Type Effect’,
and the ‘Transaction Type Value Direction’ for the new type. See
Finance Ledger Codes.
When you have finished defining the transaction type, click ‘Create’
Note
Editing a transaction type is restricted to updating the value restriction only.
Other properties including the name cannot be modified after initial creation.
Editing Transaction Types
In the Metrix Asset Management system, editing a transaction type is restricted to
updating the value restriction only. Other properties including the name cannot be
modified after initial creation.
To edit the value direction restriction on a transaction type, complete the following steps:
Navigate to the ‘Transaction Type’ management page (Assets Menu > Transaction Types).
This page renders every transaction type currently configured in the system. To edit a
particular transaction type value restriction, click on the pencil ‘Edit’ icon on the
right-hand side of the ‘Direction’ field in the corresponding row.
Set the new transaction type value restriction to either ‘Negative Only’, ‘Positive Only’,
or ‘Any’.
Once finished, click on the tick icon at the right-end of the input box.
Deleting Transaction Types
When a transaction type is no longer required, the Metrix Asset Management
system provides functionality for administrators to permanently remove it from the system.
Warning
Deleting transaction types cannot be undone. The following restrictions also apply
when it comes to deleting transaction types:
Transaction type cannot be in use: If the transaction type is currently assigned
to any component via a posted transaction within the system, then it cannot be deleted.
Built-in transaction types cannot be deleted: The system comes pre-seeded with a
number of transaction types. These cannot be deleted.
To delete a transaction type, follow these steps:
To begin deleting a transaction type, navigate to the ‘Transaction Type’ management page
(Assets Menu > Transaction Types).
This page renders every transaction type currently configured in the system. To delete
a particular transaction type, click the trash-can ‘Delete’ icon at the far right-hand
side of the row. If the button is not enabled, this means that
the transaction type cannot be deleted (see warning notes, above).
In the subsequent dialog, confirm your decision by clicking ‘Delete’.
The transaction type will now be permanently deleted from the system.
Classification Resource Configuration
In addition to linking resources for use throughout an asset portfolio, the classification
configuration screen allows you to set other properties that control the behaviour
of assets and their components throughout the Metrix Asset Management system.
This includes setting resources for both:
Asset level classifications, and
Component group level classifications.
Subsections of Classification Resource Configuration
About
This section contains basic information about classification configurations in the Metrix Asset Management system.
Subsections of About
Component Flags
Component flags are simple ways to toggle the expected requirements of a component
group. Such flags include:
Conditioned:
The conditioned flag indicates if components assigned to the relative component group will
typically require condition assessments to be conducted. Setting this flag to ‘off’
will mean that any assigned components do not contribute to any ‘missing condition’
counts or filters.
Depreciable:
The depreciable flag indicates if components assigned to the relative component group will
typically require periodic depreciation charged against its carrying value. This can
be useful for report generation as well as tracking the state of the organisations
depreciation runs.
Carries value:
The carries value flag indicates if components assigned to the relative component group will
typically be posted against in the financial transaction ledger. This would be set
to ‘off’ for non-valued assets that are included for reference or other reasons.
Smart Attributes
Smart attributes can be defined to link an asset components attribute to the
underlying spatial feature, and setting its value to the length or area of said
geometry. Once an attribute has been defined as a smart attribute for a given
classification, its value can no longer be set by end users. Rather, any changes
to the underlying spatial feature will trigger an update of the fields value.
In order to be defined as a smart attribute, the form field must be marked
as required.
Info
The definition of a smart attribute, like cost unit formulas, must be done via the
classification screen. This is because form definitions can be shared across multiple
classifications, and it may not be correct for an attribute to be ‘smart’ for all
of the classifications that rely upon it.
Cost Unit Formulas
Cost unit formulas can be defined to calculate an asset components cost unit
value according to a user defined algorithm based on the underlying attribute
form and/or any defined smart attributes. When a cost unit formula is defined
and in force, end users will be unable to manually set the ‘Cost Units’ value
for asset components within that component group.
Example
Consider the Surface component of a Local Road asset. The Intervention Treatment
assigned to the component may have a Unit Rate that is based in square metres.
Therefore, the units of measure for the component Cost Units would also need
to be in square metres. This Cost Unit value can be set automatically by
a Cost Unit Formula result.
Firstly, the organisation would need to define an attribute form with at least the
following two (2) fields:
Length: as a required, numeric field (possibly a smart attribute linked to a line length)
Width: as a required, numeric field
With the attribute form assigned to the Road Surface component group, the organisation
would then define the following Cost Unit Formula:
[Length] x [Width]
Assigning this formula as the component group’s Cost Unit Formula would then cause
any assigned components to have an automatically calculated Cost Unit field that
will react to changes to the Length and/or Width attributes.
Classification Resources
In addition to linking resources for use throughout an asset portfolio, the classification
configuration screen allows you to set other properties that control the behaviour
of assets and their components throughout the Metrix Asset Management system.
This includes setting resources for both:
Asset level classifications, and
Component group level classifications.
All classification linked resources can be managed from the classification configuration
screen (in addition to the link portals on the resource management page). This includes the
following resource types:
This section contains how to guides with respect to classification configurations in the Metrix Asset Management system.
Subsections of How To Guides
Define Cost Unit Formula
This section covers the necessary steps involved in creating a new
cost unit formula for a given classification within the Metrix
Asset Management System.
Prerequisites
In order to set a Cost Unit Formula, the following prerequisites must be met:
To create a new cost unit formula definition within Metrix, complete the
following steps:
Navigate to the component group within the asset classification using
the ‘Classifications’ page. (Assets Menu > Classifications > Selected Classification
> Selected Component Group).
Click on ‘Edit Configuration’ to enter allow editing the classification definition.
This will convert the view to an editing mode with some additional options. Make
sure you have the desired component group selected before continuing.
Within the ‘Data’ section, click on the drop down menu under ‘Cost Units Formula’.
Note
If this is not available, it means that a valid form definition does not exist for setting smart attribute definitions.
To define a NEW cost unit formula, click on the ‘New Cost Unit Formula’ option in the
drop down list.
A dialog will appear ready to define the cost unit formula.
First, set the Formula Name by entering it into the input box.
Then, to define a cost unit formula, you will need to build a valid algorithm using:
Valid attribute definitions,
Fixed numeric values, and/or,
Basic mathematical operators.
Note
Remember that only attributes matching the prerequisite definitions will be shown.
Within the ‘Formula Builder’ section is three (3) menu options that allow users to choose the
next input or operator for the cost unit formula. As you select inputs/operators, the algorithm
expression preview will populate for you.
To edit or remove a particular input or operator, simply click on that entry in the algorithm
expression to see a list of options for edit or removal.
Before you can commit any new or revised cost unit formula, you must test it. This involves
providing ‘dummy’ values for any attribute fields in the algorithm. Once the ‘dummy’ values are
set, click ‘Evaluate Formula with Test Values’.
The server will evaluate the formula and return a response. Make sure you verify this result
yourself before continuing.
Once complete, click ‘Save Formula’.
Important: The cost unit formula has now been defined and is available for use. In order to actually
use it for the selected component group, ensure you select it from the ‘Cost Unit Formula’ drop down
list.
Info
Cost Unit Formula definitions are stored against the underlying form definition (as this is where
the input attribute fields are defined). Any component group assigned to a form definition with one or more
defined cost unit formulas, can use that formula.
Once you have finished click ‘Save Config Changes’.
Define Smart Attributes
This section covers the necessary steps involved in creating a new
smart attribute for a given classification within the Metrix
Asset Management System.
Prerequisites
In order to set a Smart Attribute, the following prerequisites must be met:
To create a new smart attribute definition within Metrix, complete the
following steps:
Navigate to the component group within the asset classification using
the ‘Classifications’ page. (Assets Menu > Classifications > Selected Classification
> Selected Component Group).
Click on ‘Edit Configuration’ to enter allow editing the classification definition.
This will convert the view to an editing mode with some additional options. Make
sure you have the desired component group selected before continuing.
Within the ‘Data’ section, click on ‘Manage Smart Attribute(s)’.
NOTE: If this is not available, it means that a valid form definition does not exist for setting
smart attribute definitions.
A dialog will appear showing all of the configured field definitions that match the
prerequisites for smart attributes.
To set a smart attribute as linked to the underlying spatial feature’s Length, check the corresponding box
in the ‘Set by Spatial Length’ column.
To set a smart attribute as linked to the underlying spatial feature’s area, check the corresponding box
in the ‘Set by Spatial Area’ column.
Once you have finished, click ‘Done’. Then, in the main window, click ‘Save Config Changes’.
Bulk Update Smart Attributes & Cost Units
This section covers the necessary steps involved in recalculating and applying the values for
smart attribute and cost unit formulas, for a given range of classifications within the Metrix
Asset Management System.
Prerequisites
In order to bulk update Smart Attribute and Cost Unit Formulas, the following prerequisites must be met:
To recalculate and apply the values for smart attribute and cost unit formulas within Metrix,
for a given range of classifications, complete the following steps:
Navigate to the ‘Classifications’ page. (Assets Menu > Classifications).
Click on ‘Actions’ menu at the top of the Classifications page, and choose
‘Update Smart Attributes and Cost Unit Formulas’ to launch the bulk editing tool.
A dialog will appear and ask you to select the Classifications that you want to roll the update for.
Once you have ticked/unticked the relevant Classification(s) to update, select ‘Fetch Components for Classifications’.
The dialog will fetch this information from the server and then advise you of how many components would be affected
by the update. Clicking ‘Proceed’, will proceed to update any Smart Attributes and Cost Unit Formulas for the selected components.
Import/Export Classification Configurations
At any time when using the Metrix Asset Management System, users can opt to import
and/or export their classification configurations. This can be useful if you are working
with a provided training or test environment and wish to migrate configurations
between the two.
Exporting Classification Configurations
To get started, navigate to the ‘Export Configurations’ page. (Assets Menu > Export Configuration).
The export system allows users to export resource definitions at one or more of the following levels:
Specific Classes: an entire asset class definition. For example: all of the ‘Transportation’ class.
Specific Classifications: a single asset classification definition. For example: just the ‘Local Road’
asset group.
Each of the above level selectors will render a different list of available checkboxes to include in the
export. That is, if you choose ‘Specific Classes’, you will be presented with a list of checkboxes
representing each asset class configured in your system. If you choose ‘Specific Classification’ each
asset group will be rendered with a checkbox.
Simply tick the checkboxes you wish to include in the export.
Then, on the right-hand side, simply confirm which resources you want to include in the export by
checking/unchecking resource types.
When ready, click ‘Generate and Download’.
This will download a .json file that can be used in the following instructions for ‘Importing Classification Configurations’.
Make sure you save the file in a location that you can easily access.
Importing Classification Configurations
To get started, navigate to the ‘Import Configurations’ page. (Assets Menu > Import Configuration).
From this page you can either drag and drop a valid configuration file (see above) in to file dropper, or click
‘Select a File to Upload’ to choose a file from your system.
The system will parse the supplied file and validate the classifications and resources included therein. A preview
of the found elements will be rendered when ready.
To confirm the import, click ‘Import Found Configurations’.
The imported configurations are now ready to use.
Classification Resource Management
When defining classification resources within the Metrix Asset Management System, users
are provided with a means of assigning that new resource to specific asset and/or component
classifications. This is very useful for when you are building a particular resource, say
an intervention treatment, for one (1) target classification. However, from time to time it
may be necessary to manage resource assignments in bulk for a given classification. This
guide will instruct you on how to do this in the system.
To begin assigning classification resources from within a classification definition in Metrix, complete the
following steps:
Navigate to the desired classification, or the component group within the asset classification, using
the ‘Classifications’ page. (Assets Menu > Classifications > Selected Classification
> (Selected Component Group)).
Click on ‘Edit Configuration’ to enter allow editing the classification definition.
For asset classification level resources, the following resources can be linked via the configuration screen:
Attribute Form: select the desired form definition from the drop down list.
Task Types: click on ‘Manage Task Type Link(s)’ and choose the desired task type definitions from
the dialog box. When complete, click done.
For component classification level resources, the following resources can be linked via the configuration screen:
Component Flags: simply check or uncheck the desired component flags.
Attribute Form: select the desired form definition from the drop down list.
Info
If any smart attributes or cost unit formulas are linked to the component classification, this option will be disabled.
Intervention Treatments: click on ‘Manage Treatment Link(s)’ and choose the desired treatment definitions
the dialog box. When complete, click done.
Condition Functions: select the desired condition function from the drop down list.
Task Types: click on ‘Manage Task Type Link(s)’ and choose the desired task type definitions from
the dialog box. When complete, click done.
When complete, click ‘Save Config Changes’.
Site Management
This section covers areas of the Metrix Asset Management System that
would be managed by a system administrator. The settings discussed will control
how your system behaves and operates. The following topics are covered:
Users, Roles & Permissions
Custom Search Data
Timezone & Map Projection
Ageing Periods
Subsections of Site Management
User Management
This section provides administrators with the information needed to setup and manage users and user
permissions within the Metrix Asset Management system. Throughout this section, information as well
as how to guides are provided for the following topics:
Creating new users within the Metrix system
Managing permissions for users
Disabling user account access.
Subsections of User Management
About
This section provides background information around users and user management within the
Metrix Asset Management system.
Subsections of About
Users
The User Account and Access Control implementation within the Metrix Asset Management system is underpinned
by an industry leading cloud-based solution for authentication and authorisation; ensuring the security of your
asset data. Each and every user account within your environment can be entirely managed by your own system
administrators via the restricted-access system administrations portal in the Metrix Asset Management system.
Through this portal, system administrators can:
Create new user accounts,
Add or Remove role-based permissions for users, and
Disable access for user accounts.
The user account creation process is provided as a fully self-service management system for system administrators
to extend the accessibility of their environment. When creating a new account, a secure short-lived password will be
emailed to the new user along with an invite to complete their account setup. At that point, the user will be
prompted to initialise their own password - which is required to meet various constraints, including:
Minimum length of 8 characters
No spaces
At least one uppercase letter
At least one lowercase letter
t least one number
At least one special characters (excluding + and -)
Permissions
User permissions are managed through various pre-configured roles designed to function at a user activity level. Within each
role, representing an end user activity, users can be given simple read, write, and/or delete permissions. Examples of such
activity roles include:
Managing asset/component information,
Configuring classifications,
System configuration,
and more.
Roles
As mentioned above, permissions are managed through roles. Essentially, a role is a combination of one or more permissions to
create a functional set of things that a user can and cannot do in the system.
To see what permission set each role has, simply navigate to System Admin > Roles, and select one of the listed roles. The role view
will provide a breakdown of what permissions are available to the role in terms of ‘Can View’, ‘Create/Edit’, and/or ‘Delete’.
Example
One of the pre-configured roles is “Asset Admin”. This role has a number of permissions assigned to it relating to Asset data,
Finance data, Defects, as well as Configuration management options. If you were to view the “Asset Admin” role breakdown, you
would note that the role has a full suite of permissions when it comes to Asset data (view/edit/delete), but a restricted set
of permissions for Finance data (view/edit only - no delete).
This is an example of a role providing enough functionality for managing asset data, including deleting assets, as well as viewing
and modifying finance data, but not deleting it.
Permissions
As indicated above, permissions are accessed (by users) through their assigned roles. Below is a brief breakdown of what each permission
category enables when allowed for VIEW, CREATE/EDIT, or DELETE.
Asset/Components: Roles containing permissions of this category are allowed to view/edit/delete (as assigned) records within the core
asset/component register within the system. This is a foundational permission set.
Finance: Roles containing permissions of this category are allowed to view/edit/delete (as assigned) the financial records
associated with asset components within the system.
Programming: Roles containing permissions of this category are allowed to view/edit/delete (as assigned) functionality within the
Operations module as it pertains to tasks (condition, attribute, and other). That is, see and/or manage Mobile App programmes.
Defects: Roles containing permissions of this category are allowed to view/edit/delete (as assigned) functionality within the Defects
sub-module of the Operations module. For example, the ability to VIEW defects would permit a user to see captured defects and their
configuration options.
Budgets: Roles containing permissions of this category are allowed to view/edit/delete (as assigned) functionality within the Capital
module as it pertains to viewing and/or setting capital works budget/bucket items and spends. Note; in order to capitalise spends from
a budget bucket, a user would still need ‘finance edit’ in their role.
Asset Config: Roles containing permissions of this category are allowed to view/edit/delete (as assigned) functionality within the
asset configuration menu. That is, viewing/setting classification structures, form definitions, report categories, etc.
Manage Users: Roles containing permissions of this category are allowed to view/edit/delete (as assigned) functionality within the
user management page of the System Admin seciton. That is, view/modify users of the system.
Mobile Users: Roles containing permissions of this category are allowed to use the Metrix Mobile app.
Disabled Accounts
Through the user management portal within the Metrix Asset Management system, administrators are able to disable system access
completely for any user account. This action will leave the user profile setup within the environment, but prevent that account
from logging into Metrix from anywhere.
Administrators, in addition to disabling access, can also re-enable account access via the same portal.
How To Guides
This section contains how to guides for managing users and user access within the
Metrix Asset Management system.
Subsections of How To Guides
Creating New Users
This section covers the necessary steps involved in creating a new user account within the Metrix Asset Management System.
Info
If you do not a profile menu item titled ‘System Admin’, and you are a System Administrator, please contact the Metrix
Support team for assistance.
To create a new user within the Metrix Asset Management system, navigate to the System Admin menu from the profile menu, and
then follow the steps below:
Select the ‘Users’ sections from the left-hand side navigation pane within the System Admin page.
The list of current user accounts will be displayed. At the top of the list, beneath the page header, click ‘New User’.
The page will then display a portal to setup the new account details. Firstly, enter the new users name in the ‘Display Name’
text input box.
Next, enter the users email address. This is where the temporary password will be emailed upon completion.
Lastly, choose the user’s default permission roles from the list of displayed checkboxes. As a minimum, at least ‘Asset Reader’
or ‘Mobile User’ should be chosen. See the
To complete the account creation, click ‘Create User’ at the bottom of the portal.
Managing Permissions
This section covers the necessary steps involved in managing user permissions within the Metrix Asset Management System.
Info
If you do not a profile menu item titled ‘System Admin’, and you are a System Administrator, please contact the Metrix
Support team for assistance.
To manage existing user permissions within the Metrix Asset Management system, navigate to the System Admin menu from the profile menu, and
then follow the steps below:
Select the ‘Users’ sections from the left-hand side navigation pane within the System Admin page.
The list of current user accounts will be displayed alphabetically. Locate the user you wish to modify and click that row.
The details of the selected user will be presented. At the bottom of the page, a list of permission roles are rendered with
checkbox controls. To add a role, check the adjacent checkbox. To remove a role, uncheck the adjacent checkbox.
To commit your changes to the system, click ‘Save’ at the top of the page.
Disabling/Enabling Accounts
This section covers the necessary steps involved in disabling and enabling user accounts within the Metrix Asset Management System.
Info
If you do not a profile menu item titled ‘System Admin’, and you are a System Administrator, please contact the Metrix
Support team for assistance.
To enable or disable existing users within the Metrix Asset Management system, navigate to the System Admin menu from the profile menu, and
then follow the steps below:
Select the ‘Users’ sections from the left-hand side navigation pane within the System Admin page.
The list of current user accounts will be displayed alphabetically. Locate the user you wish to modify and click that row.
The details of the selected user will be presented. Within the top section of the page, a checkbox is rendered that allows you to
disable or enable the user account. Toggle this checkbox accordingly.
To commit your changes to the system, click ‘Save’ at the top of the page.
Custom Search Data
This section contains details about loading your own Custom Search Data into the Metrix Asset Management system.
Throughout this section is background and how to guides on working with your custom search data including:
Generating spatialised search indexes, and
Updating search indexes.
Subsections of Custom Search Data
About
This section provides background information around managing custom search data within the
Metrix Asset Management system.
How To Guides
This section provides how to guides around custom search data management within the
Metrix Asset Management system.
Timezones & Map Projections
This section provides information about how your Timezone is considered within in the Metrix Asset Management system.
Further to this, this section covers the implications of Mapping Projections on your spatial Asset information. As these
settings do not change, the documentation is provided for information purposes, rather than how to guides.
Subsections of Timezones & Map Projections
About
This section provides information about timezones and map projections within the Metrix Asset Management system.
Financial Years
This section provides information about how the Financial Year is considered within in the Metrix Asset Management system.
Further to this, this section covers the implications of setting and rolling-over the financial year.
Subsections of Financial Years
About
This section provides information about financial year management within the Metrix Asset Management system.
Subsections of About
Financial Years
The management of Financial Years within the Metrix Asset Management System is a feature available to
system administrators. The two core concepts to discuss when it comes to the management of your system’s
current financial year:
A financial year runs for a year from July to June.
The current financial year is defined as the period following the most recently locked financial year. If there is
no locked year, the current financial year is calculated from the period of the first entry into the Financial
Transactions Ledger.
Locking a Financial Year
Locking a Financial Year protects the Financial Transactions Ledger from being altered in any way that would
result in the system being unable to reflect reported financial figures from a point in time. This is typically
done following the generation of periodic (usually annual) financial statements, and the subsequent successful
audit of said statements.
When a system administrator performs a lock on a financial year, the following outcomes are triggered:
All transactions that occurred within, or prior to the locked financial year are no longer editable.
That is, they cannot be deleted or altered in any way.
This also has the effect of preventing any Components with transactions within a locked financial year
from being deleted from the system.
No transactions can be posted to the locked financial year or to a date in time prior to the locked
financial year.
The minimum date value for certain date calendar picker controls will be restricted to dates
greater than the locked financial year.
Info
Locking a financial year does NOT affect the remaining useful life of components within the system. All of
these values are individually calculated according to the components respective intervention date, useful life,
current date, and any stored remaining life offsets.
Reverting to a previously locked Financial Year
When a system administrator reverts their system to a previously locked financial year, they would typically do
so for the following reasons:
The financial year was locked in error, or
Using a Metrix environment in production whilst backlog data is still being migrated to a previous financial year.
The impacts of reverting to a previously locked financial year is simply that the system will then begin to
behave as if it was indeed in the (now) unlocked financial year. No impact is caused to any entries within the Financial
Transactions Ledger.
How To Guides
This section provides how to guides around locking and unlocking financial years within the
Metrix Asset Management system.
Subsections of How To Guides
Locking a Financial Year
Beta Content
The instructions within this current document pertain to features that are flagged as BETA content. As such,
the process involved in completing these actions are subject to change. This document will be updated when
such an event occurs.
To process the locking of a financial year, follow these steps:
Navigate to the Capital Financial Year page (Capital > EOY Processing).
A financial summary of your asset portfolio is presented, along with a number of steps that are generally performed
throughout a financial year.
Ensure you are satisfied with the completion or otherwise of each these steps by clicking on the bubbles denoting
each sequence.
To perform a rollover and lock the current financial year, navigate to step 4 - Rollover.
Click ‘Rollover & Lock the X Financial Year’ (X will be replaced with the current financial year label).
To confirm this action, you will be prompted to type the current financial year into a text box, and then click ‘Rollover’.
The financial year has now been locked, and the system has progressed to the next financial year.
Unlocking a Financial Year
To process the reverting / unlocking of a financial year, follow these steps:
Navigate to the Capital Settings page (Capital > Capital Settings).
This page displays the current financial year, as well as the most recently locked financial year (if any).
Info
The current financial year is defined as the period following the most recently locked financial year. If there is
no locked year, the current financial year is calculated from the period of the first entry into the Financial
Transactions Ledger.
To revert or unlock a previously locked financial year, simply click on the button labelled ‘Unlock for Finance Posting’
adjacent to the ‘Latest Lock Year’ label.
Confirm you decision in the popup dialog.
The financial year has now been reverted to the previously locked year.
Ageing Periods
This section describes Component Ageing Events and how to manage them within the Metrix Asset Management system.
Subsections of Ageing Periods
About
This section describes Component Ageing Events.
Subsections of About
Ageing Periods
A Component Ageing Event date is a pre-ordained time of the fiscal year when an asset undergoes an ageing event - it gets older.
By default, Metrix environments are configured for annual (once per year) ageing. - however, this can be adjusted to suit the needs
of the organisation to frequencies such as quarterly, monthly, or the like.
When a Component is first built, or renewed, it will receive a ‘Construction Date` and/or an ‘Intervention Date’.
The Component Ageing Event relevant to this date is:
the Initial Ageing Event. This is the date in which the Component will BEGIN ageing.
Throughout the Component’s life, two other Component Ageing Events are continuously relevant to the Component - the ‘Most Recent Ageing Event’ and the ‘Next Ageing Event’:
the Most Recent Ageing Event is the most recent date in which the Component underwent an ageing event (last got older), and
the Next Ageing Event is the next date in which the Component is scheduled to undergo an ageing event (next gets older).
Info
Modifying the Ageing Event Frequency will change how Components age in the system. For example, if the Ageing Event Frequency is changed to quarterly, the Component Ageing Event dates will fall every three (3) months. This means that ’next event’ date from 12 December, will be 31 December instead of 30 June the following year.
All of the above Component Ageing Event dates are listed in the ‘Intervention Summary’ section of the Component info panel.
Example
Consider the following Component details:
Construction Date: 1 May 2010
Useful Life: 15 years
Ageing Event Frequency: Annual
Assuming that the current date is 1 August 2017, the Ageing Event dates for this Component are:
Initial Ageing Event: 30 June 2010
This is the first ageing event date following the construction date. The Component BEGINS ageing from this date.
Most Recent Ageing Event: 30 June 2017
This is the most recent ageing event date since the current date of 1 July 2017. The Component aged one (1) more year at this date.
Next Ageing Event: 30 June 2018
This is the next (upcoming) ageing event date from the current date of 1 July 2017. The Component will age one (1) more year at this date.
How To Guides
This section provides how to guides around setting Component Ageing Events within the
Metrix Asset Management system.
Subsections of How To Guides
Managing Ageing Events
This section covers the necessary steps involved in managing Component Ageing Events within the Metrix Asset Management System.
Warning
Changing the Ageing Period(s) WILL have an effect on the reported Residual Life values for every Component in the system.
This is because a Component will NOT start ageing until it reaches it’s first ageing period. Additionally, the most recent
ageing period is the last time that any Component could have aged. Moving these start/end points, has a direct impact on
the amount of ageing that can occur for each and every Component in the system.
Proceed with Caution!
To manage ageing events within the Metrix Asset Management system, navigate to the System Admin menu from the profile menu, and
then follow the steps below:
Select the ‘Home’ section from the left-hand side navigation pane within the System Admin page.
On this page, there is a section title ‘Component Ageing Period(s)’. In it, a button is titled with a brief description of the
current ageing event configurations. Click this button to view the detailed ageing event configurations.
A dialogue window will then appear, showing the months within a fiscal year, and indicating which months are currently selected
as ageing periods. Months that are coloured green are selected.
To add/remove months from the selected list, simply click the corresponding button.
Once you have made the necessary changes, click ‘Save Changes’ to apply the changes.
A confirmation window will appear, requiring you to confirm the changes. If you are sure you wish to proceed, tick the checkbox to
confirm, and then click ‘Confirm Changes’ to finalise the changes.
Importing Data
The Metrix Asset Management system was designed with data interoperability at the forefront. This means
there is a big focus on making it easy to get your asset data out, as well as getting new and updated asset
data into the system. This section covers the various methods available to bring external data into the
system, including:
Importing new assets and components,
Updating existing data, and
Importing financial ledger transactions
Info
IMPORTANT
When importing data into your environment (for either creating new asset components or updating them), it is important
to remember that each row of your import CSV relates to one (1) component record.
This is of particular importance when importing assets containing multi component records assigned to it (e.g. a road segment with earthworks, base, and surface components). In
these cases, each row still relates to one (1) component and the asset information on each row is be simply repeated
over and over for each component that relates to this asset.
Subsections of Importing Data
About
This section provides background context to a number of concepts and requirements of the Data Import process. Including:
For data imports, the required file type for data is CSV - that is, comma separated value files that can
be generated from Microsoft Excel or Google Sheets. See Creating CSV Files for details on this. There are also a number of other restrictions and requirements
for data imported via these CSV channels. These include;
Date Format
Within your CSV file, any date values must be formatted as DD/MM/YYYY. For example; 24/10/2023 represents the 24th of
October, 2023. It should be noted that the time of day will always be set to 00:00AM for imported data.
Spatial Format
The supported spatial format is ‘WKT’ (Well Known Text). This is a text string that represents a valid geometry definition.
See Create WKT Geometries using QGIS for
more details on this.
File Size
The maximum support CSV file size is 20MB. If your CSV file exceeds this limit, consider splitting it into two or more
smaller CSV files.
Header Row
The header row of the csv file must be restricted to row 1 of the file. Also, the header row must not contain any spaces
or special characters (such as carriage returns, or line feeds). The header row is mandatory.
Blank Cells
Throughout the CSV file, if any data row cells are blank, they will be ignored by the importer. This means that, when updating
existing data, setting a CSV cell to blank will NOT delete the corresponding data from the system.
Effective Date
Where supported, users can include the effective_date column to stipulate when the new record, or updated data, should be
considered effective from. This can be useful in setting a residual life value as at a particular point in time.
Avoid Special Characters
When constructing your CSV file, avoid special characters in both your header row and data rows. These include, but are not
limited to:
Commas within a cell’s content
Carriage returns or Line feeds
Other non-ascii characters that are not part of a standard keyboard layout.
CSV Files do not support Formulas
When using a product such as Microsoft Excel or Google Sheets, the program will allow you to utilise cell formulas whilst
working on your data. As soon as you save and close the file however, the formulas will disappear, and only the results will
be saved.
Creating CSV Files
This page provides guidance on how to create a CSV file from within Microsoft Excel and Google Sheets on a
Windows based machine. As these are 3rd party programs, screenshots and processes are subject to change without
notice. However, is is anticipated that the basic flow should remain the same.
Create CSV file in Microsoft Excel
To create a CSV file from your data in Microsoft Excel, you will need to ‘Save-As’ the data with the ‘CSV’
file extension enabled. To do this:
Click File > Save As.
Below the ‘File Name’ input box, where it says ‘Excel Workbook (.xlsx)’, use the drop down control to select
‘CSV UTF-8 (Comma Delimited) (.csv)’.
Give the file a name in the ‘File Name’ input and choose a location to save the new file.
Click ‘Save’ to finish.
Create CSV file in Google Sheets
To create a CSV file from your data in Google Sheets, you will need to ‘Download’ the data with the ‘CSV’
file type set. To do this:
A file dialog will appear asking you where you wish to save the CSV file. Save the file in a known location and
click ‘Save’ to finish.
Info
CSV files do not support multiple worksheets. If your workbook contains multiple worksheets, the CSV export
will be created from the currently active worksheet only.
Multi-Component Assets
When you are importing assets with more than one (1) component - such as a road asset with earthworks, base, and surface - you
will need to have a csv row for each of the components being imported. To tie the rows together, so the system knows they are
of the same asset, rather than distinct asset entries, set an identical asset_import_ref for each row.
Below is a video that demonstrates this practice.
WKT Geometries in QGIS
QGIS, an open source and free Spatial Data creation & editing tool, has the ability to export data in CSV format.
Within these files, the geometry data can be represented as WKT (Well Known Text). This is the supported spatial type
for importing data into the Metrix Asset Management system using CSV files. To do this, follow the steps below:
In the ‘Layer Browser’, right click on the spatial layer that you want to export.
From the menu, click on Export > Save Feature As…
A dialog box will appear. Firstly, set the ‘Format’ drop down box at the top to ‘Comma Separated Value (CSV)’.
Next, click on the 3 dots (…) on the right-hand side of the ‘File Name’ input control.
A file browser will appear. Give your export a file name in a known location, and click ‘Save’.
Then, back in the QGIS dialog, move down to the ‘Layer Options’ section of the export dialog and set the ‘GEOMETRY’
drop down to ‘AS_WKT’.
Lastly, uncheck ‘Add saved file to map’ and click ‘OK’.
You now have a valid CSV file with a WKT Geometry Column, as well as any other data attributes that were in the spatial
file from QGIS. Below is a video guide of the above steps.
How To Guides
The section contains How To guides for performing various data imports in the Metrix Asset Management system. Including:
Creating New Assets and Components
Appending New Components to Existing Assets
Updating Existing Component Data
Updating Existing Spatial Features
Creating New Financial Ledger Transactions
Viewing Import History
Subsections of How To Guides
Importing CSV Data
This document covers the workflow involved in importing data as:
Creating New Assets and Components
Appending New Components to Existing Assets
Updating Existing Component Data
Updating Existing Spatial Features
Creating New Financial Ledger Transactions
To process one of the above imports via a CSV file, complete the following steps:
Prepare your CSV file - see the relevant Checklist for guidance on this:
Navigate to the Import page (Assets Menu > Import Data) and then click on the ‘Start Import’ option within the
relevant page section. For example, to create new assets and components, click on ‘Start Import’ in the ‘New Assets and
Components Import’ section.
Info
To append components to existing assets, use the ‘New Assets and Components Import’ section.
The first step of the process simply provides advice on preparing your import file. This can be useful to revisit if you
are unsure on any specific columns of data. On the right-hand side of this page, click ‘I have my data prepared’ to
continue.
You will now be presented with a file upload control where you can choose to either:
a. Drag and drop your prepared CSV file into the control bounds, or
b. Click ‘Select file for Upload’ and choose the file from a browser dialog.
The system will then analyse your CSV file - conducting preliminary checks on the validity of your proposed import.
If any errors are detected during this stage, the page will itemise them for you. Review these and update your CSV file
to fix the issue(s). To reupload, you can click ‘Restart’.
When no errors are found, the page will continue to a confirmation stage.
Review the confirmation summary, and when satisfied, click ‘Continue with Import’. Your new data will then be imported and the
asset/component records will be created/updated.
This next step can take quite some time depending on the amount of data you are importing. Feel free to refresh your browser to
check on the process. Once finished, a completion summary will display with links out to the newly created/updated data.
View Import History
At any time, users are able to see the details around past imports that they have run. To do so,
follow these steps:
Navigate to the Import page (Assets Menu > Import Data) and then click on the ‘Import History’ button at the top of
the page.
This will take you to a page that lists the history of Data Imports for your Metrix environment.
For each row, users can click on the ‘View’ option to see additional information about the import.
For jobs that are still in the preview phase, you can see if it is in an error state, or ready to process.
For completed jobs, the view portal will take you to the final summary page for that job, with links
through to the associated resources.
Checklists
The section contains Checklists / Cheat Sheets for performing various data imports in the Metrix Asset Management system. Including:
This document provides even more information as well as suggestions around importing data to create new assets and
components in the Metrix Asset Management system. It is broken into a number of sub-sections to assist readers in
being able to focus on different asset management data contexts separately. These include:
Asset Data Fields
The following fields pertain to information that will be stored against the parent asset of the imported components.
Remember, if you are importing an asset with multiple components ↗,
the information in these columns will need to be repeated for each row, constituted by each child component.
Asset Import Reference
Required
This is a value from your import CSV that will tie the imported record back (in system) back to that CSV entry.
Header label: asset_import_ref
For an asset with multi components, this value must remain constant for each row relating to that asset.
Aside from the above case regarding assets with multi components, this value must be unique per row to ensure each
component row is created on a unique asset record.
The asset import reference is generally not visible inside the Metrix Asset Management system, however, it is
able to be included in data exports such as the ‘Component Data Export’.
Users typically set this to the ID value (i.e. asset id) from their legacy system, if unique.
This field can be used to import a barcode reference for the Asset.
Header label: asset_barcode_value
If set, this value will be displayed in the Information section within the Asset info panel.
Users typically ignore this field unless they have need for barcode identification of assets.
Component Identity Data Fields
The following fields pertain to information that will be stored against each component in relation to the components
identifying attributes.
Component Import Reference
Required
This should be set to a value from you import CSV that will tie the imported record (in system) back to that CSV entry.
Header label: component_import_ref
The component import reference is generally not visible inside the Metrix Asset Management system, however, it is
able to be included in data exports such as the ‘Component Data Export’.
Users typically set this to the ID value (i.e. component id) from their legacy system, if unique.
Barcode Value
Optional
This field can be used to import a barcode reference for the Component.
Header label: barcode_value
If set, this value will be displayed in the Information section within the Component info panel.
Users typically ignore this field unless they have need for barcode identification of components.
Component Group ID
Required
This is the unique ID of the component group within the asset classification that the component will be assigned to.
Header label: component
You must create and configure your asset classification and component groups prior to importing data.
The ID can be copied from the component classification configuration page.
The following fields enable users to define the spatial features representing the newly created asset components. It should be noted
that the required/recommended/optional flags for each field are conditional to the import scenario (hence the asterisk). Please read
each of the field notes carefully to determine if the field is required in your circumstances.
Shape WKT
Required *
The WKT stands for Well Known Text ↗ which is a method of writing simple geometry features into a standard text string.
This field allows users to define such a geometry as the spatial feature representing the component.
Header label: shape_wkt
A valid spatial feature is a mandatory element of the system.
The cost unit value for the component in accordance with any treatment definition that has been applied.
Header label: cost_units
This value will be ignored if the component classification has been configured with a cost unit formula.
If supplied, this must be a positive number to a maximum precision of 4 decimal places.
Ensure you check any Unit of Measure assigned to the component treatment when setting this value.
Residual Life
Optional
By default, residual life (remaining useful life) is calculated by the Metrix Asset Management date using the intervention
useful life, the intervention date, and the end of the current financial period. Supply this field if your data has residual
life values that are known, and/or specified differently.
Header label: intervention_residual_life
If setting this value, also supply an effective date value for the import row that baselines when the residual life assertion is valid from.
If the value is not known, exclude it and allow the system to calculate a value.
Effective Date
Optional
This field provides context to your imported data and will set the ‘modified’ date of the components to
the supplied value, instead of the current date/time.
Header label: effective_date
This field is recommended if setting the residual life value as it provides the baseline from when the
residual life assertion is founded.
If the value is not known, the date/time of when you import the file will be used.
Financial Ledger Transactions
The following fields enable users to set the initial financial transactions ledger value for the newly created asset
components. Please note, the optional flag is set to reflect that transaction posting is optional. If value exists on
the assets being imported, then these fields are indeed required.
Finance Category
Optional *
This is the unique ID of the finance category that the imported transactions will be assigned to.
Header label: finance_category
The finance category ID can be copied from the finance categories configuration page.
If a component carries value, and transaction postings are being imported, this is a REQUIRED field.
If a component carries value,
and transaction postings are being imported, this is a REQUIRED field.
This is the unique ID of the transaction type - with the type effect stripped - that the transaction value is being initialised with.
Header label: transaction_type
If the component carries value, and transaction postings are being imported, this is a REQUIRED field.
The transaction type ID can be derived from the transaction type configuration page. Simply remove the -gross or -accumulated_depreciation
tags from the ID to strip the type effect. The reason for this is that, in this import process, the transaction type effect is mandated by the
column origin of the data - being either ‘gross_value’ or ‘accumulated_depreciation’ below.
Users typically set this value to ‘recognition’, which is a built in transaction type for value initialisation.
This is the date in which the transactions should be recognised in the financial ledger.
Header label: posting_date
Don’t forget that date values should be formatted ‘DD/MM/YYYY’.
If the data import is for a site initialisation, users typically set this value to the end of the last financial
reporting period - i.e. 30/06/2023 for the 2023 EOY.
If the component carries value, and transaction postings are being imported, this is a REQUIRED field.
Gross Value
Optional *
The current replacement value of the asset component according to the organisations financial statements.
Header label: gross_value
If provided, this must be a positive number up to a maximum precision of 4 decimal places.
This value has many pseudonyms including ‘Current Replacement Cost’, ‘Fair Value’, and ‘Market Value’
Depreciation Value
Optional *
The current value of the life-to-date depreciation accumulated against the component according to the organisations financial statements.
Header label: accumulated_depreciation
If provided, this must be a negative number (or zero) up to a maximum precision of 4 decimal places.
Sometimes, this value needs to be derived from financial statements. It is the difference between ‘Gross Value’ and
the components ‘Carrying Value’ (AKA ‘Written Down Value’, and ‘Closing Value’).
Don’t forget that this value must be provided as a negative figure - simply multiply by -1
Other Fields
The following fields, whilst not typical in a data import template, are also supported.
Report Categories
Optional
This is one or more - separated by semi-colons (;) - unique report category ID values that may pertain to the asset component.
Header label: reporting
To supply more than one report category tag, use a semi-colon. I.e. category1-option; category2-option.
The report category IDs can be copied from the report categories configuration page.
Users often use report category tags to note import anomalies that will be ‘cleaned up’ later in the system.
The following fields can be included in an import sheet to set parameters around the component’s next intervention
treatment plans. Although discussed as a single entity, each of the following should be distinct columns in your CSV file. The required/optional
fields are only relevant if importing this information - otherwise, all fields are optional.
Next Treatment Description - next_treatment_description (required)
A short description of the treatment.
Next Treatment Reason - next_treatment_reason (required)
A brief reasoning for implementing the treatment.
Next Treatment ID - next_treatment_id (optional):
The unique treatment id of the treatment definition that is being set as the next intervention for the component.
This can be ignored if the next treatment is defined with a ‘Fixed Value’.
Next Treatment Cost Units - next_treatment_cost_units (optional):
An override option to the component’s cost units value for the next treatment.
This will be set if the next treatment only pertains to a known quantity subset of the component.
Next Treatment Cost Unit Factor (%) - next_treatment_cost_unit_factor (optional)
This is another override option to the component’s cost units value for the next treatment.
Instead of a known quantity, this value will set a cost unit value relative to the component cost unit value.
This is typically 100% for standard renewal plans.
Next Treatment Fixed Value - next_treatment_fixed_value (optional)
Set this value - in lieu of the above three (3) fields - if the next treatment is defined by a fixed/quoted price.
Next Treatment Date - next_treatment_expected_date (optional)
An estimated date that the next treatment should occur.
The following fields allow users to define two financial settings for components. Although discussed as a single entity,
each of the following should be distinct columns in your CSV file. The required/optional fields are only relevant if importing this information -
otherwise, all fields are optional.
Depreciable Value is the subset value of the component’s gross value that is depreciable. System default is 100%.
If setting a depreciable value for the component, this is a required field.
Set this value to fixed or variable.
Fixed means that the depreciable value you supply will be a fixed dollar value.
Variable means that the depreciable value of the component as a percentage of the component gross value.
Depreciable Value - depreciable_value (required)
The value as defined by the depreciable method chosen above.
Period Depreciation Method - period_depreciation_method (required)
Period Depreciation Value details how much value is depreciated per financial period. System default is calculated by
the component’s residual life and carrying value.
If setting a period depreciable value for the component, this is a required field.
Set this value to fixed or variable.
Fixed means that the period depreciation value you supply will be a fixed dollar value.
Variable means that the period depreciation value you supply will be a percentage of the component gross value.
Period Depreciation Value - period_depreciation_value (required)
The value as defined by the period depreciation method chosen above.
New Components (Existing Assets)
This document provides even more information as well as suggestions around importing data to create new components against
existing assets in the Metrix Asset Management system. It is broken into a number of sub-sections to assist readers in
being able to focus on different asset management data contexts separately. These include:
Asset Data Fields
Although this import pertains to Component data, there is still a requirement for some asset related information
to be provided for the import to function correctly.
Parent Asset ID
Required
The parent asset record ID field is used to link the incoming new component records with an existing asset record
from the system.
Header label: parent_asset_record_id
This value is case sensitive and should be copied from the parent asset info panel directly.
The following fields pertain to information that will be stored against each component in relation to the components
identifying attributes.
Component Import Reference
Required
This should be set to a value from you import CSV that will tie the imported record (in system) back to that CSV entry.
Header label: component_import_ref
The component import reference is generally not visible inside the Metrix Asset Management system, however, it is
able to be included in data exports such as the ‘Component Data Export’.
Users typically set this to the ID value (i.e. component id) from their legacy system, if unique.
Barcode Value
Optional
This field can be used to import a barcode reference for the Component.
Header label: barcode_value
If set, this value will be displayed in the Information section within the Component info panel.
Users typically ignore this field unless they have need for barcode identification of components.
Component Group ID
Required
This is the unique ID of the component group within the asset classification that the component will be assigned to.
Header label: component
You must create and configure your asset classification and component groups prior to importing data.
The ID can be copied from the component classification configuration page.
The following fields enable users to define the spatial features representing the newly created components. It should be noted
that the required/recommended/optional flags for each field are conditional to the import scenario (hence the asterisk). Please read
each of the field notes carefully to determine if the field is required in your circumstances.
Shape WKT
Required *
The WKT stands for Well Known Text ↗ which is a method of writing simple geometry features into a standard text string.
This field allows users to define such a geometry as the spatial feature representing the component.
Header label: shape_wkt
A valid spatial feature is a mandatory element of the system.
Set this value (instead of the ‘Shape WKT’) to link the new component’s spatial feature to an existing spatial definition
that exists on the target asset’s components.
Header label: shape_id
Spatial features CANNOT be shared across different assets.
The shape ID can be copied from the ‘Spatial’ section of the Component info panel.
The cost unit value for the component in accordance with any treatment definition that has been applied.
Header label: cost_units
This value will be ignored if the component classification has been configured with a cost unit formula.
If supplied, this must be a positive number to a maximum precision of 4 decimal places.
Ensure you check any Unit of Measure assigned to the component treatment when setting this value.
Residual Life
Optional
By default, residual life (remaining useful life) is calculated by the Metrix Asset Management date using the intervention
useful life, the intervention date, and the end of the current financial period. Supply this field if your data has residual
life values that are known, and/or specified differently.
Header label: intervention_residual_life
If setting this value, also supply an effective date value for the import row that baselines when the residual life assertion is valid from.
If the value is not known, exclude it and allow the system to calculate a value.
Effective Date
Optional
This field provides context to your imported data and will set the ‘modified’ date of the components to
the supplied value, instead of the current date/time.
Header label: effective_date
This field is recommended if setting the residual life value as it provides the baseline from when the
residual life assertion is founded.
If the value is not known, the date/time of when you import the file will be used.
Financial Ledger Transactions
The following fields enable users to set the initial financial transactions ledger value for the newly created
components. Please note, the optional flag is set to reflect that transaction posting is optional. If value exists on
the assets being imported, then these fields are indeed required.
Finance Category
Optional *
This is the unique ID of the finance category that the imported transactions will be assigned to.
Header label: finance_category
The finance category ID can be copied from the finance categories configuration page.
If a component carries value, and transaction postings are being imported, this is a REQUIRED field.
If a component carries value,
and transaction postings are being imported, this is a REQUIRED field.
This is the unique ID of the transaction type - with the type effect stripped - that the transaction value is being initialised with.
Header label: transaction_type
If the component carries value, and transaction postings are being imported, this is a REQUIRED field.
The transaction type ID can be derived from the transaction type configuration page. Simply remove the -gross or -accumulated_depreciation
tags from the ID to strip the type effect. The reason for this is that, in this import process, the transaction type effect is mandated by the
column origin of the data - being either ‘gross_value’ or ‘accumulated_depreciation’ below.
Users typically set this value to ‘recognition’, which is a built in transaction type for value initialisation.
This is the date in which the transactions should be recognised in the financial ledger.
Header label: posting_date
Don’t forget that date values should be formatted ‘DD/MM/YYYY’.
If the data import is for a site initialisation, users typically set this value to the end of the last financial
reporting period - i.e. 30/06/2023 for the 2023 EOY.
If the component carries value, and transaction postings are being imported, this is a REQUIRED field.
Gross Value
Optional *
The current replacement value of the asset component according to the organisations financial statements.
Header label: gross_value
If provided, this must be a positive number up to a maximum precision of 4 decimal places.
This value has many pseudonyms including ‘Current Replacement Cost’, ‘Fair Value’, and ‘Market Value’
Depreciation Value
Optional *
The current value of the life-to-date depreciation accumulated against the component according to the organisations financial statements.
Header label: accumulated_depreciation
If provided, this must be a negative number (or zero) up to a maximum precision of 4 decimal places.
Sometimes, this value needs to be derived from financial statements. It is the difference between ‘Gross Value’ and
the components ‘Carrying Value’ (AKA ‘Written Down Value’, and ‘Closing Value’).
Don’t forget that this value must be provided as a negative figure - simply multiply by -1
Other Fields
The following fields, whilst not typical in a data import template, are also supported.
Report Categories
Optional
This is one or more - separated by semi-colons (;) - unique report category ID values that may pertain to the asset component.
Header label: reporting
To supply more than one report category tag, use a semi-colon. I.e. category1-option; category2-option.
The report category IDs can be copied from the report categories configuration page.
Users often use report category tags to note import anomalies that will be ‘cleaned up’ later in the system.
The following fields can be included in an import sheet to set parameters around the component’s next intervention
treatment plans. Although discussed as a single entity, each of the following should be distinct columns in your CSV file. The required/optional
fields are only relevant if importing this information - otherwise, all fields are optional.
Next Treatment Description - next_treatment_description (required)
A short description of the treatment.
Next Treatment Reason - next_treatment_reason (required)
A brief reasoning for implementing the treatment.
Next Treatment ID - next_treatment_id (optional):
The unique treatment id of the treatment definition that is being set as the next intervention for the component.
This can be ignored if the next treatment is defined with a ‘Fixed Value’.
Next Treatment Cost Units - next_treatment_cost_units (optional):
An override option to the component’s cost units value for the next treatment.
This will be set if the next treatment only pertains to a known quantity subset of the component.
Next Treatment Cost Unit Factor (%) - next_treatment_cost_unit_factor (optional)
This is another override option to the component’s cost units value for the next treatment.
Instead of a known quantity, this value will set a cost unit value relative to the component cost unit value.
This is typically 100% for standard renewal plans.
Next Treatment Fixed Value - next_treatment_fixed_value (optional)
Set this value - in lieu of the above three (3) fields - if the next treatment is defined by a fixed/quoted price.
Next Treatment Date - next_treatment_expected_date (optional)
An estimated date that the next treatment should occur.
The following fields allow users to define two financial settings for components. Although discussed as a single entity,
each of the following should be distinct columns in your CSV file. The required/optional fields are only relevant if importing this information -
otherwise, all fields are optional.
Depreciable Value is the subset value of the component’s gross value that is depreciable. System default is 100%.
If setting a depreciable value for the component, this is a required field.
Set this value to fixed or variable.
Fixed means that the depreciable value you supply will be a fixed dollar value.
Variable means that the depreciable value of the component as a percentage of the component gross value.
Depreciable Value - depreciable_value (required)
The value as defined by the depreciable method chosen above.
Period Depreciation Method - period_depreciation_method (required)
Period Depreciation Value details how much value is depreciated per financial period. System default is calculated by
the component’s residual life and carrying value.
If setting a period depreciable value for the component, this is a required field.
Set this value to fixed or variable.
Fixed means that the period depreciation value you supply will be a fixed dollar value.
Variable means that the period depreciation value you supply will be a percentage of the component gross value.
Period Depreciation Value - period_depreciation_value (required)
The value as defined by the period depreciation method chosen above.
Update Existing Assets
This document provides even more information as well as suggestions around importing data to update existing assets
in the Metrix Asset Management system. It is broken into a number of sub-sections to assist readers in
being able to focus on different asset management data contexts separately. These include:
Asset Identity Data Fields
The following fields pertain to information that will be stored against each component in relation to the components
identifying attributes.
Asset ID
Required
The asset record ID field links the incoming asset update with the existing asset record in the system.
This field is the unique ID of the asset throughout the system.
Header label: asset_record_id
This value is case sensitive and should be copied from the asset info panel directly.
This field provides context to your imported data and will set the ‘modified’ date of the components to
the supplied value, instead of the current date/time.
Header label: effective_date
This field is recommended if setting the residual life value as it provides the baseline from when the
residual life assertion is founded.
If the value is not known, the date/time of when you import the file will be used.
Update Existing Components
This document provides even more information as well as suggestions around importing data to update existing components
in the Metrix Asset Management system. It is broken into a number of sub-sections to assist readers in
being able to focus on different asset management data contexts separately. These include:
Component Identity Data Fields
The following fields pertain to information that will be stored against each component in relation to the components
identifying attributes.
Component ID
Required
The component record ID field links the incoming component update with the existing component record in the system.
This field is the unique ID of the component throughout the system.
Header label: component_record_id
This value is case sensitive and should be copied from the component info panel directly.
The cost unit value for the component in accordance with any treatment definition that has been applied.
Header label: cost_units
This value will be ignored if the component classification has been configured with a cost unit formula.
If supplied, this must be a positive number to a maximum precision of 4 decimal places.
Ensure you check any Unit of Measure assigned to the component treatment when setting this value.
Residual Life
Optional
By default, residual life (remaining useful life) is calculated by the Metrix Asset Management date using the intervention
useful life, the intervention date, and the end of the current financial period. Supply this field if your data has residual
life values that are known, and/or specified differently.
Header label: intervention_residual_life
If setting this value, also supply an effective date value for the import row that baselines when the residual life assertion is valid from.
If the value is not known, exclude it and allow the system to calculate a value.
Effective Date
Optional
This field provides context to your imported data and will set the ‘modified’ date of the components to
the supplied value, instead of the current date/time.
Header label: effective_date
This field is recommended if setting the residual life value as it provides the baseline from when the
residual life assertion is founded.
If the value is not known, the date/time of when you import the file will be used.
Other Fields
The following fields, whilst not typical in a data import template, are also supported.
Report Categories
Optional
This is one or more - separated by semi-colons (;) - unique report category ID values that may pertain to the asset component.
Header label: reporting
To supply more than one report category tag, use a semi-colon. I.e. category1-option; category2-option.
The report category IDs can be copied from the report categories configuration page.
Users often use report category tags to note import anomalies that will be ‘cleaned up’ later in the system.
The following fields can be included in an import sheet to set parameters around the component’s next intervention
treatment plans. Although discussed as a single entity, each of the following should be distinct columns in your CSV file. The required/optional
fields are only relevant if importing this information - otherwise, all fields are optional.
Next Treatment Description - next_treatment_description (required)
A short description of the treatment.
Next Treatment Reason - next_treatment_reason (required)
A brief reasoning for implementing the treatment.
Next Treatment ID - next_treatment_id (optional):
The unique treatment id of the treatment definition that is being set as the next intervention for the component.
This can be ignored if the next treatment is defined with a ‘Fixed Value’.
Next Treatment Cost Units - next_treatment_cost_units (optional):
An override option to the component’s cost units value for the next treatment.
This will be set if the next treatment only pertains to a known quantity subset of the component.
Next Treatment Cost Unit Factor (%) - next_treatment_cost_unit_factor (optional)
This is another override option to the component’s cost units value for the next treatment.
Instead of a known quantity, this value will set a cost unit value relative to the component cost unit value.
This is typically 100% for standard renewal plans.
Next Treatment Fixed Value - next_treatment_fixed_value (optional)
Set this value - in lieu of the above three (3) fields - if the next treatment is defined by a fixed/quoted price.
Next Treatment Date - next_treatment_expected_date (optional)
An estimated date that the next treatment should occur.
This document provides even more information as well as suggestions around importing data to update existing spatial features
in the Metrix Asset Management system. It is broken into a number of sub-sections to assist readers in
being able to focus on different asset management data contexts separately. These include:
Spatial Definition Fields
The following fields enable users to update existing spatial features, by ‘Shape ID’, using a WKT spatial definition.
Shape WKT
Required
The WKT stands for Well Known Text ↗ which is a method of writing simple geometry features into a standard text string.
This field allows users to define such a geometry as the spatial feature representing the component.
Header label: shape_wkt
A valid spatial feature is a mandatory element of the system.
This document provides even more information as well as suggestions around importing data to create financial ledger transaction entries
in the Metrix Asset Management system. It is broken into a number of sub-sections to assist readers in
being able to focus on different asset management data contexts separately. These include:
Fixed Transaction Fields
The following fields form the basis of the transaction import.
Component ID
Required
This field is the unique ID of the component throughout the system.
Header label: component_record_id
This value is case sensitive and should be copied from the component info panel directly.
This is the date in which the transactions should be recognised in the financial ledger.
Header label: posting_date
Don’t forget that date values should be formatted ‘DD/MM/YYYY’.
If the data import is for a site initialisation, users typically set this value to the end of the last financial
reporting period - i.e. 30/06/2023 for the 2023 EOY.
Finance Category ID
Required *
This is the unique ID of the finance category that the imported transactions will be assigned to.
Header label: finance_category
The finance category ID can be copied from the finance categories configuration page.
If a component carries value, and transaction postings are being imported, this is a REQUIRED field.
If a component has no current
transaction postings, this is a REQUIRED field.
Transaction Type Headers
Following the above fixed columns, the next set of columns to include are for transaction types and their corresponding
transaction value.
For each ‘Transaction Type’ with a corresponding value for a row’s component, the
transaction type ID ↗ must be used
as the header value, and the transaction value constitutes the cell value for each row.
Example
Consider a simple, 3 row import sheet - targeting transaction imports for three (3) component records.
component_record_id
posting_date
finance_category
recognition-gross
recognition-accumulated_depreciation
C-7569020
30/06/2023
roads
152564.25
-53255.25
C-7569021
30/06/2023
roads
986123.46
C-7569022
30/06/2023
roads
8955.25
-7425.98
The above example import sheet is going to import a total of five (5) transactions - (2 for row 1, 1 for row 2, and
2 for row 3). In row 2, the accumulated depreciation value has been excluded, and thus will not be imported.
Capital Management
This section provides an overview of the Capital Management tools available within the Metrix Asset Management
system. These tools are design to streamline the management of capital budgets, capital spends, and the capitalisation
processes within your organisation. The concepts discussed in this section include:
This section provides an overview of the Capital Budgets module within the Metrix Asset Management system.
The Capital Budgets module is designed to assist with the planning and management of capital expenditure projects.
The module allows users to create and manage budgets for capital projects, track expenditure against budgets,
as well as monitor the progress of projects.
The following topics are covered in this section:
What is a budget?
Additionally, the following topics are covered in the How-To section:
How to create a budget
How to edit a budget
How to delete a budget
Subsections of Capital Budgets
About
This section discusses budgets within the Metrix Asset Management system. A budget is a means of grouping together one
or more different budget buckets, which are used to track the budgeted and actual values of a specific asset or group of
assets.
Within the Metrix Asset Management system, a Budget is a means of grouping together one or more different
budget buckets - which are used to track the budgeted and actual values of a specific asset or group of assets.
Budgets act as an entry point for users to view and manage their budget buckets in a controlled and structured way.
How To Guides
The section contains How-to-Guides for performing various budget processes in the Metrix Asset Management system. Including:
In order to create a budget, simply navigate to the ‘Capital’ section of the application and, from the top-right corner,
click on the ‘Create New Budget’ button. Follow the steps below to create a budget:
Enter a name for the budget.
Click ‘Save’ to save the new budget.
The new budget will now appear in the list of budgets. You can commence adding budget buckets to this budget.
Edit a Budget
In order to edit an existing budget, simply navigate to the ‘Capital’ section of the application and locate the budget in the
list of budgets shown. Once found, complete the following:
Select the budget you wish to rename.
Click the ‘Edit’ button to the right-hand side of the budget name.
A dialog will appear with the budget name.
Enter a new name, and click ‘Save’.
Delete a Budget
In order to delete a budget, simply navigate to the ‘Capital’ section of the application and locate the budget in the
list of budgets shown. Once found, complete the following:
Select the budget you wish to delete.
In the ‘Bucket’ panel, to the right of the budget list, find the ‘Actions’ menu (denoted with three dots).
Choose ‘Delete Entire Budget’ from the menu.
A confirmation dialog will appear, asking you to confirm the deletion of the budget. Click ‘Delete’ to proceed with the deletion.
The budget will be removed from the list of budgets and will no longer be available in the system.
Info
If the budget contains any buckets, it will NOT be possible to delete the budget. All buckets must be deleted first.
Capital Budgets Buckets
This section provides an overview of Buckets within Capital Budgets in the Metrix Asset Management system.
A Capital Budget Bucket is designed to assist with refining the scope of planning and management when it
comes to capital expenditure projects - a budget bucket is the container for the budget items that make up a budget.
The following topics are covered in this section:
What is a Budget Bucket?
What is the Bucket Limit?
Bucket Description/Ref/Comment: When to use these fields?
Capitalisation Shares: What do these imply?
Bucket Allocations.
What do bucket status codes mean?
What does the Default Filter do?
Additionally, the following topics are covered in the How-To section:
How to create a budget bucket
How to edit a budget bucket
How to delete a budget bucket
How to set the Default Filter for a budget bucket
Subsections of Capital Budgets Buckets
About
Within the Metrix Asset Management system, a Budget Bucket is the key working unit for managing groups of budgeted
items. A budget bucket can be likened to the idea of a Capital Project. Examples include the annual reseals program,
installation of a new traffic signal, or a new footpath program.
Within the Metrix Asset Management system, a Budget Bucket is the key working unit for managing groups of budgeted
items. A budget bucket can be likened to the idea of a Capital Project. Examples include the annual reseals program,
installation of a new traffic signal, or a new footpath program.
A single Budget can have one or more budget buckets. Each bucket manages their assigned items independently of each other.
What is the Bucket Limit
The bucket limit is the maximum amount of money that should be spent within a bucket. This limit is set by the user and
can be adjusted at any time. The bucket limit is important because it helps to ensure that assignments of work to the
bucket are not exceeding the expected cost of the project. In fact, when assigning items to a budget bucket, the Allocation
Tracker will compare the current amount in the bucket to the limit.
By setting a limit, users can avoid over-funding a bucket and can ensure that their money is being allocated to the right places.
Bucket Descriptors
Each budget bucket can have three (3) separate descriptor values, including:
Description - a short description of the bucket
External Ref - an external reference to the bucket
Comment - a comment about the bucket
There are no restrictions to the use of these fields, but they are intended to be used as follows:
Description - a short description of the bucket, such as “Marketing” or “Travel”
External Ref - an external reference to the bucket, such as a project code or work order number
Comment - a comment about the bucket, such as “This is a test bucket” or “This is a long term bucket”
Capitalisation Shares
Each budget bucket can be controlled with optional capitalisation share settings. The capitalisation shares refer to:
Renewal - works that improve the condition of the asset
New - works that result in a new asset
Upgrade - works that expand the capacity of the asset
When you specify capitalisation shares on a budget bucket, you are controlling how any capital expenditures within the
bucket are capitalised against the underlying components. For example:
If you specify 100% renewal, then all capital expenditures within the bucket will be capitalised as renewals of the
underlying components.
If you specify 100% new, then all capital expenditures within the bucket will be capitalised as new assets.
A single bucket can have multiple capitalisation shares. For example, you can have a bucket with 50% renewal and 50% upgrade.
In this case, all capital expenditures within the bucket will be split 50% to renewals and 50% to the improvement of capacity of
the same assets.
The total percentage share across the three (3) categories must equal 100%. For example, a project that is 50% Renewal,
and 30% Upgrade, must be 20% New; or else have additional weighting directed towards Renewal or Upgrade. In most cases,
the Capitalisation Shares will be set to 100% for a single category (such as 100% New), and not split across two or three
categories.
Bucket Allocations
A budget bucket’s allocation refers to the calculated cost of works associated with all the component items
assigned to the bucket. As you add component items to a bucket, the allocation will be updated to reflect the total cost
of all items in the bucket.
The calculated cost of work is based upon the component’s selected budgeted method. See
Budgeted Treatment Methods for more information
Bucket Status
The status of a budget bucket can be useful for understanding the current state of the bucket and its contents. The following
status indicators are currently available for budget buckets:
Draft: Bucket items are still under scrutiny and not yet approved.
Long Term: This status can be useful for marking buckets as back-logs.
Set and Ready: This status indicates that the bucket items are ready to commence works.
Underway: This status indicates that the bucket items are currently in progress.
On Hold: This status indicates that the bucket items are currently on hold for some reason.
Work in Progress: This status indicates that the bucket is long term, and some works were completed in a prior period.
Pending Finalisation: This status indicates that works are complete, but the bucket is pending capitalisation.
Closed: This status indicates that the bucket is closed and no further works are to be completed.
Currently, the ‘Closed’ status is the only status that affects how the system treats the bucket. Any closed buckets can
not be edited or modified in any way. The system will also not allow the user to assign any new items or spend items
to a closed bucket.
Bucket Default Filter
When working with an asset portfolio across many different asset/component types, it can become tedious to
constantly filter your available items to the specific type that the bucket is designed for. This is why
the concept of a default filter was introduced.
The default filter is a filter that is applied to the map when the bucket is opened. The filter does NOT control the items
that are assigned to the bucket, but rather, it controls the items that are displayed in the map when the bucket is opened.
How To Guides
This section covers some How-To instructions for working with budget buckets in the Metrix Asset Management system.
Included in this section are the following topics:
In order to create a budget bucket, you must first navigate to the budget that will contain the bucket. Once you have
selected the target budget, simply click on the ‘Create New Bucket’ button located in the top-left corner of the budget
card. A dialog will appear prompting you to complete the following steps:
Enter the Bucket Name. This field is mandatory.
Enter a Limit for the bucket.
Enter a Description for the bucket.
Enter an External Ref for the bucket.
Enter a Comment for the bucket.
Enter Capitalisation Shares for the bucket. Capitalisation Shares (renewal/upgrade/new) must sum to 100%.
Once your have filled out the above fields, click ‘Save’ to create the bucket. The new bucket will now be visible
against the budget.
Info
Only the Bucket Name is a mandatory field. All other fields are optional and can be defined later in the process
if needed.
Edit details of a Budget Bucket
In order to edit an existing budget bucket, simply navigate to the ‘Capital’ section of the application and locate the budget
bucket you wish to modify. Once found, complete the following:
Select the bucket you wish to modify.
From the ‘Action’ menu (denoted with three dots) on the left-hand side of the budget card, click ‘Edit Active Bucket’.
Modify the desired fields in the dialog that appears.
Click ‘Save’ to apply the changes.
Delete a Budget Bucket
In order to delete a budget bucket, simply navigate to the ‘Capital’ section of the application and locate the budget bucket within
the parent budget. Once found, complete the following:
Select the bucket you wish to delete.
Choose ‘Delete Budget Bucket’ from the ‘Actions’ menu (denoted with three dots).
confirmation dialog will appear, asking you to confirm the deletion of the bucket. Click ‘Delete’ to proceed with the deletion.
The budget will be removed from the list of budgets and will no longer be available in the system.
Info
If the budget bucket contains any assigned items (components), or has any spends logged against it, it will NOT be possible
to delete the bucket. All spends and assigned items must be removed first.
Bucket Default Filter
In order to set the default filter for a given Budget Bucket, navigate to the ‘Capital’ section of the application and
locate the budget bucket within the parent budget. Once found, complete the following:
Select the budget you wish to rename.
On the right hand side of the bucket row, click on the ‘Manage’ button.
You will be navigated to the bucket’s default management page (view mode)
As the default filter pertains to the visibility of assets & components when assigning items to the bucket, the screen
where you can set the default filter is located in the ‘Assign Items’ tab. At the top of the page, click on the ‘Assign Items’ tab.
You will then be taken to the ‘Assign Items’ page. On the left-hand side of the page, you will see the standard Metrix
filter panel. At the top of this filter, you will see the standard Filter selection box.
From the Filter selection box, select the filter you wish to set as the default filter for this bucket.
Info
If no saved filters exist, you will need to save one first.
Once you have selected the filter, toggle the ‘Set as Default’ switch to set the active filter as the default filter
for the bucket.
Warning
Only SHARED filters are available for selection as a default filter.
Capital Budgets Bucket Items
This section provides an overview of Bucket Items within a Capital Budget Bucket in the Metrix Asset Management system.
A Bucket Item is essentially an Asset Component that has been included in a Capital Budget Bucket for some form of
capital intervention - renewal, upgrade, installation, etc.
The following topics are covered in this section:
What is a Bucket Item?
Budgeted Treatment Methods
Additionally, the following topics are covered in the How-To section:
Selecting items for assignment
Assign a single bucket item
Assign multiple bucket items
UnAssign a single bucket item
UnAssign multiple bucket items
Set the budgeted treatment method
Subsections of Capital Budgets Bucket Items
About
Within the Metrix Asset Management system, a bucket item is a specific item within a budget bucket. It represents a
single line item or entry that contributes to the overall budget for a particular group of assets. Bucket items are used
to track and manage the budgeted and actual values associated with specific activities, projects, or expenses.
An item within a Metrix Assets Budget Bucket is an Asset Component that has been assigned to the bucket, setup
with a proposed budgeted treatment method, and hence, a proposed budgeted cost. The allocation of a budget bucket is
the sum of all the bucket items within it.
In order to be assigned to a bucket as a bucket item, an Asset Component should have the following properties:
a Valid Construction Date or Intervention Date value
a Valid Cost Units value
Whilst the above requirements to not preclude the assignment of an Asset Component to a bucket, they do mean that the
allocation assumptions and/or the capacity for the bucket item costs to be capitalised may be limited. Below are some
details pertaining to these issues:
Missing Construction Date: If a bucket item does NOT have a valid construction date, then the system will disallow
capital spends within the bucket. This is because, presently, Metrix does not allow the creation of capital valuation
transactions against components with no construction date.
Missing Cost Units value: If a bucket item does NOT have a valid cost units value, then the system will calculate
a ZERO dollar cost for any non-fixed price budgeted treatment method. This is simply because any treatment based
budgeted treatment method will leverage the cost units value to calculate the budgeted cost.
Budgeted Treatment Methods
A budgeted treatment method is the method used to calculate the cost of works for a component item in a budget bucket.
A budgeted method is chosen by the user for each component item in the bucket and can include:
Current Treatment: The cost of works will be calculated using the current intervention treatment assigned to the component.
Next Treatment: The cost of works will be calculated using the next intervention treatment assigned to the component.
Budget Override: The cost of works will be calculated using a custom override method that applies to the current bucket,
for the current component item only.
Upon assigning an item to a budget bucket, the system will automate the selection of the budgeted method as per the following:
If the component item has a ’next treatment’ available, the budgeted method will be set to ‘Next Treatment’.
If the component item has a ‘current treatment’ available, the budgeted method will be set to ‘Current Treatment’.
Otherwise, NO budgeted method will be set and the calculated cost of works will be zero.
It should be noted, that for ‘Next Treatment’ and ‘Budget Override’ specifications, the following options exist:
Treatment with Percent of Cost Units:
An intervention treatment definition is assigned as the treatment method.
The user will specify a percentage value (more or less than 100% permissible) to be applied to the Component’s
cost units (size) to calculate the cost of works.
Treatment with Fixed Cost Units:
An intervention treatment definition is assigned as the treatment method.
The user will specify a fixed value to be applied to the Component’s cost units (size) to calculate the cost of works.
Fixed Value:
This method is useful when a quotation or fixed cost is available for the works.
No intervention treatment definition is assigned.
How To Guides
This section provides a series of How-To guides for the following topics:
The following is a generic guide on making a selection set for assigning items to (or unassigning items from) a Budget Bucket.
The process remains the same regardless of whether you are assigning singularly or in bulk.
To assign/unassign Components to a Budget Bucket as an item, you will need to have navigated to the desired Budget Bucket
in the Capital module. The entry point for any budget bucket is the ‘View Items’ tab; navigate, using the tabs, to the
‘Assign Items’ tab to enter assignment mode.
From here you should see a map containing ALL the Asset Components in your portfolio. In the case that a Default Filter
has already been assigned to the Budget Bucket, you will see all the Asset Components relative to that filter.
The most common approach to assigning items to a Budget Bucket is a two-step approach:
First, design a filter that scopes the visible Asset Components down to a relevant set of items. This is done using the
‘Filter’ on the left-hand side of the map window. For help with filtering, see
this section.
Once you have a relevant set of Asset Components visible on the map, you can select them using either:
the ‘Info/Pan’ tool: allows you select one item at a time by clicking on the map feature.
the ‘Select’ tool: allows you to select multiple items by clicking and dragging a box around them. Any intersected
map features will be APPENDED to your selection set.
the ‘Deselect’ tool: allows you to remove items from your current selection set by clicking and dragging a box
around them. Any intersected map features will be REMOVED from your selection set.
All of the above tools are available in the top-left corner of the map window. The ‘Info/Pan’ tool is the default.
The above process will result in a ‘selection set’ of one or more Assets. That is, selections are ‘Asset
based’ meaning that one (1) selection could pertain to multiple Component records related to the same parent Asset
record.
Your ‘selection set’ will be displayed in an Info Panel on the right-hand side of the map window. If your selection
set contains more than one (1) Asset, the Info Panel will display the list of selected Assets, rather than details
about any single Asset. Clicking one of the listed Assets will narrow your selection set to that Asset.
Info
Once you have built a ‘selection set’ you can proceed to assign or unassign Components belonging to the selected Asset(s)
using either single or bulk methods.
Assign a Budget Item
To assign a Component as an Item to a Budget Bucket, you must have navigated to the desired Budget Bucket, and have
selected the parent Asset or Assets of the Components you want to assign. See
Selecting Items for detailed instructions on
doing this.
Info
This how-to guide pertains to assigning a single Component to a Budget Bucket. For help on assigning multiple Component
Items in bulk, see Bulk Assign Budget Items.
To assign a Component as an Item to a Budget Bucket, follow these steps:
Select a single Asset from the map using the above-mentioned methods. You will know that you have a single selected Asset
when the Asset is highlighted in blue on the map, and the Asset’s details are displayed in the right-hand Info Panel.
The Info Panel is split into three main sections:
a. The top of the Info Panel has information pertaining to the selected Asset, such as its classification, ID, and description.
b. Below this, on the left-hand side, is the Component Switcher, which allows you to select a particular Component
of the Asset to view its details, and manage its assignment state.
c. The right-hand side of the Info Panel contains the Component information pertaining to the selected Component above.
Isolate the single Component you wish to assign to the Budget Bucket by selecting it in the Component Switcher.
Click on ‘Assign to Bucket’ to assign the selected Component as an Item to the Budget Bucket.
The Component has now been assigned to the Budget Bucket as an Item. It will be configured automatically with a
default budgeted treatment method, and if this
treatment method amounts to a cost, the Buckets Allocation gauge will react accordingly.
Further to the above, any assigned Component Items will appear with an orange halo around their map feature in the map
window.
Info
If your selected Asset Component does NOT have an option to ‘Assign to Bucket’, rather, it shows options to ‘Manage
Item/Treatment’, this means that the Component is already assigned as an item to the Budget Bucket. See
Unassign Budget Items for assistance on unassigning
items from a Bucket.
Bulk Assign Budget Items
To assign many Components as Items to a Budget Bucket, you must have navigated to the desired Budget Bucket, and have
selected the parent Assets of the Components you want to assign. See
Selecting Items for detailed instructions on
doing this.
Important
Bulk Assignment will group all selected Assets by their Asset Classification, and then by their Component Group. It is
not possible to use the Bulk Assignment method in groups other than Component Group level. Users should be conscious of this
when finalising their selection set.
To assign Components as Items to a Budget Bucket, follow these steps:
Make a selection of multiple Assets from the map using the above-mentioned methods. You will know that you have a
multiple selected Assets when they are highlighted in blue on the map, and a list of Assets are displayed in the
right-hand Info Panel.
Once multiple Assets are selected, you will see an option to ‘Bulk Assign’ at the top of the Info Panel. Click on
this option.
A dialog window will appear with some options for refinement of the selected Assets. For each unique Asset Classification,
you will be offered a choice to ‘Include’ or ‘Exclude’ the one or more Component Groups within that classification. By
default, all Component Groups are marked as ‘Excluded’ - that is, nothing will be assigned by default. To ‘Include’ a
Component Group, click on that Component Group tile. The tile will change colour. To ‘Exclude’ it, simply click on it
again and the tile will revert to no colour.
Example
Your selection may contain Sewer Reticulation Mains and several Local Sealed Roads. In this case, you may see the
following options (represented by gridded tiles):
Sewer > Reticulation > Mains > Gravity
Pipe
Manhole
Transportation > Roads > Local Road > Sealed
Earthworks
Pavement
Surface
In the above, you could elect to Assign just the Sewer Manhole Components (by ‘Including’ the Manhole Component Group), or
you could Assign all Sealed Road Components (by ‘Including’ the Earthworks, Pavement and Surface Component Groups).
Once you have marked items to be ‘Included’ for assignment by clicking on their Component Group tile, you can then click
the ‘Add Filtered Component Types’ button at the bottom of the dialog window.
The Components have now been assigned to the Budget Bucket as independent Items. Each will be configured automatically with a
default budgeted treatment method, and if this treatment
method amounts to a cost, the Buckets Allocation gauge will react accordingly.
Further to the above, any assigned Component Items will appear with an orange halo around their map feature in the map
window.
Info
When selecting Component Group tiles, you may notice that the tile indicates that there ar ‘X’ in Selection and ‘Y’ Already
Assigned. This means that there are ‘X’ number of Components of that Component Group in your selection set, and ‘Y’ number
of those Components are already assigned to the Budget Bucket. Don’t worry, Components cannot be added to the same Budget
Bucket twice and any previously assigned Components will just be skipped.
Un-Assign a Budget Item
To unassign a Component Item from a Budget Bucket, you must have navigated to the desired Budget Bucket, and have
selected the parent Asset of the Component you want to unassign. See
Selecting Items for detailed instructions on
doing this.
Info
This how-to guide pertains to unassigning a single Component from a Budget Bucket. For help on unassigning multiple Component
Items in bulk, see Bulk Unassign Budget Items.
To unassign a Component Item from a Budget Bucket, follow these steps:
Select a single Asset from the map using the above-mentioned methods. You will know that you have a single selected Asset
when the Asset is highlighted in blue on the map, and the Asset’s details are displayed in the right-hand Info Panel.
For items already assigned to the Budget Bucket, the Info Panel will show a ‘Manage Item/Treatment’ button at the top.
Next to this button will be an actions menu (denoted by three dots) with additional options. Click on the ‘Actions’
menu.
From the actions menu, select ‘Remove from Bucket’.
A confirmation window will appear. Click ‘Delete’. This will unassign the selected Component from the Budget Bucket.
The Component Item has now been removed from the Budget Bucket. If the budgeted treatment method for the Item resulted
in a cost, the Bucket’s Allocation gauge will react accordingly.
Note
There are circumstances where the ‘Remove from Bucket’ option will not be available. This is usually due to the Item having
capital spends linked to it. In this case, you will need to remove any and all of these affected capital spend before you
can unassign the Item from the Bucket.
Bulk Un-Assign Budget Items
To unassign many Component Items from a Budget Bucket, you must have navigated to the desired Budget Bucket, and have
selected the parent Assets of the Components you want to unassign. See
Selecting Items for detailed instructions on
doing this.
Important
Like Bulk Assignment, Bulk Unassignment will group all selected Assets by their Asset Classification, and then by their
Component Group. It is not possible to use the Bulk Unassignment method in groups other than Component Group level. Users
should be conscious of this when finalising their selection set.
To unassign Component Items from a Budget Bucket, follow these steps:
Make a selection of multiple Assets from the map using the above-mentioned methods. You will know that you have a
multiple selected Assets when they are highlighted in blue on the map, and a list of Assets are displayed in the
right-hand Info Panel.
Once multiple Assets are selected, you will see an option to ‘Bulk UnAssign’ at the top of the Info Panel. Click on
this option.
A dialog window will appear with some options for refinement of the selected Assets. For each unique Asset Classification,
you will be offered a choice to ‘Include’ or ‘Exclude’ the one or more Component Groups within that classification. By
default, all Component Groups are marked as ‘Included’ - that is, all currently selected Items will be removed by default.
To ‘Include’ a Component Group for unassignment, click on that Component Group tile. The tile will change colour.
To ‘Exclude’ it (saving it from unassignment), simply click on it again and the tile will revert to no colour.
Example
In this process, ‘Include’ means that you with to ‘Include the Component Group for Unassigning’ from the Budget Bucket.
‘Exclude’ means that you do NOT wish to Unassign any Items associated with the Component Group from the Budget Bucket.
Your selection may contain Sewer Reticulation Mains and several Local Sealed Roads, all of which are currently assigned
to the Budget Bucket. In this case, you may see the following options (represented by gridded tiles):
Sewer > Reticulation > Mains > Gravity
Pipe
Manhole
Transportation > Roads > Local Road > Sealed
Earthworks
Pavement
Surface
In the above, you could elect to Unassign just the Sewer Manhole Components (by ‘Including’ the Manhole Component Group), or
you could Unassign all Sealed Road Components (by ‘Including’ the Earthworks, Pavement and Surface Component Groups).
Once you have marked items to be ‘Included’ for unassignment by clicking on their Component Group tile, you can then click
the ‘Remove Filtered Component Types’ button at the bottom of the dialog window.
The Components have now been unassigned from the Budget Bucket. If any of the Items had a budgeted treatment
method amounting to a cost, the Buckets Allocation gauge will react accordingly.
Info
When selecting Component Group tiles, you may notice that the tile indicates that there ar ‘X’ Assigned in Selection and
‘Y’ Selected Items not Assigned. This means that there are ‘X’ number of Components of that Component Group in your selection
set that are indeed assigned to the Budget Bucket, and ‘Y’ number of those Components that are not assigned to the Budget Bucket.
Clearly, you cannot unassign a Component that is not assigned to the Budget Bucket. Don’t worry, the system will handle
this for you and skip over any items not assigned already.
Set Budgeted Treatment Method
This page describes how to set the budgeted treatment method for a Budget Bucket Item. It is presumed that you have
already followed the required steps to assign the Items to the bucket, either
individually or in
bulk. It is also presumed that you understand the
different budgeted treatment methods available to you.
To set the budgeted treatment method for a Budget Bucket Item, follow these steps:
With the desired Budget Bucket Item selected, you will see an option to ‘Manage/Item Treatment’ at the top of the Info
Panel for the Item. Click this option.
A dialog window will appear with the range of possible budgeted treatment methods available to the selected Item. In the
top-right corner of this window, the current method will be displayed.
Each available budgeted treatment method is represented by a Tab within the dialog window. Each tab can be selected
and viewed without any changes being made to the Item.
If a particular Tab is deactivated (i.e. Next Treatment) this means that that specific method is not available for the
selected Item. This would be due to a lack of information on the underlying Component. Updating this information
(i.e. adding a ‘Next Treatment’ definition) and refreshing the Budget page will resolve this.
To set either the Current or Next Treatment Methods as the current budgeted treatment method, select the desired Tab
and click the ‘Set this as the Budgeted Treatment Method’ button at the bottom of the Tab panel.
For Current and Next Treatment methods, you have finished the process. For Override Treatment methods, you will need to
follow the additional steps below:
To set a Budgeted Override Treatment as the current budgeted treatment method, select the ‘Override Treatment’ Tab
and click the ‘Define an Override as the Budgeted Treatment Method’ button at the bottom of the Tab panel.
The Tab panel will change to display the Override Treatment definition options where you can proceed to choose the
desired Override Treatment method. For this, you will need to define either:
An estimated cost override (i.e. a fixed quote or estimate).
An intervention treatment with a fixed cost unit value (i.e. for a fixed area or volume, rather than a size relative
to the Component).
An intervention treatment with a relative cost unit value (i.e. for a size relative to the Component).
The override treatment also requires that you enter a brief description of the treatment, as well as provide a reason
for the override. This is important for audit purposes (helping future you).
Once finshed, click on the ‘Apply Override Treatment’ button at the bottom of the Tab panel.
The Budget Bucket Allocation gauge will react to the new costs associated with the chosen budgeted treatment method.
Capital Spending
This section provides an overview of the capital spending functionality within Capital Budgets module of
the Metrix Asset Management system. The capital spending functionality is designed to assist users in
managing the actual outgoings of their capital projects as they progress through stages of completion.
The following topics are covered in this section:
Global Capital Spends
Linked Capital Spends
Spending Capitalisation Share Overrides
Spend Metadata
Additionally, the following topics are covered in the How-To section:
How to Create a Global Capital Spend
How to Create a Linked Capital Spend
Editing a Capital Spend
Deleting a Capital Spend
Subsections of Capital Spending
About
This section introduces the capital spending functionality within the Capital Budgets module of the Metrix Asset
Management system. Designed to support users in tracking actual expenditures, this functionality helps manage capital
project outgoings as they advance through various stages of completion.
Within the Metrix Asset Management system, a Capital Spend refers to an amount of money that has been incurred against
a specific project (Budget Bucket) and will be Capitalised to the underlying Asset Components at the conclusion of the project.
A Global Capital Spend is one of two types of Capital Spends that can be allocated to a Budget Bucket (the other being
a Linked Capital Spend). A spend type of Global or Linked simply controls how the Capital Spend is capitalised/recognised
against the underlying Asset Components at the end of the project. In either spend type, the total Capital Spend amount is
the total amount of all Capital Spends that have been incurred against the Budget Bucket.
The term “Global” refers to the fact that the Capital Spend is not linked to a specific Asset Component,
but rather is attributed to the entire Budget Bucket. When it comes to capitalising/recognising the Capital Spends at the
end of the project, Global Capital Spends are distributed evenly (based on Cost Units) across all Budget Bucket Items
that are assigned to the Budget Bucket.
In the above example, the Budget Bucket has three items (Component A, Component B, and Component C) with differing cost
unit values. Altogether, they combine with a total cost unit value of 6000. The Budget Bucket also has two (2) Global
Capital Spends allocated to it, one for $15,000 and the other for $2,000. The total Global Capital Spend for the Budget Bucket
is $17,000.
To calculate the ‘share’ of the Global Capital Spend that each item will receive, the following formula is used:
$$ [Share of Spend] = \frac{[ Item Cost Units ]}{[ Total Cost Units of all Items ]} \times [ Total Global Spend ] $$
How this breaks down for each Component Item is shown in the table below.
Bucket Item
Cost Units Share
Total Global Spend
Share of Spend
Component A
2000 / 6000 = 33%
$17,000
$5,610
Component B
3000 / 6000 = 50%
$17,000
$8,500
Component C
1000 / 6000 = 17%
$17,000
$2,890
This means, when it comes to capitalising/recognising the Global Capital Spend, Component A will incur $5,610 of the
overall spent amount.
Linked Capital Spends
Within the Metrix Asset Management system, a Capital Spend refers to an amount of money that has been incurred against
a specific project (Budget Bucket) and will be Capitalised to the underlying Asset Components at the conclusion of the project.
A Linked Capital Spend is one of two types of Capital Spends that can be allocated to a Budget Bucket (the other being
a Global Capital Spend). A spend type of Global or Linked simply controls how the Capital Spend is capitalised/recognised
against the underlying Asset Components at the end of the project. In either spend type, the total Capital Spend amount is
the total amount of all Capital Spends that have been incurred against the Budget Bucket.
The term “Linked” refers to the fact that the Capital Spend is linked to one or more specific Asset Components. When it
comes to capitalising/recognising the Capital Spends at the end of the project, Linked Capital Spends are distributed
evenly (based on Cost Units) across ONLY the Budget Bucket Items that are linked to the Capital Spend. Items that are not
linked to the Capital Spend will not receive any of the specifically linked Capital Spend amount.
Note
Although the following may seem complicated, it is important to understand that the system will automatically calculate
all of this on your behalf. As an end user, you need only understand the principles behind it, and how to set up the
Linked Capital Spends correctly.
I.e. “this spend only relates to these three components over here…”
The system will do the rest!
In the above example, the Budget Bucket has three items (Component A, Component B, and Component C) with differing cost
unit values. Altogether, they combine with a total cost unit value of 6000. The Budget Bucket also has three (3) Linked
Capital Spends allocated to it, one for $15,000, one for $2,000, and the other for $4,000. The total Capital Spend for
the Budget Bucket is $21,000.
To calculate the ‘share’ of the Linked Capital Spends that each item will receive, the following formula is used and
calculated for EACH Linked Capital Spend:
$$ [Share of Spend] = \frac{[ Item Cost Units ]}{[ Total Cost Units of all Linked Items ]} \times [ Spend Value ] $$
Info
It should be noticed that the key difference in the formulas (between global and linked spending) is that for LINKED spends,
the denominator for the cost units only considers the cost units of items that are linked to the spend in question. Whereas
with a global spend, the denominator considers the cost units of all items in the Budget Bucket.
Furthermore, a Global Capital Spend share is calculated once per Budget Bucket Item. A Linked Capital Spend share is
calculated once per Linked Capital Spend entry, per Budget Bucket Item linked to that spend.
As noted above, calculating Linked Spend shares is a two-step process. First we must assess the Total Cost Units per
Linked Spend, and then we can calculate the share of spend for each item. The following table outlines how we can
deduce the Total Cost Units for each Linked Capital Spend:
Spend
Component A (2000)
Component B (3000)
Component C (1000)
Total Cost Units for Spend
Spend 1
✅
✅
❌
5000
Spend 2
❌
✅
✅
4000
Spend 3
❌
✅
❌
3000
From the above, we can see that Spend 1 is linked to Component A and Component B, which (through summing their cost units)
we can see have a total of 5000 cost units. So, for each spend, the spend shares can be calculated as follows:
Spend 1: $15,000
Bucket Item
Cost Units Share
Total Linked Spend
Share of Spend
Component A
2000 / 5000 = 40%
$15,000
$6,000
Component B
3000 / 5000 = 60%
$15,000
$9,000
Component C
0 / 5000 = 0%
$15,000
$0
Spend 2: $2,000
Bucket Item
Cost Units Share
Total Linked Spend
Share of Spend
Component A
0 / 5000 = 0%
$2,000
$0
Component B
3000 / 4000 = 75%
$2,000
$1,500
Component C
1000 / 4000 = 25%
$2,000
$500
Spend 3: $2,000
Bucket Item
Cost Units Share
Total Linked Spend
Share of Spend
Component A
0 / 5000 = 0%
$0
$0
Component B
3000 / 4000 = 100%
$2,000
$2,000
Component C
0 / 4000 = 0%
$0
$0
Putting this together is simply a matter of summing the share of spend per Component Item within the Budget Bucket.
This is detailed below:
Bucket Item
Spend 1 Share
Spend 2 Share
Spend 3 Share
Total Spend
Component A
$6,000
$0
$0
$6,000
Component B
$9,000
$1,500
$2,000
$12,500
Component C
$0
$500
$0
$500
This means, when it comes to capitalising/recognising the Global Capital Spend, Component A will incur $6,000 of the
overall spent amount.
Hybrid Capital Spending
The previous two (2) sections covered the concepts of Global and Linked Capital Spending. Within those sections, each spend
type was assessed in isolation from the other. In practice, however, it is possible (and common) to have both Global and Linked
Capital Spend events ascribed to a Budget Bucket. Consider the following:
Example
Consider a Road Resealing program - for simplicity, the program only pertains to two (2) road segments. One segment is a
small back lane with next to zero traffic. The other road segment is a major arterial road with heavy traffic. The resealing
contractor was able to cover the cost of traffic control internally for the back lane, but for the arterial road, they
requested that you hire a traffic control company to manage the traffic on their behalf.
This resealing program has two (2) Capital Spends:
A Global Capital Spend ($65,000) for the resealing contractor’s costs (i.e. the cost of resealing the roads).
A Linked Capital Spend ($12,000) for the traffic control costs, applicable to the major arterial road only.
In this example, the Global Capital Spend would be allocated to both road segments, while the Linked Capital Spend would only
be allocated to the major arterial road. The system will automatically calculate the share of each spend for each item, and
the total Capital Spend for each Bucket Item will be the sum of their Global and Linked Capital Spend Shares.
So, first to calculate the Global Capital Spend share for each item. To do this, we simply apply the formula for Global
Capital spend to each item. This is shown in the table below:
Bucket Item
Cost Units Share
Total Global Spend
Share of Spend
Component A
2000 / 6000 = 33%
$65,000
$21,450
Component B
3000 / 6000 = 50%
$65,000
$43,550
Next, we allocate the Linked Capital Spend to the major arterial road only. As the spend pertains to the one segment only,
the share of cost units for this item is 100%. The breakdown per item is therefore:
Bucket Item
Cost Units Share
Total Linked Spend
Share of Spend
Component A
0 / 3000 = 0%
$12,000
$0
Component B
3000 / 3000 = 100%
$12,000
$12,000
Finally, we can combine the two (2) Capital Spend shares to get the total Capital Spend for each item. This is shown in the
table below:
Bucket Item
Global Capital Spend
Linked Capital Spend
Total Capital Spend
Component A
$21,450
$0
$21,450
Component B
$43,550
$12,000
$55,550
Once again, the system does all of these calculations on your behalf. As an end user, you need only understand the
principles behind it, and how to set up the Global and/or Linked Capital Spends correctly.
Capital Spend Share Overrides
By now you are familiar with how Capital Spends (Global,
spends, Linked spends, and a combination or
Hybrid using both) can be used
within the Metrix Asset Management system to attribute capital expenditure to your various Budget Buckets. You are
also familiar with how the system uses Budget Bucket Capitalisation Shares
to determine how any capital expenditure against the Bucket is capitalised at the end of the project.
This section expands upon these concepts and introduces the concept of Spend Capitalisation Share Overrides, which can be
used to instruct the system on how to allocate the capital expenditures for a specific Spend entry.
Info
By default, the system will use the Capitalisation Shares set on the Budget Bucket to determine how to allocate the capital
expenditures for Spend entries. This article is discussing the use of Spend Capitalisation Share Overrides, which can be
used to essentially ignore the Budget Bucket Capitalisation Shares and apply a different set of Capitalisation Shares
for the specific Spend entry only.
Below is an example of how Capitalisation Shares Overrides can be used, and what impact that has on the final recognition
figures for Component Items in a Budget Bucket in regard to their end of project capitalisation. For this example, we
will use the simple global spend example from our previous section - as the spending structure is not the focus here, rather
the capitalisation shares are.
Also, for the sake of simplicity, we will assume that the Budget Bucket has a simple Capitalisation Share structure of
100% New (that is, we’re building new Assets).
The details of the above spends are as follows:
Spend
Value
New Override
Renewal Override
Upgrade Override
Global Spend 1
$15,000
-
-
-
Global Spend 2
$2,000
0%
0%
100%
The above table is essentially stating that the first spend does NOT have any overrides defined, and therefore the system
will honour the Budget Bucket Capitalisation Shares of 100% New when capitalising this spend. The second spend does have
defined overrides, and therefore the system will ignore the Budget Bucket Capitalisation Shares and apply these overrides
when capitalising this spend.
This ultimately results in the following capitalisation figures for the two spends:
Spend
Value
New Capitalisation
Renewal Capitalisation
Upgrade Capitalisation
Global Spend 1
$15,000
100%
0%
0%
Global Spend 2
$2,000
0%
0%
100%
As you can see, the first spend simply inherits the Capitalisation Shares from the parent Budget Bucket. These breakdowns
would result in the following capitalisation figures for the underlying components:
Component Item
Capitalisation Outcome
Item 1
$15,000 capitalised as New infrastructure
Item 2
$2,000 capitalised as an Upgrade of the existing infrastructure
This example, while simple, demonstrates the concept of Spend Capitalisation Share Overrides. The system will always
honour the Capitalisation Shares set on the Budget Bucket, unless you specifically override them at the Spend level.
Spend Metadata
The Spend Metadata options provide opportunity for users to log ancillary information about a spend entry. Specifically,
the following fields are available:
Description: A free text field for users to enter a description of the spend entry.
External Ref: A free text field for users to enter an external reference for the spend entry.
Comment: A free text field for users to enter comments about the spend entry.
How each field is utilised is a matter of user preference. For example, the Description field could be used to enter a
description of the spend entry, while the External Ref field could be used to enter a reference number from an external
system. The Comment field could be used to enter any additional comments or notes about the spend entry.
None of the above metadata fields are mandatory, and can be overwritten as blank (by the user) if required at a future date.
How To Guides
This section contains some How-To articles on interacting with Captial Spends in the Metrix Asset Management System.
The following topics are covered:
To create a Global Spend within a Budget Bucket, you must have navigated to the desired Budget Bucket and selected the
‘Spending’ tab from the Buckets navigation pane. This page is divided into two sections. The left-hand side contains
a map window showing the Budget Bucket Items. The right-hand side contains a summary view of any spends that have been
ascribed to the Budget Bucket already.
To create a Global Spend, follow these steps:
From the ‘Spending’ tab of the Budget Bucket, click the ‘New’ button in the top-left corner of the right-hand side
summary view.
The ‘Log Spend’ form will appear, and by default, the Spend Type will be set to ‘Global’. Don’t change this.
For the remaining fields, fill in the following as it pertains to your situation:
Spend Value: Enter the value of the spend in this numeric field. This is a required field, so you must enter
a value.
Capitalisation Allocation Overrides: Enter any OVERRIDES to the Budget Bucket Capitalisation Shares in these
fields. This is an optional field and should only be used if the Spend shares differ from that of the Budget Bucket.
Make sure the total of the entered overrides equate to 100%.
Description: Enter a description of the spend in this text field. This is an optional field, but it is recommended
that you enter a description to help identify the spend later.
External Ref: Enter an external reference for the spend in this text field. This is an optional field.
Comment: Enter a comment for the spend in this text field. This is an optional field.
Once you have at least entered a Spend Value, you can click the ‘Save’ button at the top of the form to save the spend.
The new Global Spend will now appear in the right-hand side summary view of the Budget Bucket’s Spending tab. The spending
summary gauge will also react accordingly to reflect the new spend.
Create a Linked Spend
To create a Linked Spend within a Budget Bucket, you must have navigated to the desired Budget Bucket and selected the
‘Spending’ tab from the Buckets navigation pane. This page is divided into two sections. The left-hand side contains
a map window showing the Budget Bucket Items. The right-hand side contains a summary view of any spends that have been
ascribed to the Budget Bucket already.
To create a Linked Spend, follow these steps:
From the ‘Spending’ tab of the Budget Bucket, click the ‘New’ button in the top-left corner of the right-hand side
summary view.
The ‘Log Spend’ form will appear, and by default, the ‘Spend Type’ will be set to ‘Global’. This MUST be changed to ‘Spend
Linked to Budget Item(s)’.
For the remaining fields, fill in the following as it pertains to your situation:
Spend Value: Enter the value of the spend in this numeric field. This is a required field, so you must enter
a value.
Capitalisation Allocation Overrides: Enter any OVERRIDES to the Budget Bucket Capitalisation Shares in these
fields. This is an optional field and should only be used if the Spend shares differ from that of the Budget Bucket.
Make sure the total of the entered overrides equate to 100%.
Description: Enter a description of the spend in this text field. This is an optional field, but it is recommended
that you enter a description to help identify the spend later.
External Ref: Enter an external reference for the spend in this text field. This is an optional field.
Comment: Enter a comment for the spend in this text field. This is an optional field.
Now it is time to Link the spend to one or more Budget Bucket Items. With the spend form still active, use the map tools
in the left-hand side map window to navigate and select a Budget Bucket Item that you wish to link to.
Info
The selection pattern for this map window is based on Budget Bucket Items rather than Assets (as is the case for the
Assign tab). This means that you may encounter stacked Component Items (that relate to a single Asset) resulting in
a Multi-Selection.
It can be useful to FILTER the map to show only the Items you wish to link to. For information regarding filtering the map,
see Filtering the Spend Map.
From the map, there are two modes supported for linking a spend to a Budget Bucket Item:
Single Selection: Click on a single Budget Bucket Item you wish to link to. The selected item will be highlighted in
blue, and the ‘Link to Spend’ button will be shown at the top of the Info Panel. Toggle the ‘Link to Spend’ switch
to link the selected item to the spend.
Multi-Selection: Click and drag a box around multiple Budget Bucket Items you wish to link to. The selected items
will be highlighted in blue, and the ‘Link to Spend’ button will again be shown at the top of the Info Panel. This time,
the toggle switch is referring to all the Items within your selection set. Toggle the ‘Link to Spend’ switch to
link all selected items to the spend.
Additionally, there are some shortcut methods available for linking a spend to one or more Budget Bucket Items. These are
available from the menu button (labelled, ‘Shortcuts’) just below the ‘Spend Type’ selector from step 2 above. The following
shortcut options are available:
Link All Items: This will link all Budget Bucket Items CURRENTLY assigned to the bucket, to the spend. This is useful if you are
creating a spend that relates to all items within the Budget Bucket, but you do not wish to make it global - to protect against
future Item adjustments.
Link Filtered Items: This will link all Budget Bucket Items that are currently filtered within the map to the spend. This is useful
if you are creating a spend that relates to a subset of items within the Budget Bucket.
Unlink All Items: This will unlink all Budget Bucket Items from the spend. This can be useful for ‘restarting’ your
spend selections.
Unlink Filtered Items: This will unlink all Budget Bucket Items that are currently filtered within the map from the spend. This is useful
for refining away linked items.
Linked Items will appear in the ‘Linked Items’ section of the form. You can remove a linked item by clicking the
trash can icon next to the item in the list. This will remove the link from the spend, but will not delete the Budget Bucket Item
itself.
Once you entered a Spend Value and linked at least one (1) item, you can click the ‘Save’ button at the top of the
form to save the spend.
The new Linked Spend will now appear in the right-hand side summary view of the Budget Bucket’s Spending tab. The spending
summary gauge will also react accordingly to reflect the new spend.
Edit a Spend
Editing a spend within a Budget Bucket is a very simple and straightforward process. To edit a spend, navigate to the
desired Budget Bucket and enter the ‘Spending’ tab panel. Then, perform the following steps:
On the right-hand side of the screen is shown a list of all the spends currently ascribed to the Budget Bucket. Locate
the spend you with to modify and click the row entry.
The spend form will appear, showing the details of the selected spend. You can now edit any of the fields in the form, including:
Spend Amount
Capitalisation Share Overrides
Description
External Reference
Comment
The spend type CANNOT be edited. That is, a global spend cannot be changed to a linked spend, and vice versa.
For linked spends, you can also modify the array of Bucket Items that are linked to the spend. Simply follow the
steps listed in Create a Linked Spend.
Once you have made the desired changes, click the Save button to save your changes. The spend will be updated.
Note
Spends that have been capitalised cannot be edited. If you need to edit a capitalised spend, you will need to revert that
capitalisation batch first.
Such spends will be marked with a padlock icon in the spend list.
Delete a Spend
Deleting a spend within a Budget Bucket is a very simple and straightforward process. To delete a spend, navigate to the
desired Budget Bucket and enter the ‘Spending’ tab panel. Then, perform the following steps:
On the right-hand side of the screen is shown a list of all the spends currently ascribed to the Budget Bucket. Locate
the spend you with to remove and click the row entry.
At the top of the Spend form is an Action menu (denoted by three dots). Click on the Actions menu and select ‘Delete’.
A confirmation dialog will appear, asking you to confirm the deletion. Click ‘Delete’ to delete the spend.
The spend will be removed from the Budget Bucket and will no longer be available for capitalisation.
Note
Spends that have been capitalised cannot be removed. If you need to edit a capitalised spend, you will need to revert that
capitalisation batch first.
Such spends will be marked with a padlock icon in the spend list.
Filtering the Spend Map
Within the ‘Spending Tab’ of a Budget Bucket, the map window supports dynamic filtering (like the Assign tab and other
map windows within the Metrix Asset Management system). The small difference with filtering in the Spend Map is that,
regardless of the filter settings, the map will only ever show items that are at least assigned to the Budget Bucket. That is,
the default state is for the map to show all items that are assigned to the Budget Bucket, and the filter settings will only
serve to restrict within this set of items.
Using the filter within the ‘Spending Tab’ is the same as using the filter on any Metrix map component. For detailed
instructions on how to use the filter, please refer to the Filtering Data
documentation.
Capitalisation of Spending
This section provides an overview of the capitalisation of spending functionality within Capital Budgets module of
the Metrix Asset Management system. The capitalisation of spending functionality is designed to assist users in
reconciling the actual spends (outgoings) of their capital projects against the underlying components as Capital
Expenditure Transactions.
The capitalisation of spending functionality includes the following features:
Item Level Spending Summary
Transaction Posting History
Capitalisation Issues
WIP Transactions
Capitalisation Transactions
Batch Deletion
This section also contains a How-To guide for the following topics:
Capitalise to WIP
Capitalise and Close Bucket
Delete a Batch
Subsections of Capitalisation of Spending
About
This section outlines the functionality for capitalising spending within the Capital Budgets module of the Metrix Asset
Management system. This feature helps users align actual expenditures (outgoings) from their capital projects with the
associated components recorded as Capital Expenditure Transactions.
The Item Level Spend Summary provides users with an overview of how the combination of Capital Spends (Global and/or
Linked) and Capitalisation Shares breakdown against the Budget Bucket Items within their project. The following information
is provided, per Budget Bucket Item:
Component - This is the Metrix Record ID (component ID) of the Budget Bucket Item.
Issues - This is a flag to indicate whether any issues are anticipated in regard to applying capitalisation
transactions to the underlying Component. See Capitalisation Issues
for more information.
Value - This is the total value of the Capital Spends (Global and/or Linked) that are calculated as associated with
the Budget Bucket Item. This has been weighted by the Item’s Cost Units value.
Renewal Share - This is the amount of the Value that will be directed to a Renewal Transaction Type during final
capitalisation.
Upgrade Share - This is the amount of the Value that will be directed to an Upgrade Transaction Type during final
capitalisation.
New Share - This is the amount of the Value that will be directed to a New Transaction Type during final capitalisation.
The above information can be very useful in assessing the general outcome of a pending capitalisation process.
Info
The above summary does NOT provide comment on any Disposal that may be associated with the eventual capitalisation
of the Capital Spends. Disposals are considered when the Capitalisation Shares include Renewals, and are assessed on
an Item by Item basis during transaction generation. See Capitalisation Transactions
for more information.
Transaction Posting History
The Transaction Posting History provides users with an overview of the history of transactions that have been posted to
the Financial Transaction Ledger within Metrix for the Budget Bucket. In most cases, this will be a single processing
batch associated with the final capitalisation of the Capital Spends, however, more batches may exist if the works
were processed to WIP (Works in Progress) during the life of the project.
The following information is provided, per Budget Bucket Component Item:
Component - This is the Metrix Record ID (component ID) of the Budget Bucket Item.
Finance Category - The Finance Category that the transaction was capitalised against.
Transaction Type - The Transaction Type that the transaction was capitalised against.
Effect - The effect (Gross or Accumulated Depreciation) of the Transaction Type.
Posting Date - The date that the transaction was posted to the Financial Transaction Ledger.
Value - This is the SUM of the transaction values that were posted to the Financial Transaction Ledger for the Budget
Bucket Item, for the selected Finance Category and Transaction Type.
The presence of a Transaction Posting History entry confirms that some or all of the Capital Spends associated with the
Budget Bucket will be locked for editing. That is, once a transaction has been posted to the Financial Transaction Ledger,
the Capital Spends associated with the Budget Bucket Item will be locked for editing.
Info
You may notice the use of the term, Batch. This is a reference to a ‘group’ of transactions that are processed in one
bulk operation. These same ‘groups’ can be reverted as one operation, and are thus referred to as a ‘Batch’ in the system.
Capitalisation Issues
During the capitalisation process, Metrix is able to identify a number of issues that may prevent the successful
processing of Capitalisation Transaction batches (including WIP). The following provides some detail to the types of
issues that may be detected and how to resolve them.
Missing Cost Unit Values
Cost unit values are essential for calculating a budget item’s proportionate share of all global spend values,
as well as any linked spend values where the spend is linked to more than 1 item.
Without a cost unit value, the system will calculate a zero spend value share for the affected item(s).
Missing Construction Date Values
Construction date values are required attributes for any Component receiving capitalisation transactions. This is
to ensure that any required depreciation events are calculable.
Without a construction date value, the system will NOT be able to process capitalisation transactions for the affected
item(s).
Missing Finance Category Values
Finance category values are required attributes for any Component receiving capitalisation transactions. This is
to ensure that a valid Finance Category can be assigned to a Component’s first capital transaction.
Without a finance category value, the system will NOT be able to process capitalisation transactions for the affected
item(s).
WIP Transactions
During the life of a project, things don’t always go to plan. Timelines can slip, and projects may need to be carried
over to the next financial period (or, the project just might be massive in nature, and it is unavoidable that it will span
multiple periods). In these cases, it is important to be able to track the costs associated with a project, and see those
costs reflected in the financial statements of the organisation when periods roll over. This is where WIP (Work in Progress)
transactions come into play.
What are WIP Transactions
A WIP transaction is a special type of transaction that allows you to capitalise costs associated with a project against
the underlying Bucket Component Items, without having to consider any other capitalisation impacts such as disposal,
impairment, or the effect on accumulated depreciation.
The Transaction Type for WIP Transactions is called ‘WIP Transfers’.
WIP transactions behave just like a regular transaction in that they are protected by the rules of the Capital Transactions
Ledger, they exist within a single reporting period, are ascribed to a Finance Category, and will impact the Fair Value
of the underlying Component. The one exception to the ’normal’ suite of rules is that WIP transactions can be posted against
Components that have a status of ‘Proposed’. That is, a Component that is not yet commissioned, may receive WIP transactions
to carry value prior to final commissioning.
The above compliance with the rules of the Capital Transaction Ledger rules is why you will still be required to provide
a valid Posting Data and Finance Category when generating WIP transactions. Note; the Finance Category is only required
for Components that do not currently have any entries in the Capital Transactions Ledger.
What happens to WIP Transactions after Final Capitalisation
When a project is completed, and the final capitalisation occurs, the WIP transactions that have been posted against each
Component (by the current Budget Bucket) are summed up and the total value is ‘rolled back’ against each item. The following
table outlines how this process may look from the perspective of a single Component Item:
Date
Transaction Type
Amount
Description
2024-06-30
WIP Transfer
$102,750
WIP Transfer for Project X
2025-06-30
WIP Transfer
$48,150
WIP Transfer for Project X
2026-06-30
WIP Transfer
-$150,900
WIP Transfer reverted for Project X
2026-06-30
Installation
$150,900
Final Capitalisation of Project X
As shown above, the WIP transactions that were posted against the Component Item over several years are
rolled back at the time that the Final Capitalisation occurs. The same value that is rolled back, is then
added to the Component Item using the Capitalisation methodology defined for the Budget Bucket. In this case,
it was ‘Installation’, reflecting 100% New Capitalisation shares.
Capitalisation Transactions
At the end of a Capital Project, the costs that have been incurred need to be capitalised against the underlying
Component Items. This is done in the Metrix Asset Management system using Capitalisation Transactions. The process
of generating (and applying) capitalisation transactions causes the following:
The Budget Bucket will be closed/locked.
The cost of works (sum total of Capital Spends) will be transferred to the Capital Transactions Ledger.
A transaction batch summary will be created against the Budget Bucket.
Warning
Capitalisation Transactions can only be applied ONCE during the life of a project - It marks the end of the project.
To perform any more capital works against the same Component Items, a new Budget Bucket must be created.
When Capitalisation Transactions are applied, the Budget Bucket will be Closed (locked).
It is in point 2 above that the bulk of the capitalisation work occurs. When the value is transferred to the Capital
Transactions Ledger, the following considerations are taken into account:
Any disposal/impairment of existing Component carrying value is measured and applied (see Renewal Methodologies below).
Any effect on accumulated depreciation is measured and applied (see Renewal Methodologies below).
Any effect on the gross replacement cost of the Component is measured and applied.
Components are seeded with a Finance Category (in the case that they do not already exist within the Capital
Transactions Ledger).
Renewal Methodologies
For Capital Spends that have any Capitalisation Shares that are attributed to ‘Renewal’, consideration must be given to
how the system will process any existing carrying value of the underlying Component Item(s). The system does this through
the implementation of ‘Renewal Methodologies’.
Info
For Capital Spends that have any Capitalisation Shares that are attributed to ‘Renewal’, a Renewal Methodology must be
chosen in order to Generate Capitalisation Transactions.
Renewal Methodologies are essentially a set of rules that define how the system treats existing gross value and accumulated
depreciation value when capitalising renewal spends against a Component Item. Given the complexity of these methodologies,
only one is discussed here. For a full breakdown of the available Renewal Methodologies, see the ‘Renewal Method Examples’
within your Metrix Application.
An example Renewal Methodology, for the purposes of explaining the type of things they control, is the ‘Disposal Method’.
When capitalisation transactions are generated under the ‘Disposal Method’, the system will do the following:
When the Component’s Spend Share value exceeds its accumulated depreciation value, but not its gross value:
The system will generate ‘Disposal’ transactions to accelerate the accumulated depreciation value up to that of
the Spend Share value, or the gross value of the Component (whichever is less).
The system will then generate a ‘Renewal’ transaction to capitalise the Component’s Spend Share value against the
accumulated depreciation of the Component. Essentially, reversing the accumulated depreciation value.
When the Component’s Spend Share value exceeds its gross value:
Firstly, the system performs the above process to allocate as much of the spend as possible to the accumulated
depreciation value of the Component.
The remainder of the Spend Share value is then capitalised against the gross value (as another ‘Renewal’ transaction)
of the Component.
Again, this is a very simplistic example of how the system treats existing carrying value and accumulated depreciation.
See the ‘Renewal Method Examples’ within your Metrix Application for a full breakdown of the available Renewal Methodologies.
Batch Deletion
From time to time, you may need to ‘undo’ some work you have previously completed. If this involves the existence of
Capitalisation or WIP transaction batches, then you will need to properly delete these batches in order to continue.
The Metrix Asset Management provides support for such operations, to adequately privileged users. This section
outlines exactly ‘what’ happens to the transactions when you delete a batch.
When you delete a batch of transactions from a Budget Bucket, the following events occur:
The transaction entries are marked as inactive within the Capital Transactions Ledger.
The related Capital Spend entries will be unlocked - so they can now be edited.
Any Bucket Items that were associated with the transaction entries will also be unlocked - so they can now be removed.
How To Guides
This section also contains a How-To guide for the following topics:
To generate and post transactions to WIP, you will need to have navigated to the relevant Budget Bucket, and entered
the ‘Capitalisation’ tab. At this point, it is assumed that you have already posted the required
Capital Spends against the Budget Bucket.
To generate WIP transactions, perform the following steps:
At the top of the Capitalisation tab page, there is an ‘Actions’ button (denoted by three dots). Click on this button
to reveal a dropdown menu and choose ‘Generate WIP Transactions’ from the menu.
A dialog window will appear asking for some basic information required to generate the transaction batch, include:
Posting Date: The date the transaction will be posted to WIP. This date must be within the current financial period.
Once the above requirements have been satisfied, click ‘Generate’.
Info
Clicking ‘Generate’ will NOT post any transactions to the Capital Transactions Ledger. This merely generates a
temporary batch of transactions and returns them for you to review. Repeating this step (at another time) would
generate a different batch of transactions for review.
The generated transactions will be returned and displayed in a table format, with a summary at the top. The summary
will show the total value of transactions that were generated per Transaction Type (which will be just the ‘WIP Transfer’
type). Above the summary, the following options will be available:
Post WIP Transactions: This will post the transactions to the Capital Transactions Ledger. The transactions will
be posted with the Posting Date you specified in the previous step. Click this button to post the transactions.
Download as CSV Template: This will export the transactions to a CSV file. The CSV file will contain all the
details of the transactions, including the Posting Date and Finance Category. This file is compatible with the Metrix
transaction import style. Click this button to download the CSV file (you will need to manually import the file
in order to process the transactions).
Regenerate: This will regenerate the transactions - giving you a chance to change some inputs.
Warning
If you elect to ‘Download as CSV Template’, you will need to manually import the file into the system in order to process
the transactions. Furthermore, the batch of transactions that apply will NOT have any relation back to the Budget Bucket
you are working in. This means that spending items will not be locked and other protections may be missing.
The above does not apply if you click ‘Post WIP Transactions’ after downloading the CSV file.
Capitalise to Transactions
To generate and post capitalisation transactions, you will need to have navigated to the relevant Budget Bucket, and entered
the ‘Capitalisation’ tab. At this point, it is assumed that you have already posted the required
Capital Spends against the Budget Bucket.
To generate capitalisation transactions (and subsequently close the budget bucket), perform the following steps:
At the top of the Capitalisation tab page, there is a ‘Generate Transactions & Close Budget’ button. Click on this
button.
A dialog window will appear asking for some basic information required to generate the transaction batch, include:
Posting Date: The date the transaction will be posted to WIP. This date must be within the current financial period.
Renewal Methodology: In the case that the Budget Bucket has any Capital Spends with a Renewal Capitalisation Share,
you will need to select a predefined Renewal Methodology. This will be required to generate the transactions in cases
where this applies.
To see additional information about available Renewal Methods, click on the ‘Renewal Method Examples’ button at the
top of the dialog window.
Once the above requirements have been satisfied, click ‘Generate’.
Info
Clicking ‘Generate’ will NOT post any transactions to the Capital Transactions Ledger. This merely generates a
temporary batch of transactions and returns them for you to review. Repeating this step (at another time) would
generate a different batch of transactions for review.
The generated transactions will be returned and displayed in a table format, with a summary at the top. The summary
will show the total value of transactions that were generated per Transaction Type. Above the summary, the following
options will be available:
Post Transactions & Close Budget: This will post the transactions to the Capital Transactions Ledger. As the
button label implies, it will also mark the Budget Bucket as closed. Click this button to post the transactions.
Download as CSV Template: This will export the transactions to a CSV file. The CSV file will contain all the
details of the transactions, including the Posting Date and Finance Category. This file is compatible with the Metrix
transaction import style. Click this button to download the CSV file (you will need to manually import the file
in order to process the transactions).
Regenerate: This will regenerate the transactions - giving you a chance to change some inputs.
Warning
If you elect to ‘Download as CSV Template’, you will need to manually import the file into the system in order to process
the transactions. Furthermore, the batch of transactions that apply will NOT have any relation back to the Budget Bucket
you are working in. This means that spending items will not be locked and other protections may be missing.
The above does not apply if you click ‘Post Transactions & Close Budget’ after downloading the CSV file.
Delete a Batch
From time to time, you may need to ‘undo’ some work you have previously completed. If this involves the existence of
Capitalisation or WIP transaction batches, then you will need to properly delete these batches in order to continue.
To delete a batch of transactions from a Budget Bucket, perform the following steps:
Navigate to the relevant Budget Bucket and enter the ‘Capitalisation’ tab.
Any existing transaction batches will be displayed in the upper portion of the Capitalisation tab page. In the
upper-right hand corner of each transaction batch, there is a trash can icon. Click on this icon to delete the
relative transaction batch.
A dialog window will appear asking you to confirm the deletion. It will also provide detail as to the potential
consequences of deleting the transaction batch (in monetary terms). Click ‘Confirm Deletion’ to delete the transaction
batch.
Info
Transaction batches CANNOT be deleted out of sequence. That is, they must be deleted in the reverse order to which they
were created (most recent batch first).
Assigning Finance Categories
Before you can generate transactions, you will need to ensure that any Components without a Finance Category are nominated
with a valid Finance Category. Note; this will be any Components that have yet to receive a Capital Transaction in the past.
To assign Finance Categories to Components, perform the following steps:
Navigate to the relevant Budget Bucket and enter the ‘Capitalisation’ tab.
If any Budget Bucket Items exist without a Finance Category, an entry in the Capitalisation Issues error block will
appear. You will also see an option to ‘Set Finance Categories’ at the top of the section.
Click on the ‘Set Finance Categories’ button to open a dialog window.
A dialog window will appear with a list of all Budget Bucket Items that do not have a Finance Category assigned. You can
select the Finance Category for each Budget Bucket Item from the dropdown list. Alternatively, you can select one (1)
Finance Category to apply to all Budget Bucket Items.
Once you have selected the Finance Categories, click ‘Save’ to apply the changes.
The dialog window will close, and the Capitalisation Issues error block will refresh to show that the Finance Categories
have been successfully assigned.
Post Capitalisation Data Updates
This section provides an overview of the bulk data update workflows available within the Capital Budgets module
of the Metrix Asset Management system. These workflows are useful for processing the impacts of capital
intervention works on the underlying component records.
The concepts discussed in this section include:
Attributes to Update
Additionally, a How-To document is provided to guide you through the following:
Bulk Update Budget Bucket Items
Subsections of Post Capitalisation Data Updates
About
This section outlines the bulk data update workflows featured in the Capital Budgets module of the Metrix Asset Management
system. These workflows facilitate the handling of changes resulting from capital intervention works on related component records.
Following the completion of a project using a Budget Bucket in the Metrix Asset Management system, it is often
necessary to update the intervention attributes of the underlying Asset Components to reflect the work that was
completed throughout the project.
What can be Updated
This section discusses the common attributes that you may consider updating as the
result of a capital intervention project:
Condition: The condition of an Asset Component is often updated to reflect the current state of the Component
following the completion of the project. In many cases, the condition of all Components can be set to the same value
of ‘Excellent’, or equivalent.
Intervention Date: The date of the intervention is often updated to reflect the projects completion date as the
most recent intervention date for the underlying Asset Components. Once again, this is often the same value for all
Components in the Budget Bucket.
Treatment Useful Life: In the event that the project had an effect on the useful life of the Asset Component, it is
important to update the Treatment Useful Life attribute to reflect the new useful life of each Component. Note; this is
different to the Remaining/Residual Life of the Asset Component.
Residual Life: This attribute is relevant mostly in Renewal projects where the remaining useful life of the Asset
Component has been restored (typically to match the Treatment Useful Life). In this case, the Residual Life attribute
can typically be updated to match the Treatment Useful Life.
Cost Units: This attribute is relevant mostly in Upgrade projects where the size/scale of the underlying Asset
Component may have changed. Such changes are NOT typically done in a bulk update, but rather, on a Component by
Component basis.
Report Categories: Some users have implemented various Report Categories/Tags to track the Capital status of various
Asset Components. If this pertains to you, don’t forget to update the Report Categories/Tags of the underlying Asset
Component upon completion of the project.
Note
It is important to note that Metrix will NOT automatically adjust any of the above attribute information. Whilst we
do provide the ability to update many of these attributes in bulk, it is still up to the user to determine the correct
values, and apply the changes to the underlying Asset Components.
Grouping of Updates
In the data update tab, you will find a list of the unique Asset Classifications that pertain to the underlying Asset Components
within the Budget Bucket. For each of the Asset Classifications, you will find the related Component Groups listed. Clicking on
one of the Asset Classification tiles will show you Asset level attributes that you can edit. Clicking on one of the Component
Group tiles will show you Component level attributes that you can edit.
As you might have presumed, when you edit attributes on a given tile, those changes will apply to the Asset/Component
entities that are associated with that tile. For example, if you edit the ‘Condition’ attribute on the Component Group tile
for ‘Sealed Road Surface’, the changes will apply to all the underlying Asset Components that are associated with that
Component Group.
This form of grouping was chosen so that the bulk update process aligns with the classification configuration structure
of Metrix. That is, each Asset Classification, and its child Component Groups, could potentially have a different
set of Custom Attributes defined for them. Therefore, the Bulk Update tool is designed to allow you to edit the attributes
for each Asset Classification and Component Group as independent groups.
This section provides guidance on how to use the Bulk Update helper tool within each Budget Bucket.
Info
Before starting, it should be noted that Metrix will save/store any adjustments you make in the Bulk Update tool
for the life of the Budget Bucket. The changes will NOT be applied to the underlying Asset Components until you
actually save those changes. This allows you to make multiple changes to the Bulk Update tool, and then apply them all at once
when you are ready.
To use the Bulk Update tool provided within each Budget Bucket, follow these steps:
Navigate to the Budget Bucket with the Asset Components that you want to update.
Navigate to the ‘Post Processes’ tab of the Budget Bucket.
The tab panel is divided into three (3) sub tabs:
Data Updates: This section allows you to set values for attribute values of the underlying Assets and/or Components.
Report Category Updates: This section allows you to modify the Report Categories/Tags of the underlying Asset Components.
Update Summary: This is where you can review the changes you have made, and apply them to the underlying Asset Components.
Each of the above sub tabs are described in more detail below.
Data Updates
To update a particular attribute, or set of attributes, navigate to the respective Asset Classification or Component
Group tile within the Data Updates tab. For the listed attributes, you can set a value for any of the attributes that are
enabled. Remember, any changes you make will flow through to all the underlying Assets or Components that associate
with the respective Classification tile you have selected.
At present, the following attribute classes are supported:
Custom Attribute data
Intervention Data
Current Intervention Treatment
When you have finished making the changes you need to make, there is nothing more you need to do until you want
commit those changes to the underlying Asset Components. See the Update Summary section below for more.
Remember, changes are stored in the Budget Bucket until such time you are ready to save them.
Report Category Updates
The Report Category/Tag update section is NOT grouped by Asset Classification or Component Group. Instead, it is
grouped by the Report Category/Tag name itself. For each of the Report Categories/Tags, you have the option to:
Assign all underlying Asset Components to a specific Report Category/Tag Options, or
Unassign all underlying Asset Components from a specific Report Category/Tag Option or Options.
To assign a specific Report Category/Tag to all underlying Asset Components, click on the tile for the Report Category/Tag
you want to assign. This will expand the tile and show you the available options to Assign or Unassign the Category/Tag.
On the left-hand side, use the drop-down menu to select the Option you wish to apply for the Report Category/Tag.
To unassign a specific Report Category/Tag from all underlying Asset Components, click on the tile for the Report Category/Tag
you want to unassign. This will expand the tile and show you the available options to Assign or Unassign the Category/Tag.
On the right-hand side, click inside the input control. A drop-down menu will appear with the Category/Tag Options
that pertain to the selected Report Category/Tag. Select the Option you wish to unassign from the underlying Asset Components.
You may select more than one Option to unassign from the underlying Asset Components.
Note
Remember, only one Option for any given Report Category/Tag can be assigned to the underlying Asset Components at any one time.
If you select to Assign an Option for a Report Category/Tag, then the option to Unassign for that Report Category/Tag will
be disabled - as the assignment of one option, immediately precludes any other options.
When you have finished making the changes you need to make, there is nothing more you need to do until you want
commit those changes to the underlying Asset Components. See the Update Summary section below for more.
Remember, changes are stored in the Budget Bucket until such time you are ready to save them.
Update Summary
The Update Summary tab provides a summary of the changes you have made in the Data Updates and Report Category Updates
tabs. This is where you can review the changes you have made, and apply them to the underlying Asset Components.
To apply the changes you have made, firstly enter an Effective Date for the Changes to take effect. This can be any date
that is NOT in the future. The principal attribute this value is linked to is the Residual Life. It is the date at which
you are saying the Residual Life value is true - i.e. 6 years, 3 months remaining as of today.
Once you have entered the Effective Date, and are satisfied with the reviewed changes, click on the Save Changes button.
This will apply the changes to the underlying Asset Components.
Note
Whilst this is termed a ‘Post Process’ step, there is no limit to the number of times you can perform a bulk update on
the underlying Asset Components using this tool. It is simply a means of Bulk Updating all the Asset Components that
have been assigned to the Budget Bucket.
Report Generation
The Metrix Asset Management system was designed with data interoperability at the forefront. This means
there is a big focus on making it easy to get your asset data in, as well as getting complete and up to date
data out of the system. This section covers the various methods available to export information from the
system, including:
Asset and Component information,
Financial data including movements, and
Useful data extracts
Subsections of Report Generation
About
This section provides background context and requirements of several of the built-in Reports within the
Metrix Asset Management system, including:
Component Data Export: a utility report that is capable of
exporting most of your asset portfolio data.
Financial Movement Report: a report that summarises the
capital value movements of asset components during a specified reporting period.
Indexation Export: a data export that can be used to perform
periodic indexation of component capital value.
Depreciation Export: a data export that can be used to perform
periodic depreciation of component capital value.
Residual Life Report: a data export that can be used to calculate
updated residual life values based on relevant condition assessment results.
It should be noted, that in addition to the above listed reports, the system also contains the following
report options:
Condition Profile: A report that summarises the average condition of components per asset classification.
Latest Condition Report: A report that details the latest condition assessment results for each component in the system.
Programme Report: A report that provides details from a mobile data capture programme.
Calculated Component Value Export: A report that calculates the ‘current’ replacement cost of components based on
the selected intervention treatment, and compares that to the value reported in the financial transactions ledger.
Raw Finance Data: A snapshot of the financial transactions ledger.
Upcoming Component Renewals Export: A report that summarises the ‘Next’ component intervention dates.
Subsections of About
Component Data Export
The ‘Component Data Export’ report is the most comprehensive data extract tool that the Metrix Asset
Management system has to offer. Using the ‘Component Data Export’ will export your information to a single CSV
file, and supports the following features:
Info
This data export can be found under the ‘Data’ section of the Reports Generation page, titled ‘Component Data Export’.
Support for Backdated Report Date
This report type has support for specifying the date in which the report
data should be generated from. Essentially, this allows for users to export
their asset portfolio as it was at a specific time in the past. Where available,
this feature is not compatible with custom filter refinement.
This report type supports the use of a field picker that allows users to expand or limit
the number of report fields included in the export. This can be useful when preparing an
export for an external agency who may not want (or should not see) specific attribute
data.
Custom Attribute Data Inclusion
This report type has support for including custom attribute data from the
asset and/or asset component form definition for included records. Where supported,
this feature will only be available when a custom filter has been selected to
refine the export’s scope of data.
This report type has support for report categories (tags). Where supported,
users will be presented with an option to include or exclude various report
category tags for the data export. If an asset or asset component has been
tagged with the respective report category, it will be populated in an
additional export column.
The ‘Financial Movement Report’ is your principal method of extracting information from the financial transactions ledger within
the Metrix Asset Management system. Using the ‘Financial Movement Report’ will export a summary of your asset component
capital value to a single CSV file, and supports the following features:
Info
This data export can be found under the ‘Finance’ section of the Reports Generation page, titled ‘Financial Movement Report’.
Reporting Period Definition
The ‘Financial Movement Report’ is a special, in that it supports reporting dates as a date range - that is, an ‘opening date’
and a ‘closing date’. This allows organisations to specify the period through which they wish to summarise their portfolio’s
capital value movements via the financial transactions ledger.
The selected dates are INCLUSIVE - start of the day for the ‘opening date’ and the end of the day for the ‘closing date’. A
transaction’s ‘Posting Date’ mandates if it falls inside a selected reporting period.
The ‘Financial Movement Report’, will include the ‘Opening’ & ‘Closing’ capital valuations (gross and accumulated depreciation
value) position for each asset component. For users wanting to understand the financial ‘Movements’ that caused the change in
capital value throughout their opening/closing period, the system includes the sum of all postings made to each configured
transaction type.
Each transaction type (and transaction type effect) will constitute a report column - the value contained representing the sum
of all transactions posted to that specific transaction type throughout the report period.
Users can choose to exclude any transaction types that they know have zero movements throughout the period to simplify the
export, however by default, all transaction types are included.
The ‘Financial Movement Report’ will export a single row per asset component except in the event of a financial re-categorisation
occurring within the report period. In these cases, a row to summarise movements for each affected finance category will be
exported.
If an asset component has undergone a financial re-categorisation during the selected reporting period (opening/closing dates),
then those components will be displayed across two (2) export rows. One row will pertain to the financial movements that occurred
whilst the component was assigned to the original finance category, including the financial ‘write-off’ against that category. Then,
another row will pertain to the financial movements that occurred whilst the component was assigned to the new finance category,
including the financial ‘write-on’ to that category.
This report type has support for report categories (tags). Where supported,
users will be presented with an option to include or exclude various report
category tags for the data export. If an asset or asset component has been
tagged with the respective report category, it will be populated in an
additional export column.
The ‘Indexation Export’ is a helper utility report that generates a valid
Transaction Import Template
with pre-populated indexation transaction types based on supplied metrics. Using the ‘Indexation
Export’ will generate a CSV file that conforms with the import requirements of the
financial ledger transactions import process within the Metrix Asset Management system, including
the following columns:
Component ID,
Posting Date,
Finance Category ID, and
Column headers and transaction values for the indexation-gross and indexation-accumulated depreciation
transactions.
The ‘Indexation Export’ requires the following information. Each is discussed below.
Warning
Merely exporting the report will NOT post the indexation transactions to the financial transactions ledger. Users
must follow the appropriate import steps, with the generated file, to recognise these movements within the system.
‘Indexation At’ Date
This is the date at which you wish to calculate the indexation from. The chosen date value controls:
‘When’ components are considered to be linked to Finance Categories.
‘When’ to calculate each components capital value (gross and accumulated depreciation) at.
Finance Categories
This is the array of finance categories for which you wish to calculate and export indexation movements
for. Any component linked to one of the included finance categories at the supplied ‘Indexation
At’ date value, will be included in the export results.
Indexation Rate
This is the desired rate of indexation (supplied as a percentage) to be applied across the selected Finance Categories. Once
supplied, the system will perform the following calculations:
The above gross and accumulated depreciation values are calculated as at the supplied ‘Indexation
At’ date value. The indexation rate is divided by 100 to convert it to its decimal implication.
Posting Date
This is the date that will be pre-populated into the posting_date column of the exported template.
If the generated report is used to import the indexation transactions, this will be the ‘Posting Date’
for the resulting financial transaction ledger entries.
Cost to Bring to Satisfactory Report
The Cost to Bring to Satisfactory (BTS) report calculates intervention metrics for components based on their
condition a pre-defined factor set. This report works by putting components into groups based on
their assigned report category options (for the chosen report category), and applying a pre-defined
multiplication factor to their aggregated factor bases. A factor base is defined as either the current replacement cost
or the current carrying value of the components - this is defined in the factor set.
Example
For example, taking all of the components assigned to the ‘Roads’ option under the ‘Responsible Manager’
report category, and generating the following results:
Sum of replacement value for components of condition 1, multiplied by a factor of 0%.
Sum of replacement value for components of condition 2, multiplied by a factor of 0%.
Sum of replacement value for components of condition 3, multiplied by a factor of 75%.
Sum of replacement value for components of condition 4, multiplied by a factor of 50%.
Sum of replacement value for components of condition 5, multiplied by a factor of 100%.
Such a report allows asset managers to see a weighted perfective of the condition profile of their asset
portfolio. This report also satisfies part of the requirement for NSW Local Government Organisations to generate the
Special Schedule 7 report.
The report contains the following configuration options:
Support for Backdated Report Date
This report type has support for specifying the date in which the report
data should be generated from. Essentially, this allows for users to export
their asset portfolio as it was at a specific time in the past. Where available,
this feature is not compatible with custom filter refinement.
The BTS Factor Set is a special lookup matrix that is configured for this style of report. By default, the system contains
a standard Factor Set definition that can be modified by users. A valid Factor Set essentially requires:
A report category to be specified, and
For each option within the chosen report category, a percentage based multiplier for a components ‘Replacement
Value’ or ‘Carrying Value’ as specified, for each possible condition score between 1-5.
Depreciation Export
The ‘Depreciation Export’ is a helper utility report that generates a valid
Transaction Import Template
with pre-populated depreciation transaction types based on supplied metrics. Using the ‘Depreciation
Export’ will generate a CSV file that conforms with the import requirements of the
financial ledger transactions import process within the Metrix Asset Management system, including
the following columns:
Component ID,
Posting Date,
Finance Category ID, and
Column headers and transaction values for the depreciation-accumulated_depreciation
transaction per Component.
The ‘Depreciation Export’ requires the following information. Each is discussed below.
Warning
Merely exporting the report will NOT post the depreciation transactions to the financial transactions ledger. Users
can follow the appropriate import steps, with the generated file, to recognise these movements within the system.
Posting Date
This date will be used to set the pre-populated posting_date column of the exported template.
If the generated report is used to import the depreciation transactions, this will be the ‘Posting Date’
for the resulting financial transaction ledger entries.
The ‘Posting Date’ also dictates the Period in which to calculate any required depreciation movements until.
Finance Categories
This is the array of finance categories for which you wish to calculate and export depreciation movements
for. Any component linked to one of the included finance categories at the supplied ‘Depreciation Since’
date value, will be included in the export results.
Calculating Depreciation
Given the manner in which component life is managed
within the Metrix Asset Management system, as well as the system’s ability to manage
ageing events across the fiscal year, it is
possible to calculate the required depreciation amount of a component at any given point in time.
Formula for Depreciation (Straight Line)
The formula used to calculate the depreciation charge for any given period (PD) in the Metrix Asset Management system considers
Written Down Value (WDV), the Non-Depreciable Value (NDV), and the Remaining Life (RL). It is:
$$ PD_a = \frac {{ (WDV - NDV)_a }}{{ RL_a }} $$
Proof:
This is an implementation of straight-line depreciation that has the capacity to react to changing assumptions for component
life, as well as adjustments to component value (indexation and/or renewal) over its lifetime. It can be shown (below how to reach this formula
from the more commonly known straight-line depreciation formula - The basic accepted formula for depreciation for a period (PD), given Depreciable Gross
Value (DGV) and Useful Life (UL), is:
$$ PD = \frac {{ DGV }}{{ UL }} $$
The whole of life depreciation schedule (D) for straight line depreciation can be expressed as the sum of this formula across the Useful Life (UL) and Age (a) of the component:
$$ D = \frac {{ DGV }}{{ UL }} + \frac {{ DGV }}{{ UL }} + \frac {{ DGV }}{{ UL }} + ... + \frac {{ DGV }}{{ UL }} = \sum_{a=1}^{UL} \frac {{ DGV }}{{ UL }} $$
Essentially, the formula repeats every year – or depreciation period – until age is 1 (depreciation is not charged once the component has zero remaining life).
This is an extremely simplified expression of straight-line depreciation. It does NOT consider any modifications to the value or expected life of the component
over its lifetime.
Example: The problem with Gross Value & Useful Life only…
Consider a component worth $10K that was expected to last 10 years – each year it would depreciate by $1K under the above formula.
At year 4, engineers reassessed the component and determined that it would last a further 8 years (not the 6 years that the depreciation schedule purported).
This means that by year 10, the component would reach a $0K carrying value, but still have another 2 years of service life left. The rate of depreciation should
have increased once the remaining life was reassessed.
This is why, when working with long-lived assets and components, we must consider the impact of assumption changes over a lifetime. Fortunately, the formula can
be expressed in terms of:
$$ D = \sum_{a=1}^{UL} \frac {{ DGV_{a-1} }}{{ (UL - a) }} $$
In the above, the ‘a - 1’ notation on the numerator is representing a recursive pattern. That is, in each series, the numerator is equal to the Depreciable Gross Value
(DGV) less the effect of previous iterations of the formula’s application. Another way to state this, is the depreciable value of the component, less its previous consumption
charges. In other words, it is the Written Down Value (WDV) less the Non-Depreciable Value (NDV) at the time of calculating the depreciation charge (D).
It should also be noted that the denominator, ‘UL - a’, can also be simplified. The Useful Life (UL) minus Age (a) is also known as the Remaining Life (RL) at Age (a).
Therefore, the series can be expressed more simply as:
This means, at any point in the component’s Aae (a), the period depreciation (PD) charge can be expressed simply as:
$$ PD_a = \frac {{ (WDV-NDV)_a }}{{ RL_a }} $$
Below is a table showing both formulae in application. On the left-hand side, the Gross Value (GV) and Useful Life (UL) are shown.
On the right-hand side, the Remaining Life (RL) and Written Down Value (WDV) is shown. Each row represents one depreciation period
(for simplicity, let’s say one (1) year). Taking any of the rows in isolation, each formula equates to the same period
depreciation (PD) in the middle column.
Gross Value (GV)
Non-Depreciable Value (NDV)
Useful Life (UL)
Period Depreication (PD)
Remaining Life (RL)
Written Down Value (WDV)
$11K
$1K
10
$1K
10
$10K
$11K
$1K
10
$1K
9
$9K
$11K
$1K
10
$1K
8
$8K
$11K
$1K
10
$1K
7
$7K
$11K
$1K
10
$1K
6
$6K
$11K
$1K
10
$1K
5
$5K
$11K
$1K
10
$1K
4
$4K
$11K
$1K
10
$1K
3
$3K
$11K
$1K
10
$1K
2
$2K
$11K
$1K
10
$1K
1
$1K
With this in mind, it is important to address instances where a depreciation charge may have been ‘missed’ for a component.
This can occur if the system ageing events
do not line up with the frequency of depreciation charges. It can also occur if a quarter’s depreciation run was simply missed
(nobody is perfect).
To cater for this, the report includes a flag that notifies you, as a user, that a depreciation charge may have been missed.
In these cases, it is important that users consider the implications of applying a modified depreciation charge to the
subject component.
Residual Life Report (Beta)
The ‘Residual Life report’ calculates updated Residual Life values for each Component based on Condition
inspection results. It lets users apply both new and existing filters, date constraints, and various
Condition selection criteria. The report provides calculated Residual Life (with lower and upper estimates),
differences from current system values, relevant warnings, and options to include calculation details.
Finally, the final report is structured so that the CSV export can be seamlessly imported as a
Component Update Import Template,
facilitating the onboarding of new life values as required.
The ‘Residual Life Report’ has a core functionality, set of configuration options, and predefined output
fields as discussed below.
Warning
Merely exporting the report will NOT post the updates to Component residual life. Users can follow the
appropriate import steps, with the generated file, to recognise these adjustments within the system.
Core Functionality
The Residual Life report takes a Condition assessment result and calculates a Residual Life value (with lower
and upper estimates) based on a Straight-Line ageing profile. To do this, the Component’s underlying raw
Condition score – a score of 1 (excellent) to 100 (poor) – is multiplied, as a percentage, by the Useful Life
to determine a Condition based Age for the Component. This is consistent with the application of Straight-Line
ageing profiles.
Example
For example, a Component with an underlying raw Condition score of 70, and a Useful Life of 80 years, would
receive a Condition based Age result of 70% × 80 years = 56 years. From this, the Residual Life is simply
taken as the difference between Age and Useful Life, or 80 years - 56 years = 24 years.
For Metrix to provide upper and lower estimates, the system relies upon a built-in Condition Scale and, again,
Straight-Line ageing profiles. The Condition Scale currently utilised by the report breaks the possible Condition
scores (1-100) into 5 distinct scales:
Condition 5: Scores from 100 to 80
Condition 4: Scores from 80 to 60,
Condition 3: Scores from 60 to 40,
Condition 2: Scores from 40 to 20, and
Condition 1: Scores from 20 to 1.
As shown above, each Condition Scale has a lower score bounds and an upper score bounds. It is these bounds (surrounding
the raw Condition score) that are leveraged in calculating the lower and upper estimates for Residual Life values. To
calculate a bounds value, the same principle of Residual Life calculation is applied.
Example
For example, consider the above raw Condition of 70, and Useful Life of 80 years. The raw Condition score intersects
the ‘Condition 4’ Condition Scale and thus has score range of 80 to 60. The lower/upper estimates are therefore:
Upper Age: 60% x 80 years = 48 years
Lower Age: 80% x 80 years = 64 years
Upper Residual Life Estimate: 80 years - 48 years = 32 years
Lower Residual Life Estimate: 80 years - 64 years = 16 years
The following graph shows how raw Condition Scores (1-100) within standard Condition Scales (1-5) interpolate
to provide a calculated Residual life with lower and upper range estimates. Figures from the above example have
been highlighted for clarity.
The above image shows the interpolation of calculated Residual Life values from raw Condition Scores and Condition
Scales.
Configuration
The Residual Life Report has support for the following configuration options:
Effective Date for Residual Life Calculations
The date to use for calculating the residual life values, relative to each component’s useful life.
When “Use Condition Record Date per Component” is selected, the effective date will be determined by each
component’s latest condition record date within the specified condition date limits.
Data filter
The predefined filter to use in restricting the data returned by the report.
Condition Selection Criteria
There are several Condition Selection Criteria that can be used to ‘refine’ the type and scope of Condition
Assessments you wish to require to satisfy this report. It is important to note that (unless explicitly requested)
the Condition Selection Criteria will NOT limit the Components that are exported by the report. Rather, it limits
what Condition records are considered valid for the report. The criteria include:
Condition Date Range Upper Limit
The latest condition record date to consider when selecting condition records for residual life calculations.
Condition records captured after this date will be excluded. Please note that this does not exclude
components from the export, rather, it simply limits what condition records are considered relevant when
calculating residual life. Clearing this value will default it to today.
Condition Date Range Lower Limit
The earliest condition record date to consider when selecting condition records for residual life calculations.
If left blank, all condition records prior to the upper limit will be considered. Please note that this does
not exclude components from the export, rather, it simply limits what condition records are considered
relevant when calculating residual life.
Condition Function Limitations
Select the condition function(s) as a filter for condition records to use for residual life calculations.
Only condition records captured against the selected function(s) will be considered. Please note that this does
not exclude components from the export, rather, it simply limits what condition records are considered relevant
when calculating residual life. No Exclusions when Blank.
Exclude Components without Condition Records
Components with no condition records matching the specified criteria will NOT be exported.
Enabling this will exclude any components that do not have condition records matching the specified criteria.
It should be noted that, even with default criteria, some components will not have a valid condition record
and will be excluded by this option.
Output
Depending on the report configuration options above, the Residual Life Report will generate the following
fields. Fields marked with an asterisk are compliant with reimportation for Component Updates.
Component Record ID *
The unique identifier for the Component record. This field is also vital for importing the dataset as a
Component Update.
Intervention Residual Life *
This is the calculated Residual Life of the Component, based on the most relevant Condition record, as
per any Condition Selection Criteria. The field name is consistent with the Component Update Import template
for modifying a Components Residual Life value.
Lower Range Residual Life
This is the calculated lower range Residual Life of the Component. This value is predicated on the ‘worst-case’
scenario of the relevant Condition Scale.
Upper Range Residual Life
This is the calculated upper range Residual Life of the Component. This value is predicated on the ‘best-case’
scenario of the relevant Condition Scale.
Intervention Useful Life *
This is the Component’s useful life value. It is included in the report to provide users with context for the
Residual Life calculations.
Effective Date *
This is the date in which the calculated Residual Life is ‘effective’ from. Report configuration options can
alter this value. When performing an update on Residual Life values, the effective date gives the context
of ‘when’ the change applies from; this is vital because Residual Life changes over time.
Effective Date Basis
This is an informational field detailing the way the effective date was set in the report’s initial configuration
options. It will be either ‘Condition’ or ‘Custom’. If ‘Condition’, it indicates that the date of the
Condition Assessment is being used (per-component) as the effective date of Residual Life calculations.
A ‘Custom’ basis indicates that the user supplied a fixed date for calculating Residual Life values.
Residual Life as at Effective Date
This value is included to provide the user with context around what the Component’s Residual Life value would
be at the supplied/derived effective date (above) without any data alterations.
Residual Life Range Differential as at Effective Date
This value is included to provide the user with context around what the difference between ‘current’ values
and calculated values are. It is important to note that comparisons are always made to the upper/lower
bound estimates, rather than the calculated Residual Life. The graph below highlights the measurements
that this figure indicates.
In the above graph, the following is occurring:
Point ‘A’ falls below the lower estimate, therefore its differential is calculated from the lower estimate.
Point ‘B’ falls above the upper estimate, therefore its differential is calculated from the upper estimate.
Point ‘C’ falls within the lower/upper estimates, therefore there is zero differential.
Residual Life as at Now
This value is included to provide the user with context around what the Component’s Residual Life value
is as at the date of generating the report. This does not reflect the the supplied/derived effective date (above).
Selected Condition Record Function
This value indicates the underlying Condition Function used for the Component’s relevant Condition Assessment.
Essentially, it indicates the method of Condition Assessment per-row.
Selected Condition Record Date
This value indicates ‘when’ the relevant Condition Assessment was conducted. Note; if the ‘Effective Date Basis’
is set to ‘Condition’, this value will also be the ‘Effective Date’.
Selected Condition Raw Value
This is the underlying raw score for the relevant Condition Assessment. This is used to derive the Useful
Life multiplier for Residual Life calculations.
Selected Condition Value
This is the ‘scaled’ Condition value of the relevant Condition Assessment. Until the report supports custom
‘Condition Scale’ inputs (coming soon), it will always be a value between 1-5.
Condition Curve
This field is a placeholder for an upcoming feature that will permit users to define a custom relationship
between raw Condition scores and Life Multiplier values. Until the report supports such custom ‘curves’
(coming soon), it will always be ‘Straight Line’.
Condition Curve Life Multiplier
This field is a placeholder for the abovementioned ‘Condition Curve’ feature that will permit users to
define a custom relationship between raw Condition scores and Life Multiplier values. Until the report
supports such custom ‘curves’ (coming soon), this value will always reflect the ‘Straight Line’ calculation
metric described in the ‘Core Functionality’ section of this guide.
Selected Condition Functions
This is an informational field that reflects the reports underlying Configuration options. If the user
selects one or more ‘Condition Functions’ in as ‘Condition Function Limitations’, they will be listed
here. Otherwise, this field will state, ‘No Restrictions’.
Condition Scale Used
This is an informational field that reflects any constraints placed on the ‘Condition Scale’ used in
calculating the lower/upper estimates. This is a placeholder field and will always state, ‘System Default’
until custom Condition Scale selections are supported by the report (coming soon).
Warnings
This field may contain one or more messages per-row. These predefined messages are aimed at picking up
known scenarios that may be pertinent to the Component’s current state. The following are considered:
Missing construction/intervention date.
Construction/Intervention date greater than effective date.
Could not calculate residual life value as intervention useful life is missing.
Could not calculate residual life value as condition value is missing or no condition matches criteria’.
Residual life as at effective date is outside condition range residual life bounds.
Coming Soon
Due to the beta status of this report, there are a couple of features that have yet to be fully
rounded out, and as such, are flagged as ‘Coming Soon’. The following gives a brief overview of
these features.
Condition Curves (Ageing Profiles)
Condition curves will allow sites to define custom relationships between condition raw values (1-100)
and the corresponding life multiplier values. As detailed throughout this guide, the current methodology
for ageing profiles is ‘Straight Line’ where each increment in raw condition score, reflects a like
decrement in the life multiplier.
Condition Scales (Bounds for Estimations)
Custom condition scales, aside from enabling sites to define condition ranges such as 1-10 (or similar),
will also enable sites to have some control over the scale of upper/lower bounds for life estimates.
That is, if you control the range of raw condition scores covered by a condition’s corresponding scale,
then you also control the upper/lower estimates for residual life.
How To Guides
This section provides an overview on the following Report Generation topics:
To generate a new report in the Metrix Asset Management system, follow these steps:
Navigate to the ‘Reports’ page of the application.
Reports are grouped into sections of common themes and each report is represented by a tile with a label
and brief description. Click on your desired report. See Report Generation: About
for further information about specific reports.
The report configuration/preview page will load. Depending on the selected report template, a number of configuration
options may be present on the left, whilst on the right-hand side, a preview of the report will be shown. Make sure you
provide a setting for any required report configuration settings by scrolling through the left-hand side section.
Tip
Some reports will display additional options when certain configuration settings are switched. Try applying a ‘Custom Filter’
to the ‘Component Data Export’. The option to include ‘Custom Attributes’ will then be shown.
Once configured, update the name for your report (optional - a default name is pre-populated), and click ‘Run report’.
The report has now been queued for generation. The application will navigate to the generated reports page where past
reports are listed for download. At the top of this list, the report you just created will be listed with a status flag in the
left-most column. Once it is displayed as ‘Ready’, click the ‘Download’ option for that report.
Depending on your browser settings, you may be prompted for a ‘save’ location for the generated report. Save the file
to your computer. You have now generated and downloaded a report from Metrix.
Downloading Past Reports
Each report generated in the Metrix Asset Management system is available for download at any time, via the
‘Generated Reports’ page. To view and download a past report, follow these steps:
Navigate to the ‘Reports’ page of the application.
Click on the ‘Generated Reports’ option on the left-hand side of the page.
On this page, past reports are listed for download in a chronological order (by the date they were created). For
the report you wish to view, click the ‘Download’ option for that report.
Depending on your browser settings, you may be prompted for a ‘save’ location for the generated report. Save the file
to your computer.
Defining Report Factor Sets
The Metrix Asset Management system offers the
Cost to Bring to Satisfactory Report
as a built-in report template for users. This report calculates intervention metrics for components based on their
condition a pre-defined factor set. This guide details how to create and manage such factor sets.
Navigate to the ‘Reports’ page of the application.
From the report template list, select ‘Cost to Bring to Satisfactory Report’.
This will take you to the generation/configuration page for this report option. The current chosen ‘Factor Set’ will
be active in the ‘Report Factor Set’ drop-down. If you have never created your own ‘Factor Set’, this will be a system
default set.
To create a new ‘Factor Set’, select ‘Create New Factor Set’ from the drop-down list options. To edit the active ‘Factor Set’,
click on ‘View/Manage’ next to the drop-down list.
If creating a new ‘Factor Set’, enter a ‘Factor Set Name’ in the text input box. Then select the ‘Report Category’ for which
this ‘Factor Set’ will apply to. If editing, the existing ‘Factor Set’, click ‘Edit’.
For each option configured for the report category, an array of factors will be generate per scaled condition score of 1-5. These
are placeholders for you to replace with your actual factors. To set the factors, there are two options:
Set Globally
The top row of the list is reserved for global assignment. That is, this row does not pertain to a particular report category
option - it is there to allow you to set a figure that will be replicated across ALL report category options below.
Set Individually
Excepting the top row, each row represents a configured report category option. These rows can be individually managed by
inputting values directly.
First, choose a factor base as ‘Replacement Value’ or ‘Carrying Value’. This is the metric that will be multiplied by the report
factor per scaled condition score.
or each scaled condition score across the row, input the desired report factor from 0% to 100%.
When you have finished, click ‘Save’ at the top of the table.
3rd Party Integration
This section provides an overview on the current integration options available to 3rd party applications
from the Metrix Asset Management system. Additional integrations are always being developed, and will only
be documented once they have been thoroughly tested. If there is a 3rd party platform with which you would
like to integrate with your Metrix Asset Management system, please contact support@metrixassets.com. The
integrations discussed in this section are:
The Metrix Asset Management system QGIS Plugin enables users to swiftly and easily access their Asset Records directly within the QGIS interface. This provides the capacity to:
Edit Geometries using QGIS’s powerful editing suite of tools,
Create detailed maps with custom styling and layouts,
Overlay other user data for custom integrations
Install
Info
QGIS 3.16 or above is required to use this Integration
To install the QGIS Plugin we will use the Plugin Manager to add new plugin repository in order to make sure you can receive the latest plugin versions updates when
they are released.
You should now have two plugin ‘Plugin Repositories’ shown; the official one and the Metrix Assets one
Select the ‘All’ side menu item to show all available plugins
Search for ‘Metrix Assets’ and select ‘Install’
Setting Up a Connection
To begin using the QGIS plugin for Metrix Assets we first have to create a connection to the Cloud Portal. To do this:
Right click on the Metrix Assets node in your QGIS Browser.
Select ‘Connection Settings…’ from the dialogue menu.
NOTE: These options are also available from the Plugin’s Menu Bar.
In the resulting dialogue box, set the ‘Client ID’ based on your normal Metrix Assets Portal URL. For example; for a Metrix Assets Portal of http://demo.Metrixassets.com the ‘Client ID’ will be demo.
The next step is to setup the Authentication parameters (username and password).
Click the ‘+’ icon to begin adding your Authentication parameters.
NOTE: QGIS maintains its own secure Authentication Parameter store. If you have never setup Authentication Parameters in QGIS before, you will be prompted for a Master Password that secures and encrypts the Parameter Store on your local machine.
In the resulting dialogue box, set the following:
Name: This is simply a name that can be used to edit this Authentication Parameter at a later date - set it to whatever works best.
Username: The email address you sign into Metrix Assets with.
Password: The password you use to sign into Metrix Assets with.
Click Save once the above parameters are set.
You will be taken back to the ‘Connection Settings’ dialogue box with all the required settings now established. To connect to your data, simply click ‘Connect’ with the Authentication Configuration you defined in the ‘Authentication Configuration’ menu.
Loading Data using the Metrix Assets QGIS Plugin
Once you have setup a connection to your Metrix Assets environment, accessing your available layers can be achieved using the QGIS Browser Panel node ‘Metrix Assets’. To do this:
If not already connected, right click on the ‘Metrix Assets’ node in the QGIS Browser Panel and click ‘Connect’.
Once connected, expand the ‘Metrix Assets’ node in the QGIS Browser Panel to display the layers available. Each layer is constructed by a complete Asset Class.
To add a layer to the map, simply double-click the layer, or drag it into the map.
From this point, the geometries in the layer can be manipulated just like any other layer in QGIS. That is, to make an alteration to the layer, toggle editing for the layer and process your changes from there, using any native QGIS tools.
NOTE: Attribute management is NOT currently supported by the tool.
Just like standard QGIS methodology, when you have finished making your alterations, simply toggle editing and Save the changes. At this point, your changes have been saved to a local cache on your local machine.
The final step is to synchronise these changes with the Cloud. To do this, navigate to the Plugin’s Menu bar and expand the ‘Synchronise’ sub-menu. From this sub-menu, select ‘Push All Local Changes…’
Your changes will then be processed up to the Cloud and reflected there immediatley.
Using the Panel Interface
The Metrix Assets QGIS Plugin also has support for a Panel interface to view the status of your changes per layer. To use this:
In the Plugin’s menu bar, ensure ‘Status’ is enabled (ticked).
When enabled, you will have access to the Metrix Asset’s control panel which shows the sync status of your changes per layer.
Linking to the Cloud Portal
At any time whilst using the Metrix Assets QGIS Plugin, you can view one or many selected assets in the Cloud Portal with a simple click of a button. To do this:
Select one or many assets in your layer.
From the Plugin’s menu, select ‘View Selection in Metrix Assets’.
This will open your default Internet Browser and show you the selected asset(s) in the portal.
Metrix Sync
Metrix Sync enables administrators to schedule the download of component data locally (on-premise) into a local database. The local data can then be ingested into 3rd party software such as Intramaps/QGIS for viewing purposes only.
NB. Users can alternatively manually download Reports that can contain more information than Metrix Sync supports such as conditions/financials/treatments.
Features
Able to be scheduled via Task Scheduler
Downloads component attribution
Built-in Search lookup
Security details are encrypted
User-defined Database connection parameters
User-defined Attributes to download
User-defined Search attributes
Built-in Metadata
Asset-based and component-based views per geometry type
Data loads in popular GIS software such as Intramaps/QGIS
Support for commonly used database flavors - Microsoft SQL Server
Self-updating
Requirements
Windows Operating System
.NET Framework 4.6.1
SQL Server 2014+
Installation
Request a Metrix consultant to roll this out for you. Refer to Metrix Sync Admin.
Example Screenshots
Schedule data to sync to a local SQL Server instance and detect changes made since the last sync.
Setup data in 3rd party software with select, search, layer toggle and integration capabilities
Get an API Key from Metrix -> My Profile -> API Keys
Login to SQL Server Management Studio
Create an assets_cache database
Nominate a SQL Server user that Metrix Sync will use. Ensure that it has read/write/admin/owner permissions to the assets_cache database. If this user is a domain (AD) user, then Task Scheduler will need to Run As this user.
Unzip and put on customer network. e.g. \\SERVER_GIS_DIR\Application\Metrix\Metrix_Sync
Open the Config.ini in a Text Editor
Configure the Database Connection Details
Configure the Debug Mode: debug_mode=true
Configure the Encryption Mode: mode=encrypt
Configure the Apikey: apikey_unencrypted=APIKEY
Configure optional parameters
api_url=https://api.metrixassets.com/api/v1
Only useful if the api url changes by the Metrix team.
api_attributes=attribute1,attribute2
A comma delimited list of attributes to download. Refer to Metrix API.
search_attributes=attribute1,attribute2
A comma delimited list of attributes that should be populated in the dbo.cache_lookup_for_search for search reasons. If unset, the ids and description will be searchable.
update_mode=true
Set this to false if there are proxy or IT limitations that prevent the self-updater from functioning.
Run Metrix_Sync.exe
Copy the encrypted apikey
Note that if you cannot copy the apikey, right click the top of the cmd window, click Edit and click Mark. You should then be able to interact with the window and highlight the text. Click the ENTER key to copy.
Open the Config.ini in a Text Editor
Configure the Apikey: apikey=ENCRYPTED_APIKEY
Delete the Unencypted APIKey line: apikey_unencrypted=APIKEY
Delete the Encryption Mode line: mode=encrypt
Run Metrix Sync
Check for any errors in the log files
Configure the Debug Mode: debug_mode=false
Open Task Scheduler
Create a new scheduled task to run nightly (or weekly) using the user defined above or a service account.
Implementation into Intramaps (Optional)
In Intramaps MapManager, create a map file called Assets (preferably) or if such exists, call it Infrastructure
Setup 3 live SQL Server layers to the assets_cache.dbo.*_vw views in MM
Note: Ensure all three are setup. If you get errors due to empty views, set them up in the MM text
Call the layers:
Metrix Point
Metrix Line
Metrix Polygon
Setup classes per layer that are based on the theme_name (if it exists) or classification.
Note: You can get a distinct list of required themes via:
Setup an Other class per layer.
Setup 3 Tables in the Spatial tab of Intramaps ConfigManager pointing to the 3 component views
Setup 3 Selection Layers in the Spatial tab whose mapkey is the component_record_id and whose names are:
Metrix Polygon SQL
Metrix Line SQL
Metrix Point SQL
Setup the following Info1 whose name is Info in all 3 Selection Layers. Ensure you change the URL!
For IM 9.10 and onwards, remove the following: +’|Click here'
Setup a new Database in the Databases tab called SQL (Assets MultiLayer) pointing to one of the 3 selection layers
Setup a new Auto-Complete Combobox query named Assets Descr AUTO
Setup a Multi-layer search named Metrix Asset with 1 field whose name is @keyword and whose Label is Asset with a width of 50 pointing to the above combobox
Rename the cache_metadata to cache_metadata_backup
Rename the cache_metadata_backup PK from PK_cache_metadata to PK_cache_metadata_backup
Rename the cache_metadata_backup constraint from DF_cache_metadata_last_processed to DF_cache_metadata_backup_last_processed
Run Metrix Sync
Restore the backed up cache_metadata by deleting the newly created cache_metadata, renaming the backed up one and renaming it’s PK back to PK_cache_metadata and constraint back to DF_cache_metadata_last_processed
Site Integrations
Metrix Site Integrations enable administrators to establish URL-based links to any 3rd-party environment that supports hyperlinking ‘into’.
When an end user triggers a site integration link, Metrix will build the target URL (based on the defined parameters of the integration)
and redirect the user to that URL in a new browser tab.
There are no restrictions on the shape of the integrating URL aside from those stipulated by the rules of HTTP redirection, being:
Only GET endpoints are supported,
Custom request headers cannot be set, since browsers do not allow them for standard link navigation, and
Request bodies are not supported, (as GET requests do not include a body).
Features
Site integration links support the following features:
Fully customisable URL endpoint specifications
Dynamic value injection, including:
User click location: latitude/longitude and zoom level of where the user clicked.
Active record location: latitude/longitude of the user’s currently active record.
Dynamic record values: field values from the user’s currently active record.
Static values: to assist with URL re-usability across integration specifications.
Info
As stated above, site integrations do not support custom headers within the browser redirect flow. If authorization is required, contact
our support team to discuss server-to-server approaches using temporary tokens and the like.
In most cases however, existing session cookies or similar browser-based authentication will be sufficient for the target integration.
Read More
See the following guides for more information on Site Integrations:
To set up a new Site Integration link, navigate to the System Admin menu from the profile menu, and
then follow the steps below:
Info
If you do not see a profile menu item titled ‘System Admin’, and you are a System Administrator, please contact the Metrix
Support team for assistance.
Select the ‘Site Integrations’ sections from the left-hand side navigation pane within the System Admin page.
A list of current Site Integrations will be shown (if any exist).
Select an option between ‘New Info Panel Integration’ and ‘New Map Tool Integration’ to initialise a new (blank)
integration configuration. See Integration Types
for more information on integration types.
Firstly, provide a Name for the integration. This name MUST be unique to any other Site Integrations you may have
set up. Furthermore, the integration Name will be displayed to the end user as the button text for initiating the link.
Next, mark the Site Integration as either ‘Active’ or ‘Inactive’. By default, new setups are set to inactive until an
administrator explicitly sets it as active. This setting can be toggled at any time to control the availability of the
Site Integration for end users.
Enter the URL for the new Site Integration. Any dynamic fields MUST be wrapped by two (2) curly braces and preceded by a
period, as per the following:
{{.placeholder}} - indicates a dynamic field by the name ‘placeholder’.
{{.1invalid placeholder}} - is an invalid placeholder name. Placeholders cannot start with a number or contains spaces or
special characters.
Once you have supplied the URL, click ‘Validate’. This will parse and verify your provided URL as well as identify any
placeholders that may exist within the string.
Example
As an example, the following URL has three (4) placeholder values:
client: this placeholder has been situated within the core URL path,
lat_value: this placeholder is being used as the ‘value’ for the URL query parameter ’lat’,
long_value: this placeholder is being used as the ‘value’ for the URL query parameter ’long’, and
my_org_key: this placeholder is being used as the ‘value’ for the URL query parameter ‘orgKey’.
For any placeholders that were identified within the URL, you will then need to configure how Metrix is to assign
their value. Following validation, a table will be populated with the discovered placeholders. For each of the placeholders,
select a valid ‘Key Type’ and, if required, supply a ‘Value’ that corresponds with the chosen ‘Key Type’.
If you have modified a pre-existing URL value (and subsequently performed another ‘Validation’), some of your placeholders
may be ‘flagged for removal’. This means that the Site Integration URL previously contained a placeholder by the respective
name, but that placeholder is no longer present.
You will not be able to proceed with saving the Site Integration until you explicitly remove these orphaned placeholders
by clicking the ‘delete’ option on the respective row.
For ‘Info Panel Integrations’, it is possible to OPTIONALLY constrain the integration’s availability. That is, you can
specify that it only appears to an end user who has clicked on an asset/component:
that is of one or more Asset/Component Classifications, or
that is assigned to one or more Report Category Options.
Once you have completed all the above (as is relevant), simply click ‘Save’ at the top of the form. The Site Integration,
if marked as Active in step 4, will appear immediately following a browser refresh for end users.
Constraining Site Integration Links
To constrain the presence of a new or existing Info Panel Integration link, perform the
following steps whilst editing (or creating a new) Site Integration Link:
From the Info Panel Integration Link edit form, click ‘Manage Integration Constraints’.
A panel will appear with constraint options for the Integration.
Info
If you are editing an existing Info Panel Integration that is already constrained, this
button will read either:
‘Manage Classification Constraints’, or
‘Manage Report Category Constraints’.
For Map Tool Integrations, this button will not display at all.
For unconstrained Integrations the default state for this panel is ‘Classification’ based
constraints. If the intention is to constrain the Integration via assignment to one or
more Report Category Options, simply click ‘Use Category Constraints’.
Info
It is not possible to use both ‘Classification’ and ‘Report Category’ constraints on the same
Integration configuration. Furthermore, if any constraints (of a specific type) have been applied
previously to the Integration, then these will need to be fully removed before switching to the
alternate constraint type.
For each of the constraints you wish to assign to the Integration, simply click ‘Assign’
next to the relevant option.
For Classification Constraints
The panel will be split into two halves. The upper-half lists Asset Classifications whilst
the lower-half lists Component Classifications.
Constraining an Integration to one or more Asset Classifications means that the current
Integration will only appear in the Asset Info Panel for Assets of that/those types.
Constraining an Integration to one or more Component Classifications means that the current
Integration will only appear in the Component Info Panel for Components of that/those types.
It is allowed to specify BOTH Asset and Component Classifications as constraints to any one
Integration configuration.
For Report Category Option Constraints
The panel will show a single list of available Report Category Options.
Constraining an Integration to one or more Report Category Options means that the current
Integration will only appear in the Component Info Panel for Components that have been assigned
to that/those category options.
To remove a constraint, simply click ‘Unassign’ next to the relevant option.
Once finished, simply click ‘Done’ at the top of the panel to stage your changes and close the panel.
Warning
The changes to Integration Constraints only take effect if you subsequently ‘Save’ the Integration
after the constraints panel closes. Up until such point, the changes to constraints are merely
staged for commit.
About
This section provides an overview of the features of Site Integration links within
the Metrix Asset Management system.
There are two (2) Integration Types supported by the Metrix Asset Management system.
Info Panel Integrations: will appear in a (relevant) info panel when a user selects a record in the main Assets page.
Map Tool Integrations: will appear as an option in the ‘Integrations’ menu within main Asset page’s map window. Note:
if no map tool integrations exist, the ‘Integrations’ menu will not show in the map window.
The following explains the above Integration Types in further detail.
Info Panel Integrations
These integrations will appear as a button within relevant info panels when an end user selects a record in the main
Assets page. Info Panel Integrations support several Dynamic Field Types
as well as options for Constraining Integration Links.
Dynamic Fields Available for Info Panel Integrations
Record Value: a value that is pulled from the selected record in the main Assets page. When using this dynamic field
type, administrators will need to specify (as a ‘value’) which field value to pull from the selected record.
Record Location: the latitude and/or longitude coordinates (WGS84) of the selected record in the main Assets page.
No ‘value’ specification is required when using one of these location types of dynamic fields.
Static Value: a value that is set by the administrator when creating the integration link and does not change. When
using this dynamic field type, administrators will need to specify (as a ‘value’) the static value that they want to
be injected into the Integration Link.
Constraining Info Panel Integrations
Record Classification: the Asset and/or Component Classification(s) of the selected record in the main Assets page.
Record Report Category: whether the selected record in the main Assets page has a Report Category assigned or not.
Map Tool Integrations
These integrations will appear as an option in the ‘Integrations’ menu within main Asset page’s map window. End users will
choose an Integration from the menu and then proceed to CLICK the map to activate the integration link. The click location
and the current zoom level of the map will be supplied as dynamic field values to the Integration Link.
Dynamic Fields Available for Map Tool Integrations
Click Location: the latitude and longitude coordinates (WGS84) of the user’s click on the map. No ‘value’ specification
is required when using this dynamic field type.
Map Zoom Level: the current zoom level of the map when the user clicks on the map to activate the integration link.
No ‘value’ specification is required when using this dynamic field type.
Static Value: a value that is set by the administrator when creating the integration link and does not change. When
using this dynamic field type, administrators will need to specify (as a ‘value’) the static value that they want to
be injected into the Integration Link.
Constraining Map Tool Integrations
Constraining Map Tool Integrations is not supported.
Dynamic Field Types
There are several Dynamic Field Types that can be specified when configuring placeholder values within
a Site Integration Link. The following list details the Dynamic Field Types that are currently supported
by the Metrix Asset Management system:
Static Values
Availability
Value Specification Required
Info Panel and Map Tool Integrations
Yes, the static value to be injected into the integration link
A value that is set by the administrator when creating the integration link and does not change. When
using this dynamic field type, administrators will need to specify (as a ‘value’) the static value that they want to
be injected into the Integration Link.
The use case for these types of dynamic fields (as opposed to simply hardcoding the value into the URL itself) is to
allow administrators to easily re-use the same URL for multiple integration links, and simply update the static value
for each link as required.
Feature Attribute Values
Availability
Value Specification Required
Info Panel Integrations Only
Yes, the name of the field to be extracted from the record
A value that is derived from the end user’s active record. As such, this dynamic field type is only
available for Info Panel Integrations. When using this dynamic field type, administrators will need
to specify (as a ‘value’) which field value to pull from the selected record in the main Assets page.
At present, the following field names are supported for this dynamic field type:
record_id: the Cloud Record ID for the Asset/Component record.
description: the Description field value for the Asset/Component record.
NOTE: Any custom field can also be used as a Feature Attribute. This will retrieve the specified
custom attribute value from the Asset/Component record (if it exists). For these fields, the ‘value’ to
specify should be the ID/CODE of the specific Custom Attribute. These can be found in the relevant
Form Specification.
Click Location Latitude Values
Availability
Value Specification Required
Map Tool Integrations Only
No
The latitude coordinate (WGS84) of where the end user clicks on the map the activate the integration.
No ‘value’ specification is required when using this dynamic field type.
Click Location Longitude Values
Availability
Value Specification Required
Map Tool Integrations Only
No
The longitude coordinate (WGS84) of where the end user clicks on the map the activate the integration.
No ‘value’ specification is required when using this dynamic field type.
Map Zoom Level Values
Availability
Value Specification Required
Map Tool Integrations Only
No
The current zoom level of the map when the end user clicks on the map to activate the integration. The zoom
level is specified as a number between 0 and 25 (as per Web Map Tile Zoom Levels).
No ‘value’ specification is required when using this dynamic field type.
Record Location Latitude Values
Availability
Value Specification Required
Info Panel Integrations Only
No
The latitude coordinate (WGS84) of the selected record in the main Assets page.
No ‘value’ specification is required when using this dynamic field type.
Record Location Longitude Values
Availability
Value Specification Required
Info Panel Integrations Only
No
The longitude coordinate (WGS84) of the selected record in the main Assets page.
No ‘value’ specification is required when using this dynamic field type.
Record Location Spatial Type Values
Availability
Value Specification Required
Info Panel Integrations Only
No
The underlying spatial feature type (line, point, polygon) of the selected record in the main Assets page.
Note: Multi-Types are reported as their single counterparts - that is, MultiLineString = line. If the
spatial feature is of a special type (other than line, point, or polygon, single or multi) then the
output will be ‘unknown’.
No ‘value’ specification is required when using this dynamic field type.
Report Runner Tool
The Report Runner tool available for sites using the Metrix Asset Management system allows users to automate
the running and subsequent download of any CSV report available through the system. This can be useful for sites
that wish to store spreadsheet versions of their asset data in a local file system for use by other applications
or the like.
Getting the Report Runner Tool
To get the Report Runner tool, simply contact our support team. We will provide you with the latest stable version
of the tool. The tool is a simple executable file that can be run on any Windows machine.
Setting up the Report Runner Tool
The Report Runner tool leverages a simple configuration file to instruct it on which report(s) to fetch, where
to store the downloaded CSV file(s), and how to authenticate with Metrix in order to perform each request. The
following outlines the required configuration parameters. Also shown, is an example configuration file.
token: a valid API token (with asset:read scope) generated within your Metrix Asset Management
environment. This token is used to authenticate the Report Runner tool with your Metrix environment.
log_file: the file path to which the Report Runner tool should write its log output to. This can be useful for
debugging and monitoring purposes.
reports: an ARRAY of report objects that the Report Runner tool should fetch and download. Each report object
should contain the following parameters:
template_id: the unique identifier of the report template you wish to run. This can be seen in the URL when you
open any report template within the Metrix Asset Management system. For example, for a report template with a URL
of …/reports/template/RTO_E3MWCDP the template id will be RTO_E3MWCDP.
name: the name of the CSV file you wish to have the report saved as. This should be a simple string value and
should NOT include any file path or extension details.
output_location: the file path to which the Report Runner tool should save the downloaded CSV file to. This should
be a valid file path on the machine that the Report Runner tool is being executed on.
max_status_retries: the maximum number of times the Report Runner tool should retry checking the status of a
report run before it gives up on downloading it and moves on to the next report. This can be useful for handling cases
where report runs may take a long time to complete. A safe standard value for this field is, 5.
config: an object containing key-value pairs that represent the configuration parameters for the report you wish
to run. For specific advice on what configuration parameters are required for various report templates, see the section below.
For any reports that are not listed below, please contact our support team.
Note: in the above example, the keyword ${end-of-day} is used as a special/dynamic value for the selected_date configuration
parameter. When the Report Runner tool encounters this keyword, it will automatically replace it with the current date at 11:59:59 PM.
This can be useful for ensuring that your reports always run with the most up-to-date data without having to manually update the
configuration file each time.
Running the Report Runner Tool
To run the Report Runner tool, simply execute it by calling the following from a command line interface:
report-runner.exe config_file.json
Note: in the above command, the terminal’s current working directory is within the folder that contains both the report-runner.exe
file and the config_file.json file.
Report Template Configuration Parameters
The following outlines the required configuration parameters for some of the most commonly used report templates within
the Metrix Asset Management system. For any report templates not listed below, please contact our support team.
Component Data Export
Template ID: RTO_E3MWCDP
The Component Data Export report template allows you to export a comprehensive dataset containing information about all of your
assets and their components. The report takes the following configuration parameters:
selected_date: the date for which you want to run the report for. This should be in ISO format (YYYY-MM-DDTHH:MM:SS.SSSZ)
and specified at UTC. Being a date, users can also leverage the dynamic keyword ${end-of-day} for this configuration parameter.
filter: a string value that references the filter to apply to your asset network when running this report. This can
either be the ID of a valid filter you have defined, or set to one of the following:
$DEFAULT: this is the standard default filter that includes all asset types, but excludes disposed and proposed assets.
$ALL_ASSETS: this is the same as default, but includes disposed and proposed assets as well.
append_asset_data: a boolean value indicating whether you want the report to include asset-level custom attribute data.
This option is currently only available when the filter configuration parameter is NOT set to $DEFAULT.
append_component_data: a boolean value indicating whether you want the report to include component-level custom attribute
data.
fields_to_include: an array of string values that specify which standard fields you want to include in the report output.
The full list of available fields is as follows:
component_id,
asset_id,
component_description,
asset_description,
asset_barcode_value,
barcode_value,
asset_class,
asset_type,
asset_subtype,
asset_group,
comp_group,
depreciable,
carries_value,
requires_condition,
finance_category,
gross_value,
depreciable_value,
designated_period_depreciation,
accumulated_depreciation_value,
carrying_value,
estimated_annual_depreciation,
last_depreciation_date,
construction_date,
intervention_date,
latest_condition,
latest_condition_date,
intervention_treatment,
intervention_useful_life,
intervention_residual_life,
residual_life_offset,
expected_residual_life,
cost_units,
intervention_cost_rate,
intervention_cost_method,
next_treatment,
next_treatment_rate,
next_treatment_cost_units,
next_treatment_description,
next_treatment_reason,
next_treatment_expected_date,
status,
effective_date,
shape_id,
shape_wkt,
shape_x,
shape_y,
shape_projection,
shape_longitude,
shape_latitude,
shape_source,
shape_source_text,
shape_confidence,
component_import_reference,
asset_import_reference,
asset_record_id,
component_record_id (automatically injected, need not specify),
mod_user,
mod_date
selected_report_categories: an array of string values that specify which report categories you want to include in the report
output. The string value to use will be the Report Category label as defined for your site. E.g. “Special Schedule 7”.
Raw Finance Data Export
Template ID: RTB_EFYWCDPP
The Raw Finance Data Export report template allows you to export a dataset containing complete dump of financial transactions from
your environment. The report takes the following configuration parameters:
selected_date: the date for which you want to run the report for. This should be in ISO format (YYYY-MM-DDTHH:MM:SS.SSSZ)
and specified at UTC. Being a date, users can also leverage the dynamic keyword ${end-of-day} for this configuration parameter.
Asset Data Export
Template ID: REP_A75909GJD
The Asset Data Export provides a comprehensive dataset with one asset per row. Each component is fanned out to columns
of the same row. The report takes the following configuration parameters:
fields_to_include: an array of string values that specify which standard fields you want to include in the report output.
The full list of available fields is as follows:
Construction_Date,
Intervention_Date,
Useful_Life,
Residual_Life,
Cost_Units,
Condition,
Condition_Date,
Treatment,
Treatment_Unit_Rate,
Treatment_UOM
append_custom_data: a boolean value indicating whether you want the report to include asset-level custom attribute data.
selected_report_categories: an array of string values that specify which report categories you want to include in the report
output. The string value to use will be the Report Category label as defined for your site. E.g. “Special Schedule 7”.
filter: a string value that references the filter to apply to your asset network when running this report. This can
either be the ID of a valid filter you have defined, or set to one of the following:
$DEFAULT: this is the standard default filter that includes all asset types, but excludes disposed and proposed assets.
$ALL_ASSETS: this is the same as default, but includes disposed and proposed assets as well.