With appropriate user rights, editing your asset information in the Metrix Asset Management system
has been tailored to be super simple, and safe. To get started with editing your asset information,
follow these steps:
Navigate to the main ‘Assets’ page and make a
selection
from the map screen.
Your asset and component data is displayed inside the info panel on the right-hand side of the
page. This is where you will also edit the data.
To edit a field, simply click the information content - if the field is editable, and you have the
appropriate privileges, the content will transform into an editable control. Depending on the field,
users will be presented with one of the following controls:
Instructions on how to use each of the above controls are discussed below.
Text Input Box
For alpha-numeric free text fields, the control that renders when you set it to edit mode will be
a standard input box.
To edit content in an input box, simply locate your cursor and begin typing.
Once you have finished making your edits, click anywhere outside of the box to release the control.
The edits you made are now STAGED and ready to save.
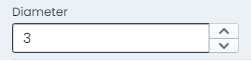
Number Input Box
For numeric data fields, the control that renders when you set it to edit mode will be a standard number input/picker box.
To edit content in an input box, simply locate your cursor and begin typing.
Another option you have is to click the increase/decrease toggles on the right-hand side of the input box.
Once you have finished making your edits, click anywhere outside of the box to release the control.
The edits you made are now STAGED and ready to save.
Option Row
For list based data fields that have fewer than 5 options, the control that renders when you set it to edit mode will be an option row.
To alter or set the active choice in the option row, simply click that option.
The edits you made are now STAGED and ready to save.
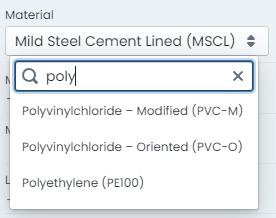
Drop Down List
For list based data fields that have more than 5 options, the control that renders when you set it to edit mode will be an drop-down list.
To alter or set the active choice in the option row, simply choose that option from the list.
The drop down list control also supports filtering of the visible list items. To do this, simply type your filtering letters into the
search box at the top of the list.
The edits you made are now STAGED and ready to save.
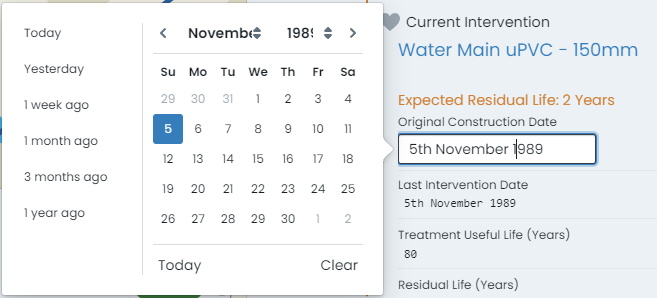
Calendar Picker
For date based data fields, the control that renders when you set it to edit mode will be a dynamic calendar control.
To edit content in a calendar control, simply choose the date value from the displayed calendar widget.
The calendar is month based. Users can change the visible month and year using the drop down options at the top of the control.
Some calendar controls are also pre-configured with ‘quick-dates’ allowing you to set the value to date such as ‘1 week ago’.
The edits you made are now STAGED and ready to save.
Save or Discard Changes
Making edits to your asset information in the Metrix Asset Management system is a two-phased
process. First, you make the alterations. Then, you save those changes (or discard them). The following
outlines how you can do this.
This document provides guidance on saving changes, as well as some other options around saving or discarding
your changes, including.
For each of the following sections, we assume you have one or more pending changes to your asset information.
If not, make some edits
to your asset and/or component information.
Info
It should be noted that users can make many edits in a single sessions before opting to save or discard
those changes.
Give it a try.
After your first alteration, you will notice that the ‘Save or Discard Edits’ button in the top-right
hand corner of the page is now activated. Additionally, there is an orange marker line surrounding the
info panel for the asset/component that the changes occurred on.
Saving Changes
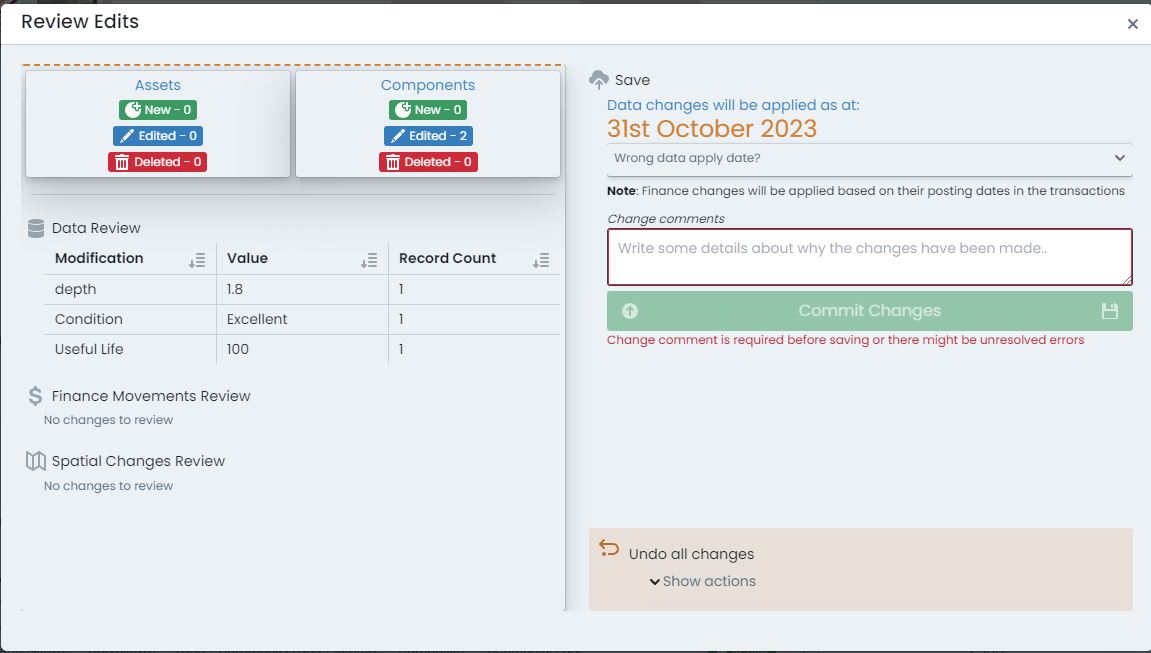
Start by reviewing your change(s), click on the ‘Save or Discard Edits’ button. A dialog will appear with a
summary of the changes you have made to your asset and/or component data.
Alterations are broken down by type, and summarised into affected record counts.
To commit the changes, provide a short comment about the alteration, and then click ‘Commit Changes’.
The data will then be permanently saved to your Metrix Asset Management system.
Saving Changes at a Specific Date
The Metrix Asset Management system maintains a full audit history of changes users make in the
system. This audit history is available through the ‘Report’ generators - allowing a user to backdate
certain reports, to get asset/component information as it was at a specific point in time.
To extend upon this capacity, the system also supports backdating the ‘Effective Date’ of an alteration
so that it can be visible in specific reporting ranges.
Example
A common use case for this feature is logging updated CONDITION values for components that were renewed during
a specific financial period - but only being recorded after said period has passed.
For example, updating condition values during your ‘End of Year’ process in August, to affect information in June.
Start by reviewing your change(s) - click on the ‘Save or Discard Edits’ button. A dialog will appear with a
summary of the changes you have made to your asset and/or component data.
Alterations are broken down by type, and summarised into affected record counts.
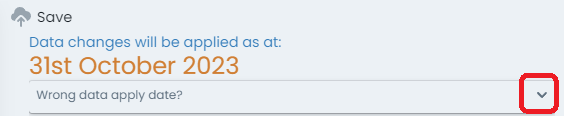
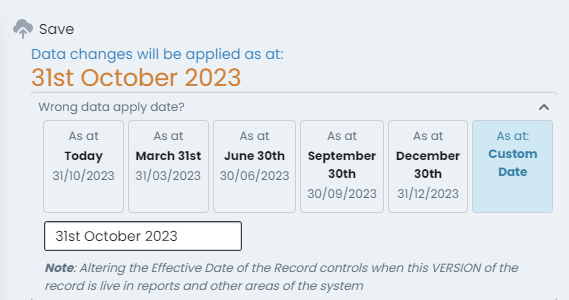
To set a specific ‘Effective Date’ for the alterations summarised, expand the panel below the current date (which
is rendered at the top of this dialog).
The expanded panel provides options to override the ‘Effective Date’ with shortcut values, or a custom date entry.
Make your selection for ‘when’ the change(s) should be applied.
The data will then be permanently saved to your Metrix Asset Management system, effective from the date you
specify.
Discarding ALL Changes
Start by reviewing your change(s), click on the ‘Save or Discard Edits’ button. A dialog will appear with a
summary of the changes you have made to your asset and/or component data.
Alterations are broken down by type, and summarised into affected record counts.
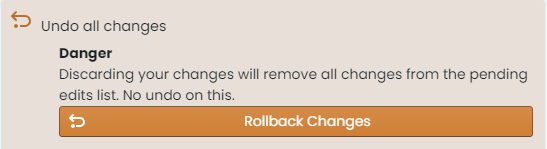
On the bottom left-hand side of the dialog portal, a collapse panel is rendered offering you the
option to ‘Undo all Changes’. Click on this panel.
The panel will expand, revealing an option to ‘Rollback Changes’. To continue with undoing any
alterations you have made since your last save, click this button.
Any alterations you have made will be reverted, and your session restored.
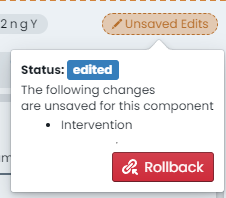
Discarding Specific Component Alterations
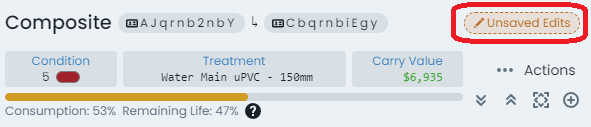
At any time during an editing session, users can review what information has changed on a specific
asset or component from right within the info panel. In the top right-hand corner of the info
panel is an ‘Edits Indicator’ that appears when the active asset/component has pending edits against
it.
Click on this indicator to see a brief summary of the changes.
To rollback all changes recorded against the active component, click on the ‘Rollback’ button inside
this preview.
Note
This option only relates to COMPONENT data edits. It cannot be used to revert alterations made on the parent
asset info panel.
Task Types
This guide provides an overview on how to create or edit task records in the
Metrix Asset Management system. The areas covered include:
Info
It should be noted that, in order to use a specific task type, it must be assigned
to the classification.
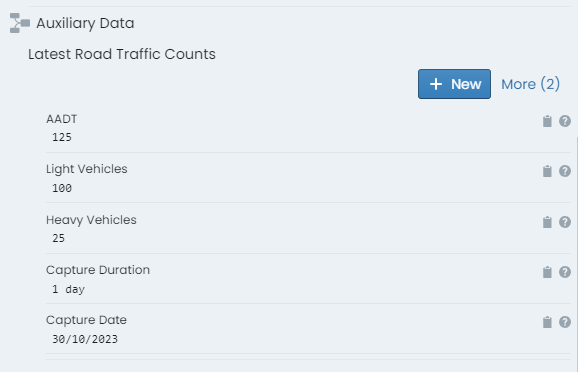
Viewing Task Records
Any task records that have been captured, will be displayed in the parent asset info panel (for records
logged at an asset level), or the component info panel (for records logged against a specific component). To see the records,
scroll to the bottom of the respective info panel, to the section titled ‘Task Data’.
The most recent entry will be displayed in a form layout. In the top right-hand corner of the form is an indicator (titled ‘More’)
regarding how many records of that task type exist against the asset or component. Click this label to see more records.
The form view will expand at this point to a form view per task record, stacked and ordered by record date. Scroll this view to
see the details of each entry.
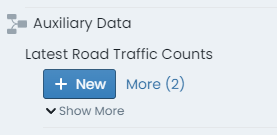
Enter a New Task Record
To capture a new task data record, navigate to the relevant info panel. That is, to capture a record against the
asset, go to the parent asset info panel. To capture a record against a specific asset component, go to that component info panel.
Scroll to the bottom of the info panel to where the task records are rendered.
Info
If no task types are assigned to the appropriate classification level, this section will simply state ‘No task types configured’.
If more than one task type is assigned, they will each be listed in this section.
For the relevant task type definition, click on the ‘New’ button.
A fly-out panel will appear with the task form rendered in edit mode. Complete this form.
When you are finished, simply click ‘OK’ at the bottom of the form. To cancel, click the ‘X’ in the top right-hand
corner of the form.
The new task record entry is now STAGED and ready to save.
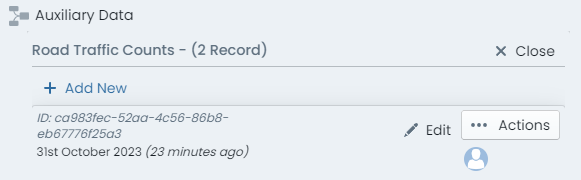
Edit a Task Record
To edit an existing task data record, simply navigate to the record in the appropriate info panel. That is, for a record
logged against an asset, go to the parent asset info panel. For a record logged against specific asset component, go to that component info
panel.
Scroll to the bottom of the info panel to where the task records are rendered.
For the task type you are altering, click the ‘More’ option to expand the entries.
Each record entry rendered for the task definition will have an ‘Edit’ button at the top of it. Click this button.
A fly-out panel will appear with the task form rendered in edit mode. Update this form.
When you are finished, simply click ‘OK’ at the bottom of the form. To cancel, click the ‘X’ in the top right-hand
corner of the form.
The modified task record entry is now STAGED and ready to save.
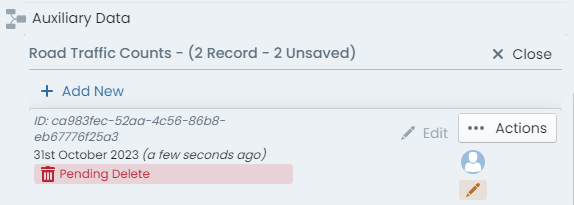
Delete a Task Record
To delete an existing task data record, simply navigate to the record in the appropriate info panel. That is, for a record
logged against an asset, go to the parent asset info panel. For a record logged against specific asset component, go to that component info
panel.
Scroll to the bottom of the info panel to where the task data records are rendered.
For the task type you are altering, click the ‘More’ option to expand the entries.
Each record entry rendered for the task type definition will have an ‘Actions’ button at the top of it. Click this button.
In the menu that flies out from this button, there will be a ‘Delete’ option. Click this option.
The task record entry is now STAGED for deletion. Simply save
your changes for this to take effect.
Reshape/Replace Component Geometry
This section provides an overview on how to manage your spatial features within the Metrix Asset Management
system. The context covered includes:
Important
Spatial features can be shared by more than one component. Remember to check if the feature you are modifying is
shared
and if this has any effect on you doing so.
Reshaping an existing Component Spatial Feature
To alter the spatial feature of a component, select the asset and navigate to the appropriate component info panel.
Within the component info panel, is a section titled ‘Spatial’. To modify the current geometry without changing the
geometry type (point, line, polygon), click ‘Reshape/Move’.
The info panel will hide itself and you will be immersed into the geometry editing view.
Make the desired edits to your geometry, according to its type of
point or
line/polygon.
When finished, click ‘End Editing’ on the panel at the top of the map window.
The updated geometry is now STAGED and ready to save.
Replacing an existing Component Spatial Feature
To replace the spatial feature of a component, select the asset and navigate to the appropriate component info panel.
Within the component info panel, is a section titled ‘Spatial’. To replace the current geometry by changing the
geometry type (point, line, polygon), click the ‘Replace With’ menu.
From the menu list, choose the desired geometry type for the new spatial feature - point, line, or polygon.
The info panel will hide itself and you will be immersed into the geometry editing view.
When finished, click ‘End Editing’ on the panel at the top of the map window.
The replaced geometry is now STAGED and ready to save.
For more information, see the helpful tutorial video below.
Confirming Shared Spatial Features
To confirm whether or not an active component spatial feature is shared with other components on the asset record, navigate
to the parent asset info panel.
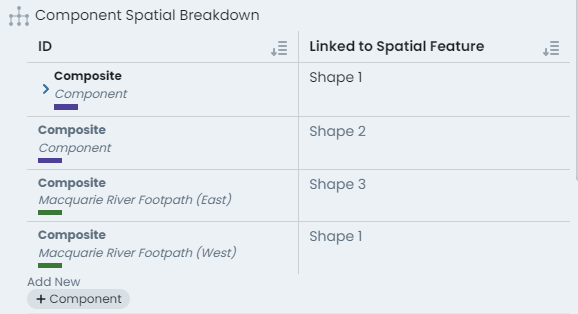
Within the parent asset info panel is a section titled ‘Component Spatial Breakdown’. This displays a table view specifying each
asset component alongside the geometry number* that the component is using.
In the above screenshot, the asset has four (4) components, and three (3) unique spatial features. The first and last component (in the table view)
are using ‘Shape 1’* and the middle two components reference their own shape. We therefore know that ‘Shape 1’ is shared across those two
components.
* this number is dynamically generated and simply serves to inform whether a shape feature is used on more than one component.
Modifying Point Features
Point features support relocation.
Moving Points
To move a point, simply:
Click once on its current location (it will change color to bright green).
Click-and-drag the feature from where it currently is, to where you wish it to be located.
Release to finish relocating.
When finished, click ‘End Editing’.
Modifying Lines & Polygons
Line/Polygon features support both relocation and reshaping.
Moving Lines/Polygons
To move a line or polygon, simply:
Click once on any of the line/perimeter segments.
Click-and-drag (from that segment). The entire shape will begin to follow your cursor across the map.
Release to finish relocating.
Reshaping Lines/Polygons
To reshape a line or polygon, simply:
Click once on any of the line/perimeter vertex nodes (it will change color to bright green).
Click-and-drag (from that vertex node) from where it currently is, to where you wish it to be located.
Release to finish relocating the node.
Repeat the above for other vertex nodes that need moving.
To ADD a new vertex node, click once on one of the segment center marker (white dot).
A new vertex node will be created, click-and-drag it to the desired location.
Release to finish relocating.
Creating Point Features
To create a new point feature:
Simply click on the map window where you want the point to be located.
To alter this location after initial placement, follow the instructions to relocate a
point
Creating Line & Polygons
To create a new line or polygon feature:
Click on the map window where you want the first vertex node to be located.
Then, continue to click map locations for each subsequent vertex node location.
Double-click to finish drawing new vertex nodes.
To alter the location of a vertex node after initial placement, follow the instructions to relocate a
line/polygon
Assign/Unassign Report Categories (Tags)
This document provides an overview on how to assign and unassign specific report category tags from asset
components in the Metrix Asset Management system. Please note that in order to use a report category,
it must be first defined
in the system configuration.
Assign Report Categories
To assign a report category (tag) against a component:
Navigate to the component info panel for the asset component.
Within the first ‘Identification’ section of the panel is a sub-section called ‘Report Categories’.
To add a new report category tag, click on the ‘+’ drop down list. The remaining available (not currently
assigned to the active component) report categories will render inside this menu.
Info
If the ‘+’ button is disabled, it means there are no available report categories, or, all report categories have
already been assigned to the active component.
For each report category, the menu will render a sub-menu so that you can choose the tag to apply. Choose
the desired combination you wish to apply.
The category assignment is now STAGED and ready to
save.
Unassign Report Categories
To unassign a report category (tag) from a component:
Navigate to the component info panel for the asset component.
Within the first ‘Identification’ section of the panel is a sub-section called ‘Report Categories’.
Current assignments will display in this section. On the right-hand side of each rendered category tag,
there is a ‘-’ (remove) icon. To unassign the category tag, simply click this icon.
The category un-assignment is now STAGED and ready to
save.
Update Condition
This document provides an overview on how to set or update the condition score of an asset
component in the Metrix Asset Management system. Please note that in order to use CUSTOM condition assessments,
one must be first defined
and assigned to the
relevant component group in the system configuration. Otherwise, the default condition assessment form will be used.
To set/update the condition for a component:
Navigate to the desired asset component and select the intervention info panel.
At the top of the intervention info panel, the current condition is summarised. If this part of the info panel
is not currently expanded, click on ‘Show More’ to expand it.
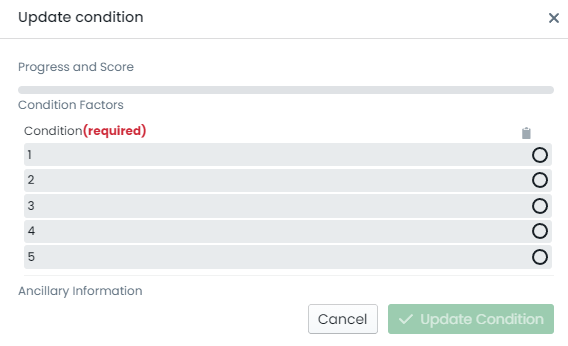
Click on ‘Update Condition’
A fly-out panel will then appear with the condition form rendered in edit mode. Fill out this form.
When finished, click ‘Update Condition’ at the bottom of the form.
The new condition entry is now STAGED and ready to
save.
Update Treatment
This document provides an overview on how to set, update, or remove an intervention treatment of an asset
component in the Metrix Asset Management system. Please note that in order to use an intervention
treatment definition, it must be first
defined
and assigned
to the relevant component group in the system configuration.
To set/update the intervention treatment for a component:
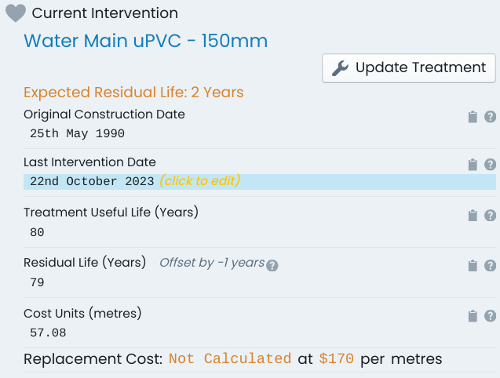
Navigate to the desired asset component and select the intervention info panel.
Within the intervention info panel, the current treatment details are summarised.
If this part of the info panel is not currently expanded, click on ‘Show More’ to expand it.
Click on ‘Update Treatment’
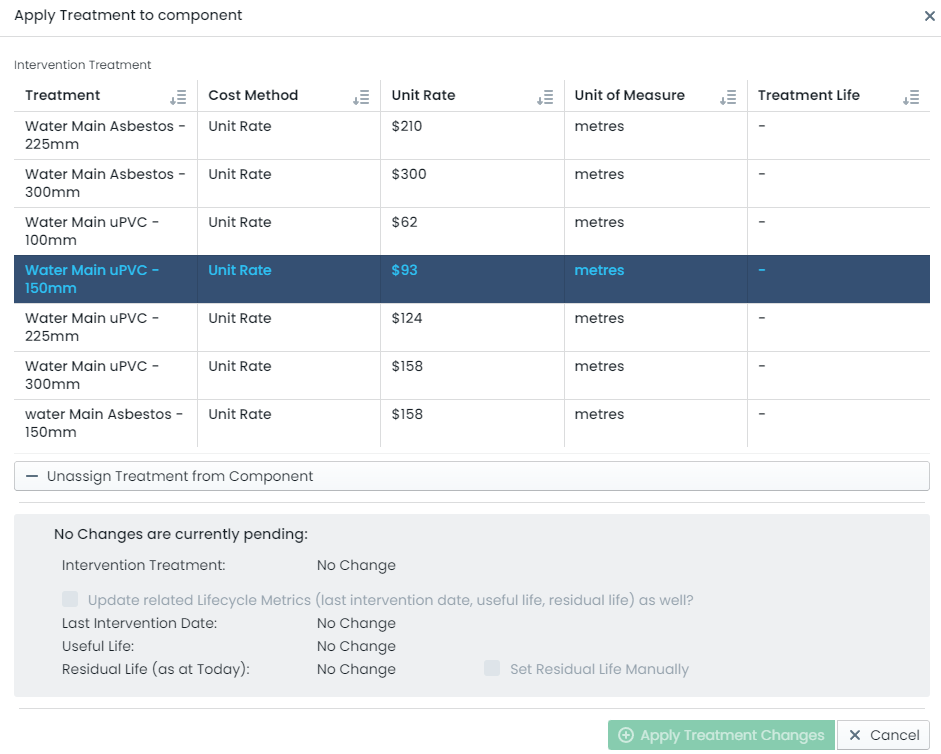
A fly-out panel will then appear with a list of
assigned
intervention treatments as well as other intervention related settings.
For your first step, choose the appropriate treatment from the list of treatments by clicking on it. Alternatively,
to completely clear the component’s treatment definition, select ‘Unassign Treatment from Component’ at the bottom of
the table.
At the bottom of the panel, a brief summary of the change is rendered. Additionally, there is a checkbox
asking if you wish to change any associated details along with the treatment. To update the:
Last Intervention Date,
Useful Life, and
Residual Life,
toggle the checkbox. Doing so will set the intervention date to today, the useful life to the treatment
definition’s default useful life, and the residual life to be equal with useful life.
For the above associated lifecycle metrics, users are able to overwrite the default values generated by
the system. Simply input any adjustments to the Last Intervention Date, Useful Life, and/or Residual Life
as deemed fit.
Info
Be aware that the useful life cannot be exceeded by the residual life. Also, when setting a value for the
residual life, please be aware that the default effective date for the residual life offset is today.
See Residual Life Calculations
When finished, click ‘Apply Condition’ at the bottom of the form.
The new treatment and any associated changes are now STAGED and ready to
save.
Info
The option to update the intervention date and useful/residual life values is provided as a way of
prompting users to consider possible side effects of a treatment change. Please also consider if the
condition should be updated, or any financial ledger entries made.
Update Next Treatment
This document provides an overview on how to set or update the next treatment specifications of an asset
component in the Metrix Asset Management system. Please note that in order to use particular treatment
definitions, they must first be
defined
and assigned
to the relevant component group in the system configuration.
To set/update the next treatment specification for a component:
Navigate to the desired asset component and select the intervention info panel.
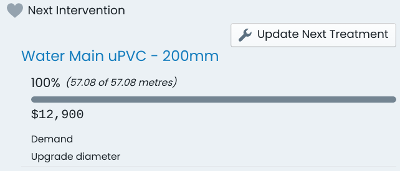
Within the intervention info panel, the current definition for the next treatment is summarised.
If this part of the info panel is not currently expanded, click on ‘Show More’ to expand it.
Click on ‘Update Next Treatment’
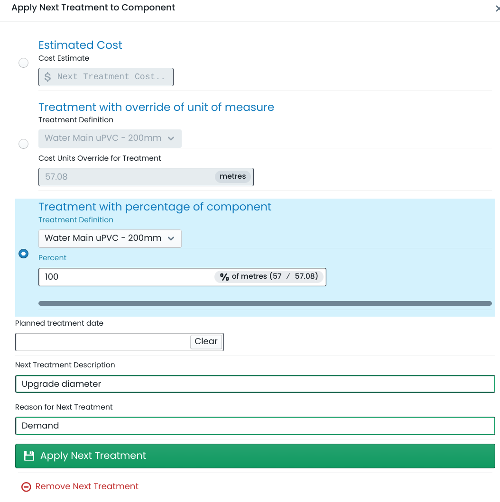
A fly-out panel will then appear with the options for setting the next treatment specification.
The first part of the panel requires users to choose the manner in which the component next treatment
is being specified. This is either:
Estimated Cost: If choosing this method, enter the estimated cost of the next treatment into the
input box below the radio button.
Treatment with Override Unit of Measure: if choosing this method, pick a treatment from the drop-down
list, and also set an override value for the component cost units.
Treatment with Percentage of Component: if choosing this method, pick a treatment from the drop-down
list, and also set an override percentage share for the component cost units.
Set one of these options.
Next, set the estimated date for the next intervention treatment. This is an optional field.
Lastly, enter a description and reason for the next intervention treatment.
When finished, click ‘Apply Next Treatment’ at the bottom of the form.
The new treatment specification is now STAGED and ready to
save.
Bulk Updates
This document provides an overview on how to perform bulk updates across many asset components in the Metrix
Asset Management system. To use this feature, the components must be a part of an active
collection
set.
Info
Currently, bulk updates are restricted to the following areas:
Navigate to the main ‘Assets’ map in the Metrix Asset Management system.
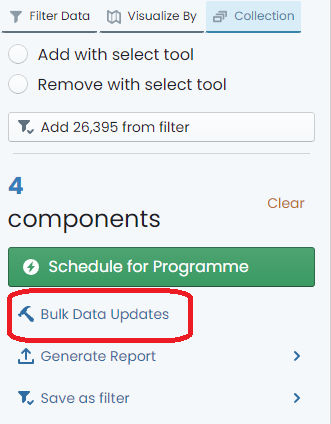
Build a collection
containing the asset components you want to update.
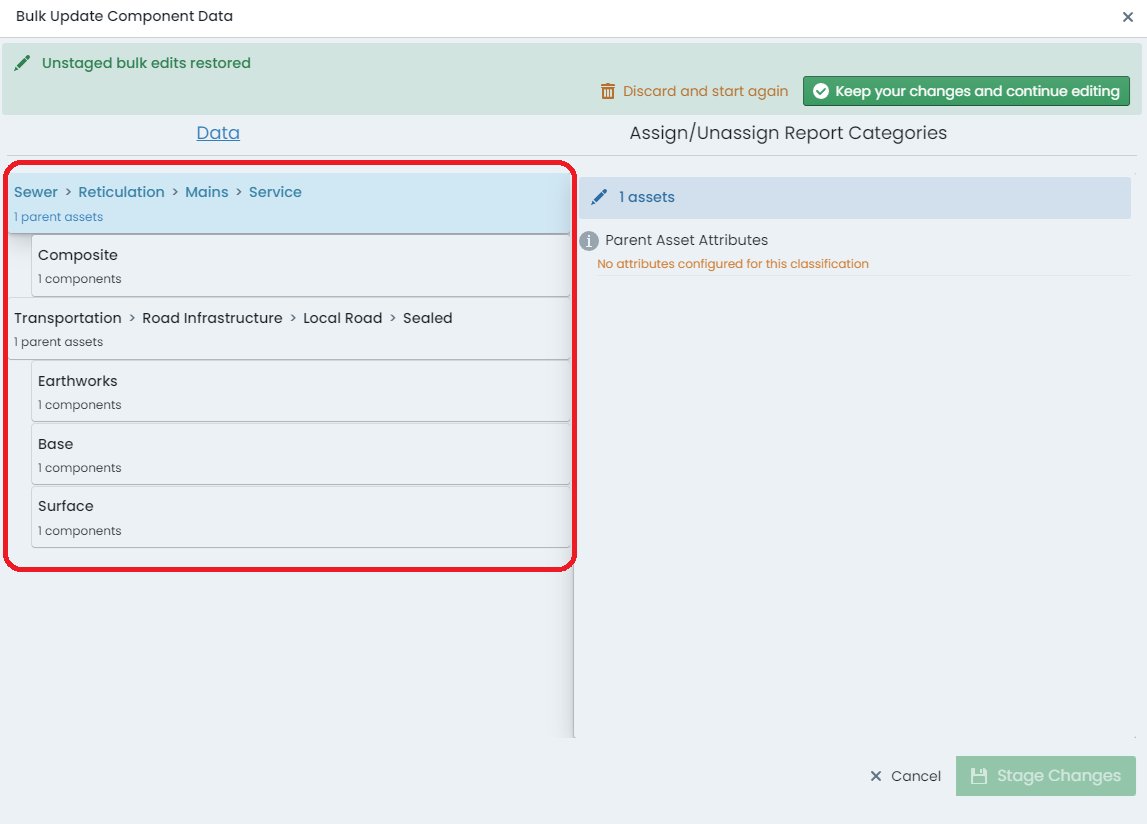
When the collection is ready, click ‘Bulk Data Updates’ in the collection actions area. This will launch the
‘Bulk Data Update’ panel where assets and components within your collection are batched into their respective
classification configuration.
Data Updates
To perform data updates, ensure you are using the ‘Data’ tab of the bulk panel and then locate the specific
asset classification or component group on the left-hand side navigation tree.
On the right-hand side of the panel, a form will render showing you the possible data updates that you can
make.
Info
At the top of this form, the number of assets or components (from your collection set) that are associated with
the selected asset classification or component group will be rendered.
Remember, any changes you make on this panel will be played out across all of those records.
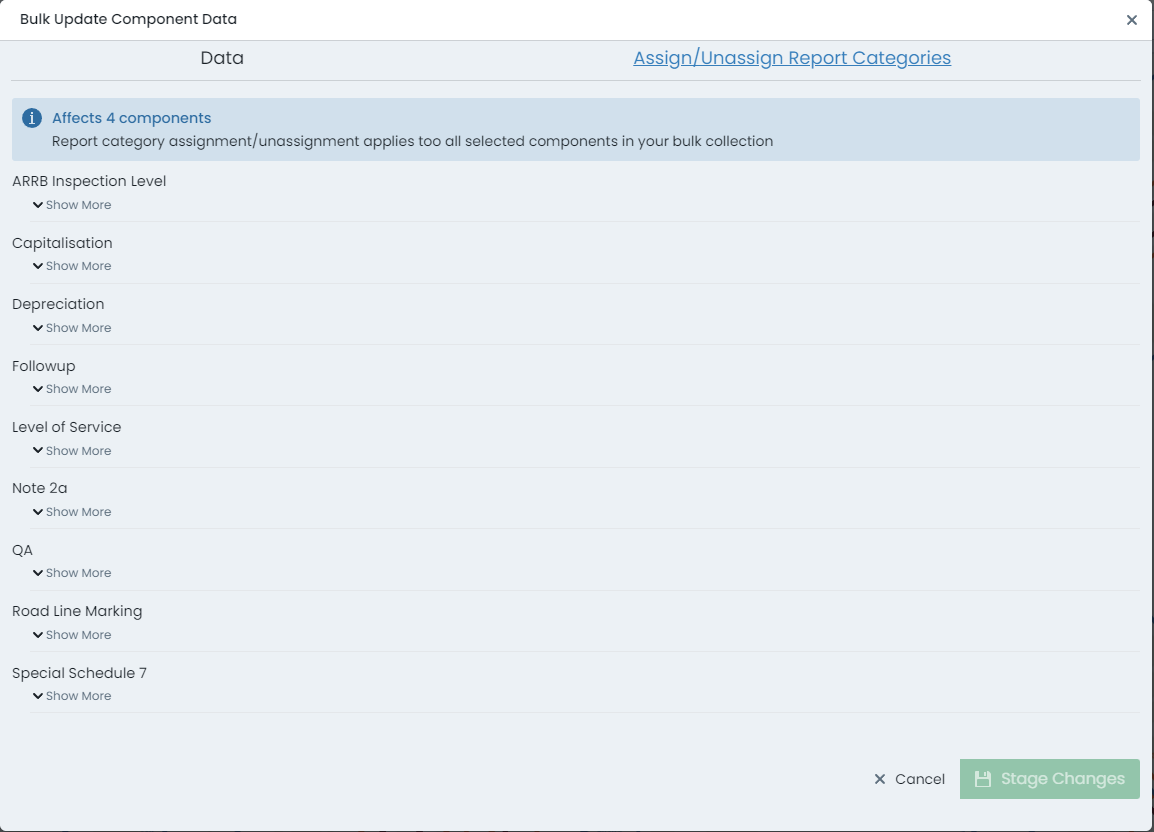
Report Category Updates
To perform report category updates, switch to the ‘Assign/Unassign Report Categories’ tab of the bulk panel.
Each report category defined in the system will be listed.
Click to expand the desired report category.
Each category has two options to choose from:
Bulk assign your collection set to a single report category option.
Bulk unassign your collection from one or more report category options.
Choose options from the left or right-hand side controls based on your desired outcome.
Bulk updating information is more prone to errors as the program cannot perform much of the validation
until the save step
of the process.
Component Finance Settings
This document provides an overview on how to set or update the financial settings for an asset
component in the Metrix Asset Management system. These settings relate to how the component is
going to be depreciated over it’s lifetime, including any residual value, and the rate at which
it is consumed.
Info
These settings are completely optional and serve to allow users to override the default status of
zero residual value and a remaining life vs carrying value based depreciation schedule.
Currently, maintaining these values will not impact ‘Estimated Depreciation’ report values or
consumption dashboards. They are designed for users to reference for information purposes.
To set/update the finance settings for a component:
Navigate to the desired asset component and select the transactions info panel.
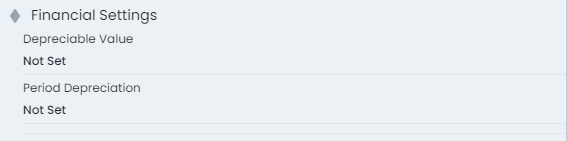
Within the transactions info panel is a section title ‘Financial Settings’. It is here
that users can record such information.
Depreciable Value
To set or update the ‘Depreciable Value’, click on the current field value (it may be
set to ‘Not Set’).
First, choose whether the ‘Depreciable Value’ is to be a fixed dollar value, or a percentage figure
based on the component’s gross value. To completely remove the ‘Depreciable Value’ setting for the
active component, choose ‘Not Set’ and skip the next step.
Set the numeric value that corresponds with the option you set in the previous step. For percentage
figures, the value must be between 0 & 100.
Period Depreciation Value
To set or update the ‘Period Depreciation’ value, click on the current field value (it may be
set to ‘Not Set’).
First, choose whether the ‘Period Depreciation’ value is to be a fixed dollar value, or a percentage
figure based on the component’s gross value. To completely remove the ‘Period Depreciation’ value
setting for the active component, choose ‘Not Set’ and skip the next step.
Set the numeric value that corresponds with the option you set in the previous step. For percentage
figures, the value must be between 0 & 100.
The updated finance settings are now STAGED and ready to
save.
Posting Component Transactions
This document provides an overview on how to create a new posting to the financial transactions ledger
for an asset component in the Metrix Asset Management system. These transactions form the basis of
a component’s capital valuation and an organisation’s end of period financial statements.
Info
It should be noted that this is considered the ‘macro’ method of maintaining component capital value
in the system. Typically, movements of asset value are driven via complimentary methods such as:
CSV Data Import, and
Capital Budget Finalisation
To post a new financial transactions ledger entry for an asset component:
Navigate to the desired asset component and select the transactions info panel.
Within the transactions info panel is a section title ‘Transaction History’. It is here
that users can see past recorded movements, as well as post new ones.
To post a new financial transactions ledger entry, click ‘New Transaction’ at the top of the
history summary table.
Info
If the summary table and/or the ‘New Transaction’ button is not displayed for your active
component, it typically means that the asset component does not currently contain the
prerequisite information for carrying capital value.
This typically means that the underlying component is not Active.
Users may also be presented with warnings about missing construction/intervention dates
or useful life values - these are warnings that do not prevent transaction creation, but
should be considered.
A fly-out panel with a transaction generation form will appear.
Set the posting ‘Date’ for the new transaction. This is the date that the transactions value
will be recognised by the system. The date cannot extend beyond the end of the current
financial period (typically the end of the financial year).
Select the ‘Effect’ that the posting will have on the asset component. That is, will the
posting affect the component’s gross value, or its accumulated depreciation value.
From the transaction ‘Type’ drop-down list, choose the desired transaction type for the
new posting.
Info
Each transaction type in the list is tagged with the required polarity of the transaction ‘Value’
according to the chosen transaction type ‘Effect’. This will be either:
Positive: value must be greater than zero
Negative: value must be less than zero
Any: no restriction
Enter a transaction ‘Value’ with consideration for the polarity restriction for your chosen
transaction type.
Info
For the ‘Depreciation’ transaction type, an ‘Estimated Annual Depreciation Amount’ figure will be
displayed above the ‘Value’ input box for information purposes.
If the component does not currently carry any capital value, the ‘Finance Category’ will need
to be defined next. Choose a valid finance category from the drop-down list. If your
component already carries value, this drop-down will be disabled.
Lastly, enter a comment for the transaction.
When finished, click the button below the comment input box that contains a summary of
the transaction.
The transaction has been generated and is now STAGED and ready to
save.
Info
Users can also ‘Quick Populate’ the transaction entry page by choosing a recently generated
transaction from the ‘Recent’ drop-down list at the top of the panel. This will populate
each field according to the chosen recent transaction.
Deleting Component Transactions
This document provides an overview on how to delete existing postings to the financial transactions ledger
for an asset component in the Metrix Asset Management system.
Info
Deleting a transaction CANNOT BE UNDONE and should only be performed as a last resort. An alternative
option (to deleting a transaction) would be to post a transaction of the same transaction type, with an
obverse value to the transaction you are over-riding, where allowed by the transaction type.
To delete an existing financial transactions ledger entry for an asset component:
Navigate to the desired asset component and select the transactions info panel.
Within the transactions info panel is a section title ‘Transaction History’. It is here
that users can see past recorded movements, and delete them.
In the transaction history table, each entry contains a ‘Delete’ option (rendered as a trash-can) on
the far right-hand side of the row. To delete a transaction entry, click this button.
Info
When processing the deletion of one or more transactions, the system considers the following:
Following removal of the transactions, the component must not be left with a negative carrying value.
Transactions from previous financial periods cannot be removed.
These restrictions do not apply to transactions that have not yet been saved/committed to the system.
Repeat the above step for each transaction that you may need to remove.
The transaction(s) have been STAGED for removal and are ready to
save.
Editing Barcode Values
This document provides an overview on how to set or remove a barcode value of an asset or asset
component in the Metrix Asset Management system. Please note that in order to modify barcode
values, the user must have the appropriate permissions set.
To set the barcode value for an asset or component:
Navigate to the desired asset or component and select the basic info panel.
Within the info panel ‘Identification’ section, details pertaining to any current barcode value assignment
is shown. If no value has been assigned, this will be empty.
Hovering over the barcode value will render a preview of the barcode
To assign a barcode value (where one has not previously been assigned), click ‘Add Barcode Link’.
Note: If the asset or component has a previously assigned barcode value, this will need to be removed/unlinked
first.
A panel will slide out asking for the value of the barcode to link to the active asset or component.
Enter the value within this text entry.
The panel will validate the supplied barcode value. If the value is NOT valid, the ‘Save (Immediatley)’ button
will be disabled - follow the prompts to ‘repair’ the entered value.
To save the new barcode value, click ‘Save (Immediately)’. Note; this change (as inferred) does NOT go via
the staged changes process. Rather, the link will occur immediatley.
To remove the barcode value for an asset or component:
Navigate to the desired asset or component and select the basic info panel.
Within the info panel ‘Identification’ section, details pertaining to any current barcode value assignment
is shown.
To remove the currently assigned barcode link for an asset or component, simply click the ‘Trash’ icon
next to the barcode value.
A dialog will appear asking for confirmation. Confirm the deltion.