Subsections of About
Global Capital Spends
Within the Metrix Asset Management system, a Capital Spend refers to an amount of money that has been incurred against
a specific project (Budget Bucket) and will be Capitalised to the underlying Asset Components at the conclusion of the project.
A Global Capital Spend is one of two types of Capital Spends that can be allocated to a Budget Bucket (the other being
a Linked Capital Spend). A spend type of Global or Linked simply controls how the Capital Spend is capitalised/recognised
against the underlying Asset Components at the end of the project. In either spend type, the total Capital Spend amount is
the total amount of all Capital Spends that have been incurred against the Budget Bucket.
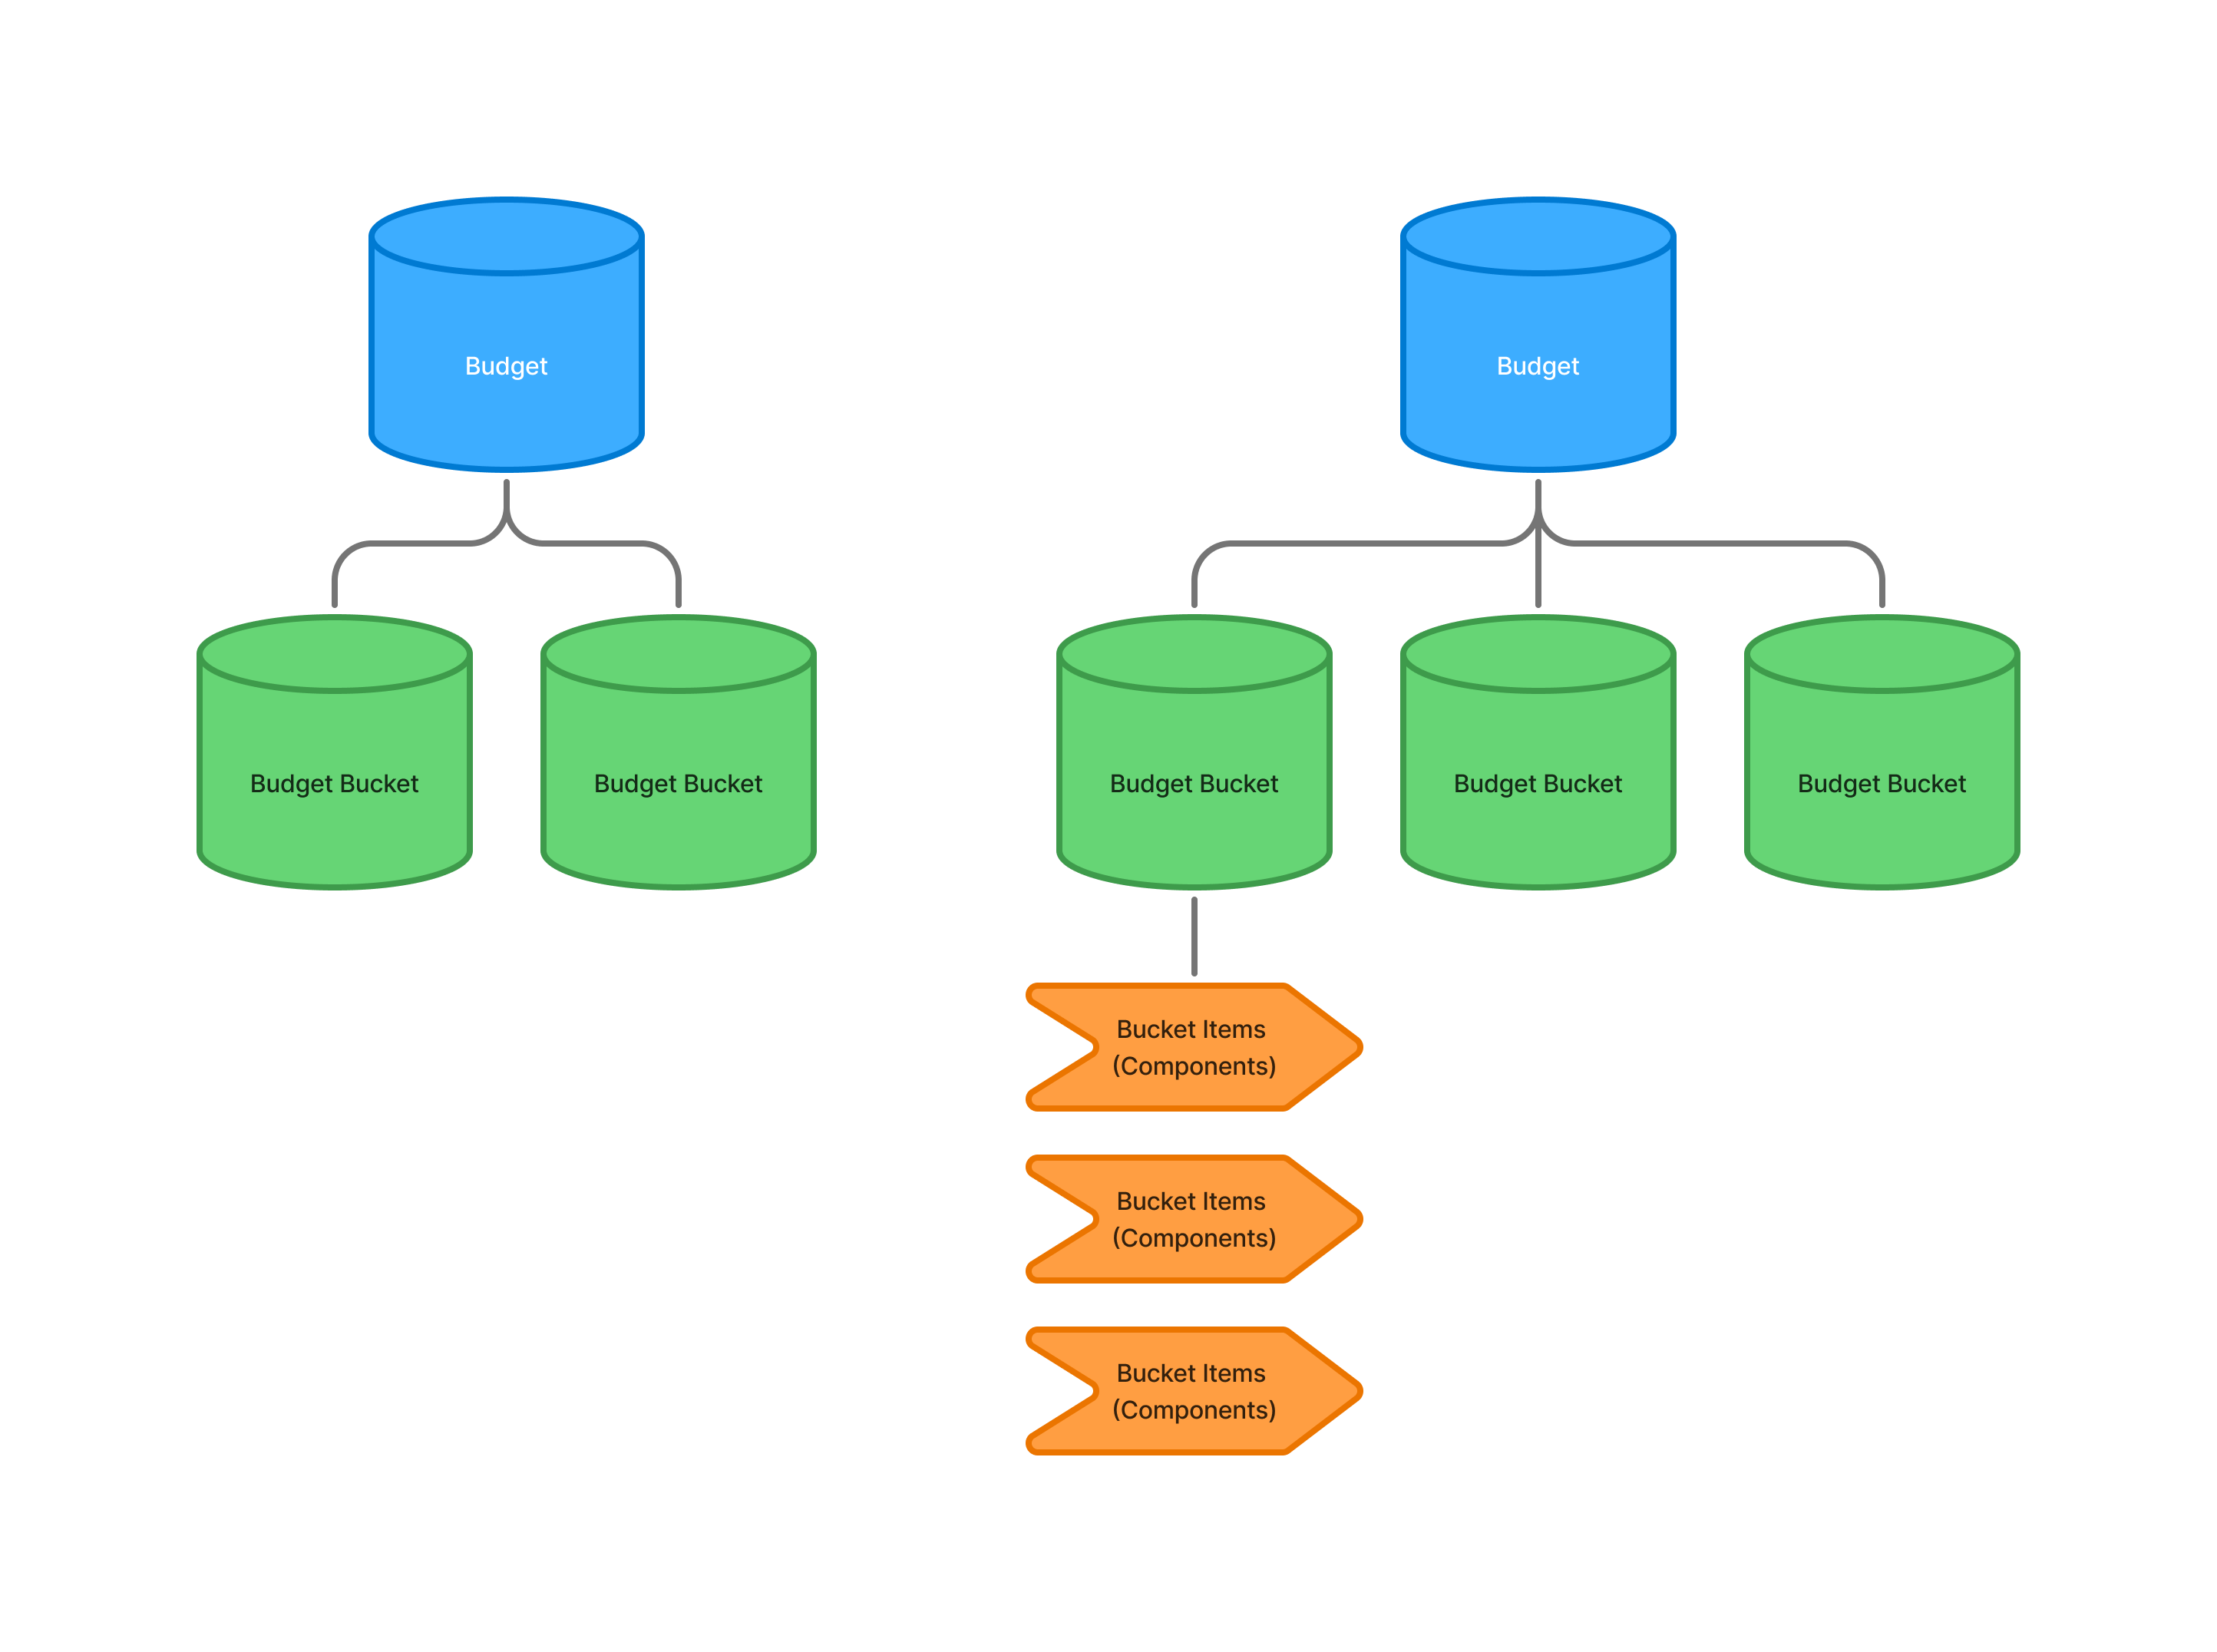
The term “Global” refers to the fact that the Capital Spend is not linked to a specific Asset Component,
but rather is attributed to the entire Budget Bucket. When it comes to capitalising/recognising the Capital Spends at the
end of the project, Global Capital Spends are distributed evenly (based on Cost Units) across all Budget Bucket Items
that are assigned to the Budget Bucket.
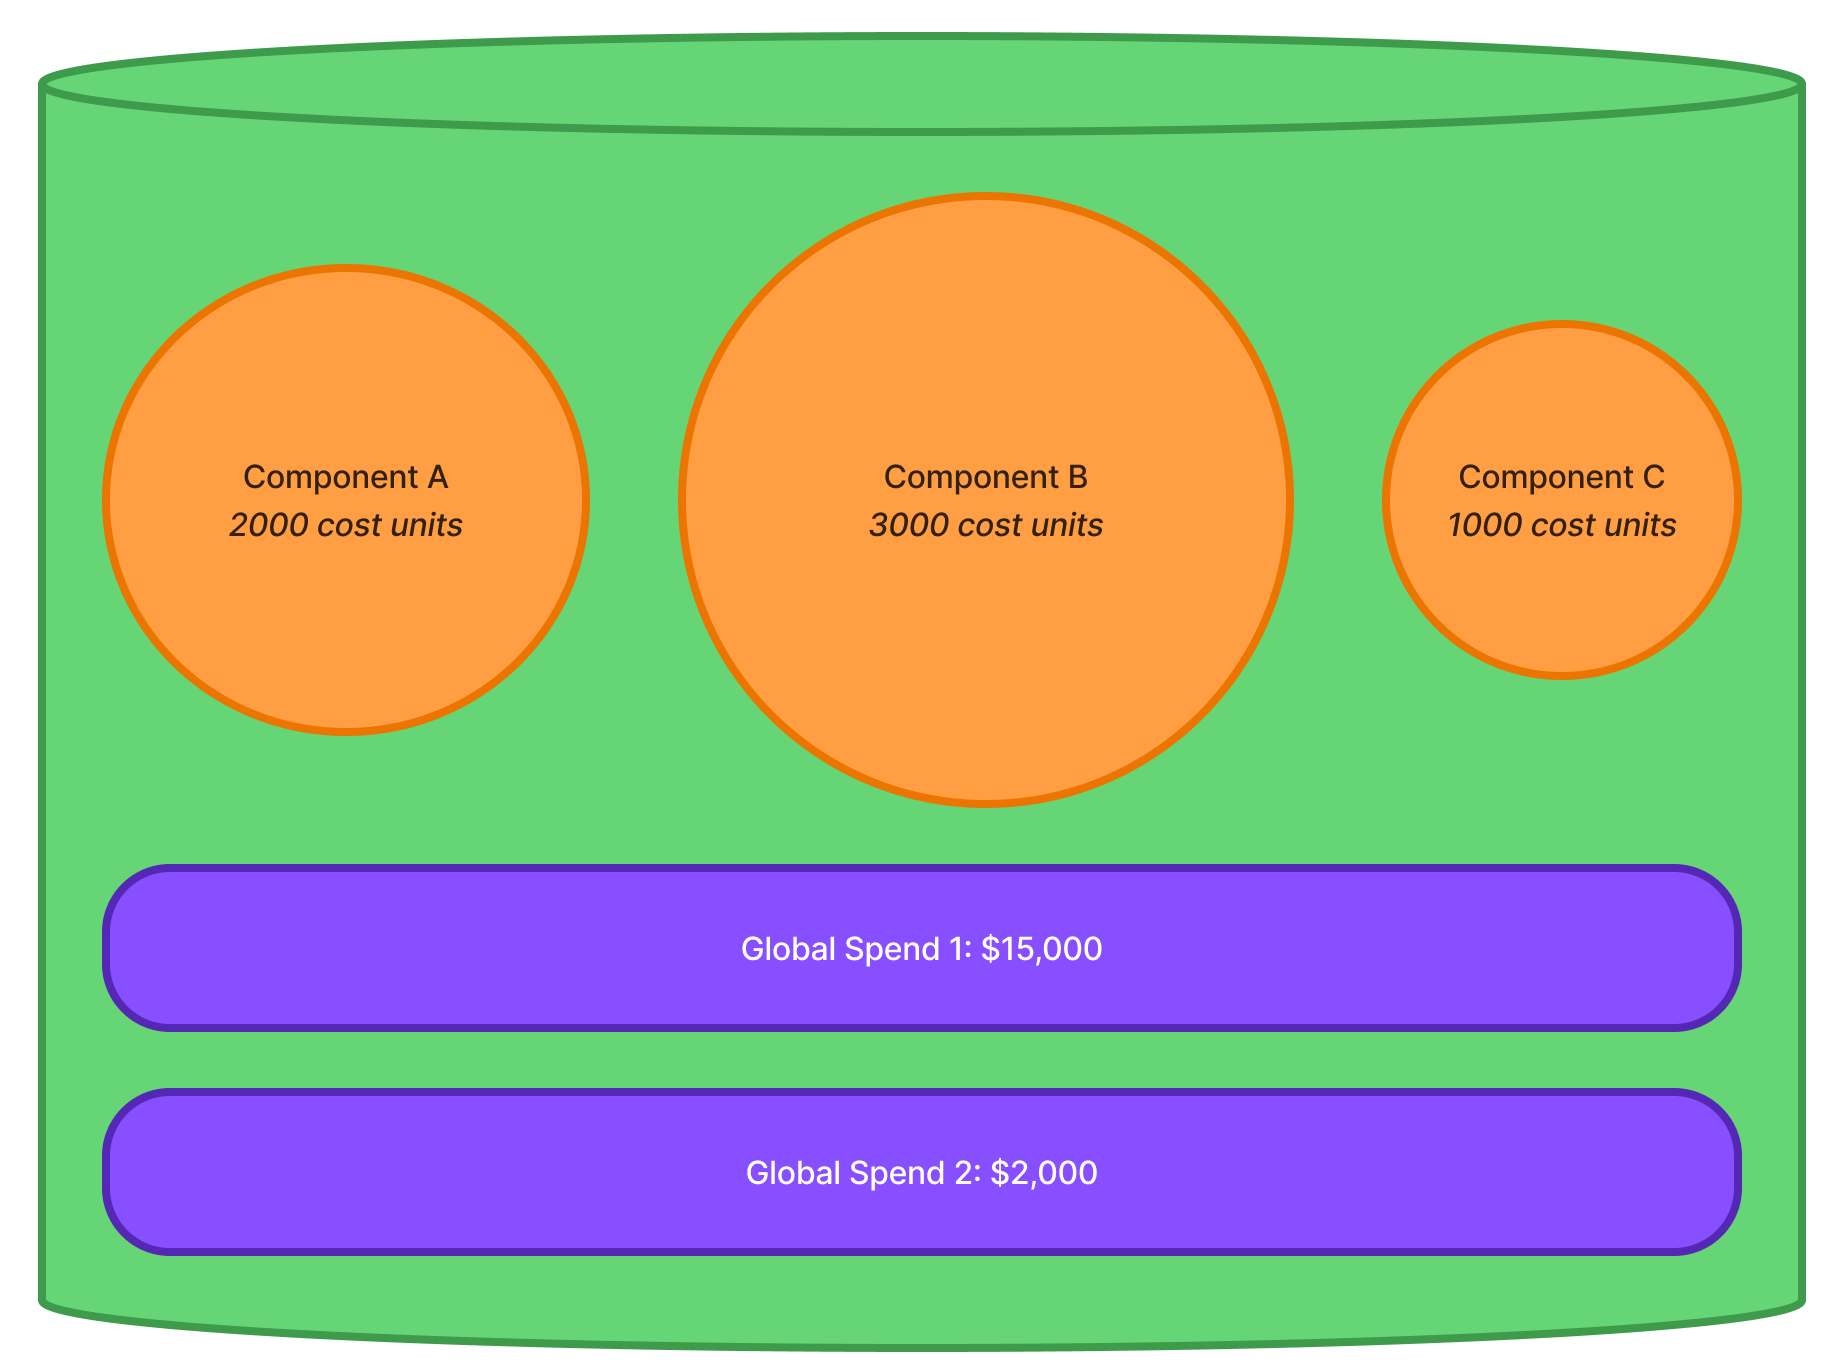
In the above example, the Budget Bucket has three items (Component A, Component B, and Component C) with differing cost
unit values. Altogether, they combine with a total cost unit value of 6000. The Budget Bucket also has two (2) Global
Capital Spends allocated to it, one for $15,000 and the other for $2,000. The total Global Capital Spend for the Budget Bucket
is $17,000.
To calculate the ‘share’ of the Global Capital Spend that each item will receive, the following formula is used:
$$ [Share of Spend] = \frac{[ Item Cost Units ]}{[ Total Cost Units of all Items ]} \times [ Total Global Spend ] $$How this breaks down for each Component Item is shown in the table below.
| Bucket Item |
Cost Units Share |
Total Global Spend |
Share of Spend |
| Component A |
2000 / 6000 = 33% |
$17,000 |
$5,610 |
| Component B |
3000 / 6000 = 50% |
$17,000 |
$8,500 |
| Component C |
1000 / 6000 = 17% |
$17,000 |
$2,890 |
This means, when it comes to capitalising/recognising the Global Capital Spend, Component A will incur $5,610 of the
overall spent amount.
Linked Capital Spends
Within the Metrix Asset Management system, a Capital Spend refers to an amount of money that has been incurred against
a specific project (Budget Bucket) and will be Capitalised to the underlying Asset Components at the conclusion of the project.
A Linked Capital Spend is one of two types of Capital Spends that can be allocated to a Budget Bucket (the other being
a Global Capital Spend). A spend type of Global or Linked simply controls how the Capital Spend is capitalised/recognised
against the underlying Asset Components at the end of the project. In either spend type, the total Capital Spend amount is
the total amount of all Capital Spends that have been incurred against the Budget Bucket.
The term “Linked” refers to the fact that the Capital Spend is linked to one or more specific Asset Components. When it
comes to capitalising/recognising the Capital Spends at the end of the project, Linked Capital Spends are distributed
evenly (based on Cost Units) across ONLY the Budget Bucket Items that are linked to the Capital Spend. Items that are not
linked to the Capital Spend will not receive any of the specifically linked Capital Spend amount.
Note
Although the following may seem complicated, it is important to understand that the system will automatically calculate
all of this on your behalf. As an end user, you need only understand the principles behind it, and how to set up the
Linked Capital Spends correctly.
I.e. “this spend only relates to these three components over here…”
The system will do the rest!
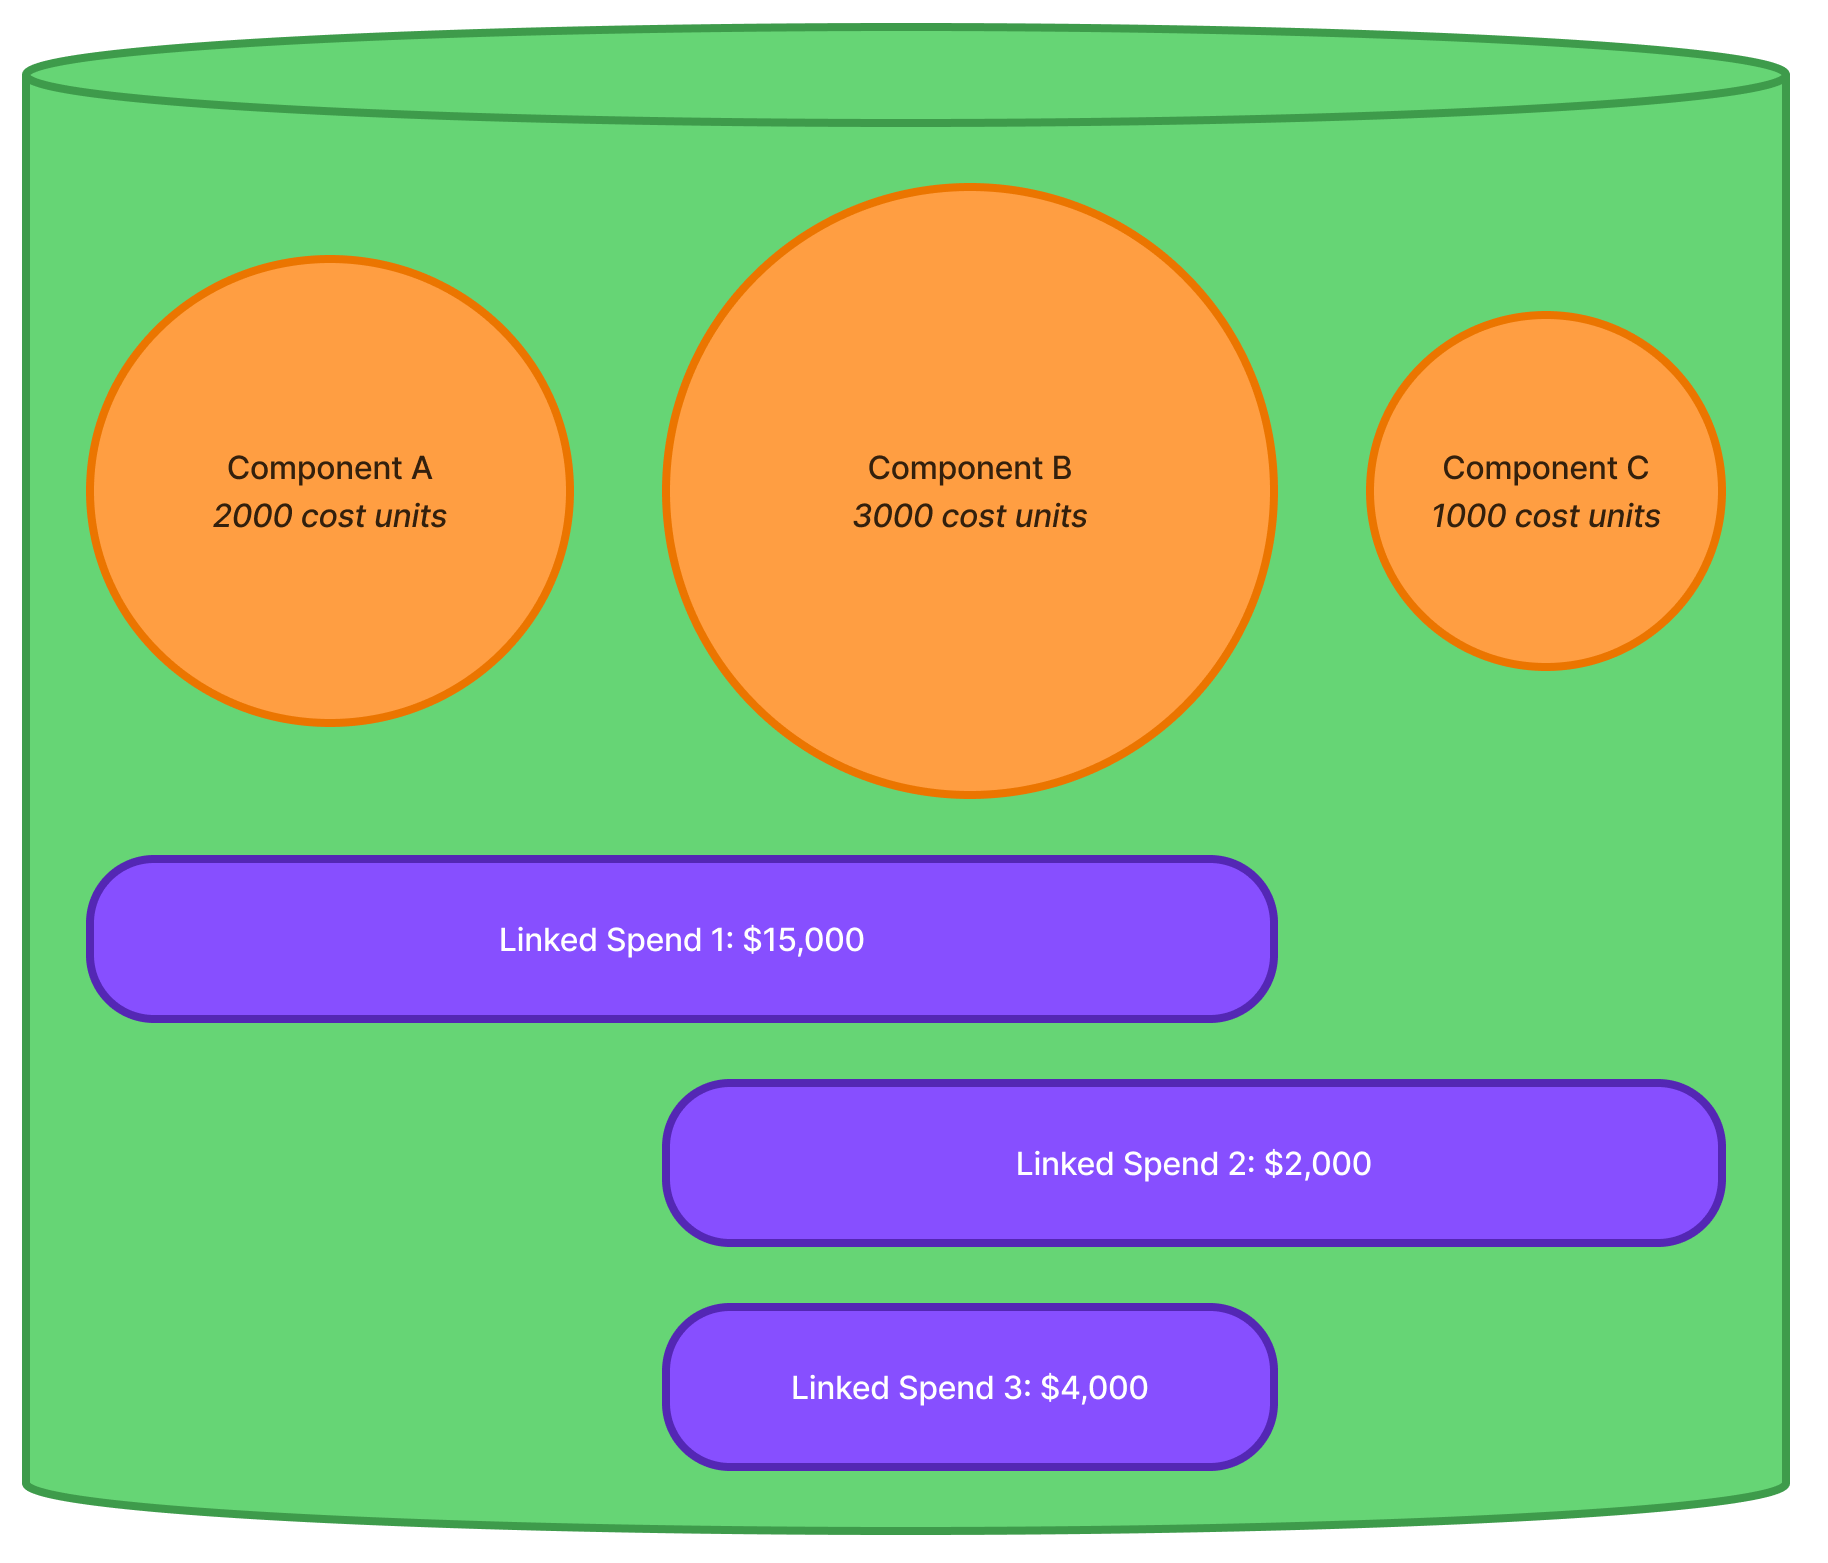
In the above example, the Budget Bucket has three items (Component A, Component B, and Component C) with differing cost
unit values. Altogether, they combine with a total cost unit value of 6000. The Budget Bucket also has three (3) Linked
Capital Spends allocated to it, one for $15,000, one for $2,000, and the other for $4,000. The total Capital Spend for
the Budget Bucket is $21,000.
To calculate the ‘share’ of the Linked Capital Spends that each item will receive, the following formula is used and
calculated for EACH Linked Capital Spend:
$$ [Share of Spend] = \frac{[ Item Cost Units ]}{[ Total Cost Units of all Linked Items ]} \times [ Spend Value ] $$
Info
It should be noticed that the key difference in the formulas (between global and linked spending) is that for LINKED spends,
the denominator for the cost units only considers the cost units of items that are linked to the spend in question. Whereas
with a global spend, the denominator considers the cost units of all items in the Budget Bucket.
Furthermore, a Global Capital Spend share is calculated once per Budget Bucket Item. A Linked Capital Spend share is
calculated once per Linked Capital Spend entry, per Budget Bucket Item linked to that spend.
As noted above, calculating Linked Spend shares is a two-step process. First we must assess the Total Cost Units per
Linked Spend, and then we can calculate the share of spend for each item. The following table outlines how we can
deduce the Total Cost Units for each Linked Capital Spend:
| Spend |
Component A (2000) |
Component B (3000) |
Component C (1000) |
Total Cost Units for Spend |
| Spend 1 |
✅ |
✅ |
❌ |
5000 |
| Spend 2 |
❌ |
✅ |
✅ |
4000 |
| Spend 3 |
❌ |
✅ |
❌ |
3000 |
From the above, we can see that Spend 1 is linked to Component A and Component B, which (through summing their cost units)
we can see have a total of 5000 cost units. So, for each spend, the spend shares can be calculated as follows:
Spend 1: $15,000
| Bucket Item |
Cost Units Share |
Total Linked Spend |
Share of Spend |
| Component A |
2000 / 5000 = 40% |
$15,000 |
$6,000 |
| Component B |
3000 / 5000 = 60% |
$15,000 |
$9,000 |
| Component C |
0 / 5000 = 0% |
$15,000 |
$0 |
Spend 2: $2,000
| Bucket Item |
Cost Units Share |
Total Linked Spend |
Share of Spend |
| Component A |
0 / 5000 = 0% |
$2,000 |
$0 |
| Component B |
3000 / 4000 = 75% |
$2,000 |
$1,500 |
| Component C |
1000 / 4000 = 25% |
$2,000 |
$500 |
Spend 3: $2,000
| Bucket Item |
Cost Units Share |
Total Linked Spend |
Share of Spend |
| Component A |
0 / 5000 = 0% |
$0 |
$0 |
| Component B |
3000 / 4000 = 100% |
$2,000 |
$2,000 |
| Component C |
0 / 4000 = 0% |
$0 |
$0 |
Putting this together is simply a matter of summing the share of spend per Component Item within the Budget Bucket.
This is detailed below:
| Bucket Item |
Spend 1 Share |
Spend 2 Share |
Spend 3 Share |
Total Spend |
| Component A |
$6,000 |
$0 |
$0 |
$6,000 |
| Component B |
$9,000 |
$1,500 |
$2,000 |
$12,500 |
| Component C |
$0 |
$500 |
$0 |
$500 |
This means, when it comes to capitalising/recognising the Global Capital Spend, Component A will incur $6,000 of the
overall spent amount.
Hybrid Capital Spending
The previous two (2) sections covered the concepts of Global and Linked Capital Spending. Within those sections, each spend
type was assessed in isolation from the other. In practice, however, it is possible (and common) to have both Global and Linked
Capital Spend events ascribed to a Budget Bucket. Consider the following:
Example
Consider a Road Resealing program - for simplicity, the program only pertains to two (2) road segments. One segment is a
small back lane with next to zero traffic. The other road segment is a major arterial road with heavy traffic. The resealing
contractor was able to cover the cost of traffic control internally for the back lane, but for the arterial road, they
requested that you hire a traffic control company to manage the traffic on their behalf.
This resealing program has two (2) Capital Spends:
- A Global Capital Spend ($65,000) for the resealing contractor’s costs (i.e. the cost of resealing the roads).
- A Linked Capital Spend ($12,000) for the traffic control costs, applicable to the major arterial road only.
In this example, the Global Capital Spend would be allocated to both road segments, while the Linked Capital Spend would only
be allocated to the major arterial road. The system will automatically calculate the share of each spend for each item, and
the total Capital Spend for each Bucket Item will be the sum of their Global and Linked Capital Spend Shares.
So, first to calculate the Global Capital Spend share for each item. To do this, we simply apply the formula for Global
Capital spend to each item. This is shown in the table below:
| Bucket Item |
Cost Units Share |
Total Global Spend |
Share of Spend |
| Component A |
2000 / 6000 = 33% |
$65,000 |
$21,450 |
| Component B |
3000 / 6000 = 50% |
$65,000 |
$43,550 |
Next, we allocate the Linked Capital Spend to the major arterial road only. As the spend pertains to the one segment only,
the share of cost units for this item is 100%. The breakdown per item is therefore:
| Bucket Item |
Cost Units Share |
Total Linked Spend |
Share of Spend |
| Component A |
0 / 3000 = 0% |
$12,000 |
$0 |
| Component B |
3000 / 3000 = 100% |
$12,000 |
$12,000 |
Finally, we can combine the two (2) Capital Spend shares to get the total Capital Spend for each item. This is shown in the
table below:
| Bucket Item |
Global Capital Spend |
Linked Capital Spend |
Total Capital Spend |
| Component A |
$21,450 |
$0 |
$21,450 |
| Component B |
$43,550 |
$12,000 |
$55,550 |
Once again, the system does all of these calculations on your behalf. As an end user, you need only understand the
principles behind it, and how to set up the Global and/or Linked Capital Spends correctly.
Capital Spend Share Overrides
By now you are familiar with how Capital Spends (Global,
spends, Linked spends, and a combination or
Hybrid using both) can be used
within the Metrix Asset Management system to attribute capital expenditure to your various Budget Buckets. You are
also familiar with how the system uses Budget Bucket Capitalisation Shares
to determine how any capital expenditure against the Bucket is capitalised at the end of the project.
This section expands upon these concepts and introduces the concept of Spend Capitalisation Share Overrides, which can be
used to instruct the system on how to allocate the capital expenditures for a specific Spend entry.
Info
By default, the system will use the Capitalisation Shares set on the Budget Bucket to determine how to allocate the capital
expenditures for Spend entries. This article is discussing the use of Spend Capitalisation Share Overrides, which can be
used to essentially ignore the Budget Bucket Capitalisation Shares and apply a different set of Capitalisation Shares
for the specific Spend entry only.
Below is an example of how Capitalisation Shares Overrides can be used, and what impact that has on the final recognition
figures for Component Items in a Budget Bucket in regard to their end of project capitalisation. For this example, we
will use the simple global spend example from our previous section - as the spending structure is not the focus here, rather
the capitalisation shares are.
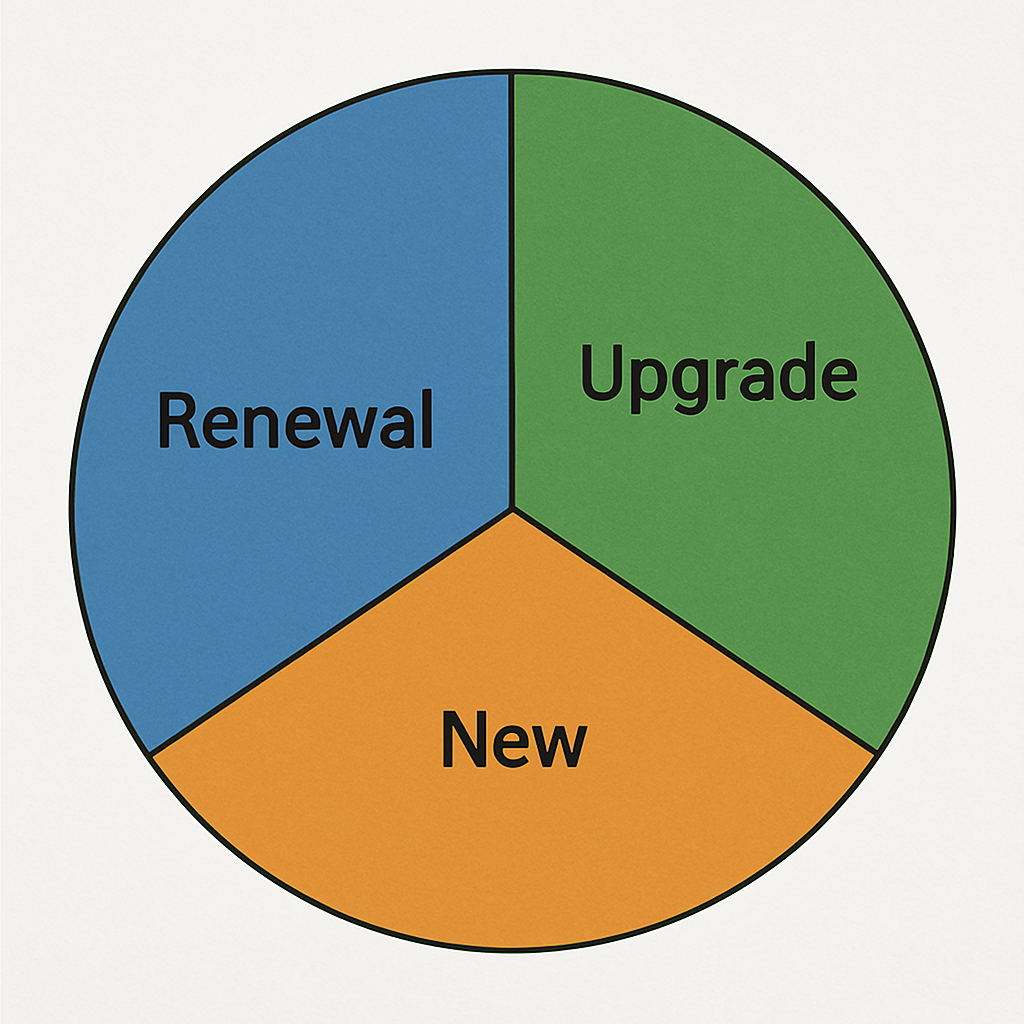
Also, for the sake of simplicity, we will assume that the Budget Bucket has a simple Capitalisation Share structure of
100% New (that is, we’re building new Assets).
The details of the above spends are as follows:
| Spend |
Value |
New Override |
Renewal Override |
Upgrade Override |
| Global Spend 1 |
$15,000 |
- |
- |
- |
| Global Spend 2 |
$2,000 |
0% |
0% |
100% |
The above table is essentially stating that the first spend does NOT have any overrides defined, and therefore the system
will honour the Budget Bucket Capitalisation Shares of 100% New when capitalising this spend. The second spend does have
defined overrides, and therefore the system will ignore the Budget Bucket Capitalisation Shares and apply these overrides
when capitalising this spend.
This ultimately results in the following capitalisation figures for the two spends:
| Spend |
Value |
New Capitalisation |
Renewal Capitalisation |
Upgrade Capitalisation |
| Global Spend 1 |
$15,000 |
100% |
0% |
0% |
| Global Spend 2 |
$2,000 |
0% |
0% |
100% |
As you can see, the first spend simply inherits the Capitalisation Shares from the parent Budget Bucket. These breakdowns
would result in the following capitalisation figures for the underlying components:
| Component Item |
Capitalisation Outcome |
| Item 1 |
$15,000 capitalised as New infrastructure |
| Item 2 |
$2,000 capitalised as an Upgrade of the existing infrastructure |
This example, while simple, demonstrates the concept of Spend Capitalisation Share Overrides. The system will always
honour the Capitalisation Shares set on the Budget Bucket, unless you specifically override them at the Spend level.
The Spend Metadata options provide opportunity for users to log ancillary information about a spend entry. Specifically,
the following fields are available:
- Description: A free text field for users to enter a description of the spend entry.
- External Ref: A free text field for users to enter an external reference for the spend entry.
- Comment: A free text field for users to enter comments about the spend entry.
How each field is utilised is a matter of user preference. For example, the Description field could be used to enter a
description of the spend entry, while the External Ref field could be used to enter a reference number from an external
system. The Comment field could be used to enter any additional comments or notes about the spend entry.
None of the above metadata fields are mandatory, and can be overwritten as blank (by the user) if required at a future date.
Subsections of How To Guides
Create a Global Spend
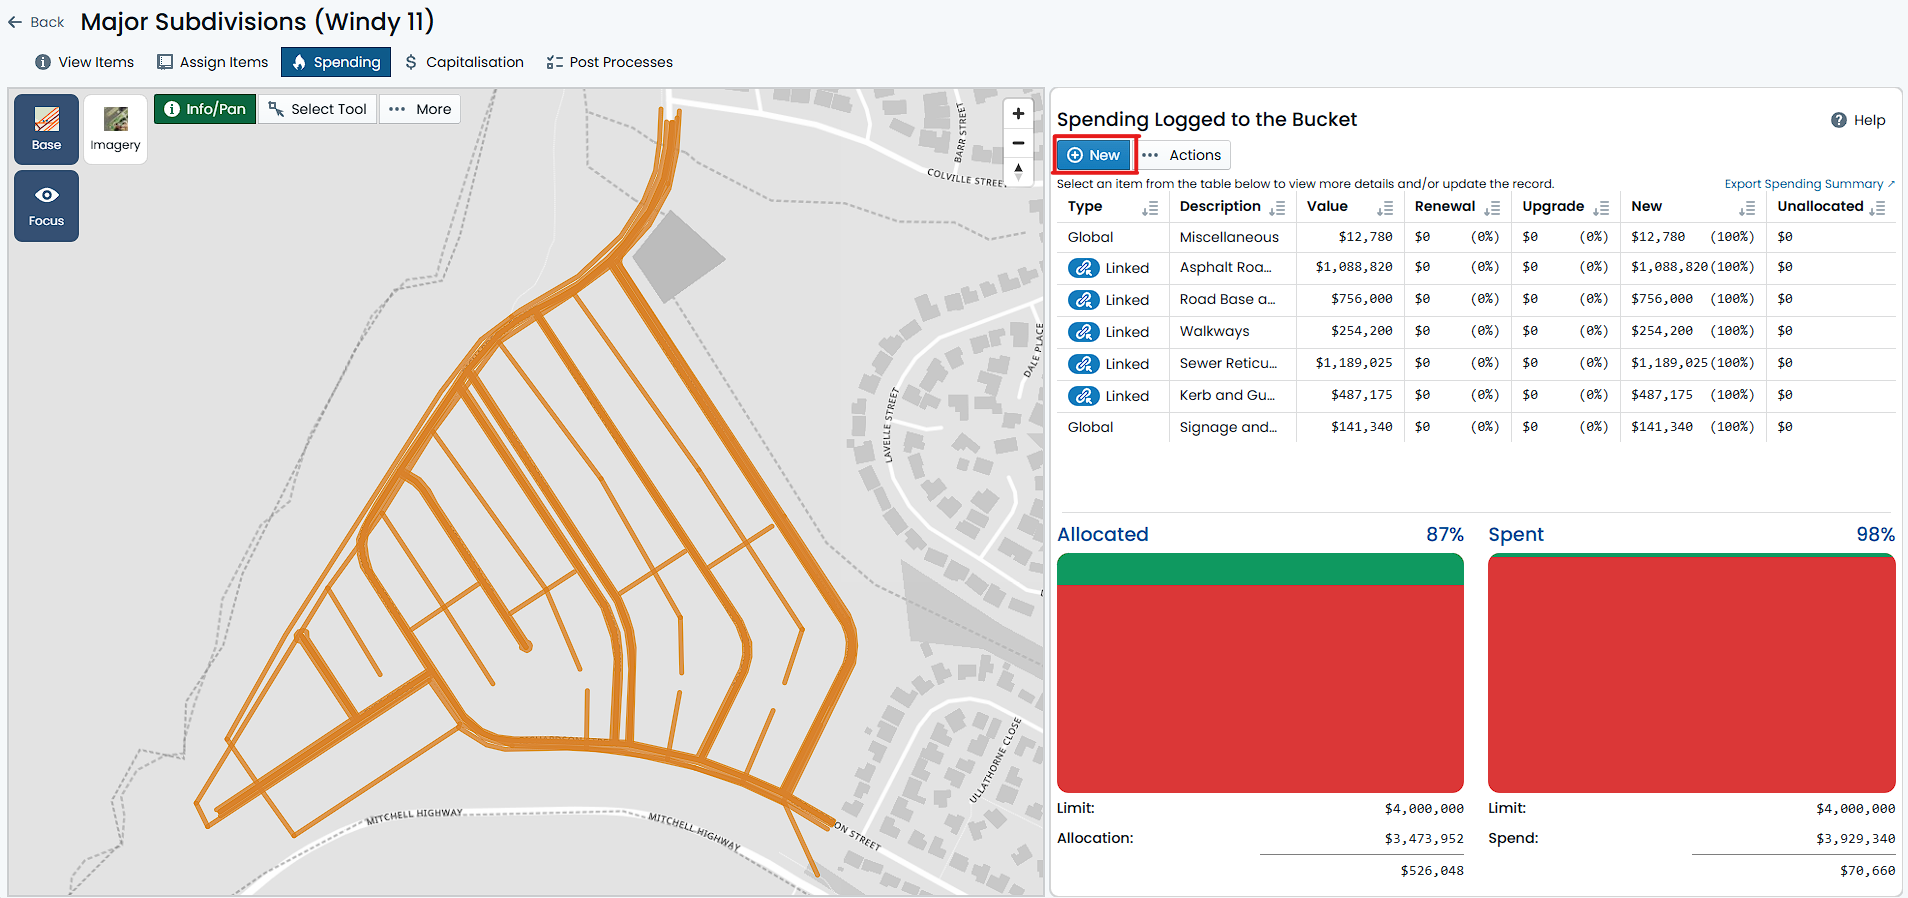
To create a Global Spend within a Budget Bucket, you must have navigated to the desired Budget Bucket and selected the
‘Spending’ tab from the Buckets navigation pane. This page is divided into two sections. The left-hand side contains
a map window showing the Budget Bucket Items. The right-hand side contains a summary view of any spends that have been
ascribed to the Budget Bucket already.
To create a Global Spend, follow these steps:
-
From the ‘Spending’ tab of the Budget Bucket, click the ‘New’ button in the top-left corner of the right-hand side
summary view.
-
The ‘Log Spend’ form will appear, and by default, the Spend Type will be set to ‘Global’. Don’t change this.
-
For the remaining fields, fill in the following as it pertains to your situation:
-
Spend Value: Enter the value of the spend in this numeric field. This is a required field, so you must enter
a value.
-
Capitalisation Allocation Overrides: Enter any OVERRIDES to the Budget Bucket Capitalisation Shares in these
fields. This is an optional field and should only be used if the Spend shares differ from that of the Budget Bucket.
Make sure the total of the entered overrides equate to 100%.
-
Description: Enter a description of the spend in this text field. This is an optional field, but it is recommended
that you enter a description to help identify the spend later.
-
External Ref: Enter an external reference for the spend in this text field. This is an optional field.
-
Comment: Enter a comment for the spend in this text field. This is an optional field.
-
Once you have at least entered a Spend Value, you can click the ‘Save’ button at the top of the form to save the spend.
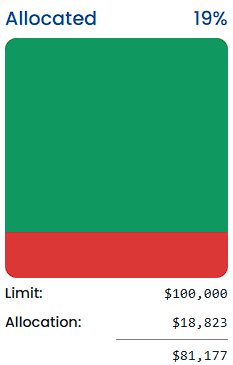
The new Global Spend will now appear in the right-hand side summary view of the Budget Bucket’s Spending tab. The spending
summary gauge will also react accordingly to reflect the new spend.
Create a Linked Spend
To create a Linked Spend within a Budget Bucket, you must have navigated to the desired Budget Bucket and selected the
‘Spending’ tab from the Buckets navigation pane. This page is divided into two sections. The left-hand side contains
a map window showing the Budget Bucket Items. The right-hand side contains a summary view of any spends that have been
ascribed to the Budget Bucket already.
To create a Linked Spend, follow these steps:
-
From the ‘Spending’ tab of the Budget Bucket, click the ‘New’ button in the top-left corner of the right-hand side
summary view.
-
The ‘Log Spend’ form will appear, and by default, the ‘Spend Type’ will be set to ‘Global’. This MUST be changed to ‘Spend
Linked to Budget Item(s)’.
-
For the remaining fields, fill in the following as it pertains to your situation:
-
Spend Value: Enter the value of the spend in this numeric field. This is a required field, so you must enter
a value.
-
Capitalisation Allocation Overrides: Enter any OVERRIDES to the Budget Bucket Capitalisation Shares in these
fields. This is an optional field and should only be used if the Spend shares differ from that of the Budget Bucket.
Make sure the total of the entered overrides equate to 100%.
-
Description: Enter a description of the spend in this text field. This is an optional field, but it is recommended
that you enter a description to help identify the spend later.
-
External Ref: Enter an external reference for the spend in this text field. This is an optional field.
-
Comment: Enter a comment for the spend in this text field. This is an optional field.
-
Now it is time to Link the spend to one or more Budget Bucket Items. With the spend form still active, use the map tools
in the left-hand side map window to navigate and select a Budget Bucket Item that you wish to link to.
Info
The selection pattern for this map window is based on Budget Bucket Items rather than Assets (as is the case for the
Assign tab). This means that you may encounter stacked Component Items (that relate to a single Asset) resulting in
a Multi-Selection.
It can be useful to FILTER the map to show only the Items you wish to link to. For information regarding filtering the map,
see Filtering the Spend Map.
From the map, there are two modes supported for linking a spend to a Budget Bucket Item:
- Single Selection: Click on a single Budget Bucket Item you wish to link to. The selected item will be highlighted in
blue, and the ‘Link to Spend’ button will be shown at the top of the Info Panel. Toggle the ‘Link to Spend’ switch
to link the selected item to the spend.
- Multi-Selection: Click and drag a box around multiple Budget Bucket Items you wish to link to. The selected items
will be highlighted in blue, and the ‘Link to Spend’ button will again be shown at the top of the Info Panel. This time,
the toggle switch is referring to all the Items within your selection set. Toggle the ‘Link to Spend’ switch to
link all selected items to the spend.
Additionally, there are some shortcut methods available for linking a spend to one or more Budget Bucket Items. These are
available from the menu button (labelled, ‘Shortcuts’) just below the ‘Spend Type’ selector from step 2 above. The following
shortcut options are available:
- Link All Items: This will link all Budget Bucket Items CURRENTLY assigned to the bucket, to the spend. This is useful if you are
creating a spend that relates to all items within the Budget Bucket, but you do not wish to make it global - to protect against
future Item adjustments.
- Link Filtered Items: This will link all Budget Bucket Items that are currently filtered within the map to the spend. This is useful
if you are creating a spend that relates to a subset of items within the Budget Bucket.
- Unlink All Items: This will unlink all Budget Bucket Items from the spend. This can be useful for ‘restarting’ your
spend selections.
- Unlink Filtered Items: This will unlink all Budget Bucket Items that are currently filtered within the map from the spend. This is useful
for refining away linked items.
-
Linked Items will appear in the ‘Linked Items’ section of the form. You can remove a linked item by clicking the
trash can icon next to the item in the list. This will remove the link from the spend, but will not delete the Budget Bucket Item
itself.
-
Once you entered a Spend Value and linked at least one (1) item, you can click the ‘Save’ button at the top of the
form to save the spend.
The new Linked Spend will now appear in the right-hand side summary view of the Budget Bucket’s Spending tab. The spending
summary gauge will also react accordingly to reflect the new spend.
Edit a Spend
Editing a spend within a Budget Bucket is a very simple and straightforward process. To edit a spend, navigate to the
desired Budget Bucket and enter the ‘Spending’ tab panel. Then, perform the following steps:
-
On the right-hand side of the screen is shown a list of all the spends currently ascribed to the Budget Bucket. Locate
the spend you with to modify and click the row entry.
-
The spend form will appear, showing the details of the selected spend. You can now edit any of the fields in the form, including:
- Spend Amount
- Capitalisation Share Overrides
- Description
- External Reference
- Comment
The spend type CANNOT be edited. That is, a global spend cannot be changed to a linked spend, and vice versa.
-
For linked spends, you can also modify the array of Bucket Items that are linked to the spend. Simply follow the
steps listed in Create a Linked Spend.
-
Once you have made the desired changes, click the Save button to save your changes. The spend will be updated.
Note
Spends that have been capitalised cannot be edited. If you need to edit a capitalised spend, you will need to revert that
capitalisation batch first.
Such spends will be marked with a padlock icon in the spend list.
Delete a Spend
Deleting a spend within a Budget Bucket is a very simple and straightforward process. To delete a spend, navigate to the
desired Budget Bucket and enter the ‘Spending’ tab panel. Then, perform the following steps:
-
On the right-hand side of the screen is shown a list of all the spends currently ascribed to the Budget Bucket. Locate
the spend you with to remove and click the row entry.
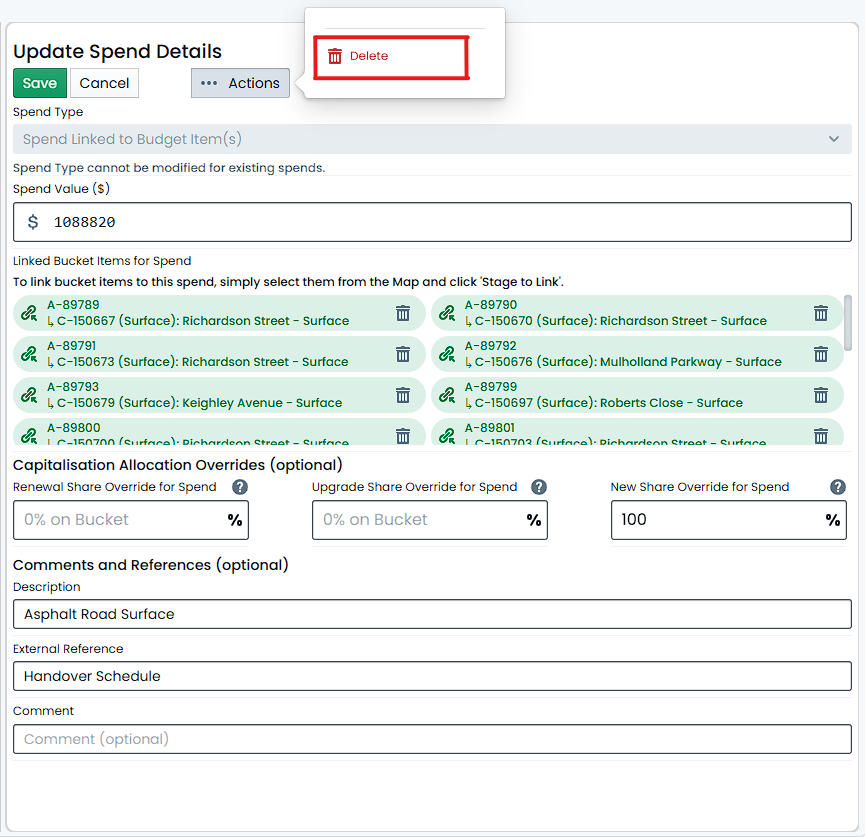
-
At the top of the Spend form is an Action menu (denoted by three dots). Click on the Actions menu and select ‘Delete’.
-
A confirmation dialog will appear, asking you to confirm the deletion. Click ‘Delete’ to delete the spend.
The spend will be removed from the Budget Bucket and will no longer be available for capitalisation.
Note
Spends that have been capitalised cannot be removed. If you need to edit a capitalised spend, you will need to revert that
capitalisation batch first.
Such spends will be marked with a padlock icon in the spend list.
Filtering the Spend Map
Within the ‘Spending Tab’ of a Budget Bucket, the map window supports dynamic filtering (like the Assign tab and other
map windows within the Metrix Asset Management system). The small difference with filtering in the Spend Map is that,
regardless of the filter settings, the map will only ever show items that are at least assigned to the Budget Bucket. That is,
the default state is for the map to show all items that are assigned to the Budget Bucket, and the filter settings will only
serve to restrict within this set of items.
Using the filter within the ‘Spending Tab’ is the same as using the filter on any Metrix map component. For detailed
instructions on how to use the filter, please refer to the Filtering Data
documentation.