How To Guides
This section provides a series of How-To guides for the following topics:
This section provides a series of How-To guides for the following topics:
The following is a generic guide on making a selection set for assigning items to (or unassigning items from) a Budget Bucket. The process remains the same regardless of whether you are assigning singularly or in bulk.
To assign/unassign Components to a Budget Bucket as an item, you will need to have navigated to the desired Budget Bucket in the Capital module. The entry point for any budget bucket is the ‘View Items’ tab; navigate, using the tabs, to the ‘Assign Items’ tab to enter assignment mode.
From here you should see a map containing ALL the Asset Components in your portfolio. In the case that a Default Filter has already been assigned to the Budget Bucket, you will see all the Asset Components relative to that filter.
The most common approach to assigning items to a Budget Bucket is a two-step approach:
First, design a filter that scopes the visible Asset Components down to a relevant set of items. This is done using the ‘Filter’ on the left-hand side of the map window. For help with filtering, see this section.
Once you have a relevant set of Asset Components visible on the map, you can select them using either:
All of the above tools are available in the top-left corner of the map window. The ‘Info/Pan’ tool is the default.
The above process will result in a ‘selection set’ of one or more Assets. That is, selections are ‘Asset based’ meaning that one (1) selection could pertain to multiple Component records related to the same parent Asset record.
Your ‘selection set’ will be displayed in an Info Panel on the right-hand side of the map window. If your selection set contains more than one (1) Asset, the Info Panel will display the list of selected Assets, rather than details about any single Asset. Clicking one of the listed Assets will narrow your selection set to that Asset.
Once you have built a ‘selection set’ you can proceed to assign or unassign Components belonging to the selected Asset(s) using either single or bulk methods.
To assign a Component as an Item to a Budget Bucket, you must have navigated to the desired Budget Bucket, and have selected the parent Asset or Assets of the Components you want to assign. See Selecting Items for detailed instructions on doing this.
This how-to guide pertains to assigning a single Component to a Budget Bucket. For help on assigning multiple Component Items in bulk, see Bulk Assign Budget Items.
To assign a Component as an Item to a Budget Bucket, follow these steps:
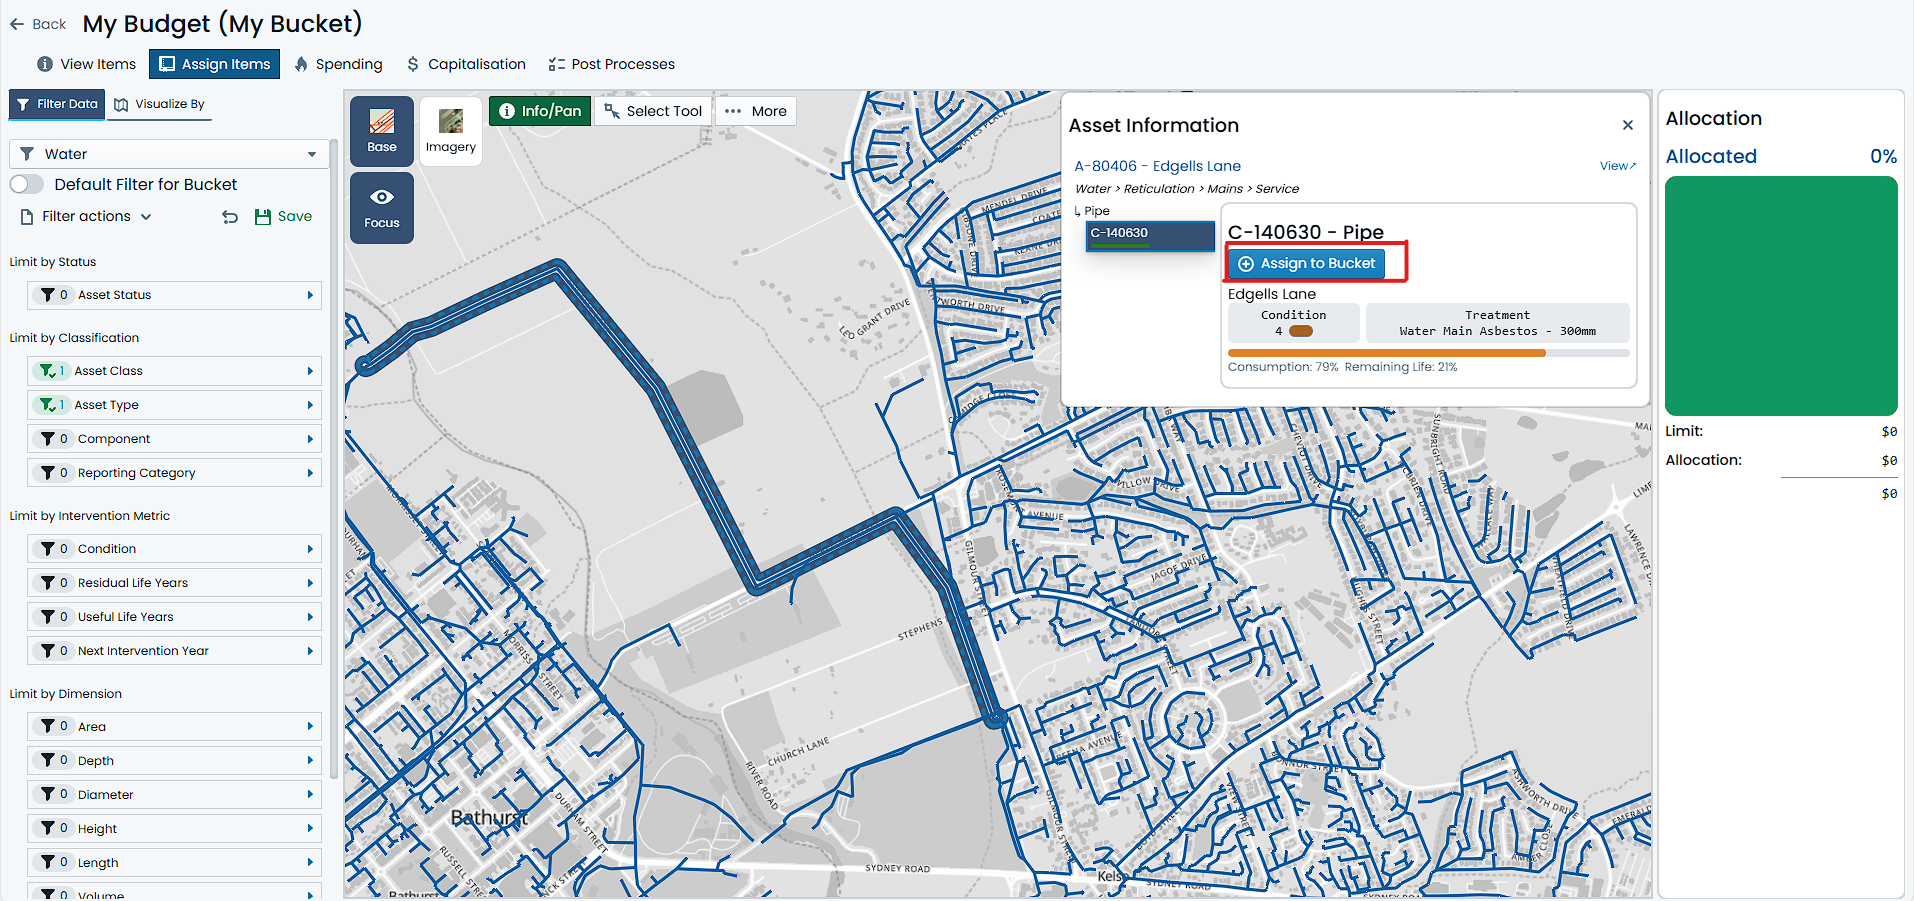
Select a single Asset from the map using the above-mentioned methods. You will know that you have a single selected Asset when the Asset is highlighted in blue on the map, and the Asset’s details are displayed in the right-hand Info Panel.
The Info Panel is split into three main sections:
a. The top of the Info Panel has information pertaining to the selected Asset, such as its classification, ID, and description.
b. Below this, on the left-hand side, is the Component Switcher, which allows you to select a particular Component of the Asset to view its details, and manage its assignment state.
c. The right-hand side of the Info Panel contains the Component information pertaining to the selected Component above.
Isolate the single Component you wish to assign to the Budget Bucket by selecting it in the Component Switcher.
Click on ‘Assign to Bucket’ to assign the selected Component as an Item to the Budget Bucket.
The Component has now been assigned to the Budget Bucket as an Item. It will be configured automatically with a default budgeted treatment method, and if this treatment method amounts to a cost, the Buckets Allocation gauge will react accordingly.
Further to the above, any assigned Component Items will appear with an orange halo around their map feature in the map window.
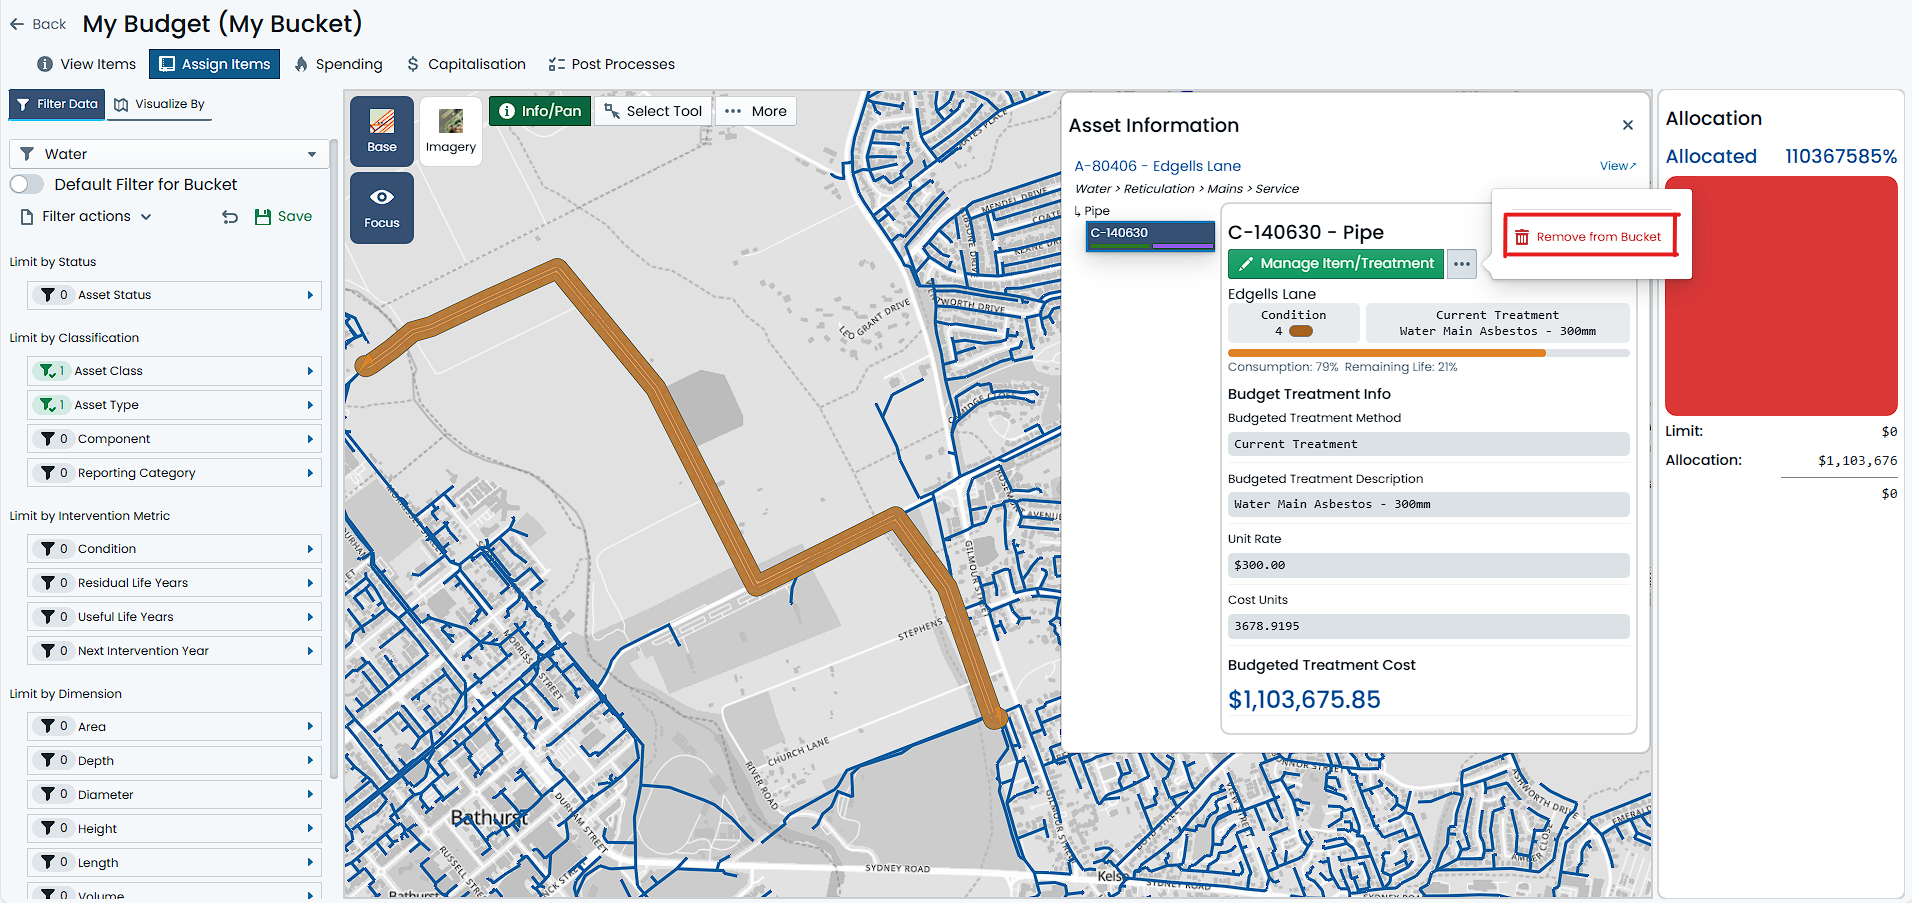
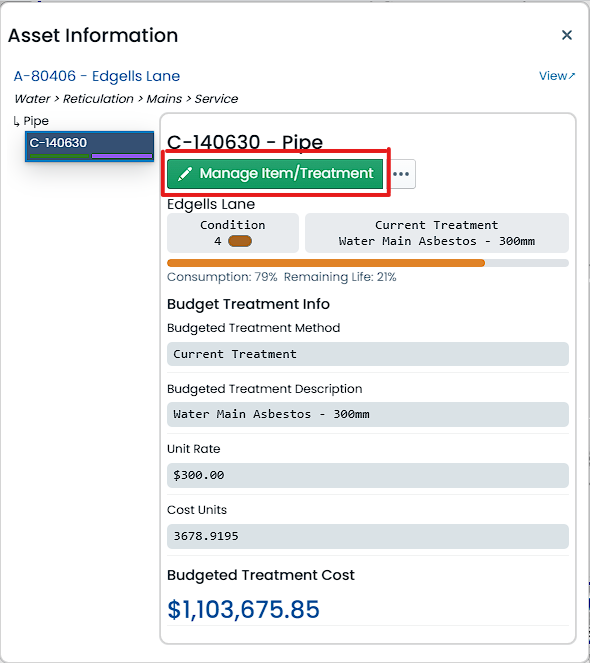
If your selected Asset Component does NOT have an option to ‘Assign to Bucket’, rather, it shows options to ‘Manage Item/Treatment’, this means that the Component is already assigned as an item to the Budget Bucket. See Unassign Budget Items for assistance on unassigning items from a Bucket.
To assign many Components as Items to a Budget Bucket, you must have navigated to the desired Budget Bucket, and have selected the parent Assets of the Components you want to assign. See Selecting Items for detailed instructions on doing this.
Bulk Assignment will group all selected Assets by their Asset Classification, and then by their Component Group. It is not possible to use the Bulk Assignment method in groups other than Component Group level. Users should be conscious of this when finalising their selection set.
To assign Components as Items to a Budget Bucket, follow these steps:
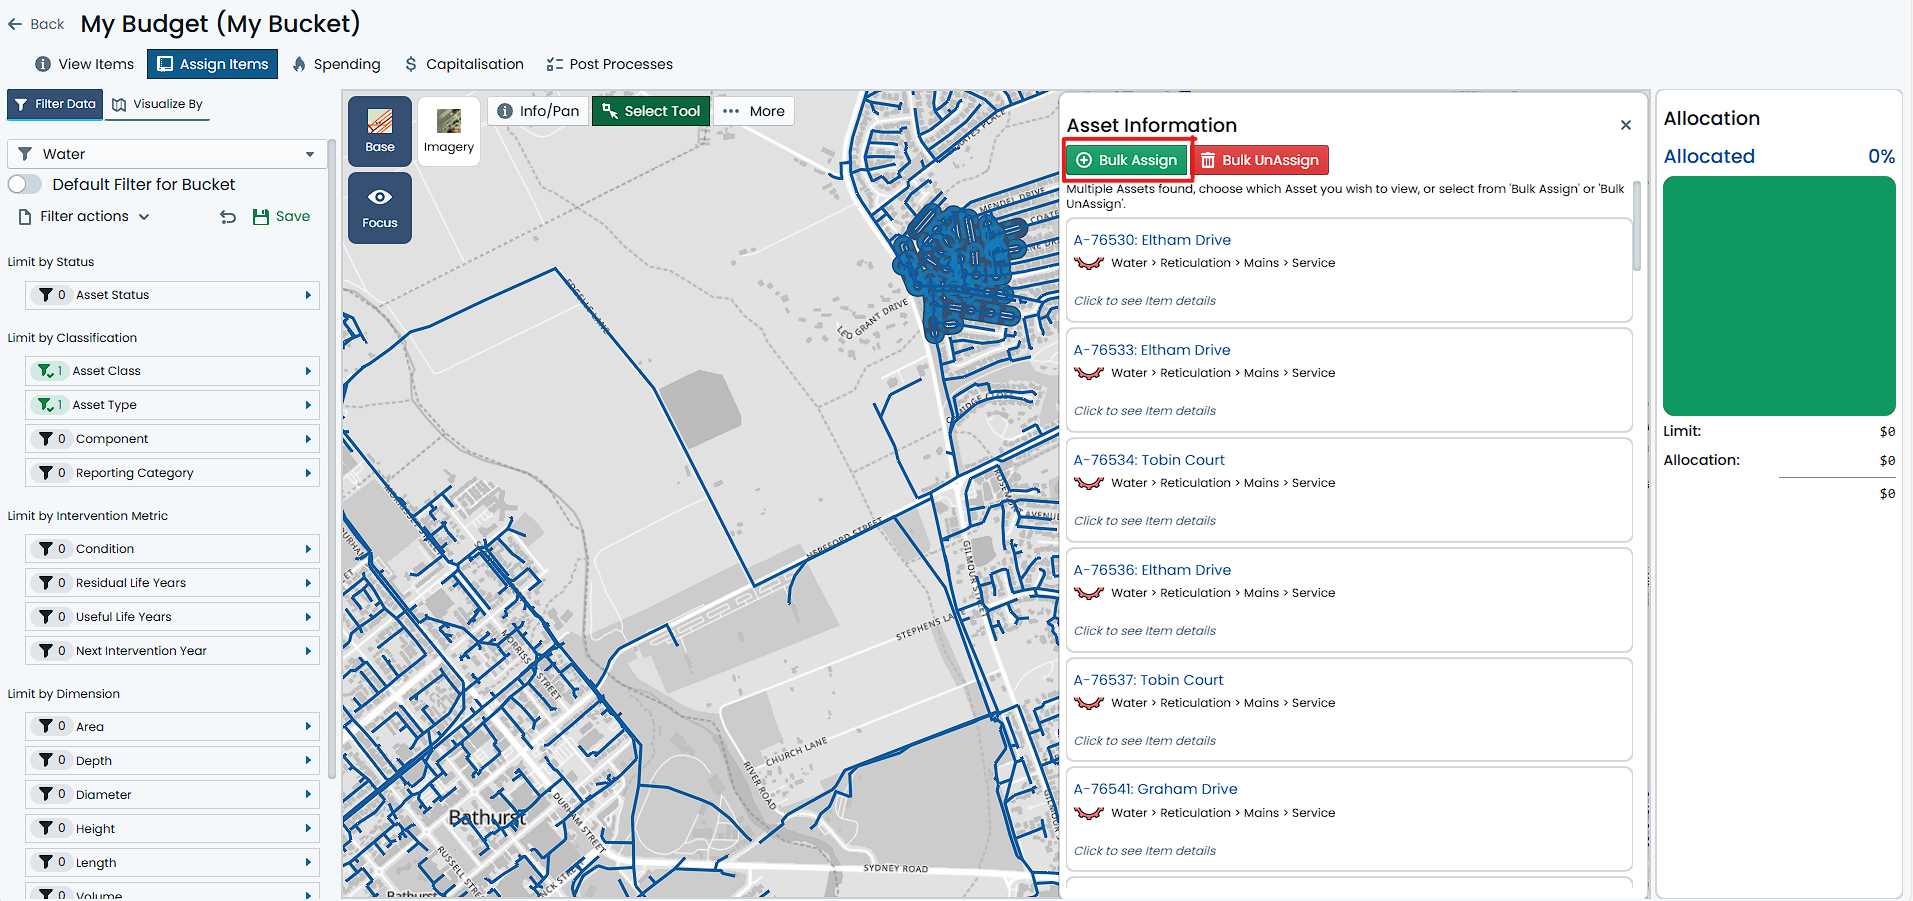
Make a selection of multiple Assets from the map using the above-mentioned methods. You will know that you have a multiple selected Assets when they are highlighted in blue on the map, and a list of Assets are displayed in the right-hand Info Panel.
Once multiple Assets are selected, you will see an option to ‘Bulk Assign’ at the top of the Info Panel. Click on this option.
A dialog window will appear with some options for refinement of the selected Assets. For each unique Asset Classification, you will be offered a choice to ‘Include’ or ‘Exclude’ the one or more Component Groups within that classification. By default, all Component Groups are marked as ‘Excluded’ - that is, nothing will be assigned by default. To ‘Include’ a Component Group, click on that Component Group tile. The tile will change colour. To ‘Exclude’ it, simply click on it again and the tile will revert to no colour.
Your selection may contain Sewer Reticulation Mains and several Local Sealed Roads. In this case, you may see the following options (represented by gridded tiles):
In the above, you could elect to Assign just the Sewer Manhole Components (by ‘Including’ the Manhole Component Group), or you could Assign all Sealed Road Components (by ‘Including’ the Earthworks, Pavement and Surface Component Groups).
Once you have marked items to be ‘Included’ for assignment by clicking on their Component Group tile, you can then click the ‘Add Filtered Component Types’ button at the bottom of the dialog window.
The Components have now been assigned to the Budget Bucket as independent Items. Each will be configured automatically with a default budgeted treatment method, and if this treatment method amounts to a cost, the Buckets Allocation gauge will react accordingly.
Further to the above, any assigned Component Items will appear with an orange halo around their map feature in the map window.
When selecting Component Group tiles, you may notice that the tile indicates that there ar ‘X’ in Selection and ‘Y’ Already Assigned. This means that there are ‘X’ number of Components of that Component Group in your selection set, and ‘Y’ number of those Components are already assigned to the Budget Bucket. Don’t worry, Components cannot be added to the same Budget Bucket twice and any previously assigned Components will just be skipped.
To unassign a Component Item from a Budget Bucket, you must have navigated to the desired Budget Bucket, and have selected the parent Asset of the Component you want to unassign. See Selecting Items for detailed instructions on doing this.
This how-to guide pertains to unassigning a single Component from a Budget Bucket. For help on unassigning multiple Component Items in bulk, see Bulk Unassign Budget Items.
To unassign a Component Item from a Budget Bucket, follow these steps:
Select a single Asset from the map using the above-mentioned methods. You will know that you have a single selected Asset when the Asset is highlighted in blue on the map, and the Asset’s details are displayed in the right-hand Info Panel.
For items already assigned to the Budget Bucket, the Info Panel will show a ‘Manage Item/Treatment’ button at the top. Next to this button will be an actions menu (denoted by three dots) with additional options. Click on the ‘Actions’ menu.
From the actions menu, select ‘Remove from Bucket’.
A confirmation window will appear. Click ‘Delete’. This will unassign the selected Component from the Budget Bucket.
The Component Item has now been removed from the Budget Bucket. If the budgeted treatment method for the Item resulted in a cost, the Bucket’s Allocation gauge will react accordingly.
There are circumstances where the ‘Remove from Bucket’ option will not be available. This is usually due to the Item having capital spends linked to it. In this case, you will need to remove any and all of these affected capital spend before you can unassign the Item from the Bucket.
To unassign many Component Items from a Budget Bucket, you must have navigated to the desired Budget Bucket, and have selected the parent Assets of the Components you want to unassign. See Selecting Items for detailed instructions on doing this.
Like Bulk Assignment, Bulk Unassignment will group all selected Assets by their Asset Classification, and then by their Component Group. It is not possible to use the Bulk Unassignment method in groups other than Component Group level. Users should be conscious of this when finalising their selection set.
To unassign Component Items from a Budget Bucket, follow these steps:
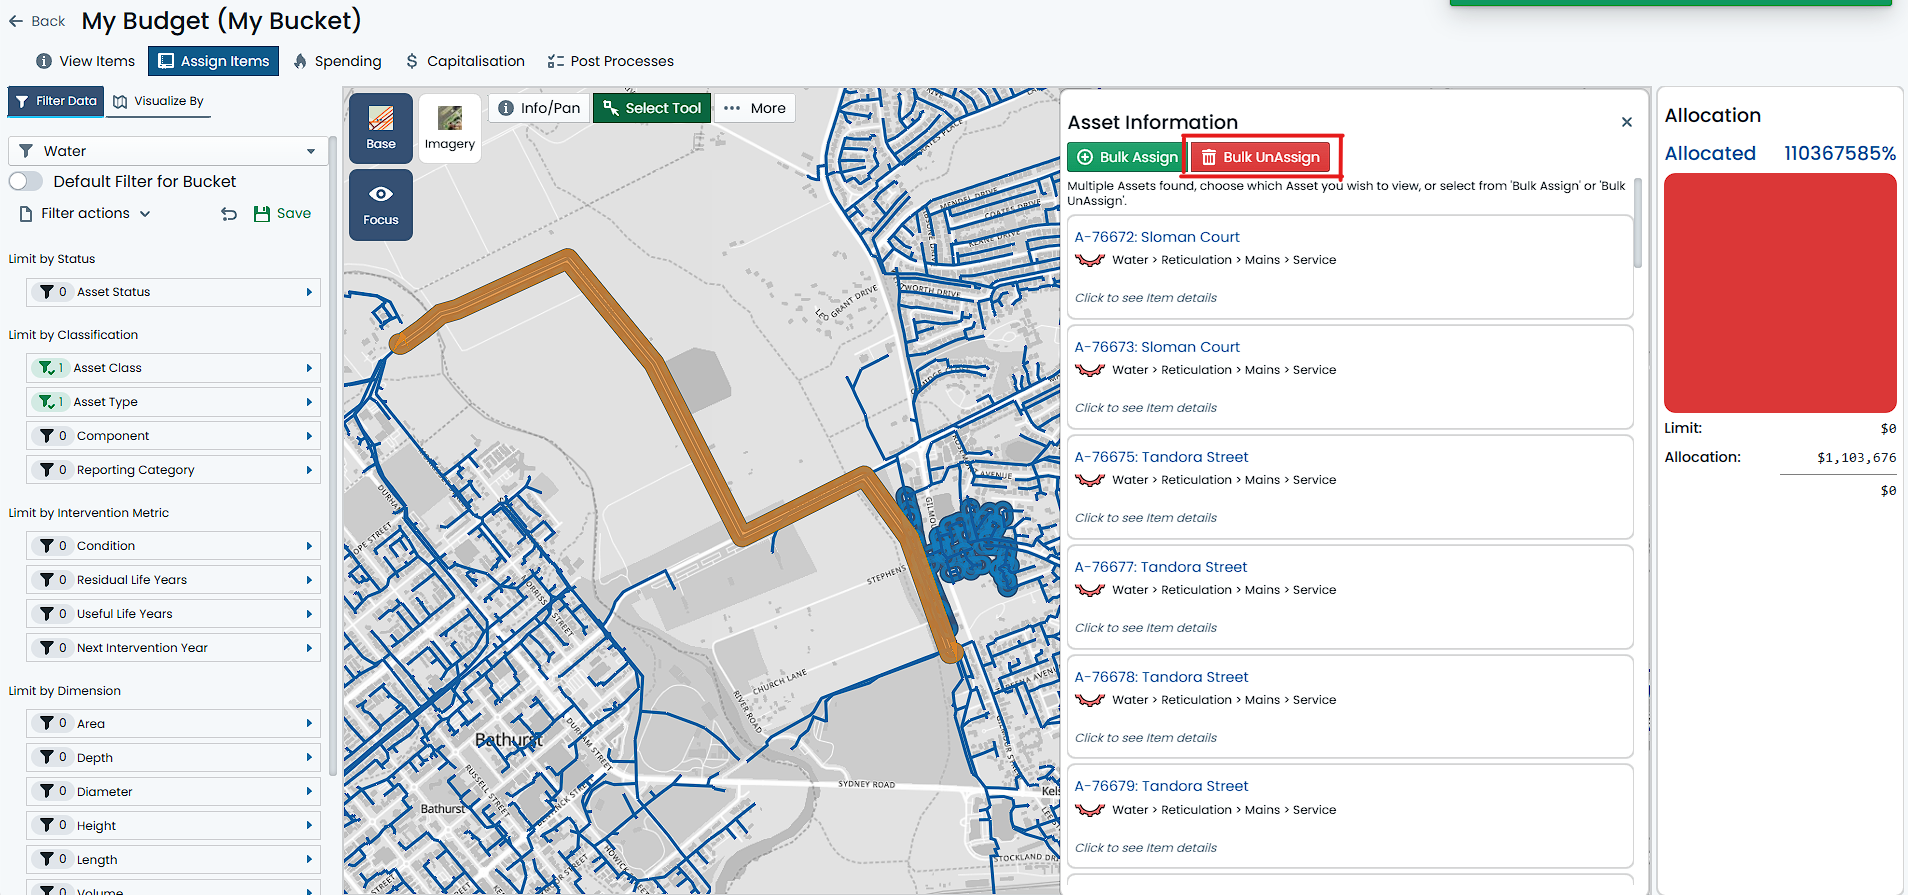
Make a selection of multiple Assets from the map using the above-mentioned methods. You will know that you have a multiple selected Assets when they are highlighted in blue on the map, and a list of Assets are displayed in the right-hand Info Panel.
Once multiple Assets are selected, you will see an option to ‘Bulk UnAssign’ at the top of the Info Panel. Click on this option.
A dialog window will appear with some options for refinement of the selected Assets. For each unique Asset Classification, you will be offered a choice to ‘Include’ or ‘Exclude’ the one or more Component Groups within that classification. By default, all Component Groups are marked as ‘Included’ - that is, all currently selected Items will be removed by default. To ‘Include’ a Component Group for unassignment, click on that Component Group tile. The tile will change colour. To ‘Exclude’ it (saving it from unassignment), simply click on it again and the tile will revert to no colour.
In this process, ‘Include’ means that you with to ‘Include the Component Group for Unassigning’ from the Budget Bucket. ‘Exclude’ means that you do NOT wish to Unassign any Items associated with the Component Group from the Budget Bucket.
Your selection may contain Sewer Reticulation Mains and several Local Sealed Roads, all of which are currently assigned to the Budget Bucket. In this case, you may see the following options (represented by gridded tiles):
In the above, you could elect to Unassign just the Sewer Manhole Components (by ‘Including’ the Manhole Component Group), or you could Unassign all Sealed Road Components (by ‘Including’ the Earthworks, Pavement and Surface Component Groups).
Once you have marked items to be ‘Included’ for unassignment by clicking on their Component Group tile, you can then click the ‘Remove Filtered Component Types’ button at the bottom of the dialog window.
The Components have now been unassigned from the Budget Bucket. If any of the Items had a budgeted treatment method amounting to a cost, the Buckets Allocation gauge will react accordingly.
When selecting Component Group tiles, you may notice that the tile indicates that there ar ‘X’ Assigned in Selection and ‘Y’ Selected Items not Assigned. This means that there are ‘X’ number of Components of that Component Group in your selection set that are indeed assigned to the Budget Bucket, and ‘Y’ number of those Components that are not assigned to the Budget Bucket.
Clearly, you cannot unassign a Component that is not assigned to the Budget Bucket. Don’t worry, the system will handle this for you and skip over any items not assigned already.
This page describes how to set the budgeted treatment method for a Budget Bucket Item. It is presumed that you have already followed the required steps to assign the Items to the bucket, either individually or in bulk. It is also presumed that you understand the different budgeted treatment methods available to you.
To set the budgeted treatment method for a Budget Bucket Item, follow these steps:
With the desired Budget Bucket Item selected, you will see an option to ‘Manage/Item Treatment’ at the top of the Info Panel for the Item. Click this option.
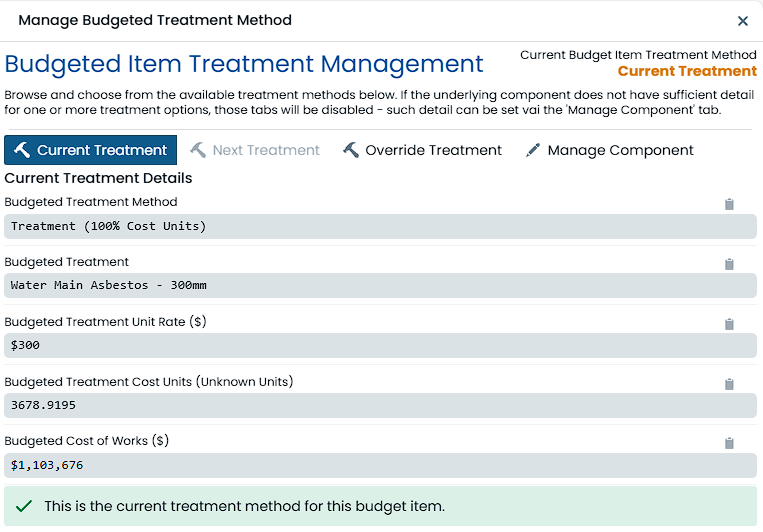
A dialog window will appear with the range of possible budgeted treatment methods available to the selected Item. In the top-right corner of this window, the current method will be displayed.
Each available budgeted treatment method is represented by a Tab within the dialog window. Each tab can be selected and viewed without any changes being made to the Item.
If a particular Tab is deactivated (i.e. Next Treatment) this means that that specific method is not available for the selected Item. This would be due to a lack of information on the underlying Component. Updating this information (i.e. adding a ‘Next Treatment’ definition) and refreshing the Budget page will resolve this.
To set either the Current or Next Treatment Methods as the current budgeted treatment method, select the desired Tab and click the ‘Set this as the Budgeted Treatment Method’ button at the bottom of the Tab panel.
For Current and Next Treatment methods, you have finished the process. For Override Treatment methods, you will need to follow the additional steps below:
To set a Budgeted Override Treatment as the current budgeted treatment method, select the ‘Override Treatment’ Tab and click the ‘Define an Override as the Budgeted Treatment Method’ button at the bottom of the Tab panel.
The Tab panel will change to display the Override Treatment definition options where you can proceed to choose the desired Override Treatment method. For this, you will need to define either:
The override treatment also requires that you enter a brief description of the treatment, as well as provide a reason for the override. This is important for audit purposes (helping future you).
Once finshed, click on the ‘Apply Override Treatment’ button at the bottom of the Tab panel.
The Budget Bucket Allocation gauge will react to the new costs associated with the chosen budgeted treatment method.