Classification Resource Configuration

In addition to linking resources for use throughout an asset portfolio, the classification configuration screen allows you to set other properties that control the behaviour of assets and their components throughout the Metrix Asset Management system.

This includes setting resources for both:

  • Asset level classifications, and
  • Component group level classifications.

Subsections of Classification Resource Configuration

About

This section contains basic information about classification configurations in the Metrix Asset Management system.

Subsections of About

Component Flags

Component flags are simple ways to toggle the expected requirements of a component group. Such flags include:

Conditioned:

The conditioned flag indicates if components assigned to the relative component group will typically require condition assessments to be conducted. Setting this flag to ‘off’ will mean that any assigned components do not contribute to any ‘missing condition’ counts or filters.

Depreciable:

The depreciable flag indicates if components assigned to the relative component group will typically require periodic depreciation charged against its carrying value. This can be useful for report generation as well as tracking the state of the organisations depreciation runs.

Carries value:

The carries value flag indicates if components assigned to the relative component group will typically be posted against in the financial transaction ledger. This would be set to ‘off’ for non-valued assets that are included for reference or other reasons.

Smart Attributes

Smart attributes can be defined to link an asset components attribute to the underlying spatial feature, and setting its value to the length or area of said geometry. Once an attribute has been defined as a smart attribute for a given classification, its value can no longer be set by end users. Rather, any changes to the underlying spatial feature will trigger an update of the fields value.

In order to be defined as a smart attribute, the form field must be marked as required.

Info

The definition of a smart attribute, like cost unit formulas, must be done via the classification screen. This is because form definitions can be shared across multiple classifications, and it may not be correct for an attribute to be ‘smart’ for all of the classifications that rely upon it.

Cost Unit Formulas

Cost unit formulas can be defined to calculate an asset components cost unit value according to a user defined algorithm based on the underlying attribute form and/or any defined smart attributes. When a cost unit formula is defined and in force, end users will be unable to manually set the ‘Cost Units’ value for asset components within that component group.

Example

Consider the Surface component of a Local Road asset. The Intervention Treatment assigned to the component may have a Unit Rate that is based in square metres. Therefore, the units of measure for the component Cost Units would also need to be in square metres. This Cost Unit value can be set automatically by a Cost Unit Formula result.

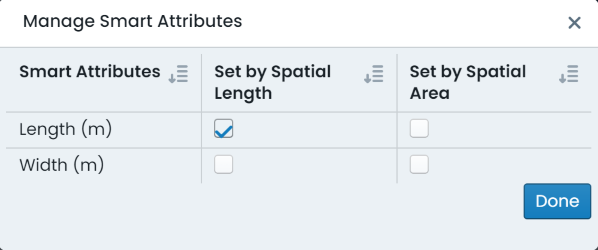
Firstly, the organisation would need to define an attribute form with at least the following two (2) fields:

  • Length: as a required, numeric field (possibly a smart attribute linked to a line length)
  • Width: as a required, numeric field

With the attribute form assigned to the Road Surface component group, the organisation 
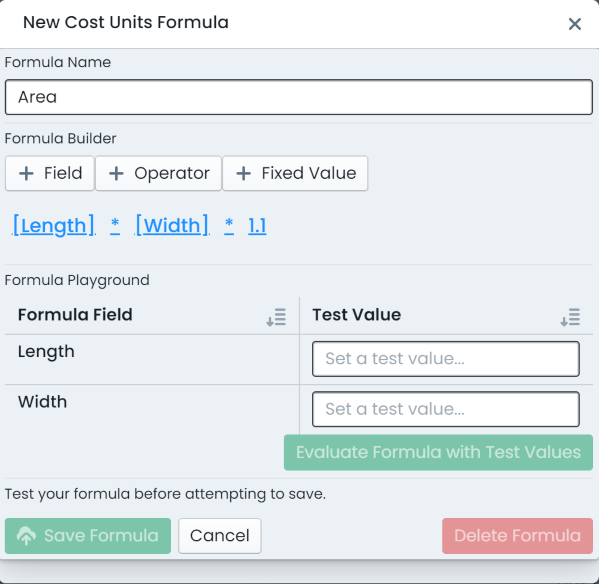
would then define the following Cost Unit Formula:

[Length] x [Width]

Assigning this formula as the component group’s Cost Unit Formula would then cause any assigned components to have an automatically calculated Cost Unit field that will react to changes to the Length and/or Width attributes.

Classification Resources

In addition to linking resources for use throughout an asset portfolio, the classification configuration screen allows you to set other properties that control the behaviour of assets and their components throughout the Metrix Asset Management system.

This includes setting resources for both:

  • Asset level classifications, and
  • Component group level classifications.

All classification linked resources can be managed from the classification configuration screen (in addition to the link portals on the resource management page). This includes the following resource types:

Asset Level Resources

Component Level Resources

How To Guides

This section contains how to guides with respect to classification configurations in the Metrix Asset Management system.

Subsections of How To Guides

Define Cost Unit Formula

This section covers the necessary steps involved in creating a new cost unit formula for a given classification within the Metrix Asset Management System.

Prerequisites

In order to set a Cost Unit Formula, the following prerequisites must be met:

  • The component classification must have a valid attribute form assigned to it. See Form Management or Classification Resource Management for more information.

  • The assigned form specification must contain at least one (1) field matching the following attribute definition:

    • Data Type: Decimal Number
    • Required: True

    See Form Management for more information

To create a new cost unit formula definition within Metrix, complete the following steps:

  1. Navigate to the component group within the asset classification using the ‘Classifications’ page. (Assets Menu > Classifications > Selected Classification > Selected Component Group).

  2. Click on ‘Edit Configuration’ to enter allow editing the classification definition.

  3. This will convert the view to an editing mode with some additional options. Make sure you have the desired component group selected before continuing.

  4. Within the ‘Data’ section, click on the drop down menu under ‘Cost Units Formula’.

    Note

    If this is not available, it means that a valid form definition does not exist for setting smart attribute definitions.

  5. To define a NEW cost unit formula, click on the ‘New Cost Unit Formula’ option in the drop down list.

  6. A dialog will appear ready to define the cost unit formula.

  7. First, set the Formula Name by entering it into the input box.

  8. Then, to define a cost unit formula, you will need to build a valid algorithm using:

    • Valid attribute definitions,
    • Fixed numeric values, and/or,
    • Basic mathematical operators.
    Note

    Remember that only attributes matching the prerequisite definitions will be shown.

    Within the ‘Formula Builder’ section is three (3) menu options that allow users to choose the next input or operator for the cost unit formula. As you select inputs/operators, the algorithm expression preview will populate for you.

    To edit or remove a particular input or operator, simply click on that entry in the algorithm expression to see a list of options for edit or removal.

  9. Before you can commit any new or revised cost unit formula, you must test it. This involves providing ‘dummy’ values for any attribute fields in the algorithm. Once the ‘dummy’ values are set, click ‘Evaluate Formula with Test Values’.

  10. The server will evaluate the formula and return a response. Make sure you verify this result yourself before continuing.

  11. Once complete, click ‘Save Formula’.

  12. Important: The cost unit formula has now been defined and is available for use. In order to actually use it for the selected component group, ensure you select it from the ‘Cost Unit Formula’ drop down list.

    Info

    Cost Unit Formula definitions are stored against the underlying form definition (as this is where the input attribute fields are defined). Any component group assigned to a form definition with one or more defined cost unit formulas, can use that formula.

  13. Once you have finished click ‘Save Config Changes’.

Define Smart Attributes

This section covers the necessary steps involved in creating a new smart attribute for a given classification within the Metrix Asset Management System.

Prerequisites

In order to set a Smart Attribute, the following prerequisites must be met:

  • The component classification must have a valid attribute form assigned to it. See Form Management or Classification Resource Management for more information.

  • The assigned form specification must contain at least one (1) field matching the following attribute definition:

    • Data Type: Decimal Number
    • Required: True

    See Form Management for more information

To create a new smart attribute definition within Metrix, complete the following steps:

  1. Navigate to the component group within the asset classification using the ‘Classifications’ page. (Assets Menu > Classifications > Selected Classification > Selected Component Group).

  2. Click on ‘Edit Configuration’ to enter allow editing the classification definition.

  3. This will convert the view to an editing mode with some additional options. Make sure you have the desired component group selected before continuing.

  4. Within the ‘Data’ section, click on ‘Manage Smart Attribute(s)’.

    NOTE: If this is not available, it means that a valid form definition does not exist for setting smart attribute definitions.

  5. A dialog will appear showing all of the configured field definitions that match the prerequisites for smart attributes.

    To set a smart attribute as linked to the underlying spatial feature’s Length, check the corresponding box in the ‘Set by Spatial Length’ column.

    To set a smart attribute as linked to the underlying spatial feature’s area, check the corresponding box in the ‘Set by Spatial Area’ column.

  6. Once you have finished, click ‘Done’. Then, in the main window, click ‘Save Config Changes’.

Bulk Update Smart Attributes & Cost Units

This section covers the necessary steps involved in recalculating and applying the values for smart attribute and cost unit formulas, for a given range of classifications within the Metrix Asset Management System.

Prerequisites

In order to bulk update Smart Attribute and Cost Unit Formulas, the following prerequisites must be met:

To recalculate and apply the values for smart attribute and cost unit formulas within Metrix, for a given range of classifications, complete the following steps:

  1. Navigate to the ‘Classifications’ page. (Assets Menu > Classifications).

  2. Click on ‘Actions’ menu at the top of the Classifications page, and choose ‘Update Smart Attributes and Cost Unit Formulas’ to launch the bulk editing tool.

  3. A dialog will appear and ask you to select the Classifications that you want to roll the update for. Once you have ticked/unticked the relevant Classification(s) to update, select ‘Fetch Components for Classifications’.

  4. The dialog will fetch this information from the server and then advise you of how many components would be affected by the update. Clicking ‘Proceed’, will proceed to update any Smart Attributes and Cost Unit Formulas for the selected components.

Import/Export Classification Configurations

At any time when using the Metrix Asset Management System, users can opt to import and/or export their classification configurations. This can be useful if you are working with a provided training or test environment and wish to migrate configurations between the two.

Exporting Classification Configurations

  1. To get started, navigate to the ‘Export Configurations’ page. (Assets Menu > Export Configuration).

  2. The export system allows users to export resource definitions at one or more of the following levels:

    • Specific Classes: an entire asset class definition. For example: all of the ‘Transportation’ class.
    • Specific Classifications: a single asset classification definition. For example: just the ‘Local Road’ asset group.
  3. Each of the above level selectors will render a different list of available checkboxes to include in the export. That is, if you choose ‘Specific Classes’, you will be presented with a list of checkboxes representing each asset class configured in your system. If you choose ‘Specific Classification’ each asset group will be rendered with a checkbox.

    Simply tick the checkboxes you wish to include in the export.

  4. Then, on the right-hand side, simply confirm which resources you want to include in the export by checking/unchecking resource types.

  5. When ready, click ‘Generate and Download’.

    This will download a .json file that can be used in the following instructions for ‘Importing Classification Configurations’. Make sure you save the file in a location that you can easily access.

Importing Classification Configurations

  1. To get started, navigate to the ‘Import Configurations’ page. (Assets Menu > Import Configuration).

  2. From this page you can either drag and drop a valid configuration file (see above) in to file dropper, or click ‘Select a File to Upload’ to choose a file from your system.

  3. The system will parse the supplied file and validate the classifications and resources included therein. A preview of the found elements will be rendered when ready.

  4. To confirm the import, click ‘Import Found Configurations’.

  5. The imported configurations are now ready to use.

Classification Resource Management

When defining classification resources within the Metrix Asset Management System, users are provided with a means of assigning that new resource to specific asset and/or component classifications. This is very useful for when you are building a particular resource, say an intervention treatment, for one (1) target classification. However, from time to time it may be necessary to manage resource assignments in bulk for a given classification. This guide will instruct you on how to do this in the system.

To begin assigning classification resources from within a classification definition in Metrix, complete the following steps:

  1. Navigate to the desired classification, or the component group within the asset classification, using the ‘Classifications’ page. (Assets Menu > Classifications > Selected Classification > (Selected Component Group)).

  2. Click on ‘Edit Configuration’ to enter allow editing the classification definition.

  3. For asset classification level resources, the following resources can be linked via the configuration screen:

    • Attribute Form: select the desired form definition from the drop down list.

    • Task Types: click on ‘Manage Task Type Link(s)’ and choose the desired task type definitions from the dialog box. When complete, click done.

  4. For component classification level resources, the following resources can be linked via the configuration screen:

    • Component Flags: simply check or uncheck the desired component flags.

    • Attribute Form: select the desired form definition from the drop down list.

      Info

      If any smart attributes or cost unit formulas are linked to the component classification, this option will be disabled.

    • Smart Attributes: see Smart Attributes for details

    • Cost Unit Formula: see Cost Unit Formulas for details

    • Intervention Treatments: click on ‘Manage Treatment Link(s)’ and choose the desired treatment definitions the dialog box. When complete, click done.

    • Condition Functions: select the desired condition function from the drop down list.

    • Task Types: click on ‘Manage Task Type Link(s)’ and choose the desired task type definitions from the dialog box. When complete, click done.

  5. When complete, click ‘Save Config Changes’.