How To Guides
This section provides user guides on some of the basic elements of the Metrix Asset Management system including:
This section provides user guides on some of the basic elements of the Metrix Asset Management system including:
This guide provides an overview on how to make asset component selections from a map view withing the Metrix Asset Management system, including:
When you wish to get information about an asset and/or component in your current map view, simply click on the spatial feature.
On the right-hand side of the window, an info panel will appear. If the area you clicked on
contains more than one (1) valid asset component, you will be presented with the option to
refine your selection down to the target component you want information about.
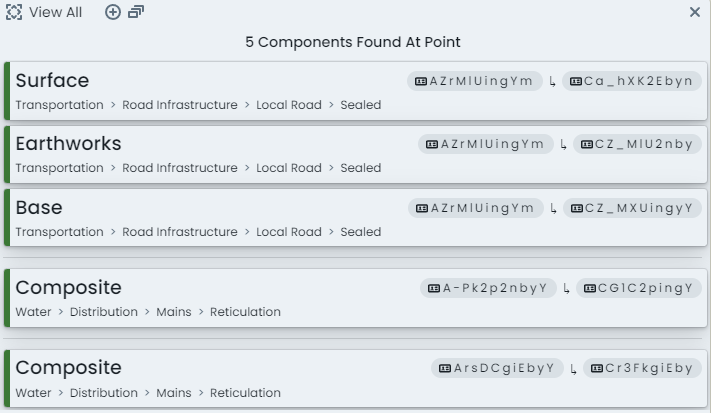
As seen above, each asset (falling in the range of your click location) will be grouped and the sub-components displayed for your choice. Click on the asset/component you wish to view.
The component info panel will then render for your chosen component.
If the location of your mouse click only intersected one (1) component, you will be taken straight to this panel.
When viewing information about a selected component, you can switch to another component on the same asset using the ‘Components’ switcher on the left-hand side of the info panel.
Each available component group (on the asset classification configuration) will be rendered in this
side panel. If the asset has one or more component entries against a particular component group,
a component ID and status tag will be shown. Otherwise, it will state, ‘None’.
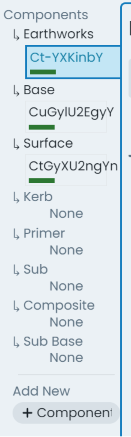
To view the information about one of the listed components in this list, simply click on that entry in this panel.
The ‘Parent Asset’ tab contains asset level information and is therefore identical no matter what component within the asset you are viewing.
This document provides an overview on how to filter your asset portfolio using the built-in custom filter tools, including:
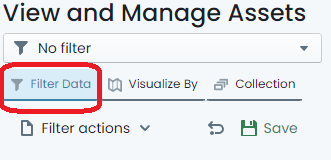
To get started using custom filters, navigate to the main ‘Assets’ map in the Metrix Asset Management system.
On the left hand side of the page, make sure the ‘Filter Data’ tab is activated.
Here, you will see a number of categories that can be used to filter the visible asset components in the map view.
Note: If there is a current filter applied, clear it by following these steps.
Choose any category to begin your filter by clicking on the ‘filter pod’ for that category. For example: Click on ‘Condition’.
A menu fly-out will appear where you can then further define how you wish to apply the filter using the chosen category. These will typically be represented by checkboxes for restrictions to apply to your portfolio. For example: For condition, you may tick ‘Excellent’. This would restrict the visible asset portfolio to components with a Condition value of ‘Excellent’.
Filter conditions can be chained together. Click on another ‘filter pod’ and set some additional restrictions. For example: Click on ‘Residual Life Years’. The fly-out requests that you input two (2) values:
a. The operator (<, >, =), and
b. The value relative to the operator.
Inputting > 6 would restrict the visible components to those with more than 6 years of residual life remaining.
To remove a specific filter definition, simply uncheck the restriction within that category. For value based filter settings, there is a ‘Reset’ option within the menu fly-out.
To clear an active filter, simply click the ‘return’ icon at the top of the filter panel. This will remove all of your configured filter settings.
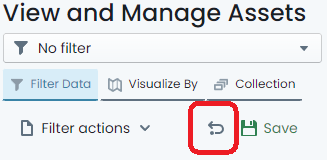
Note: This does not affect the settings of ‘Saved’ filters, but will clear the filter from being active.
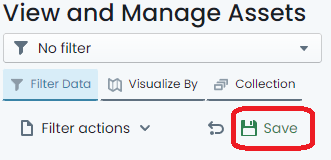
The system supports the saving and sharing of filters. To do so, define your filter following the steps above.
Once you have finished configuring the filter properties, simply click on the ‘Save’ option at the top of the filter panel.
A fly-out menu will appear prompting you for a name for the new filter. Input a name for the filter (this is how you will find it later).
To opt to allow other system users to see the filter you have defined, toggle the ‘Shared’ control. By default, filters are private and NOT shared.
When you are done, click ‘Save’. The filter is now saved under that name. If you shared the filter, other users will see it in the ‘Filter Drop-Down’ at the top of the panel.
To use a predefined filter that you have saved, or another user has saved and shared, simply expand the drop-down menu at the top of the filter panel.
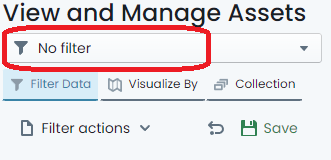
Here you will find a list of filters that can be applied. If you already have a saved filter applied, it will be highlighted in this menu.
To stop using the filter, either clear it, or select ‘No Filter’ from the ‘Filter Drop-Down’.
The ‘Filter Drop-Down’ menu also contains a section for filters that were defined using a collection set. These can be accessed from the ‘Collection’ tab of the menu. More information on saving collection sets as filters can be found here.
At any time, the user who created a custom filter, can delete that custom filter definition. This includes shared filters.
To delete a saved filter, click on the ‘Settings’ cog in the ‘Filter Drop-Down’ menu.
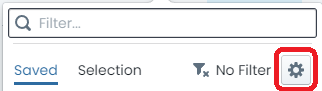
A dialog detailing each saved filter available to the user will then be displayed. Next to each of the filters in the table, is a button to ‘Delete’ the filter from the system. Click this button to delete the filter.
If the ‘Delete’ button is not visible, or deactivated, it means that you do not own the filter.
The ‘Filter’ panel also contains short-cuts to a few reports that can be generated using the current filter definition as a filter.
To use these action short-cuts, simply click on the ‘Filter actions’ menu at the top of the filter panel.
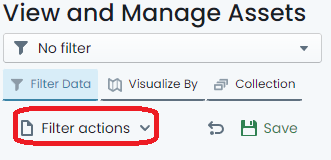
From the menu, choose which report you would like to generate.
The filter does NOT have to be saved in order to generate a report in this fashion.
This document provides an overview on how to use the built-in custom map themes in the Metrix Asset Management system.
The Metrix Asset Management system controls spatial features at a component level. When viewing some map themes, there may be overlapping shapes caused by stacked geometries of multiple asset components. This can cause obscuration and/or blending of the rendered colours.
In these cases, it is advisable to filter your data to a specific component group.
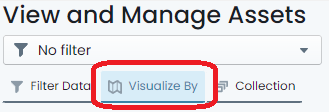
To get started, navigate to the main ‘Assets’ map in the Metrix Asset Management system.
On the left hand side of the page, make sure the ‘Visualise By’ tab is activated.
 .
.
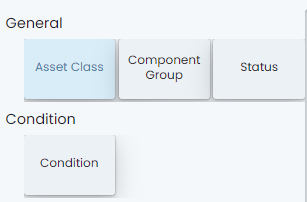
Initially, you will see a map legend for the currently applied map theme. By default, this is set to colour switch on ‘Asset Class’. To change the map theme to a different pre-configured visualisation, simply click ‘Switch Map Theme’ at the top of the panel.
This will now display all of the available built-in map themes in a range of contextual categories.
 .
.
To apply a specific visualisation, simply click on the tile in this view.
The theme will apply, and you will be returned to the ‘Legend View’ as it pertains to your chosen theme.
Repeat this process to go to another theme.
Remember, the default map theme is called ‘Asset Class’. Choosing this theme will essentially reset your visualisations to system standard.
This document provides an overview on how to use the Component Change History Viewing tool in the Metrix Asset Management system.
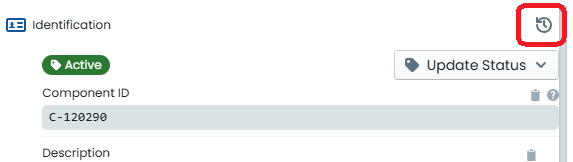
To get started, navigate to the main ‘Assets’ map in the Metrix Asset Management system and select an asset record to bring up it’s Info Panel.
Ensure you have either the ‘Info’ or ‘Intervention’ panel tab open, and look for the ‘History’ icon
along the right-hand side edge of the panel. A ‘History’ icon is available at the top of each ‘section’
of Info Panel content.
 .
.
A slide-out drawer will appear, initially with the Component’s current information listed. Only sections where history is tracked, are shown.
At the bottom of the slide-out drawer, you will see some navigation buttons. These allow you to move
backwards and forwards through the change history of the active component. Additionally, around these navigation
buttons, you will see the date and time of the change, as well as the name of user who made the change.
 .
.
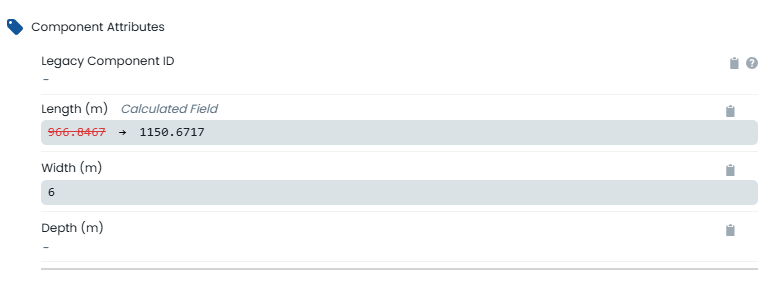
Any differences that exist between the record version you are CURRENTLY VIEWING and the LIVE VERSION of the
component record will be highlighted in red. In the example below, the current (live) value of the component’s
length is 966.8467, whereas the historic value of this field value is 1150.6717.
 .
.
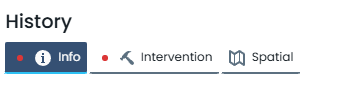
Additional indicators exist on each tab to guide users towards areas where changes exist on the current component
version. These indicators are shown as a red dot next to the tab label. In the example below, the ‘Info’ and
the ‘Intervention’ tabs contain changes, whereas the ‘Spatial’ tab does not.
 .
.
This document provides an overview on how to use the collection set concept in the Metrix Asset Management system, including:
To get started, navigate to the main ‘Assets’ map in the Metrix Asset Management system.
On the left hand side of the page, make sure the ‘Collection’ tab is activated.

To start building your collection set, click the ‘Add with select tool’ option at the top of the panel. This will place you in ‘Selection’ mode where any clicked assets in the map view will add those asset components to your collection set.
The selection tool will add ALL components from a clicked asset. It does, however, respect any applied custom filters that may be excluding some component types. That is, if you filter out road base and road earthworks (leaving just surface), and click on a road segment, only the surface will be added to your collection. Without a filter, all three (3) component groups will be added.
Once you have added some asset components to your collection, the ‘Remove with select tool’ option
will activate as an optional mode. Using this mode will mean that every asset clicked on will
REMOVE its components from your collection set (if they were a part of it).
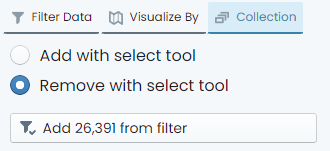
Also, you have the option of simply adding ALL components from your current custom filter definition to your collection set. That is, if you have a filter that results in 15 components, then those 15 components would be added to your collection set.
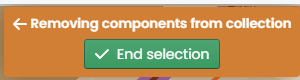
Once you have finished defining your collection set, click the ‘End selection’ option which will be
hovering at the top of the map window.
Once you have a defined collection set, you can then perform actions on it including bulk data updates and generating reports.
To generate a report from the current collection set, simply click ‘Generate Report’ from the ‘Collection Panel’ and choose the report you would like to create. The results of the report will be filtered down to your current collection set.
Other available collection actions are subject to their own instructions.
Once you have finished building the collection, simply click on the ‘Save as filter’ option in the ‘Collection Panel’.
A fly-out menu will appear prompting you for a name for the new filter. Input a name for the filter (this is how you will find it later).
To opt to allow other system users to see the filter you have defined, toggle the ‘Shared’ control. By default, filters are private and NOT shared.
When you are done, click ‘Save’. The filter is now saved under that name. If you shared the filter, other users will see it in the ‘Filter Drop-Down’ at the top of the panel.
Filters created from Collections will be listed under the ‘Collection’ tab of the ‘Filter Drop-Down’ list.