How To
This section provides guidance on creating new assets or asset component records within the Metrix Asset Management system, including:
This section provides guidance on creating new assets or asset component records within the Metrix Asset Management system, including:
Creating a new asset record in the Metrix Asset Management system is a simple process that involves choosing an asset classification, defining a spatial feature, and then populating the asset and component data fields.
To create a new asset record:
Navigate to the main ‘Assets’ page.
Above the map window, is a button titled ‘Create Asset’. Click this button.

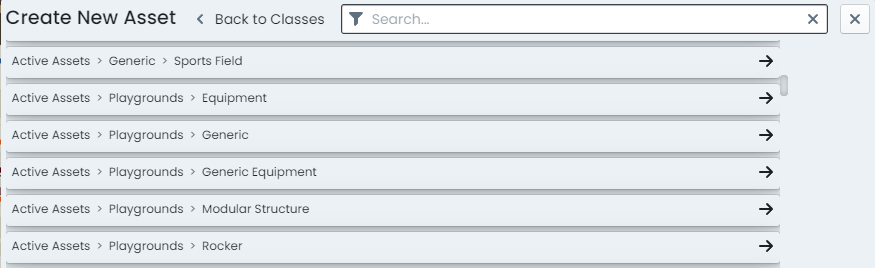
A fly-out ‘Create New Asset’ panel will show at the bottom of the map window. Firstly, it will render a list of available asset classes configured in your system.
The asset class is the ‘first level’ of the asset classification structure.
Choose an asset class for your new asset.
The panel will then render the the list of asset classifications relative to your chosen asset class.
Choose an asset classification for your new asset.
On the right-hand side of the panel, you will then be presented with options for creating the asset components. Firstly, confirm which component group(s) you wish to include as components for your new asset.
For each component group that remains checked, the system will generate one (1) component.
Next, choose the initial status from the status drop-down list. The default status is ‘Proposed’. Each of the components, defined in step 5, will be assigned this status.
Then set the effective date for the new asset components via the calendar input control. Each of the
components created, defined in step 5, will be generated as at this date.
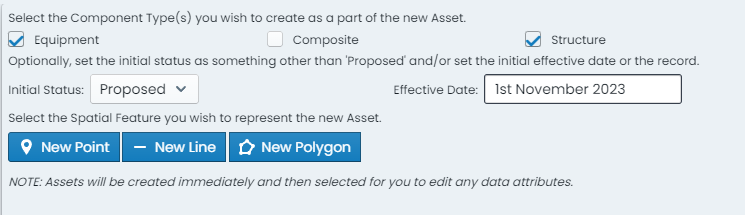
The last step involved in creating a new asset is to define the spatial feature that will be assigned to ALL of the asset components, defined in step 5. Click on either
To finish digitising lines and polygons, simply double-click the map.
When you have finished digitising the spatial feature, click ‘Finish & Create’ at the bottom of the panel. Assets will be created immediately upon clicking ‘Finish & Create’. They do NOT go via the staged changes process.
The asset, once created, will then be selected and ready for you to update the attributes, intervention details, and condition as necessary.
Creating a new component record against an existing asset in the Metrix Asset Management system is a simple process that involves selecting the parent asset, choosing the target component group, confirming or defining a spatial feature, and then populating your new component data fields.
To create a new component record against an existing asset:
Navigate to the main ‘Assets’ page and make a selection from the map screen.
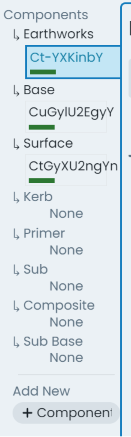
On the left-hand side of the info panel (right side of the page) the ‘Components’ switcher lists each
component group (from the asset classification configuration) available to the asset. At the bottom of
this listing, there is a button labelled ‘Add New’ and titled ‘Component’. Click this button.
A fly-out ‘Create New Component’ panel will show at the bottom of the map window rendering your component creation options. Firstly, confirm which component group(s) you wish to generate and append to the parent asset.
For each component group that remains checked, the system will generate one (1) component.
Next, choose the initial status from the status drop-down list. The default status is ‘Proposed’. Each of the components, defined in step 3, will be assigned this status.
Then set the effective date for the new components via the calendar input control. Each of the
components created, defined in step 3, will be generated as at this date.
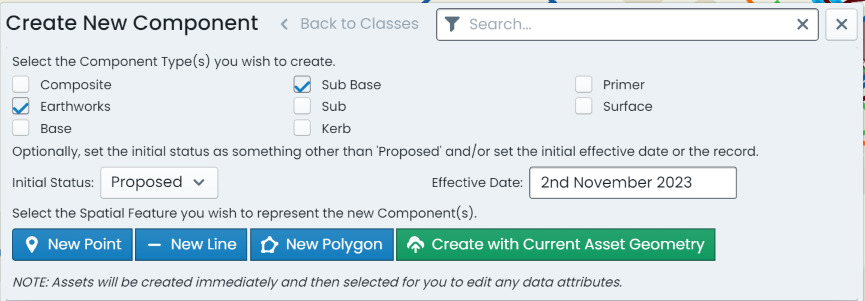
The last step involved in appending components for an asset is to define the spatial feature that will be assigned to the new components, defined in step 5. Click on either
If defining a new spatial feature, digitise the geometry as per these instructions for points ↗ or these instructions for lines/polygons ↗.
To finish digitising lines and polygons, simply double-click the map.
When you have finished generating or confirmting the spatial feature, click ‘Finish & Create’ at the bottom of the panel. To finish, click ‘Finish & Create’.
If you choose to inhertit the spatial feature from an existing component on the parent asset, one of two workflows will occur:
If the components of the parent asset rely on a single spatial feature, the fourth button option will be labelled ‘Create with Current Asset Geometry’. Clicking this option will complete the process and your new components will be appended to the parent asset and share the one spatial feature.
If the components of the parent asset rely on multiple spatial features, the fourth button option will be labelled ‘Choose from Current Asset Geometries’. Clicking this option will present another panel requiring you to choose which spatial feature to inherit.
As you hover on each option row (representing a distinct spatial feature), the corresponding feature will be highlighted
in the map window.
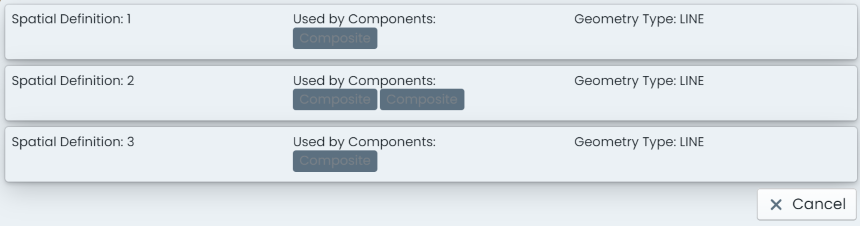
Click a spatial feature row to choose your geometry. Then click ‘Create Component’.
Components will be created immediately - they do NOT go via the staged changes process.
The components, once created, will then be selected and ready for you to update the attributes, intervention details, and condition as necessary.