Site Management

This section covers areas of the Metrix Asset Management System that would be managed by a system administrator. The settings discussed will control how your system behaves and operates. The following topics are covered:

  • Users, Roles & Permissions

  • Custom Search Data

  • Timezone & Map Projection
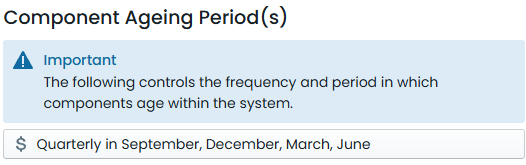
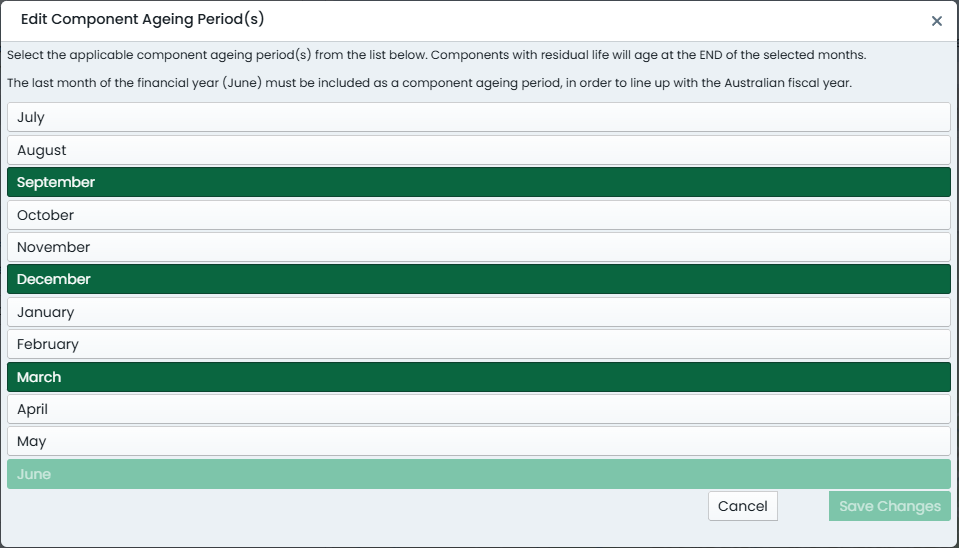
  • Ageing Periods

Subsections of Site Management

User Management

This section provides administrators with the information needed to setup and manage users and user permissions within the Metrix Asset Management system. Throughout this section, information as well as how to guides are provided for the following topics:

  • Creating new users within the Metrix system

  • Managing permissions for users

  • Disabling user account access.

Subsections of User Management

About

This section provides background information around users and user management within the Metrix Asset Management system.

Subsections of About

Users

The User Account and Access Control implementation within the Metrix Asset Management system is underpinned by an industry leading cloud-based solution for authentication and authorisation; ensuring the security of your asset data. Each and every user account within your environment can be entirely managed by your own system administrators via the restricted-access system administrations portal in the Metrix Asset Management system. Through this portal, system administrators can:

  • Create new user accounts,
  • Add or Remove role-based permissions for users, and
  • Disable access for user accounts.

The user account creation process is provided as a fully self-service management system for system administrators to extend the accessibility of their environment. When creating a new account, a secure short-lived password will be emailed to the new user along with an invite to complete their account setup. At that point, the user will be prompted to initialise their own password - which is required to meet various constraints, including:

  • Minimum length of 8 characters
  • No spaces
  • At least one uppercase letter
  • At least one lowercase letter
  • t least one number
  • At least one special characters (excluding + and -)

Permissions

User permissions are managed through various pre-configured roles designed to function at a user activity level. Within each role, representing an end user activity, users can be given simple read, write, and/or delete permissions. Examples of such activity roles include:

  • Managing asset/component information,
  • Configuring classifications,
  • System configuration,
  • and more.

Disabled Accounts

Through the user management portal within the Metrix Asset Management system, administrators are able to disable system access completely for any user account. This action will leave the user profile setup within the environment, but prevent that account from logging into Metrix from anywhere.

Administrators, in addition to disabling access, can also re-enable account access via the same portal.

How To Guides

This section contains how to guides for managing users and user access within the Metrix Asset Management system.

Subsections of How To Guides

Creating New Users

This section covers the necessary steps involved in creating a new user account within the Metrix Asset Management System.

Info

If you do not a profile menu item titled ‘System Admin’, and you are a System Administrator, please contact the Metrix Support team for assistance.

To create a new user within the Metrix Asset Management system, navigate to the System Admin menu from the profile menu, and then follow the steps below:

  1. Select the ‘Users’ sections from the left-hand side navigation pane within the System Admin page.

  2. The list of current user accounts will be displayed. At the top of the list, beneath the page header, click ‘New User’.

  3. The page will then display a portal to setup the new account details. Firstly, enter the new users name in the ‘Display Name’ text input box.

  4. Next, enter the users email address. This is where the temporary password will be emailed upon completion.

  5. Lastly, choose the user’s default permission roles from the list of displayed checkboxes. As a minimum, at least ‘Asset Reader’ or ‘Mobile User’ should be chosen. See the

  6. To complete the account creation, click ‘Create User’ at the bottom of the portal.

Managing Permissions

This section covers the necessary steps involved in managing user permissions within the Metrix Asset Management System.

Info

If you do not a profile menu item titled ‘System Admin’, and you are a System Administrator, please contact the Metrix Support team for assistance.

To manage existing user permissions within the Metrix Asset Management system, navigate to the System Admin menu from the profile menu, and then follow the steps below:

  1. Select the ‘Users’ sections from the left-hand side navigation pane within the System Admin page.

  2. The list of current user accounts will be displayed alphabetically. Locate the user you wish to modify and click that row.

  3. The details of the selected user will be presented. At the bottom of the page, a list of permission roles are rendered with checkbox controls. To add a role, check the adjacent checkbox. To remove a role, uncheck the adjacent checkbox.

  4. To commit your changes to the system, click ‘Save’ at the top of the page.

Disabling/Enabling Accounts

This section covers the necessary steps involved in disabling and enabling user accounts within the Metrix Asset Management System.

Info

If you do not a profile menu item titled ‘System Admin’, and you are a System Administrator, please contact the Metrix Support team for assistance.

To enable or disable existing users within the Metrix Asset Management system, navigate to the System Admin menu from the profile menu, and then follow the steps below:

  1. Select the ‘Users’ sections from the left-hand side navigation pane within the System Admin page.

  2. The list of current user accounts will be displayed alphabetically. Locate the user you wish to modify and click that row.

  3. The details of the selected user will be presented. Within the top section of the page, a checkbox is rendered that allows you to disable or enable the user account. Toggle this checkbox accordingly.

  4. To commit your changes to the system, click ‘Save’ at the top of the page.

Custom Search Data

This section contains details about loading your own Custom Search Data into the Metrix Asset Management system. Throughout this section is background and how to guides on working with your custom search data including:

  • Generating spatialised search indexes, and
  • Updating search indexes.

Subsections of Custom Search Data

About

This section provides background information around managing custom search data within the Metrix Asset Management system.

How To Guides

This section provides how to guides around custom search data management within the Metrix Asset Management system.

Timezones & Map Projections

This section provides information about how your Timezone is considered within in the Metrix Asset Management system. Further to this, this section covers the implications of Mapping Projections on your spatial Asset information. As these settings do not change, the documentation is provided for information purposes, rather than how to guides.

Subsections of Timezones & Map Projections

About

This section provides information about timezones and map projections within the Metrix Asset Management system.

Financial Years

This section provides information about how the Financial Year is considered within in the Metrix Asset Management system. Further to this, this section covers the implications of setting and rolling-over the financial year.

Subsections of Financial Years

About

This section provides information about financial year management within the Metrix Asset Management system.

Subsections of About

Financial Years

The management of Financial Years within the Metrix Asset Management System is a feature available to system administrators. The two core concepts to discuss when it comes to the management of your system’s current financial year:

A financial year runs for a year from July to June.

The current financial year is defined as the period following the most recently locked financial year. If there is no locked year, the current financial year is calculated from the period of the first entry into the Financial Transactions Ledger.

Locking a Financial Year

Locking a Financial Year protects the Financial Transactions Ledger from being altered in any way that would result in the system being unable to reflect reported financial figures from a point in time. This is typically done following the generation of periodic (usually annual) financial statements, and the subsequent successful audit of said statements.

When a system administrator performs a lock on a financial year, the following outcomes are triggered:

  • All transactions that occurred within, or prior to the locked financial year are no longer editable. That is, they cannot be deleted or altered in any way.
  • This also has the effect of preventing any Components with transactions within a locked financial year from being deleted from the system.
  • No transactions can be posted to the locked financial year or to a date in time prior to the locked financial year.
  • The minimum date value for certain date calendar picker controls will be restricted to dates greater than the locked financial year.
Info

Locking a financial year does NOT affect the remaining useful life of components within the system. All of these values are individually calculated according to the components respective intervention date, useful life, current date, and any stored remaining life offsets.

Reverting to a previously locked Financial Year

When a system administrator reverts their system to a previously locked financial year, they would typically do so for the following reasons:

  • The financial year was locked in error, or
  • Using a Metrix environment in production whilst backlog data is still being migrated to a previous financial year.

The impacts of reverting to a previously locked financial year is simply that the system will then begin to behave as if it was indeed in the (now) unlocked financial year. No impact is caused to any entries within the Financial Transactions Ledger.

How To Guides

This section provides how to guides around locking and unlocking financial years within the Metrix Asset Management system.

Subsections of How To Guides

Locking a Financial Year

Beta Content

The instructions within this current document pertain to features that are flagged as BETA content. As such, the process involved in completing these actions are subject to change. This document will be updated when such an event occurs.

To process the locking of a financial year, follow these steps:

  1. Navigate to the Capital Financial Year page (Capital > EOY Processing).

  2. A financial summary of your asset portfolio is presented, along with a number of steps that are generally performed throughout a financial year.

  3. Ensure you are satisfied with the completion or otherwise of each these steps by clicking on the bubbles denoting each sequence.

  4. To perform a rollover and lock the current financial year, navigate to step 4 - Rollover.

  5. Click ‘Rollover & Lock the X Financial Year’ (X will be replaced with the current financial year label).

  6. To confirm this action, you will be prompted to type the current financial year into a text box, and then click ‘Rollover’.

  7. The financial year has now been locked, and the system has progressed to the next financial year.

Unlocking a Financial Year

To process the reverting / unlocking of a financial year, follow these steps:

  1. Navigate to the Capital Settings page (Capital > Capital Settings).

  2. This page displays the current financial year, as well as the most recently locked financial year (if any).

    Info

    The current financial year is defined as the period following the most recently locked financial year. If there is no locked year, the current financial year is calculated from the period of the first entry into the Financial Transactions Ledger.

  3. To revert or unlock a previously locked financial year, simply click on the button labelled ‘Unlock for Finance Posting’ adjacent to the ‘Latest Lock Year’ label.

  4. Confirm you decision in the popup dialog.

  5. The financial year has now been reverted to the previously locked year.

Ageing Periods

This section describes Component Ageing Events and how to manage them within the Metrix Asset Management system.

Subsections of Ageing Periods

About

This section describes Component Ageing Events.

Subsections of About

Ageing Periods

A Component Ageing Event date is a pre-ordained time of the fiscal year when an asset undergoes an ageing event - it gets older. By default, Metrix environments are configured for annual (once per year) ageing. - however, this can be adjusted to suit the needs of the organisation to frequencies such as quarterly, monthly, or the like.

When a Component is first built, or renewed, it will receive a ‘Construction Date` and/or an ‘Intervention Date’. The Component Ageing Event relevant to this date is:

  • the Initial Ageing Event. This is the date in which the Component will BEGIN ageing.

Throughout the Component’s life, two other Component Ageing Events are continuously relevant to the Component - the ‘Most Recent Ageing Event’ and the ‘Next Ageing Event’:

  • the Most Recent Ageing Event is the most recent date in which the Component underwent an ageing event (last got older), and
  • the Next Ageing Event is the next date in which the Component is scheduled to undergo an ageing event (next gets older).
Info

Modifying the Ageing Event Frequency will change how Components age in the system. For example, if the Ageing Event Frequency is changed to quarterly, the Component Ageing Event dates will fall every three (3) months. This means that ’next event’ date from 12 December, will be 31 December instead of 30 June the following year.

All of the above Component Ageing Event dates are listed in the ‘Intervention Summary’ section of the Component info panel.

Example

Consider the following Component details:

  • Construction Date: 1 May 2010
  • Useful Life: 15 years
  • Ageing Event Frequency: Annual

Assuming that the current date is 1 August 2017, the Ageing Event dates for this Component are:

  • Initial Ageing Event: 30 June 2010

    This is the first ageing event date following the construction date. The Component BEGINS ageing from this date.

  • Most Recent Ageing Event: 30 June 2017

    This is the most recent ageing event date since the current date of 1 July 2017. The Component aged one (1) more year at this date.

  • Next Ageing Event: 30 June 2018

    This is the next (upcoming) ageing event date from the current date of 1 July 2017. The Component will age one (1) more year at this date.

How To Guides

This section provides how to guides around setting Component Ageing Events within the Metrix Asset Management system.

Subsections of How To Guides

Managing Ageing Events

This section covers the necessary steps involved in managing Component Ageing Events within the Metrix Asset Management System.

Warning

Changing the Ageing Period(s) WILL have an effect on the reported Residual Life values for every Component in the system.

This is because a Component will NOT start ageing until it reaches it’s first ageing period. Additionally, the most recent ageing period is the last time that any Component could have aged. Moving these start/end points, has a direct impact on the amount of ageing that can occur for each and every Component in the system.

Proceed with Caution!

To manage ageing events within the Metrix Asset Management system, navigate to the System Admin menu from the profile menu, and then follow the steps below:

  1. Select the ‘Home’ section from the left-hand side navigation pane within the System Admin page.

  2. On this page, there is a section title ‘Component Ageing Period(s)’. In it, a button is titled with a brief description of the current ageing event configurations. Click this button to view the detailed ageing event configurations.

  3. A dialogue window will then appear, showing the months within a fiscal year, and indicating which months are currently selected as ageing periods. Months that are coloured green are selected.

  4. To add/remove months from the selected list, simply click the corresponding button.

  5. Once you have made the necessary changes, click ‘Save Changes’ to apply the changes.

  6. A confirmation window will appear, requiring you to confirm the changes. If you are sure you wish to proceed, tick the checkbox to confirm, and then click ‘Confirm Changes’ to finalise the changes.