How To Guides
This section contains how to guides with respect to condition function definitions in the Metrix Asset Management system.
This section contains how to guides with respect to condition function definitions in the Metrix Asset Management system.
This section covers the necessary steps involved in creating a new condition function within the Metrix Asset Management System. This extends to the initial creation of the function with scored & weighted questions, as well as additional information fields. In subsequent sections, details such as editing functions and assigning functions to component classifications is discussed.
As with most resources within Metrix, simply creating a condition function does NOT make it available for use. You still need to assign the condition function to the Classification(s) that should use it.
By DEFAULT, all component classifications are initialised to utilise the built- in condition function which essentially requires users to choose a value between 1 and 5 to reflect the component condition.
To create a new condition function within Metrix, complete the following steps:
Navigate to the ‘Condition functions’ management page (Assets Menu > Condition functions).
Click on ‘Create New Condition Function’ at the top of the page.

This will initialise and display a default condition function definition on the right-hand side of the page.
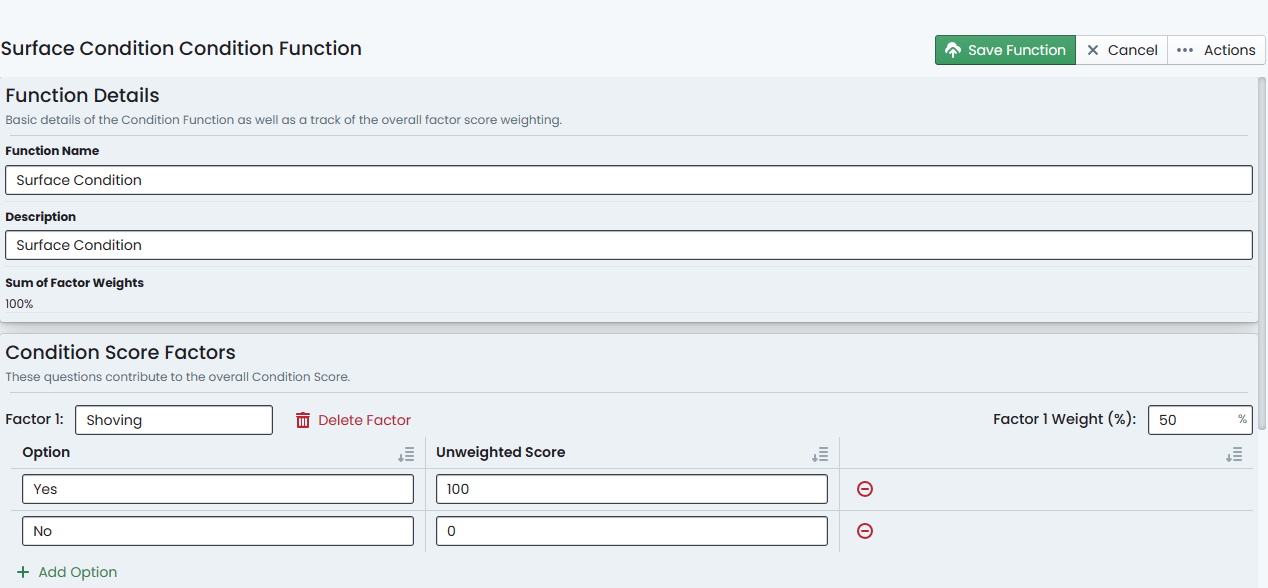
From here, you will first need to set the ‘Function Name’ and provide a short ‘Description’ for the new condition function. Simply type these values into the corresponding form fields.
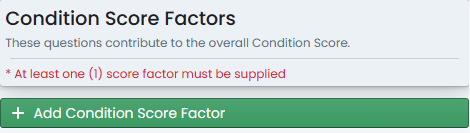
Next, you will define the condition score factors for the new condition function. This will form the set of questions asked of the user in order to derive a final condition score.
To initialise your first condition score factor, simply click on the ‘Add Condition Score Factor’ button.
Each condition score factor you define will require the following:
a. Enter a Factor Label - this is the question that will be asked of the end user.
b. Confirm a Factor Weight for the score.
c. For each answer Option, provide an Option Label and Score.
To perform the above steps, simply type these values into the corresponding form fields. In the screenshot below, the Factor Label has been set to ‘Question Label’, the Factor Weight has been set to 60%, the Option Label has been set to ‘First Option’ and the Option Score was set to 56.

To add more options to the condition score factor, simply click ‘Add Option’ and fill out the new Option Label and Option Score.
To add additional condition score factors, simply click on ‘Add Condition Score Factor’.
You can learn more about the structure and purpose of Condition Functions within these docs. See Initialising a Metrix account for further details.
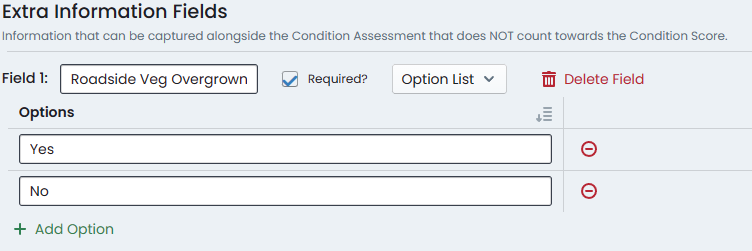
The Extra Information Fields allow you to create additional inputs for users to populate when completing condition assessments using the new condition function. An extra information field does not contribute to the overall condition score - rather, provides any required context you may wish to collect.
To add new extra information fields to your condition function, simply click ‘Add Extra Information Field’.

Each extra information field you define will require the following:
a. Enter a field label - this is the question that will be asked of the end user.
b. If applicable, mark the extra field as required by ticking the checkbox, ‘Required’.
c. Choose the response type as either ‘Text Value’ or ‘Option List’. See below for details on the two options:
This will present the user with a free text input field to respond to the extra information question.
This will require you to configure a list of valid answers to the extra information question.
When using ‘Option List’, the extra information question must be marked as required.
‘Option List’ options can be added and removed once ‘Option List’ has been chosen from the drop down.
Don’t forget that the total condition factor score weights must add up to 100%. Throughout the function definition, any errors will be highlighted for you to keep track of.
As your organisation’s Asset Maturity evolves over time, it may become necessary to alter your condition functions to reflect additional or revised data scopes. Typically, this involves adjusting some condition factor scores/weights, more or less condition factors, and/or adjusting extra field definitions. To edit an existing condition function, follow these steps:
Navigate to the desired Condition Function (Assets Menu > Condition Functions > Selected Function).
With the desired condition function selected, a preview of the definition will appear on the right-hand side of the page. This view will default to read-only. To begin editing the condition function, click the ‘Edit Function’ button.

Enter the required alterations to the selected condition function.
Once complete, simply click ‘Save Function’ to commit the changes.
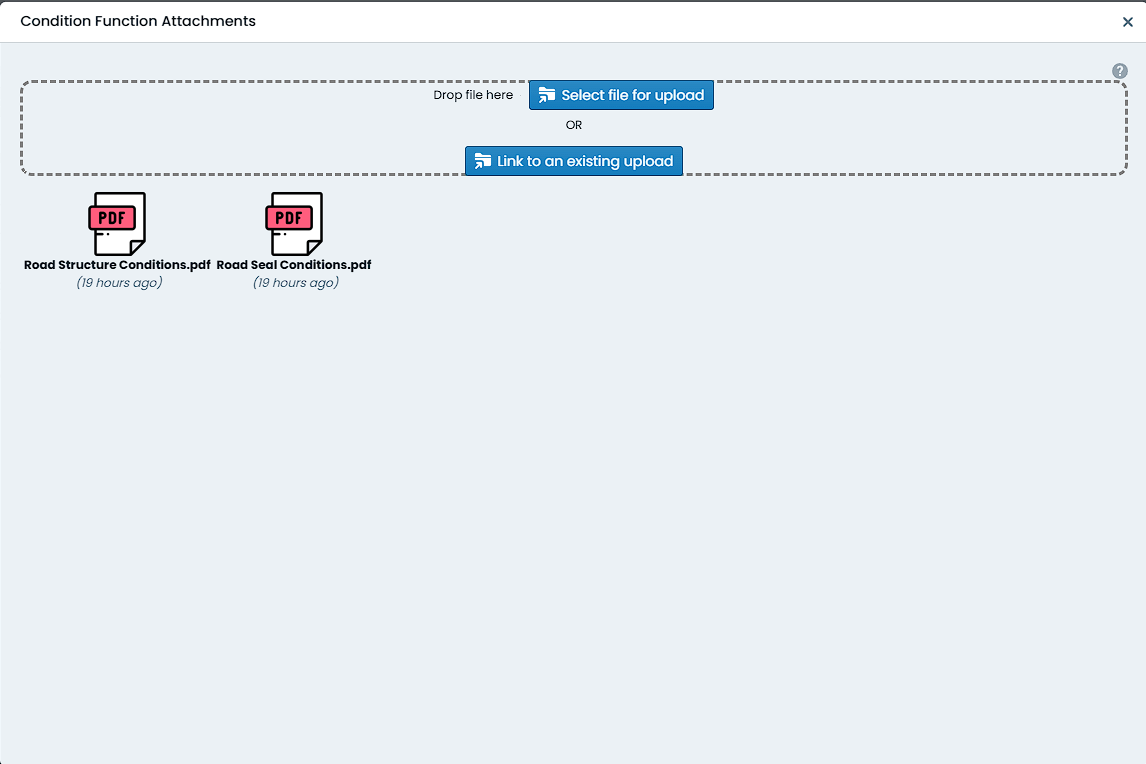
Condition Function attachments are used to provide additional context to a function definition. When mobile application users interface with the condition function, they can view the attachments and download them to their device for offline use. To add an attachment to a condition function, follow these steps:
Once a condition function has been constructed, you can assign it to a specific classification (or a set of classifications) in order to use that function in production when completing condition assessment inspections.
To begin assigning condition functions to a classification or set of classifications, navigate to that function within the Condition Function page (Assets Menu > Condition Functions> Selected Function).
With the desired function selected, a preview of the definition will appear on the right-hand side of the page.
At the top-right of this preview, is an ‘Actions’ menu that provides additional management options for the selected function. Click on the ‘Actions’ menu.
From the ‘Actions’ menu, choose ‘Manage Classification Links’.
A dialog box will appear with lists of available links that could be
made. It should be noted that only Component Classification links
are valid for Condition Functions.
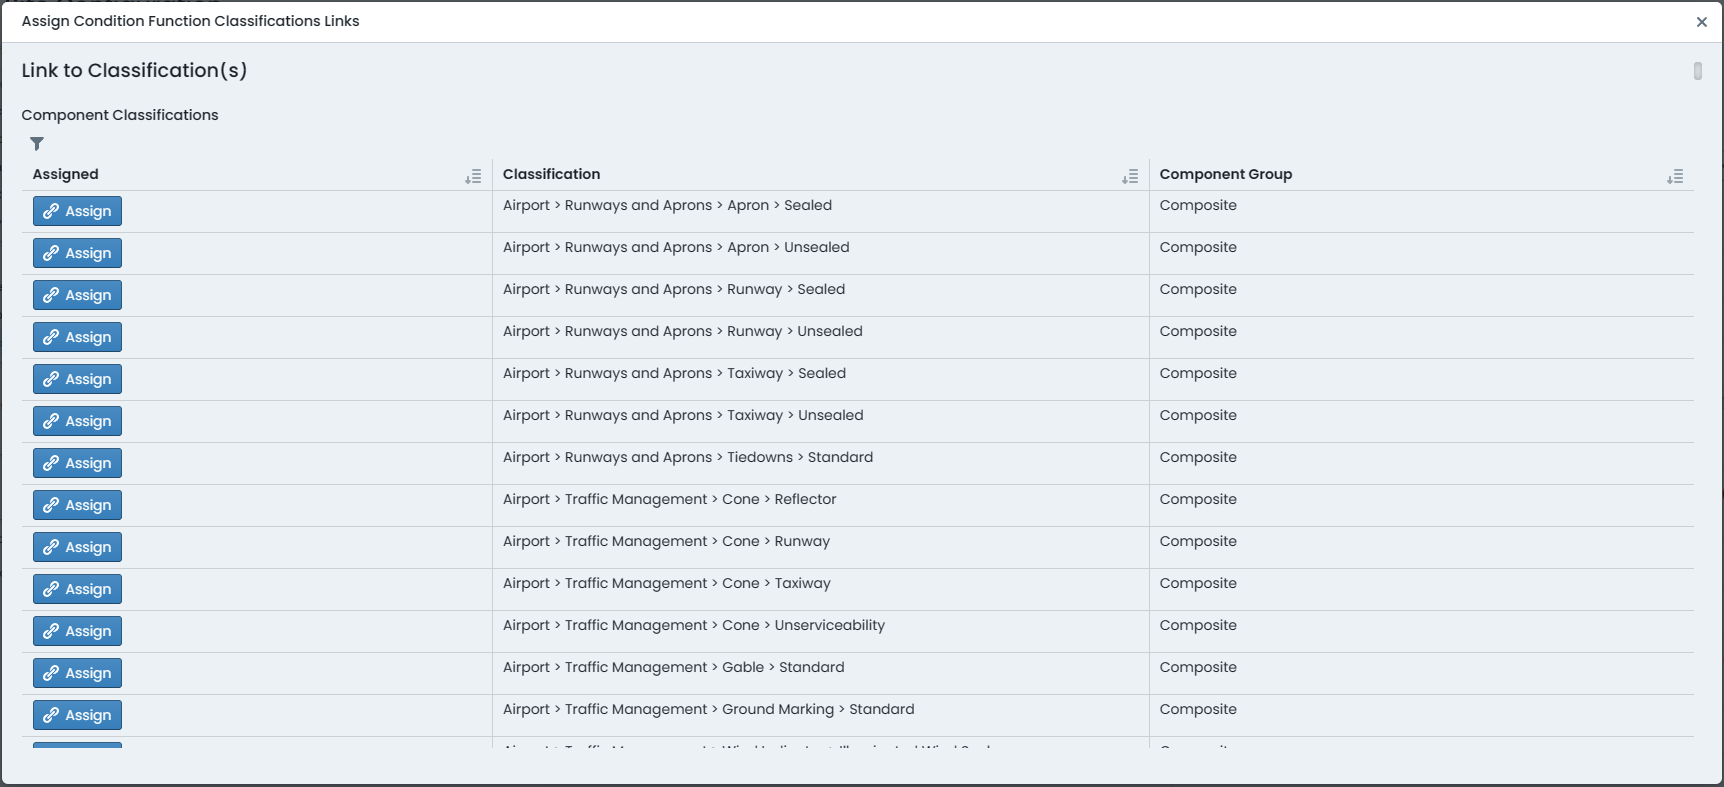
To assign a function to a classification, simply click ‘Assign’ next to that classification title.
To unassign a function from a classification, simply click ‘Unassign’ next to that classification title.
The system will manage the availability of the above buttons based on the form state in the system.
When there are a great number of Classification configurations to wade through, it can become difficult to find the one you are after. This is where the filter option comes in handy. To filter the classification list, simply click on the ‘Filter’ icon at the top of the classification list – the icon looks a little like a funnel.
To filter by a specific letter or set of letters, simply type them into the text input that will appear above the classification list.
To filter by classifications that already have the function assigned, mark the checkbox titled ‘Show Assigned Only’.
When a condition function is no longer required, the Metrix Asset Management system provides functionality for administrators to permanently remove it from the system.
Deleting condition functions cannot be undone. The following restrictions also apply when it comes to deleting condition functions:
To delete a condition function, follow these steps:
To begin deleting a condition function, navigate to that function (Assets Menu > Condition functions > Selected Condition function).
Underneath the condition function title, there is an ‘Actions’ button – this type of button is implemented system wide as an indicator of additional options to manage a resource.
From the ‘Actions’ menu, choose ‘Delete’. If the button is not enabled, this means that the function cannot be deleted (see warning notes, above).
In the subsequent dialog, confirm your decision by clicking ‘Delete’.
The condition function will now be permanently deleted from the system.