How To Guides
This section contains how-to-guides with respect to task type specifications in the Metrix Asset Management system.
This section contains how-to-guides with respect to task type specifications in the Metrix Asset Management system.
This section covers the necessary steps involved in creating a new task type definition within the Metrix Asset Management System. As the task types are backed by the form management system (see Form Management ), after a certain point the instructions will defer to the directions on creating/managing a form definition.
As with the custom attribute forms, simply creating a task type definition does NOT make it available for use. You still need to assign the task type to the Classification(s) that should use it.
To create a new task type definition within Metrix, complete the following steps:
Navigate to the ‘Task Types’ management page (Assets Menu > Task Types).
Click on ‘Create New Task Type’ at the top of the page
This will create and display a default task type definition with a single form field, ‘Comment’.
Replace the Task Type Name (‘New Form’) with a task name that relates to the new task, and then begin editing the task type form layout. For this, follow the steps outlined in Creating a new Form.
From time to time, it becomes necessary to edit the structure or contents of an existing task type specification. To do this, use the following steps as a guide:
Navigate to the task types manager page (Assets Menu > Task Types > Selected Task Type).
With the task type you wish to edit selected, simple click on the ‘Edit’ button at the top of the preview.
From here, the steps to alter the form contents are identical to creating a new form.
When you have finished the alterations, click on ‘Save Changes’. Alternatively, click ‘Cancel’ to revert to the original form.
Removing a field from a task type definition will NOT have any impact on any existing data stored against that field throughout your environment. It will just suppress that information from being displayed and stop future entry of values against it.
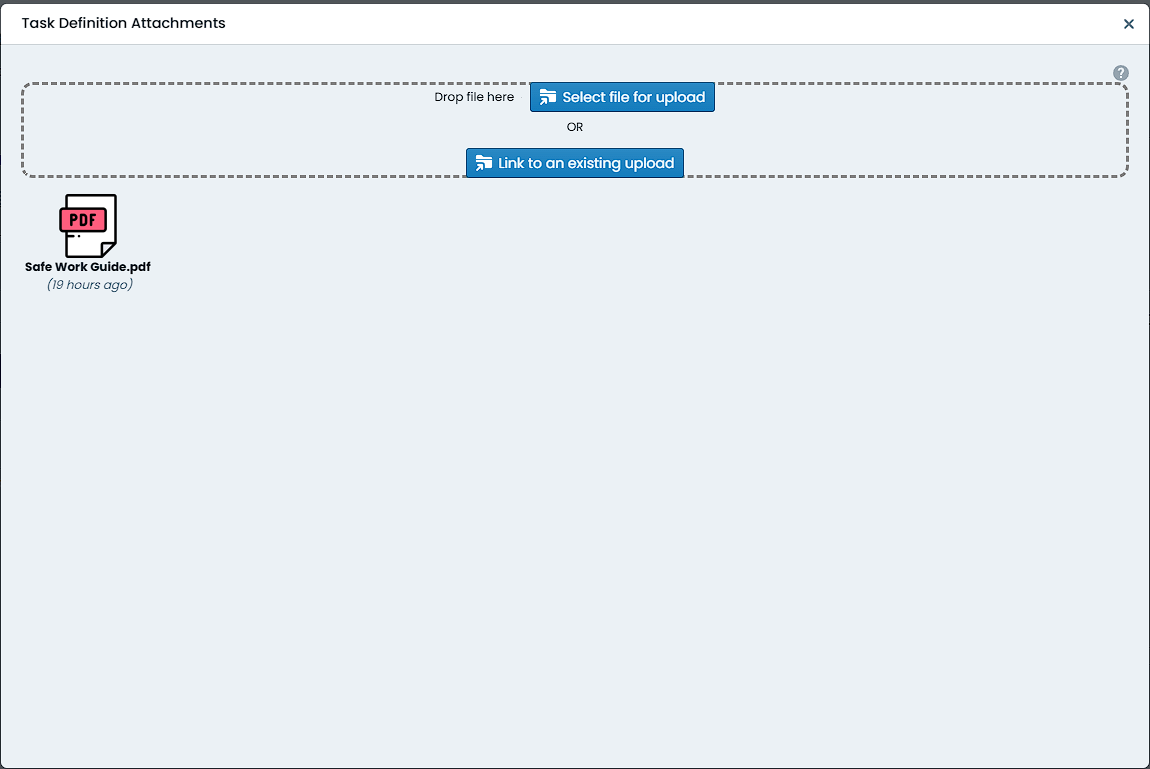
Task Type attachments are used to provide additional context to a task definition. When mobile application users interface with the task definition, they can view the attachments and download them to their device for offline use. To add an attachment to a task definition, follow these steps:
Once a task type has been constructed, you can assign it to a specific classification (or a set of classifications) to use in production.
To begin assigning a task type to a classification or set of classifications, navigate to that task type within the Task Type page (Assets Menu > Task Types > Selected Task Type).
Underneath the task type title, there is an ‘Actions’ button – this type of button is implemented system-wide as an indicator of additional options to manage a resource.
From the ‘Actions’ menu, choose ‘Manage Classification Links’.
A dialog box will appear with lists of available links that could be made. On the left-hand side, are Asset Classifications. On the right-hand side, are Component Classifications. These break down as follows:
Assigning a task type to an Asset Classification will make the task type available on the ‘Parent Asset’ tab of all child Components. That is, all Components of that Asset will share the task type.
Assigning a task type to a Component Classification will only make the task type available when users are editing that specific Component Type. Each Component within an Asset can have different task type links definitions (i.e. base vs seal forms).

To assign a task types to a classification, simply click ‘Assign’ next to that classification title.
To unassign a task type from a classification, simply click ‘Unassign’ next to that classification title.
The system will manage the availability of the above buttons based on the form state in the system.
When there are a great number of Classification configurations to wade through, it can become difficult to find the one you are after. This is where the filter option comes in handy. To filter the classification list, simply click on the ‘Filter’ icon at the top of the classification list – the icon looks a little like a funnel.
To filter by a specific letter or set of letters, simply type them into the text input that will appear above the classification list.
To filter by classifications that already have the task types assigned, mark the checkbox titled ‘Show Assigned Only’.
When a task type is no longer required, the Metrix Asset Management system provides functionality for administrators to permanently remove it from the system.
Deleting task type specifications cannot be undone. The following restrictions also apply when it comes to deleting task types:
To delete a task type definition, follow these steps:
To begin deleting a task type definition, navigate to that task type within the Task Type management page (Assets Menu > Task Types > Selected Task Type).
Underneath the task type title, there is an ‘Actions’ button – this type of button is implemented system-wide as an indicator of additional options to manage a resource.
From the ‘Actions’ menu, choose ‘Delete’. If the button is not enabled, this means that the task type cannot be deleted (see warning notes, above).
In the subsequent dialog, confirm your decision by clicking ‘Yes, delete’.
The task type definition will now be permanently deleted from the system.