How To Guides
This section contains how to guides with respect to form specifications in the Metrix Asset Management system.
This section contains how to guides with respect to form specifications in the Metrix Asset Management system.
This section covers the necessary steps involved in creating a new form definition within the Metrix Asset Management System.
With regards to Custom Attribute Forms, simply creating a form does NOT make it available for use. You still need to assign the form to the Classification(s) that should use the form.
To create a new form definition within Metrix, complete the following steps:
From the Form Manager page within the Metrix configuration section, click on ‘Create New Form’.
On the right-hand side, a new default form definition will appear. This layout is the same for all types of form designers within the Metrix Asset Management System. That is, form element management on the left, form structure in the middle, and a form preview on the right.
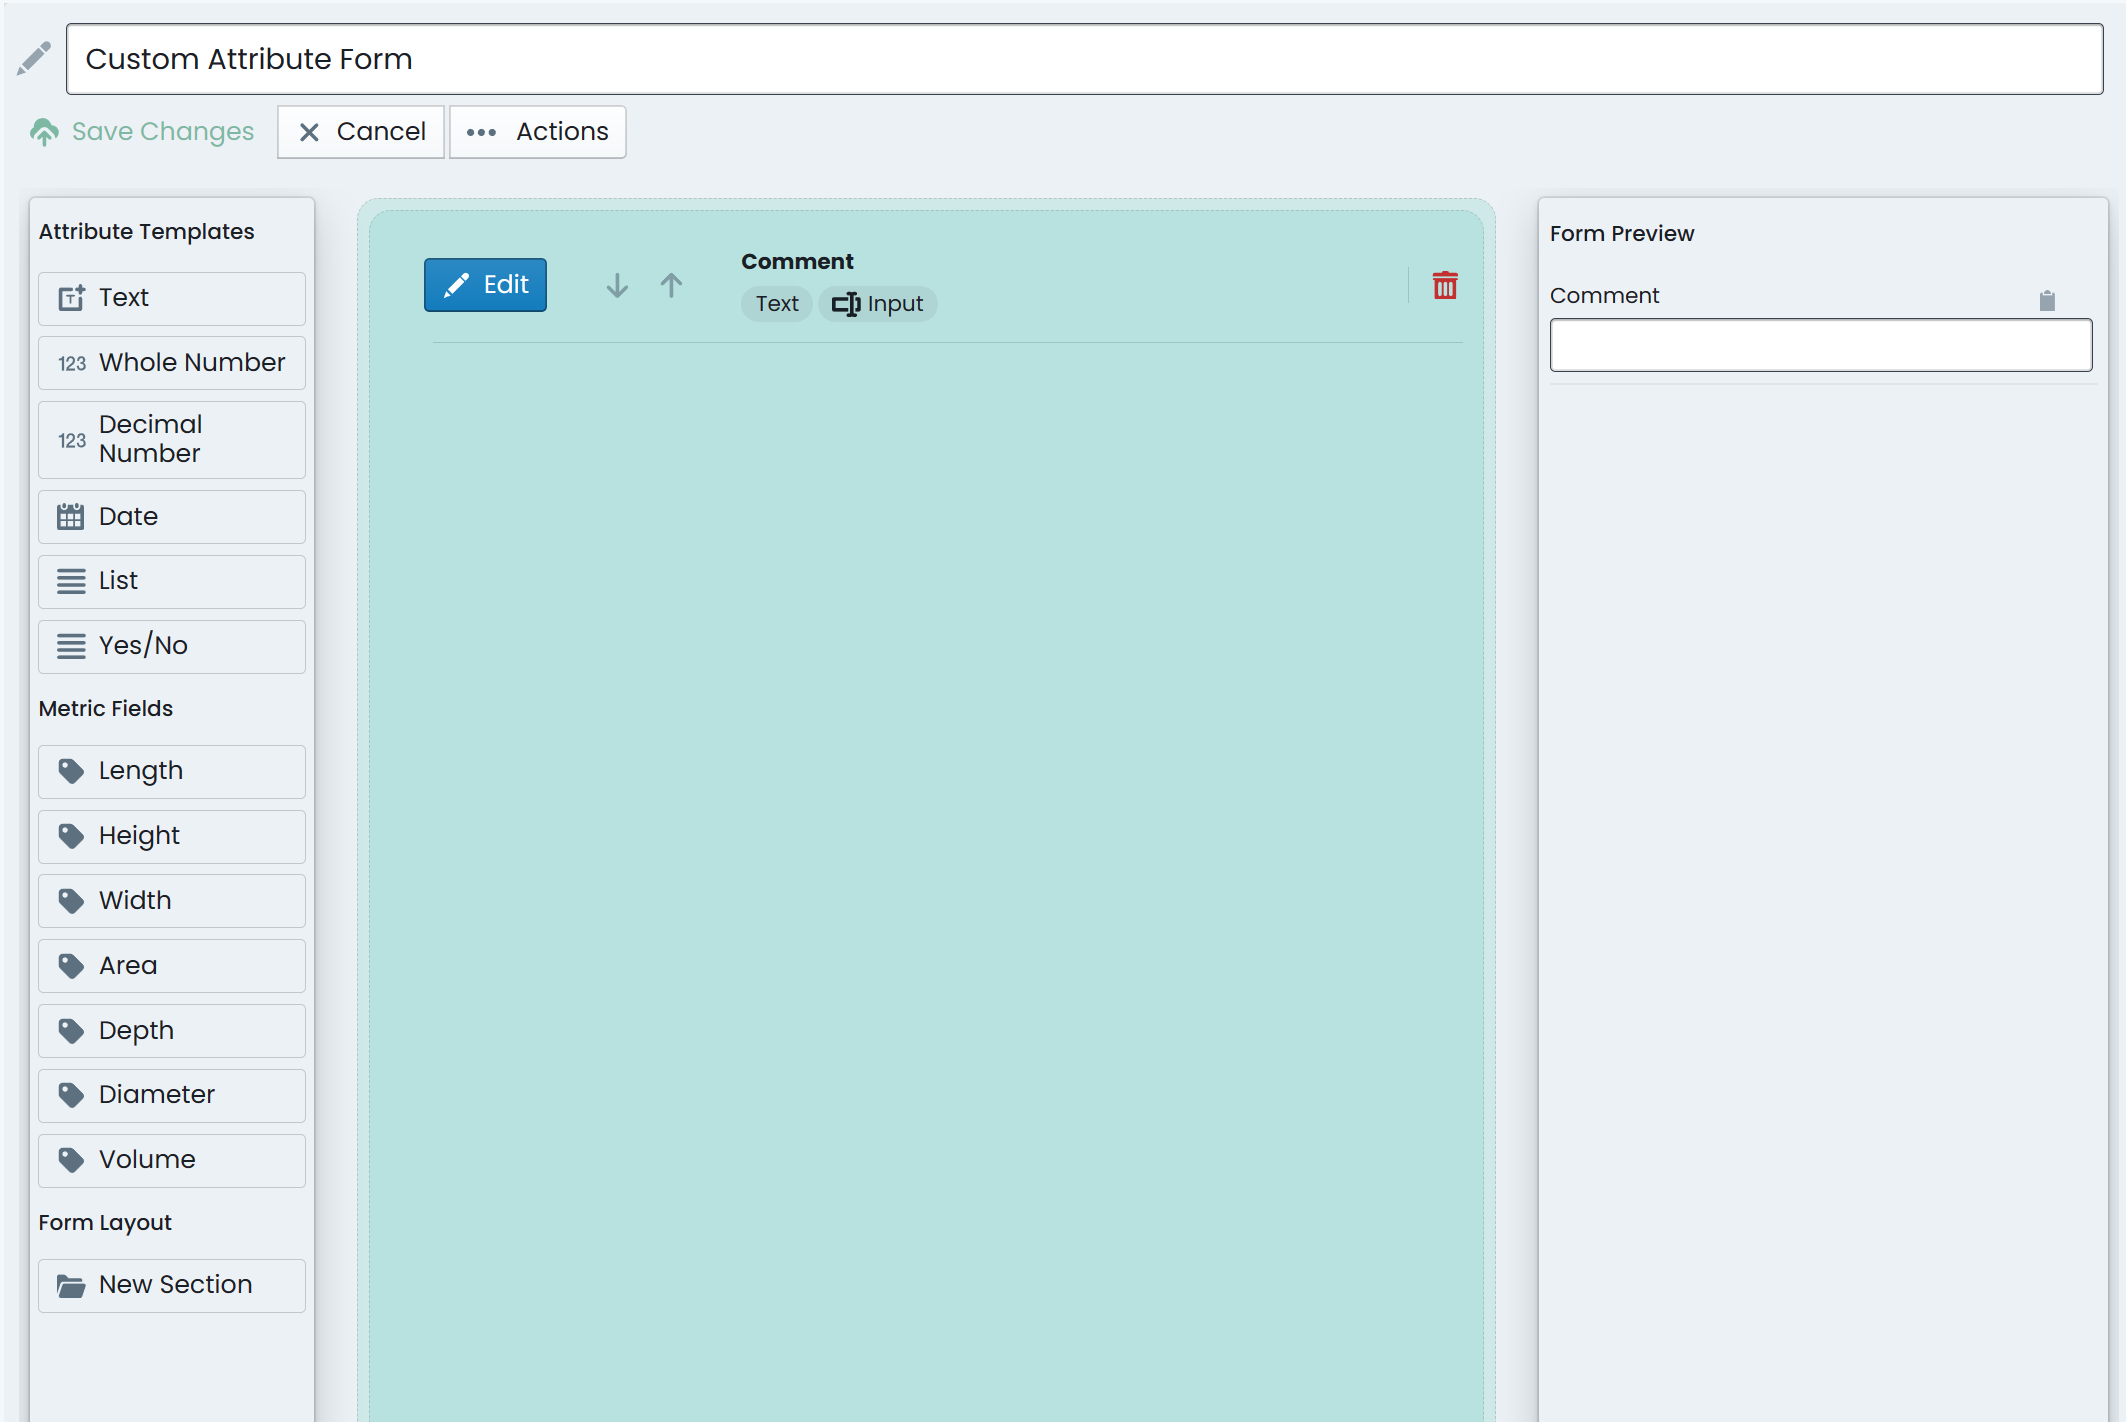
Firstly, in the text input at the top of the form designer, give you form a title – this value is defaulted to ‘New Form’. Simply overwrite that value with the title of your form.
Next, try adding a new field to the form definition. To do this, simply choose from the new attribute templates on the left-hand side of the form designer. Each of these templates offer a distinct set of default attribute field constraints, including:
a. Text: A free text input field with no restrictions
b. Whole Number: A numeric input field that restricts entries to whole numbers only.
c. Decimal Number: A numeric input field that allows entry of numbers to decimal precision.
d. Date: A calendar-based input field that allows users to pick date values.
e. List: An empty option row configuration. Once configured, users will need to choose from the list of options presented.
f. Yes/No: A preconfigured option row field. This is pre-populated with two options – ‘Yes’ and ‘No’.
Once you add the field, you will be presented with the attribute field configuration dialog.
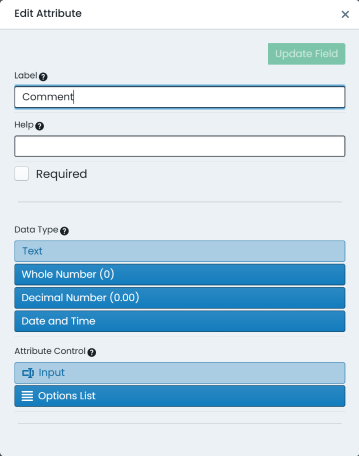
In this dialog, you can alter the attribute label – this is defaulted to ‘New Field’ and should be replaced before you can commit the field.
Another option to set is the ‘Help’ option for the field. Attribute help, if set, will be shown to the user when they hover or click on the question-mark icon next to the field in the form layout. This can be a short sentence giving context to the attribute.
The ‘Required’ checkbox will allow you to set this attribute as NOT optional. This will mean users cannot save an entry until they fill out this specific (and any other required) attribute(s).
Lastly, for attribute configuration, you can alter the ‘Data Type’ and ‘Attribute Control’. These two settings essentially enable you to essentially overwrite the initial attribute template you chose in step 4. For example, assuming that you selected a ‘Text’ attribute template, you could change this to a ‘Whole Number’ for the ‘Data Type’ and/or ‘Options List’ for the ‘Attribute Control’.
When the ‘Attribute Control’ is set to ‘Options List’ there are additional configuration steps that need to be completed before committing the attribute definition. That is, to set the option array that the user will be presented with. In the screenshot below, the attribute example has been configured with two (2) options – ‘Yes’ and ‘No’.
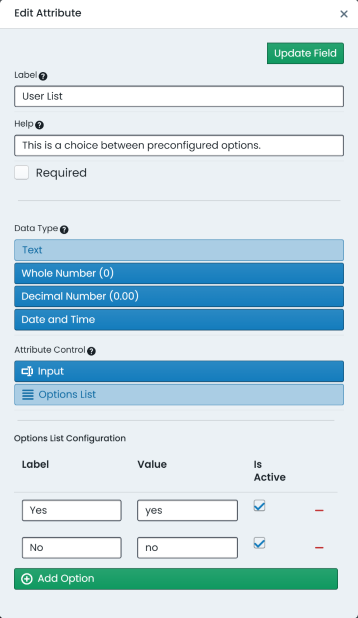
The list contains four (4) columns. From left to right, they are:
a. Label: This is the text that is displayed to the user.
b. Value: This is the value that is stored as the actual attribute value.
c. Is Active: This checkbox allows you to disable certain options from an Options List array.
d. Delete (untitled): On the far right-hand side of each Options List configuration is a ‘minus’ symbol. This represents the ability to remove an Options List option from the configured list.
To add an option to the Options List configuration, simply click ‘Add Option’ at the base of the existing list. Fill out the ‘Label’ and ‘Value’ for the new option.
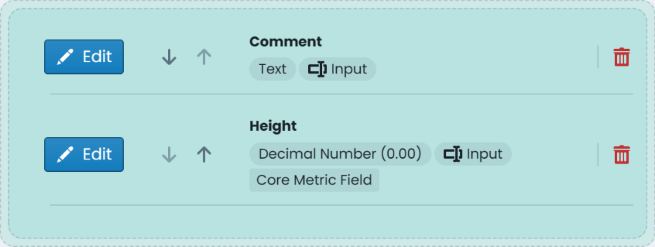
In addition to ‘Attribute Templates’, the left-hand panel also contains various predefined ‘Core Metric Field’ definitions that can be added to the form. These fields are special in the following ways:
a. Metric fields can be used as a Data Filter.
b. Metric fields can be used to define a Map Theme.
A ‘Core Metric Field’ definition is hard coded as a ‘Decimal Number’ field that is NOT marked as required. The following fields are preconfigured in the system:
a. Length,
b. Height,
c. Width,
d. Area,
e. Depth,
f. Diameter,
g. Volume.
It should be noted that any single Core Metric Field can only be used once per form definition. That is, you cannot add ‘Height’ more than once to any one form – it can, however, be used on as many separate forms as you wish.
With the desired attributes established on your form definition, you may wish to tweak the layout in one or more ways. The Metrix form designer allows users to do such quickly and easily.
To relocate an attribute within the form definition, you can click on the arrow up/down buttons on the centre form structure layout when in edit mode.
To remove a field from a form definition, you can click on the trash-can icon on the right-hand side on the field within the form definition.
Lastly, one or more attribute fields can be grouped within a form section. To create a new field group, simply click ‘New Section’ on the left-hand side of the form designer (beneath the Core Metric Fields picker).
To move fields into the section, simply move the field up or down until its position is within the section outline. It should be noted that each group will default to the bottom of the existing form definition layout.
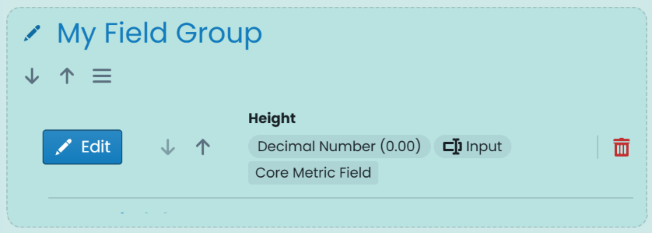
To rename a form group, click on the ‘Edit’ icon (pencil) next to the current group title. Replace the current title and save that change.
Form groups (and all of the attributes within that group) can be moved up and down the form in the same manner as individual attribute fields. To do so, use the up/down arrows beneath the group title.
To remove a form group from the form definition, click on the menu option (next to the up/down buttons). There are two options:
a. Remove Section: This will remove the form group from the definition, but any attributes that were a part of that group will be retained, and simply left as un-grouped attributes.
b. Remove Section and Fields: This will remove the form group as well as any of the attributes that were part of that group.
From time to time, it becomes necessary to edit the structure or contents of an existing attribute form. To do this, use the following steps as a guide:
Navigate to the form manager page (Assets Menu > Form Manager > Selected Form).
With the form you wish to edit selected, simple click on the ‘Edit Form’ button at the top of the form preview.
From here, the steps to alter the form contents are identical to creating a new form.
When you have finished the alterations, click on ‘Save Changes’. Alternatively, click ‘Cancel’ to revert to the original form.
Removing a field from a form definition will NOT have any impact on any existing data stored against that field throughout your environment. It will just suppress that information from being displayed and stop future entry of values against it.
Once a form definition has been constructed, you can assign it to a specific classification (or a set of classifications) in order to use that form in production.
This process relates to Custom Attribute form definitions only. For other form types, see the relevant section of this user guide for implementing the form in production.
To begin assigning a form to a classification or set of classifications, navigate to that form within the Form Manager page (Assets Menu > Form Manager > Selected Form).
Underneath the form title, there is an ‘Actions’ button – this type of button is implemented system wide as an indicator of additional options to manage a resource.
From the ‘Actions’ menu, choose ‘Manage Classification Links’.
A dialog box will appear with lists of available links that could be made. On the left-hand side, are Asset Classifications. On the right-hand side, are Component Classifications. These break down as follows:
Assigning a form to an Asset Classification will make the form behave as a custom form for an entire asset. That is, all Components of that Asset will share the attributes on that form.
Assigning a form to a Component Classification will only make the form available when users are editing that specific Component Type. Each Component within an Asset can have different form definitions (i.e. base vs seal forms).
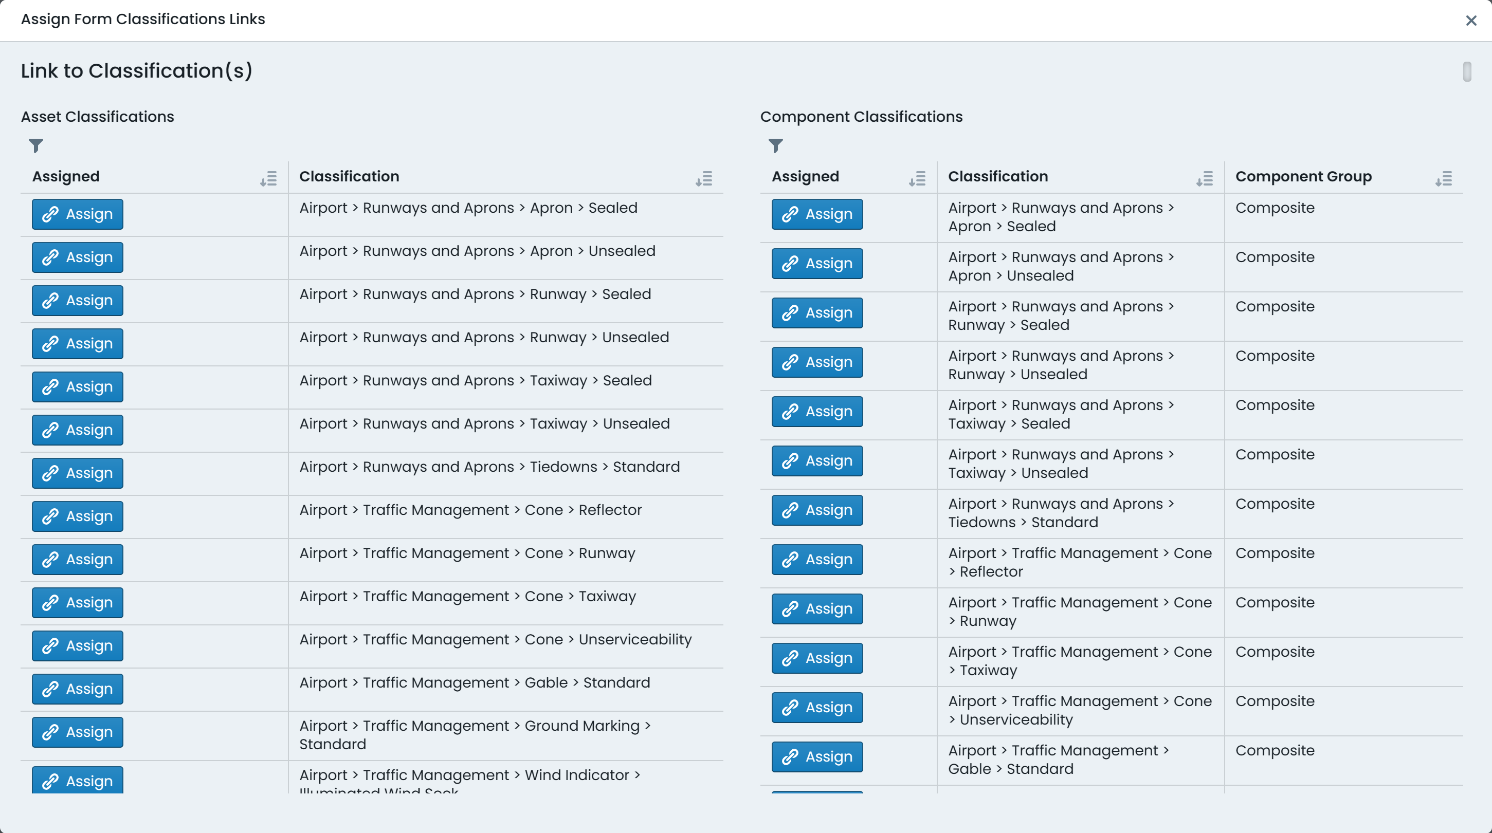
To assign a form to a classification, simply click ‘Assign’ next to that classification title.
To unassign a form from a classification, simply click ‘Unassign’ next to that classification title.
The system will manage the availability of the above buttons based on the form state in the system.
When there are a great number of Classification configurations to wade through, it can become difficult to find the one you are after. This is where the filter option comes in handy. To filter the classification list, simply click on the ‘Filter’ icon at the top of the classification list – the icon looks a little like a funnel.
To filter by a specific letter or set of letters, simply type them into the text input that will appear above the classification list.
To filter by classifications that already have the form assigned, mark the checkbox titled ‘Show Assigned Only’.
When a form is no longer required, the Metrix Asset Management system provides functionality for administrators to permanently remove it from the system.
Deleting form definitions cannot be undone. The following restrictions also apply when it comes to deleting forms:
To delete a form definition, follow these steps:
To begin deleting a form definition, navigate to that form within the Form Manager page (Assets Menu > Form Manager > Selected Form).
Underneath the form title, there is an ‘Actions’ button – this type of button is implemented system wide as an indicator of additional options to manage a resource.
From the ‘Actions’ menu, choose ‘Delete Form’. If the button is not enabled, this means that the form cannot be deleted (see warning notes, above).
In the subsequent dialog, confirm your decision by clicking ‘Yes delete this form’.
The form will now be permanently deleted from the system.