How To Guides
This section contains how to guides with respect to classifications in the Metrix Asset Management system.
This section contains how to guides with respect to classifications in the Metrix Asset Management system.
To view your asset classifications:
Navigate to the system menu in the upper right-hand corner of the application and select the “Assets” option.
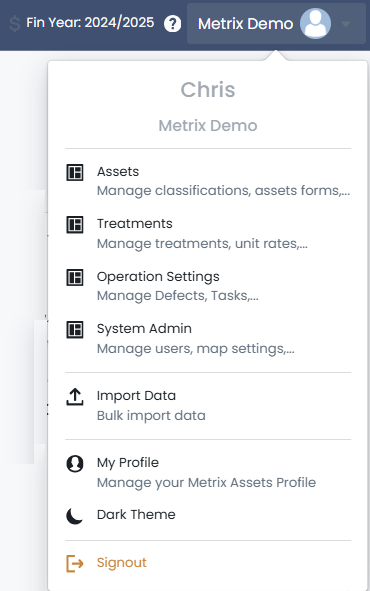
On the left-hand side of the application, you will notice a list of menu items. The Asset & Component Classification section is contained within the first option labelled, “Classifications”. If it is not already active, click on “Classifications”.
This “Classifications” management screen is broken down by asset class and then each class is segmented by the class’s types, the type’s sub-types, and lastly, the sub-type’s groups (asset group then contain one or more component types).
To navigate the classification structure, simply choose an asset class, and then the type/sub-type/group combination your desire. The corresponding configuration and available component types will then be shown.
To create a new asset classification definition, you will need to have prepared the following pieces of information:
The asset class name, or the name of an existing asset class that will contain the new classification asset type.
The asset type name, or the name of an existing asset type that will contain the new classification asset sub-type.
The asset sub-type name, or the name of an existing asset sub-type that will contain the new classification asset group.
The asset group name.
To get started, click on “Create New Classification” on the “Classification” management page. A dialog box will appear to prompt you through the following steps.
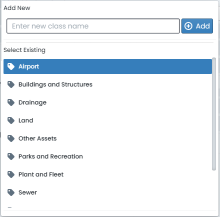
Firstly, you need to select or define the asset class name for your new asset classification. Click on the “Select (or define new) class” drop down control and either select from the existing list of asset class names or create a new asset class by typing it into the input box and clicking “Add”.
Once the asset class is selected or inputted, the system will prompt for the asset type name that belongs to the above asset class.
Repeat the process defined in step 1 for asset type, asset sub-type, and asset group.
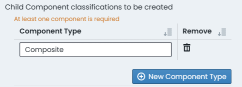
With the asset group defined, the system will then prompt for the component type definition(s).
The default “Composite” component type can be either left in place, r renamed.
To add additional component types, simple click “New Component Type” and provide a name for the definition.
Once satisfied with the new classification structure, click “Create Classification”. Your new classification will now be available for use.
Every classification structure must have at least one (1) defined component type. By default, each classification is pre-seeded with a standard component type called “Composite”.
Users may remove the “Composite” component type definition only when they define at least one (1) alternative component type.
If you have a pre-existing classification definition (class / type / sub-type / group) but you wish to further refine available component types by adding additional options, you can choose to create component types against existing asset classifications. To do so, select the desired asset classification from the “Classifications” management page, and complete the following steps:
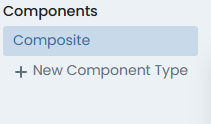
In the “Classification Configuration” panel (on the right-hand side of the page), click on “New Component Type”.
For component type creation, there are two initial options under the ‘Add Mode’ section. You can create a component type from blank, or you can create a component type and base it’s initial configuration against a difference component type’s definition.
To create from blank, simply type the new component type name in the input box and click “Create”.
To create from an existing component type, select the desired component type definition to copy, and then type the new component type name into the input box. Click “Create” when ready.
Type the name of the new Component type.
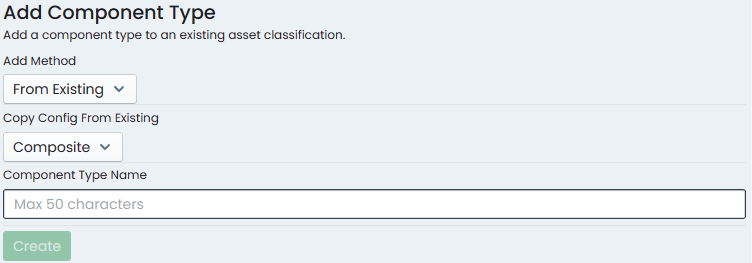
Once finished, click ‘Create’ and your new component type will be ready for configuration.
When a component group is no longer required within the scope of an asset classification, the Metrix Asset Management system provides functionality for administrators to permanently remove it from the system.
Deleting component groups cannot be undone. The following restrictions also apply when it comes to deleting component groups:
To delete a component group from an asset classification, follow these steps:
To begin, navigate to the component group within the asset classification using the ‘Classifications’ page. (Assets Menu > Classifications > Selected Classification > Selected Component Group).
Click on ‘Edit Configuration’ to enter allow editing the classification definition.

This will convert the view to an editing mode with some additional options. Make sure you have the desired component group selected (for delete) before continuing.
Click on ‘Delete Component Classification’ in the upper right-hand corner of the component configuration breakdown. If the button is not enabled, this means that the component cannot be deleted (see warning notes, above).
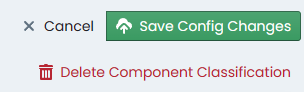
In the subsequent dialog, confirm your decision by clicking ‘Delete’.
The component group will now be permanently deleted from the system.
When an asset classification is no longer required, the Metrix Asset Management system provides functionality for administrators to permanently remove it from the system.
Deleting asset classifications cannot be undone. The following restrictions also apply when it comes to deleting asset classifications:
To delete an asset classification, follow these steps:
To begin, navigate to the asset classification using the ‘Classifications’ page. (Assets Menu > Classifications > Selected Classification).
Click on ‘Edit Configuration’ to enter allow editing the classification definition.
This will convert the view to an editing mode with some additional options. Note: the selected component group will not have any impact on this process.
Click on ‘Delete Asset Classification’ in the upper right-hand corner of the parent asset classification configuration breakdown. If the button is not enabled, this means that the asset classification cannot be deleted (see warning notes, above).

In the subsequent dialog, confirm your decision by clicking ‘Delete’.
The asset classification will now be permanently deleted from the system.