Component Change History
This document provides an overview on how to use the Component Change History Viewing tool in the Metrix Asset Management system.
-
To get started, navigate to the main ‘Assets’ map in the Metrix Asset Management system and select an asset record to bring up it’s Info Panel.
-
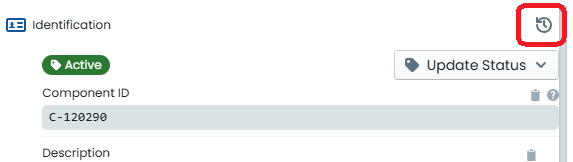
Ensure you have either the ‘Info’ or ‘Intervention’ panel tab open, and look for the ‘History’ icon along the right-hand side edge of the panel. A ‘History’ icon is available at the top of each ‘section’ of Info Panel content.
 .
. -
A slide-out drawer will appear, initially with the Component’s current information listed. Only sections where history is tracked, are shown.
-
At the bottom of the slide-out drawer, you will see some navigation buttons. These allow you to move backwards and forwards through the change history of the active component. Additionally, around these navigation buttons, you will see the date and time of the change, as well as the name of user who made the change.
 .
. -
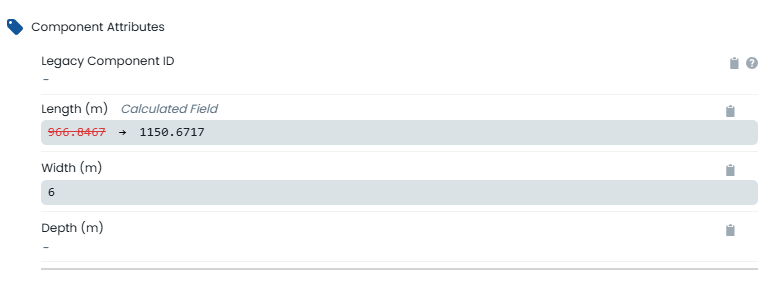
Any differences that exist between the record version you are CURRENTLY VIEWING and the LIVE VERSION of the component record will be highlighted in red. In the example below, the current (live) value of the component’s length is 966.8467, whereas the historic value of this field value is 1150.6717.
 .
. -
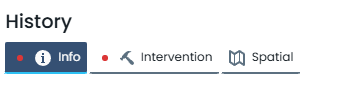
Additional indicators exist on each tab to guide users towards areas where changes exist on the current component version. These indicators are shown as a red dot next to the tab label. In the example below, the ‘Info’ and the ‘Intervention’ tabs contain changes, whereas the ‘Spatial’ tab does not.
 .
.